

Latticino
-
Posts
2,169 -
Joined
-
Last visited
Content Type
Profiles
Forums
Articles
Gallery
Downloads
Events
Posts posted by Latticino
-
-
You missed a critical process for the "finished blade": heat treatment (which we indicated in other posts). Better go back and research some more.
Curved blades are arguably harder to draw file well. Might want to start with something a bit easier. Don't think that Yataghan were typically used for gardening...
That style of blade benefits a lot from being forged to shape. Will make it easier to put a point on the steel as well. Of course you need to learn how to forge first.
The time it takes to draw file depends on your stock material characteristics, file type and condition, setup for filing and your own skills and capabilities. There is no easy way to predict this. Initial shaping with a 4" grinder might be worth investigating, and get yourself a file card to keep your files clean and cutting well.
I would suggest trying to attend a knife making class if you can, or be very careful what you do with your creations.
Good luck
-
I believe that the first anvil, with the hardy hole oriented on the diamond, is likely one of the Harbor Freight Russian anvils, from accounts I've read of same. If so they were on the order of 110 lbs and reportedly a bit soft, but still usable after some clean up. From my research, the original prices for those anvils, new, were considerably below what he is asking, but it looks like the cleanup has already been done, and you get that cool stand...

I wouldn't pay $7.5/lb. for an anvil, but each to his own. Anvil price and value are extremely location and user dependent.
-
35 minutes ago, ianinsa said:
Wow, I just love this thread! Such interesting folk.
Latticino, I don't know if you're aware but in the Cairo museum they have boomerangs that came out of an Egyptian tomb!
They are in a small nondescript display case somewhat off the beaten track, about as far as you could get from the 'main' attractions of 'Tutankhamen's tomb ' and they look just like Australian curios.
Cool, great info, though I doubt I'll be getting out there to visit any time soon. Saw what might have been a similar display many years ago (so the brain may be failing a bit) in the open case storage in the Anthropological Museum in Vancouver, Canada. A fantastic museum if anyone ever gets the chance to visit.
-
I've got all too many hobbies to keep up with, most probably not all that interesting to the group here (restoring and playing antique wooden flutes, kayaking, boomerangs and hand launched gliders, target archery, origami and ornamental knotwork...), but the one I jumped most deeply into was off hand glassblowing. Actually it is a hobby now, but at one point was my vocation, so not sure if that qualifies.
Here are some of the older shots of my work (not brilliant photos unfortunately, but that is what I've got):
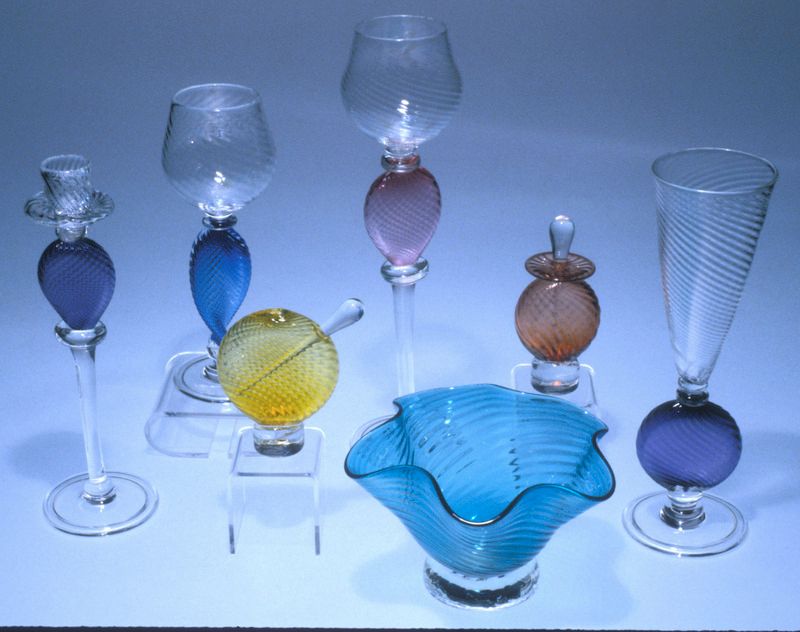 Venetian Style functional vessels
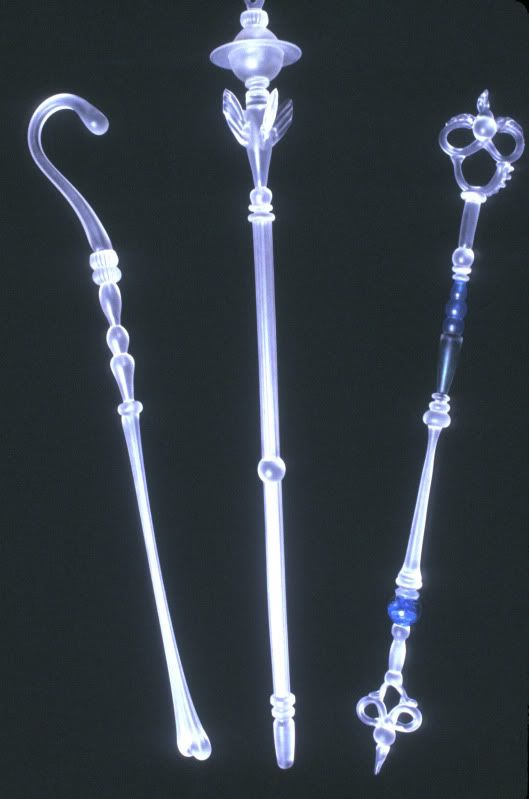 Larger sculptural works (~4' long typically)
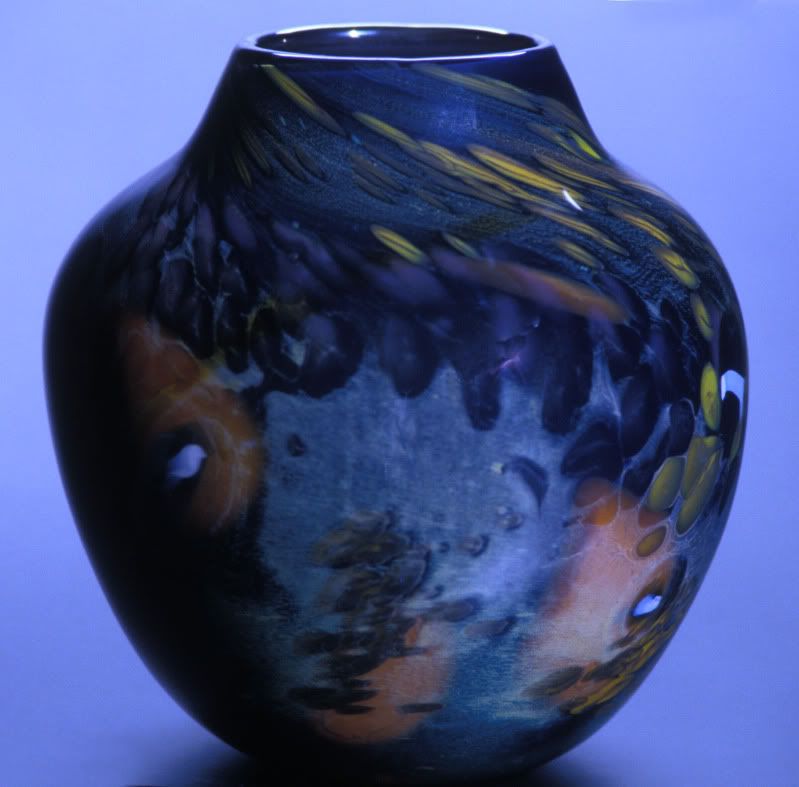 Small classic vase
-
I've never heard of preheating the fuel source in a burner system, and agree with Mikey that it sounds a bit dangerous.
However I have certainly heard of using a heat exchanger to preheat the air for the burner with the other side of the equation being the heat being thrown away in the flue gasses. For an industrial or light commercial application, where the forge is running continuously for long shifts this might be worth considering, though it adds a lot of complication to the design. I find it hard to imagine it being a worthwhile trade off for a hobby smith.
-
4 hours ago, Frosty said:
Don't worry the blower won't over come the NG if you introduce it at the blower intake. Let it flow into the blower with the intake air.
I would certainly not recommend introducing the natural gas at the blower intake unless you get a blower that is specifically designed for use with an explosive mixture (certified spark proof).
9 hours ago, timgunn1962 said:It's worth checking your NG supply pressure at an early stage, as it may impact your choice of blower. It varies by location, but here in England domestic gas is supplied at 8" WC, about 0.3 PSI.
There is not much point having a blower that gives more pressure than the gas supply because the gas will stop flowing altogether when the mixing chamber pressure reaches the supply pressure.
Most blowers the general public will use for burner construction won't get anywhere near development of 8" of static pressure at their outlets in any case. Not that this really matters, as unless there is a significant restriction in the piping downstream of the mixing chamber (say an obstructed ribbon burner, or one that does not have sufficient free area to allow the volume of gas/air mixture required to pass relatively easily through the burner) the pressure at the mixing chamber will be much closer to atmospheric than that inside the gas supply line, and that pressure differential will allow flow. Please recall that blowers, fans, and compressors are rated for a range of total static pressures (inlet to outlet) depending on their fluid flow rate (research fan curves). If your burner assembly is correctly designed with limited restrictions downstream of the mixing chamber, the external static pressure from that section that the fan experiences will be low, and the assembly will ride the fan curve down to the intersection with a shallow parabolic system curve to a point of relatively high airflow and low developed static pressure. In fact to modulate this airflow you will likely want to install a butterfly valve upstream of the mixing chamber to add some resistance to the airflow and enable making the desired air/gas mixture.
I have constructed several successful residential natural gas/forced air burner assemblies and have never had a problem with the air pressure in the mixing chamber overcoming the gas flow. However, note that for typical sized forges you will require a much larger gas line size and outlet orifice than the equivalent propane system. I used industrial burner components that I was lucky enough to get from a glass studio that was getting renovated, but there are several sources of good plans for such burner assemblies available.
-
Actually if you just want to get to knife making on a budget, my suggestion would be to forgo the forging altogether for a while. Buy yourself some decent 1084 tool steel that has already been annealed, a hacksaw, a couple of good files and a bunch of silicon carbide sandpaper. Make some stock removal blades using draw filing techniques and hand finishing. Send out your blanks for professional heat treatment. This will get you some good skills that can be used on every knife you make in the future, as well as testing your patience and attention to detail (not to mention an extremely low cost investment).
There are quite a few good books available to help you on this journey.
Once you have the grind work mastered (pun intended) you can move on to learning how to properly heat treat the blanks yourself.
The blade forging portion of knife making is only a very small portion of the overall set of skills that are needed for being a bladesmith, though arguably the most fun part. As others have stated, learning some basic blacksmithing skills with a hands on teacher will serve you well there.
-
Makes sense, looks light a good profile for a working camp knife.
-
Not sure if you are talking about the cylinder head or the engine block. Both of these are cast, as far as I'm aware, and typically not of ideal materials for anvils. The configuration doesn't seem to lend itself well for an anvil either. If the former I believe that most are relieved as much as possible behind the face to reduce the cylinder weight for efficiency. If the latter there just aren't many flat surfaces and the weight is distributed poorly for use as an anvil.
You would do better looking for old fork lift tines in the scrap yard, end mounted rail sections, or large, solid drops of mild steel. Of course virtually anything can be used as an anvil in extremity, but some things will function better than others.
-
Very nice, in particular for your first full tang. The only suggestion I would have, other than stuff you have already identified, is based on my own personal aesthetic, so take that for what it is worth: I like to see a bit of distal taper in the tang as well as the blade. For me it gives a better feeling of balance to the work, both physically and visually. You do have a fairly massive blade though, so in this case it may not be completely applicable.
-
You can also typically join at a monthly meeting. Check the website for the regional group closest to you and show up at the monthly meeting. It's just a bunch of blacksmiths, so typically pretty casual. Note that there is an "All Hands" meeting in Rochester in May as well, where there should be representatives for all regions getting together for a weekend.
For most regions there is a nominal annual fee for membership and a monthly fee (of some sort) for use of the groups forging equipment and supplies. Our meetings typically have a demo portion (for some great training) as well as some free time for open forging and just shooting the breeze.
See you there.
-
I'm going to quote a portion of one of your own posts back to you: "Pick a burner design that is known to work well and then *follow the build instructions exactly*"
You are beginning the stages of experimentation in the design of a temperature controlled forge burner assembly (which includes the design of the gas train). Experimentation implicitly includes the possibility for failure. If you are just trying to save cost of construction you need to be prepared to have the first couple of iterations of your design fail, possibly even catastrophically. Your rebuilds and testing time may end up costing you more than going with a vetted design, not to mention the safety issue.
The reason I recommend having the propane connection at the mixer is that I don't like having any obstructions to the propane/air mixture before it gets to the ignition point (other than the ribbon burner ports or flame retention nozzle, if used). God forbid that your 1" air solenoid valve on the high fire side is closed and the gate valve on the low fire side is close to closed as well (say if you were trying to fine tune the low fire setpoint). With the nominal pressure that a bouncy castle blower (BCB) can develop through a 1" pipe (aren't the outlets on those blowers closer to 2.5"?) I can easily see the propane pressure overcoming the blower and backing the mixture up into the BCB. Bet the BCB isn't spark proof

I really think that your combustion air piping is too small.
Working on a budget, in your shoes, I would just get a cheap type K thermocouple and readout only pyrometer. I would construct a basic forced air burner with only one air path and one gas path. I would then learn to adjust my propane regulator and air damper to the correct points to maintain the temperatures I was looking for at various forge door openings. Get a log book setup for different damper and regulator positions cross-referenced to different door openings. Then I would build a PID controlled electric heat treat oven (old enameling kilns can be easily modified and are often available cheap). Note that the Type K thermocouples aren't really all that accurate above around 1800 deg. F, and won't last that long above 2,100 deg. F, so get the thickest one you can and put it in a ceramic thermowell if possible. You could go for a Type R thermocouple, which would work better and last longer, but they are quite expensive.
BTW, the only reason I was able to put together my temperature controlled system is that I got all the gas train components for free when I dumpster dived after a large glass blowing studio was being renovated. They threw out two complete assemblies, including sophisticated safety controls. Probably my best score as far as "it followed me home".
-
I think it is unlikely that the thermocouple will be able to read accurately better than +/- 5 deg. F, and certainly not for the full volume of the forge, so that will be your first control hurdle. Not sure why you want that kind of accuracy, but assume it is for heat treating high carbon steels. Make sure you get a PID controller that is programmable and has an Autotune function, or you will regret it later. Electric heat treatment ovens work quite well for this.
From the narrative it appears that you wanted the 3" section of pipe to be the mixing chamber. You need to add the propane inlet to that location if that is the case, not where the air first branches.
The 1" air piping may end up being too small for the amount of air you want to push, unless you have a blower that can develop a lot of static pressure (you are going to want a high pressure blower, not a squirrel cage blower for this). I would recommend upping that to a 2" pipe (at least) and 1 1/2" for the two branch lines. If you can get butterfly valves for the air side instead of the gate valves they will work better for balancing your system without as much static losses.
You are approaching the kind of industrial configuration I designed for my temperature controlled glass furnaces. I used high/low pressure safeties, a pilot, and UV flame sensor, zero pressure regulators and an Eclipse proportional mixer to make this work with a proportional valve for the air metering (make sure the solenoid valves you get for your system are rated for gas!). The industrial assembly worked like a charm as the zero pressure regulator opens and closes the gas supply in response to the airflow upstream of the mixer. The mixer could be used to set the proportion of air/gas over the range of heat output.
I recommend looking at industrial solutions rather than this home fabrication. Expensive, but lots safer. I wouldn't turn my back on this system.
-
That should be enough of a challenge for a beginning bladesmith. Keeping a thin, largish, knife warp free during heat treatment, or not loosing the temper during grinding (depending on how much grinding you do before and after the heat treat) should push your limits if you haven't made any knives before, and have little or no instruction. I strongly suggest you make a paring knife out of the material first so you can get your process worked out before you invest the time into fabricating a kitchen knife, even if you aren't going to be doing any forging. That way when you are done you will have a set...
You may even want to consider sending the blank out for professional heat treatment. Here is some good info on the heat treatment process for blades made of 52100:
http://www.bladeforums.com/forums/showthread.php/1263160-52100-heat-treat-summary
-
Exhaust is tricky, remember that you need to have a source for makeup air for any anticipated exhaust.
Current NYS code is for 1.5 CFM/SF for repair garages, though a formal engine exhaust system should be installed if this is a regular operation. For limited spraying of paint the requirement is for a total of 6 air changes per hour (ACH) with a system that meets the NYS Fire code for handling flammable vapors. Welding fume extraction rates are dependent on the type of hood used (stationary for a work bench, or a mobile arm). Typical capture velocity is around 100 feet per minute of hood inlet crossection.
Coal and gas forges depend on the size of the hood for the former and the combustion product outlet (based on burner characteristics) for the latter.
Typical selection for a forge exhaust fan would be a high airflow, low static fan. A sidewall propeller type with a gravity (barometric) outlet damper to seal the opening when not in use is often a good choice.
-
Think you need to do some more research on the molecular structure of steel in its varied forms. This is a complicated subject, and I'm not the right person to explain it, but the various alloys of steel (typically comprised of an alloy of iron and carbon atoms with the addition of various other trace alloys depending on the particular steel material makeup) form a crystalline matrix that exhibits different properties depending on how those iron and carbon atoms are arraigned. The general layout of the carbon and iron atoms in the overall matrix can vary depending on the percentage of carbon in the mix (i.e. low carbon steel, containing carbon up to around 0.25%, and high carbon steel, with carbon percentages between around 0.55 and 0.95%) and the heat treatment process that the material is exposed to. This layout has a large effect on the properties of the steel, including working and melting temperatures, hardness, strength, flexibility, etc. The tempering you reference is only one small part of the heat treatment process.
Suggest you do some reading up on metallurgy at your local library. While anything you read online should be carefully vetted before being taken as gospel (including this post), the accepted print references in the library are typically more reliable. A local engineering school will have years of reading matter on this fascinating topic.
BTW, if you are identifying these "little balls" as atoms, then yes, steel is made up of little balls... as is arguably everything else we experience in the physical world.
-
I'm not a fantastic forge welder, but for what it is worth, one of the things that hasn't been discussed is the cleanliness of your fire and the amount of scaling you are getting on your metal. When I was taught about forge welding in a coal fire, it was emphasized that it is important to have a "fully developed, clean" fire to heat your metal in. As much coal burned to coke as possible, and limited clinker. The idea is to maximize the heat output of your fire while minimizing the excess air. There are typically three zones to your solid fuel fire, oxidizing (at the bottom where the tuyer discharges the air), neutral (in the middle) and reducing (at the top). If you are in the oxidizing section your metal will scale up more rapidly and make it more difficult to weld. I'm guessing this will be similar with a charcoal fire.
The direction I got from accomplished forge welders was to heat the metal in the neutral zone of the fire till it is yellow/orange with a melted butter like surface (possibly hotter for low carbon, mild steel), but preferably not sparking much. Then turn down the air and let it soak up the radiant heat for a count of ten before whipping the metal out of the fire and lightly tacking the weld together.
-
Thought that H-13 is air hardening and extremely difficult to properly anneal. Doubt that cooling in ash is going to get you anywhere close to annealed, if that is where you are headed.
-
Handle has an Indonesian feel to me (ref: http://oriental-arms.co.il/item.php?id=5934 parang, golok...?), but I don't recall ever seeing one with that type of guard. Might have been a one-of attempt to copy a European style guard on an eastern blade. Interesting if nothing else.
-
Looks to me like the original is done with some kind of cutter (end mill?). If you can do something similar with your Damascus billet it should show off the pattern better than forging in IMHO.
-
How about your forge floor? Is it also hard brick without any insulation between it and the outside? With that and the large rear door not being insulated (hard brick is an awful insulator on the scale of things) you could be losing a lot of heat. The insulation layers can either be inside the hard brick, as Frosty suggested above, which keeps the brick cooler, or outside the brick, where the brick will need to warm up as a large thermal mass. The latter will take a lot more time.
Sorry, read in the above that you have a layer of 1" on the floor. Not sure why you aren't getting up to temp, try insulating doors.
-
Nice job with the cable forging. Looking forward to seeing the completed blade.
Just have to ask, what the heck is that stuff wrapping around the outside of your forge? It looks like old fiberglass insulation. Please do be careful with that if it is. Once the fibers get overheated something happens to the material and it becomes more friable. The fibers can easily break into shorter lengths and become airborne. I currently have significant scarring on my lungs due to years of glassworking with equipment without encapsulated high temperature refractory fiber and fiberglass insulation.
Learn from my mistake.
-
OK, everyone is being very accommodating in answering your posts, but you still don't seem to get it so I'll try to simplify:
No, knife making is not easy for a first time smith. In addition to material selection (which you don't seem to have a clue about; no it is very unlikely you can find high carbon spring steel in a typical hardware store, Thomas gave you a good tip on where to locate some and did TacticallySharp), there is forging tapers, distal thinning, fullering for a hidden tang, forging bevels, normalizing and annealing. Then you have scale removal, profiling and grinding or filing bevels. Finally heat treating, including quenching and tempering then more finish work on the knife surface. Then making the handle, fitting the tang and attaching it securely. Without a lot more research, some luck, or direct supervision from a blade smith things can go wrong at every step of the process (some wrong steps can even get you hurt).
Yes you can make something pointy and sharp out of almost any metal and some kind of abrasive for stock removal (like the shank JMC is referring to), but it won't work for long or be safe to use if it isn't made well.
Making a sheath out of metal is certainly possible, but might be more difficult than the knife making itself.
The "craft" you are searching for that will help you in making your Persian Fighting knife is the ability to do adequate research. I suggest you get a book and do some reading on blacksmithing as well as knife making. You do seem to have the start of a grounding in terminology, which will certainly help.
-
BSP&PS? Please clarify
HT oven
in Heat Treating Knives, Blades etc
Posted
Depending on the size of the stuff you want to treat it is pretty easy to make a small oven out of an old enameling kiln. You just get PID controller, contactor, and some basic wiring and your golden. I've done it with coils from an old duct heater and soft brick also. With a bit of scrounging I've done it for around $200 in parts. You won't get an easy argon purge for that, and it might be tough to program, but once tuned it will do the job.