

Latticino
-
Posts
2,169 -
Joined
-
Last visited
Content Type
Profiles
Forums
Articles
Gallery
Downloads
Events
Posts posted by Latticino
-
-
Cross post with Frosty. We agree, as usual
")
How much do you want to spend?
I like this type for a basic propane tank (preferably with a gage attached) These are available at many locations. URL may not be acceptable here, but google propane regulators and you'll find them:
 Looks like you already have the fitting to go to the tank, so that will help. If you haven't piped gas lines before, please get help, do some research, use gas pipe tape or dope, and test all your joints.
BTW it is hard to tell, but if the tank insulation is just high temp cast refractory this thing may be a bit of a gas hog. See how hot the exterior shell gets when firing up. You may wish to reinsulate.
-
Not to mention what you are planning on forge welding. If high carbon steel only you need to get up to the high yellow/orange range. If wrought iron you need to be in the white hot range. Low carbon steel somewhere in between.
The other side of the equation is how massive your billet will be inside the forge, and how long you will take to heat it up each time. While a light weight fiber blanket forge will get up to temperature quickly, when you put a massive colder billet into it, it will cool it down quite a bit faster than a forge with some thermal mass. Of course the latter forge will take a lot longer to get up to temperature, provided it has the same insulating value in its walls.
I assume that you are planning on forge welding up some patterned billets of high carbon and nickel. I'm not the best person to answer that as I have only limited direct experience.
Remember that if you plan on using flux on your billets you need to build a forge that can handle more flux contact. It will eat through any soft brick or refractory blanket insulation in a hurry. That is why most folks have a separate forge body for welding verses the one used for forging.
-
Not completely sure why you think you need more than a 3/4" Venturi burner for a knife making forge. A forge only used for knife making doesn't have to be very large at all. Remember that you can only beat on about 6" of knife length during any heat in any case, and with a pass thru door you can make a pretty long knife in a forge that has a 6" internal diameter and is around a foot long. If you build yourself a 3/4" Frosty T-burner (the parts for which are pretty darn cheap if you already have a ball valve and propane regulator) you should be fine if the forge is properly insulated and has a good door.
Needless to say a single, well designed blown burner will also serve such a forge well. If you want to optimize the efficient heating of the blown burner, probably the best avenue for doing this is to build yourself a ribbon burner to get even heating to the walls ASAP so they can reflect the same back onto your stock.
While you can combine naturally aspirated (NA) burners with blown burners in a single chamber, it will make tuning the former much more difficult. The NA burner will be very sensitive to whether the blown burner is on and how you deal with your door openings. If the NA burner is idle, and you don't have it's opening into the forge plugged, you will heat that burner up quite a bit since there will be no air going thru it and the blown burner's exhaust gasses will in part be exhausted thru the port. Actually, on reflection, I wonder how forges with multiple NA burners get away with this without overheating their inactive NA burners. Probably not as big an issue since there is less outlet pressure from the burner assembly?
In any case, I also would not recommend combining burner types as you are proposing.
-
2 hours ago, latticino said:
A capture velocity of approximately 100 CFM per square foot of hood opening will take care of virtually anything the forge can throw out.
Again I have to apologize, I wrote this too fast. Needless to say I meant a capture velocity of 100 feet per minute not CFM.
-
Apologies if I'm overcomplicating this for you. You can certainly jury rig something together that will work, particularly if you are only using the fan for some kind of boosting of the typical exhaust that you will get anyway due to the chimney effect. I was just trying to help with a design that I would make for myself if I was trying to ensure forced capture of everything generated by the forge.
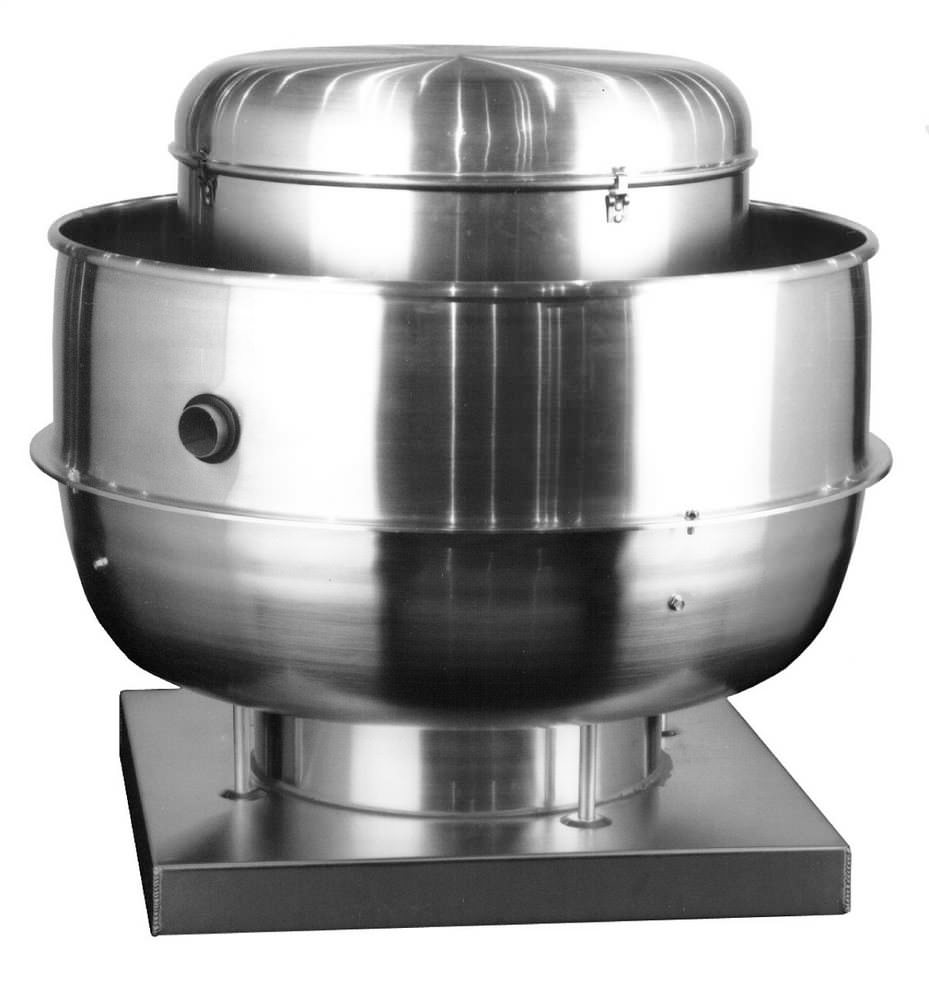
As far as an inline centrifugal fan, with the motor out of the airstream, the unit on the left is an example of that and the one next to it a similar fan with a direct drive motor in the airstream (the reason to keep the motor out of the airstream is to avoid having it damaged by heat or debris :

There are any number of suppliers for this kind of equipment. Greenheck and Loren Cook come to mind immediately as reputable manufacturers, but you could always keep an eye out at a liquidator. Other possibilities include upblast rooftop fans, or inline fans with motor in airstream (if you have enough room air induced at the hood to cool the airstream adequately):
-
I have not specifically power exhausted a forge hood, but I kind of do that sort of design stuff for a living. I have also power exhausted a hood over various glass equipment that essentially acts similarly to a forge in any case. My recommendations for full updraft capture would be to construct a hood that covers the entire heat producing area with approximately a 6" overhang on all sides. A capture velocity of approximately 100 CFM per square foot of hood opening will take care of virtually anything the forge can throw out. Your duct to the fan and building exterior should be sized for between 1,000 and 2,000 feet per minute of air velocity and the fan external static pressure be in the range between 1/2" and 3/4" water gauge (provided your duct routing doesn't go too far or have too many bends). I suggest an inline centrifugal fan with the motor out of the airstream. Make sure you obey any code requirements for the exhaust outlet location from your building and remember that you need to provide a source for makeup air to replace that which is being exhausted. A great sourcebook for additional information is "Industrial Ventilation" (check for copies in your local engineering college library).
-
There you go. Hot steel=success!
-
Cool, looking forward to seeing the video.
I just finished drilling out a 3.5" thick piece of mild steel for making a striking anvil (of sorts) and have yet to finish same. I'll be going the drill/chisel/file route most likely, as I wouldn't dare try to push around a 65# chunk of hot steel, much less get a drift stuck in same. Wish I had S7, or any kind of high carbon steel for that matter, but since I have no practical way to quench and temper such a large hunk of steel I will have to live with mild steel. Hopefully it will do for the limited number of hardy tools and hammers I plan on making.
-
Planning on smelting your own steel from raw materials, or are you going to be overly modern and use that high tech purchased stuff?
 For a beginner I would recommend 1084, after you learn some basic forging skills on alternate non-knife projects.
How about charcoal, there were whole communities formed around charcoal making in the past, or were you planning on digging you own coal as well?
If we can assume that you just mean that you want to work without electricity or refined heat sources like propane I would recommend the following (which will give you plenty of blood, sweat and tears):
Simple charcoal forge and double action bellows like Iron Dwarf suggests. A block anvil of some sort with a couple of tongs and a 2# cross peen hammer. A hacksaw, vise, a handful of files with a file card, container to quench in and oil to quench with, and some sand paper in various grits between 120 and 1200 grits.
Get the $50 knife shop book and study it carefully.
Then try to take a class in knifemaking from someone who already knows how to do it, unless you really enjoy taking an unusual time learning from your own mistakes.
-
Matto,
That's good advice. Mostly I got carried away trying to make the facets all match and removing any hammer marks. It sure is a lot of work forging the large stuff, especially in high carbon. I do really enjoy making tools though, and this one looks a lot better in person than my poor photos. Once I get the face properly crowned I hope it will move metal like Frosty's friends.
Not sure a gas card will do it... He runs out of steam because he isn't really all that interested and starts playing around with my large 15# striking hammer to get extra exercise. Then he gets too worn out to properly strike when I'm ready for him. If I tool up properly I think I can make do with the treadle hammer instead.
Thanks for the feedback.
-
I think what you are looking for is fairly rare in the blacksmith community. My setup is pretty unusual as far as I know. For some good info on "ribbon" burners (or burners with small multiple outlets for the burner head in whatever configuration) I urge you to look at the info on Dudley Giberson's site. He has been at it for quite a few years and knows his stuff as far as the premix with ribbon style burner head systems, and now even has a design specifically for small forges. That one uses propane and a ventauri, but his standard burner design works just fine for natural gas and a blower: http://www.joppaglass.com/burner/coup_mix.html. Note the inline configuration to get the most out of the low pressure squirrel cage blower. I believe that the turbulence and backpressure of the burner head works fine for getting the mixing required without the 9 pipe diameters you mentioned in the above.
Please be sure to click on the image for more detail on the burner orifice size and construction.
Note that I have no financial connection with Dudley, just know that he is a stand up guy with a great product. This page on his site is also of interest and give some info on the size burner head he recommends for a small forge: http://www.joppaglass.com/new_ideas/forge_page.html. Note in particular the ram-cast burner block he uses for the forge connection to the ribbon burner. I cast a similar one out of Mizzou for my glass furnace and it lasted for over 12 years of virtually constant use. This casting will help protect the burner head as well as the connection to the forge.
Again, these are his designs, and could have easily been found online with a simple search. My design is quite a bit different and influenced by my years of researching and building glass furnace burner assemblies.
-
No ribbon burner yet. Have an old Giberson head that I may try out, if it isn't too badly cracked (high alumina refractory multi port head in a cylindrical configuration, mine is at least 15 years old). I'm currently using a SS flame retention nozzle that came with the burner assembly. If I go up to the Giberson I'll have to cut a larger hole.
Mizzou isn't that bad for flux (glass) contact, as long as it isn't swimming in it. I had some on the floor of a pleated frax glory hole (hot glass reheating equipment, don't get the wrong idea
 ) that I used every day for 12 years and didn't have a melt thru due to glass spalling off puntys. I'm pretty sure molten soda lime silica glass is just as corrosive as molten flux.
Floor in my current forge is lined with a thin layer of bubble alumina. You could also use a high alumina hard brick split (Cristalite) but they are pretty expensive (that is what I'm using for the shelf and temporary door outside my forge, but I had them laying around for the last 25 years, so why not).
I am familiar with Wayne's excellent resource. May build one of that style burner some day.
Industrial mixers are the ticket, if you can source one cheap, like I did. True ventauri inducers and zero pressure regulators for stable mixture proportion over a range of heat output. My old setup even had programmable PID control of temperature with UV sensor on a pilot and high/low fire control.
-
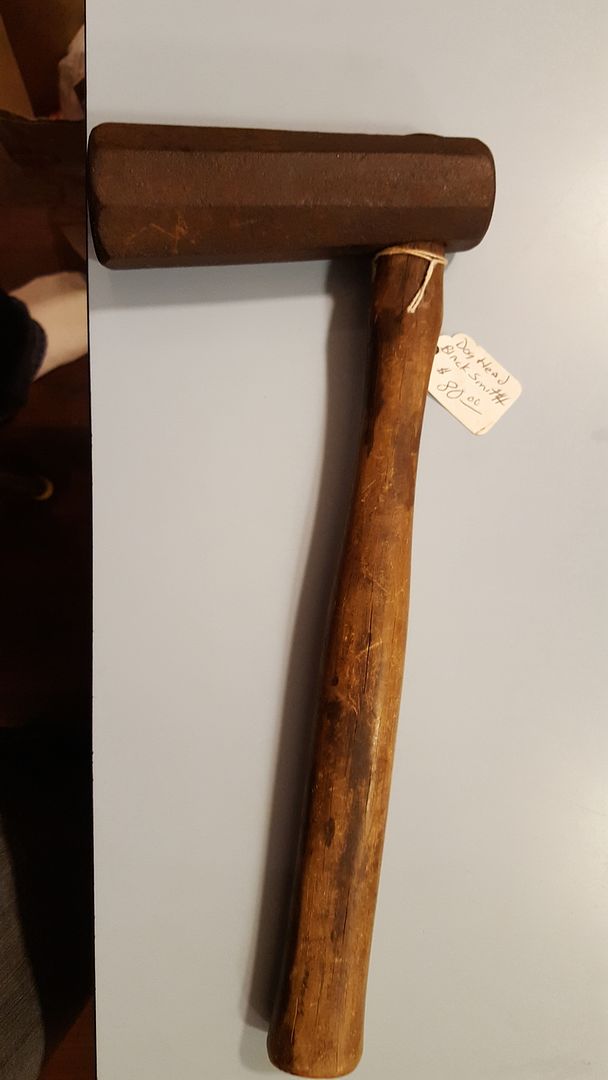
Possibly related to the ongoing surge in interest in bladesmithing, or even blacksmithing in general, prices on dog's head/sawyers/Japanese Cutlers hammers have gotten a bit crazy. I forged up a copy of any original from a quick picture (foolishly didn't take any dimensions) out of a piece of 2 1/2" dia. 4140 in my home shop a short while ago. Still need to make some final tweaks to the face, as it currently needs a bit more crown, but thought I'd post for feedback. This is the third hammer I've forged, and the first in my home shop. Made good use of a striker (my son until he ran out of gas) and treadle hammer for the punching/drifting.
Original (not my purchase, and price was from many years back):
Mine:
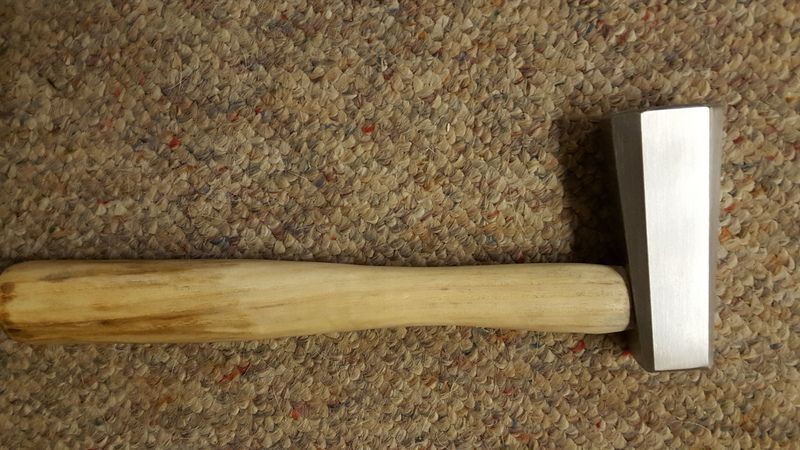
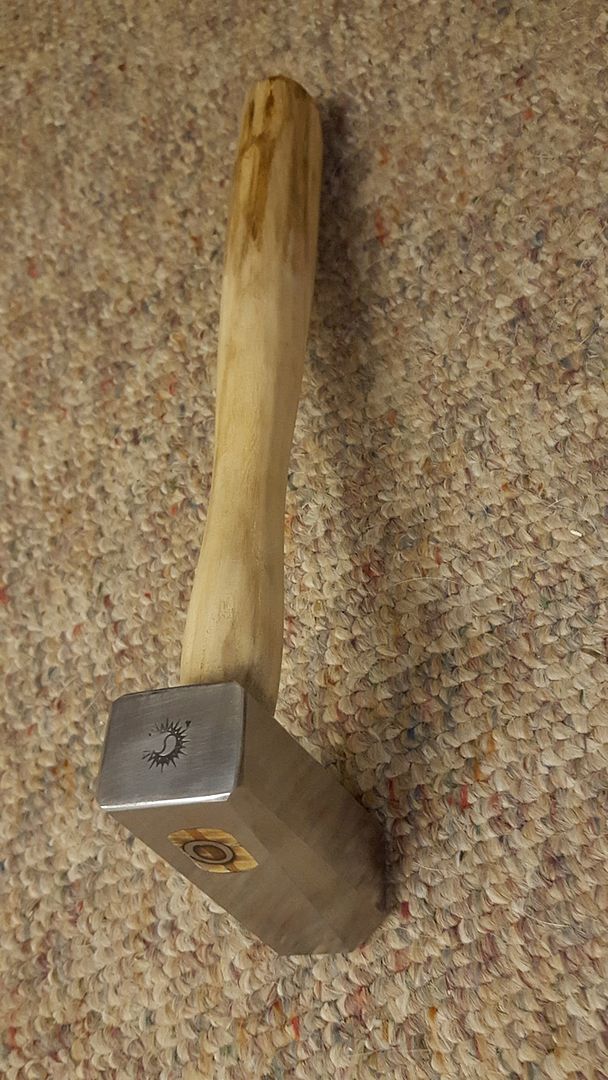
Not as happy with the rectangular crossection, but it distorted a bit when I did the punching and drifting. Still, it is just a hammer. Was aiming for around 3 LBS and lost a bit to grinding. I think it is at around 2.5 LBS now. Handle is deliberately beefy as I have large mitts and usually find most standard handles too thin. This was fun and I plan on making another after I get some use time on this one.
-
The preignition I had concerns about is not a matter of cracks (which are more a issue with differential thermal expansion and overly short temperature cycling), but the potential for the flame front to reach inside your mixer, which is a bad idea for a premix type burner like the one you have built. Top or side mounting is probably not a big issue in such a small enclosure, the key is to keep air running thru the burner while the forge interior is hot.
I've used Mizzou as a castable refractory interior lining before and it works great. Doesn't always like short thermal cycling, but you can check with the manufacturer on their recommendations for heating and cooling. Not as flux resistant as some of the higher alumina castables, but certainly better than either insulating castable, soft brick, or frax blanket.
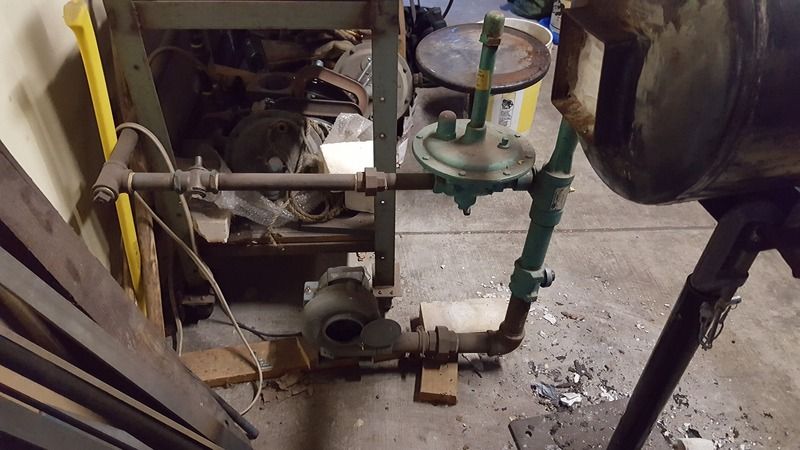
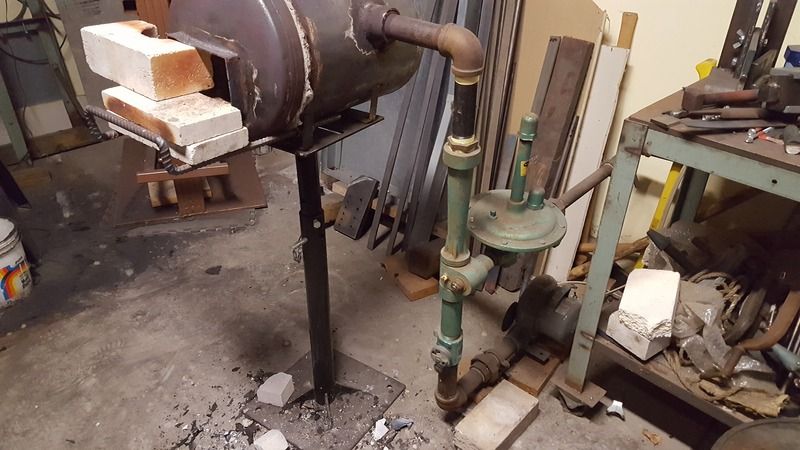
Here is my piping setup. Note that I use industrial burner parts that were originally part of a glass studio. Setup is still being massaged, I may remove one elbow from the airline to increase the air available, and the door system is quite rudimentary right now. The butterfly air valve, ventauri mixer and zero pressure regulator are really nice to use, but you can get by without them. Check Dudley Giberson and Henry Halem's books for some nice, simple burner designs.
-
You've got a nice build going there and I look forward to hearing how the ribbon burner works for you.
Unfortunately low pressure residential natural gas burner systems are a bit different than the relatively high pressure propane systems most gassers use. Not to burst your bubble or anything, but there are a couple of design issues that you may have:
- Mixing pipe line losses: First for the 2" mixer piping you have, those lovely coped elbows will shed a whole bunch of static from your blower (whichever you end up using). Typically an elbow like that one is evaluated for blower selection in terms of equivalent length of straight piping. If your 2" line is going to be used to transfer say 100 CFM of air/gas mixture you can expect around 24 inches of water gauge (WG) pressure loss per 100 feet of ducting. This is not a problem, until you realize that those coped angles are the equivalent of around 30' of straight duct each. That means that without the ribbon burner's losses you still have around 17" WG (0.6 psi) of pressure to develop in the line for the system to overcome the losses of your pipe routing. Note that residential natural gas pressure is only around 7 - 14" WG, so that could be a problem also. Of course that changes depending on how much air gas mixture you are sending through the line.
- Gas line size: I have a similarly sized forge with residential natural gas. I'm not sure exactly what my pressure is, as it runs a long way out to the forge via underground 1 1/2" gas line I installed (and I haven't put in a gauge yet), but the bottom line is that I have a 1" natural gas line feeding my forge, and when I tried a 1/2" line with a smaller mixer it wasn't sufficient. Perhaps your ribbon burner and build will be better than mine, but I'm afraid that depending on the length of run for your gas line that 1/4" will not be sufficient.
- Preignition: with your burner on the top of your forge and made out of hard refractory it will get quite hot if the air source is turned off for any reason, please be careful to run air through the system before cracking open the gas if you take a break from forging. Also, if your mixture flow velocity isn't high enough due to the flow restrictions mentioned above, you might get the flame front getting backed up to the burner. One of the other advantages of the ribbon style burner is that the local velocity at each jet increases, so it helps prevent the backflash I'm concerned about, but keep an eye on things. If the burner begins to get really hot and you get a ignition inside your mixer you will likely trash your burner head or blower at the very least.
Good luck with your build and please be careful.
-
Like this one quite a bit. Overall form language is really getting there. I'm confused by rockstar's note as I see the woven pattern already connecting the back.
As far as constructive criticism I have the following, take or ignore as you prefer:
- Like others I don't care for the pivot. Would prefer to see something either subtle enough to blend in with the rest of the bronze, or really standing out as a design element (like the copper harness burrs some use for rivet supports). I also feel that the pivot is in a location that is not as "aesthetically" balanced as it could be. To me it feels like it should be lower on the handle, more in line with the parallel straight line that sits just below the spring latch (cudos on making that out of the same material and casting as the handle, that is a brilliant move). In the position I am suggesting it would also make the latch work a bit better against the pivot, as the radius would be a bit larger. Yes, I know that would call for a significant redesign, so probably not worth the effort.
- I like the mono steel blade shape better, but don't care for the octagonal holes. Love the pattern weld blade, but think it is a bit to busy for this knife.
- Also really like the inset wood slab sections. How did you attach them to the bronze? Looks kind of like a bezel setting, with maybe some epoxy? Would be interesting if the bezel setting was a bit further proud of the plane of the edges of the handle.
Like I said, this is really wonderful work, just as it is. Suggestions above are only minor issues of my personal aesthetics. I'd be proud to own one like this and thrilled if I had the skills to make such.
-
55 minutes ago, Scrambler82 said:
One last thing, the winner stated he made up to 400 blades a year… 400 !, one plus every day of the year. When he said it I first thought he must do nothing else but make blades but once I saw how fast he was I started to understand. When he was making the final blade he didn’t have any problems, formed it up, heat treated it, again… wham bam, got it done !
I also enjoy the show. It isn't all that bad for what it is worth, and it is nice to see that the smiths cooperate with each other instead of going for the reality TV competitive BS.
As far as the one smith's production rate, as others have said, these shows are highly edited and there is no easy way to tell just how long his forging process took. As far as his annual knife production, I don't recall whether he said he forged 400 knives a year, but if it was only "making" 400 knives, perhaps he has a stock removal line and gets the blanks water jet cut. With that and a couple of grinding jigs setup you could really crank out product, particularly if you were to heat treat in an oven with an argon purge to limit scaling.
-
Nice project. As Wulf said, the spiral is particularly well executed. Did you use a jig for that and the floor ring, or just careful torch and forge work?
Only thing I'm not sure about is the transition between the antler and the steel. Seems rather abrupt. I'd like to see some kind of flare, swell or cap on the steel to make that joint look more "intentional", if you know what I mean. If you upset the end of the tools, where they join the antler, then neck them back down into a tang for that joint I think it would work well. Perhaps on the next set...
Might also be cool if you attached the large piece of antler to the end of the spiral, to echo what you have done with the tools. It seems to have a curve that follows nicely that of the spiral.
Still an excellent effort just as it stands. You have progressed very quickly.
-
A lot depends on how you have the forge insulated and how large your door/s are. Firebrick comes in several flavors. The big split though is between hard fire brick that is reasonably robust, but a mediocre at best insulator and soft firebrick which is a fair insulator, but it prone to abrasion, cracking and flux damage (not to mention total breakdown at high forging or welding temperatures if you get the type that is only rated for 2000 deg. F). Having never relined a boiler I don't know what you would have used, but as I doubt you had 2,600 deg. insulating firebrick I'd have some concerns.
IMHO, idle circuits are great, if you use them. Think about your workflow process with your gas forge. Ideally once it is up to temperature you could switch to idle every time you aren't actively heating product in the forge and save quite a bit of propane (similar to backing off on the air in a coal forge every time you switch to the anvil). The key question is will you with your gas forge?
-
Extremely nice looking anvil. Appears that Grandpa rarely used it, if at all. Wire brush that baby clean, remove the hardy cut off tool, heat some metal and get to smithing. If you are really new you might want to practice your hammer control on the section of rail for a while so you don't mark up that pristine anvil.
-
One thing that has worked for me in the past is use of an inexpensive circular bubble level. Get one side flat, flip, place level on second side and grind to suit. Charles' idea is better, but if you don't have indexed guides of tungsten or hardened steel this can do pretty well.
-
4 1/2" grinder with cutoff wheel and GOOD PPE if you really must remove it. With 2" thickness of insulation I wouldn't be extremely concerned, but you may lose a little heat thru the thermal bridge if you don't.
Hope you are going to either cast rings for the front and rear of the forge or have some kind of door system. Those openings look huge.
-
For the amount of time and effort it takes to make a proper sword I would definitely go with known, well researched tool steels that I had already had some experience heat treating at the knife level at least (probably 1084, O-1, W-1, or 5160, but that is just me). I've used 4140 chromoly for making chisels, hammer heads and other struck tools, but never any cutlery. Medium carbon 4140 can certainly be hardened and tempered, (probably not to the level of a good blade steel), but I am not aware of anyone using it for knives or swords currently (ref: http://www.bladeforums.com/forums/showthread.php/272234-Knife-made-out-of-4140). Proper heat treating of a sword is more difficult than that of a knife, and typically demands larger and more sophisticated equipment, as I'm sure you are already aware if you have made "good swords" before. It is also significantly more dangerous if you get it wrong, and plan on ever using the sword to cut anything (if you are just going for a wall hanger, why not just use cheap extruded aluminum, it will look fine and be a lot easier to machine).
You can get 1084 from the NJ Steel Baron (Aldo) at 3/16 x2 x 48" for $35. Is the $28 difference really worth taking the chance?
If you are going on the cheap, and your time and fuel isn't worth that much, you can always look into leaf or even large coil spring cut offs from an auto spring shop. The accepted wisdom is to use new material if at all possible, to attempt to avoid old springs with micro-fractures. Will be a bunch of work in the forging process, as the dimensions will not necessary be ideal, but that's what blacksmithing is all about, right?
-
2 hours ago, Buzzkill said:
When I looked up enameling kilns it seems that most of them are very small - far too small for blades of any decent length. For anything that approaches the size that would be useful for blades it looks like you'd be better off just buying a name brand heat treating oven. What am I missing here?
Guess it all depends on what you call a decent length. I did say for a small HT oven after all. I picked up what I call a small (i.e. I can lift it myself and carry it to my car without help), older, front loading Paragon oven, used, at a tag sale for around $50 about 20 years ago. It only had a pyrometer and a manual dial for setting temperature, but it still worked. Haven't used it for a while since I built my PID controlled hot box, but used to do some manual glass fusing in it back in the day, so it easily got up to 1450 deg. F. I think it could fit several 10" blanks easily, but I could be remembering poorly.
Basically I was just saying that there are many sources for electric ovens that are not traditional heat treatment units, but can be used for same. One of the alternate units might be easier to come by used, at a good discount. If I were looking now and willing to do some of my own sweat equity, I'd look into used enamel ovens, ceramic kilns (found one someone was throwing out for free once, just needed a couple of new coils) and industrial liquidators for different burn out ovens and associated controls.
Blown propane forge
in Gas Forges
Posted
Not to be overly pedantic, but:
Air outlet restrictions for the blower will "ride the fan curve" by increasing the system external static pressure (ESP, seriously... that is the acronym). This will increase the load on the motor, though probably not a big issue as far as energy cost goes with these fractional horsepower motors we use in our forges. Slide gate air inlet restriction changes the characteristics of the blower itself (the characteristic fan curve). This will affect how the motor runs in more unpredictable ways, but more often than not will lower the load against the motor, as Frosty noted.
On my forge I use air inlet restriction for gross tuning and a butterfly valve on the outlet for fine tuning, but there is no reason to go for both.
One last thing you may want to check is the orifice size for the propane jet inside the burner. It is far from critical with a blown burner and good regulator, but if you are having trouble tuning the burner that may be the culprit.
Doors are a big help. If it can reach welding temperatures I'd certainly use it just as is for a welding gas forge. With that refractory shell it will be less prone to damage from flux. You can always make a second can with better insulation for more efficient forging later.