
norrin_radd
-
Posts
298 -
Joined
-
Last visited
Content Type
Profiles
Forums
Articles
Gallery
Downloads
Events
Posts posted by norrin_radd
-
-
Thanks y'all.
I really like the Sharpmakers too. I thought about getting another oneas well.
-
Forged from a hay mower blade, blade is about 2". Handle is from a bamboo cutting board.
Kinda weird to sharpen. I got one of those Spyderco Sharpmakers. Seems to do the trick.
-
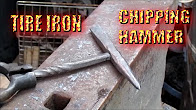
I made one out of a rail road spike a while back. Works pretty good and I didn't have to do anything to one end.
http://www.iforgeiron.com/gallery/image/38833-chipping-hammer/
Recently I started making one out of a tire iron, kept the pry end too. I haven't finished the handle on it yet though, life has been keeping me out of the shop. I haven't used it really but my taper did come out better on it. Tire irons seem to be pretty sturdy.
good luck with it.
-
Very nice I like it. I made my first real letter opener a few weeks ago. One deference I noticed from making knife blades is that on a letter opener the bade needs to be very thin and flat, at least 3" - 4" of it, to open envelopes easy. Not that I'm an expert at either but it was just an observation from the one I made. You should have no trouble transitioning to knives though. Good luck with it.
-
Man that's pretty amazing. Great job.
-
I like the Trewax too. I actually made some half and half trewax/beeswax for the last bottle openers I made. I liked how it coated. I just heated up hot to the touch. I think the next time I will put them in the toaster over for a few minutes at a low heat.
-
2 hours ago, DSW said:
You'll probably find a lot of Mack truck drivers that would buy those. Take a few in to your local Mack dealer and let them see them. they might let you put up a small display and a card. That or talk to a few guys at a decent sized trucking company that run Macks. I bet after a few guys buy one, you'll get calls from other drivers wanting their own.
Hey DSW, thats a great idea. Thanks!
-
31 minutes ago, Forging Carver said:
Great job! I remember seeing a video on YouTube of guys forging a bulldog coat hook, but a bottle opener is a great idea too!
Thanks! I saw that video a long time ago too, inspired me to try them.
-
34 minutes ago, ausfire said:
Great bulldogs From the photo they look to be folded from about 3/4 x 1/4 stock. Is that right?
Thanks ausfire. Actually they are from 1" x 3/16"
-
I like the dragons!
I started making some Bulldog openers:


Me and my son have make a few of these together, good times.
-
Me and my son watch this together and we are both getting pretty good at calling out mistakes, usually in the heat treat. Not that we could do any better but we've learned a lot from this forum and other places too, and tinkering at the forge. Not to mention the fact that its usually the same mistakes over and over. Being an "Armchair Mastersmith" is pretty entertaining
 . One of the main things I do like about the show is that they mix up the experience levels a little bit.
We are looking forward to the "Fire and Iron" show as well.
-
16 hours ago, Leon Renaud said:
go to the big box store like lowes/Home depot get the simplest bathroom vent fan their about 15$. You can either get a light dimmer switch to control it or you can make a damper to divert some of the air blast away from the forge.
That's what I did and it works great.

-
6 hours ago, Mikey98118 said:
Brilliant!!!
What an excellent idea for use as the steel shell of a small oval forge; I'm going to steel this idea (only if you give permission). Need to know your name so as to give you the credit you're do.
Michael Porter
Here is my email address in case you don't want to use your given name in a group post michael.a.porter@comcast.net
Without even using a kiln wash or other high-emissive finish coating, the forge interior is showing white in the photo, which is strong evidence that your forge design is working in the excellent range!
Hey thanks for the comments! Have at it, no need to ask permission. Don't worry about credit or anything either. If that makes you feel awkward you can just mention this thread or the YouTube video and/or channel. But honestly it's not necessary, really.
Just let me know if you make something similar, I'd like to see it.
Thanks again.
-
1 hour ago, Forging Carver said:
Oh nice, it is about the same size of a freon bottle. At first I thought these dimensions were going to be too small, but then I realized that I only do small stuff. Bottle openers, occasional knife, tools, and small pocket stuff. I think when my forge is finished, I will be very satisfied with it. I wish you the best of luck with your new forge and smithing!
Yeah that sounds like it will work good for you. I do small stuff too, for now anyway. I hope to be able to do more now that I'm not dependent on coal. Good luck to you too.
52 minutes ago, Frosty said:Pretty nice build. I looked up the Fireworks kiln wash and the MSDS. It looks like a good high alumina and kaolin wash. If you were to come up with some Zircopax it'd turn the Fireworks into a high IR reflective wash.
When you going to do a few welds in it? The wash will go a long way towards resisting borax.
Frosty The Lucky.
Thanks Frosty, i appreciate the info too. I guess I'll be looking for some Zircopax. I plan on trying some welds sooner than later.
-
2 hours ago, Forging Carver said:
Nice forge! I saw that video a few days ago. You did a pretty good job at it! What's the diameter of a muffler?
Hey thanks man! It was fun way to practice a little MIG welding. The outside of the muffler is approximately 9"x7". The inside of the finished Forge is about 5"x3 1/2"with the 4" brick floor.
Can't wait t fire it up this weekend!
-
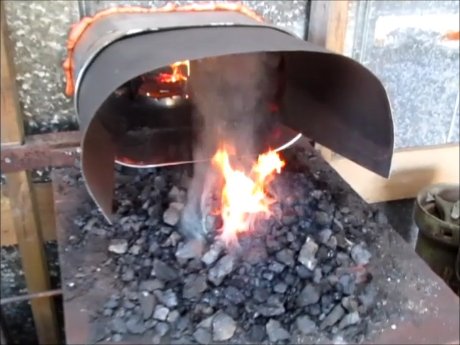
Thought I'd show ya'll the gas forge I finally made.
I used a half of an old muffler for the shell and my Atlas Knife Company 100k btu burner, I think its the Graham Forge model on there website.
I made the base out of 10 gauge and 1" angle


Lined it with 2" of ceramic wool, I think it compacted a little when I put the rigidizer on it though. I have a fire brick for the floor. Then coated all of it a few layers of "Fireworks" brand kiln wash.
Welded 2" angles to hold the firebrick doors. I welded a couple of pieces of pipe, around 5/8" ID from front to back to hold a sliding part holder made from 1/2" round and 2" angle.

Overall I think it works pretty good and I am very happy with it. I checked it with a digital thermometer and thermocoupler, just laid it in the door, and it was well over 2000° F. I stopped there because the thermocoupler looked like it was going to melt.
I hadn't known about using kiln wash until I read it here during this build. I was going to try some of the reflective coatings that Mr. Wayne Coe sells but I had already ordered the other so I thought I'd see how it did first. I did contact him with a few questions and he was very helpful. Half way through this build I realized that I would probably build a bigger one in the near future, so I will probably go that route at that time. I wasn't sure if the wash I got would work but it seemed to really help seal my insulation, and I have some left over to recoat if I have too.
Anyway thanks again for all the great info here it helped me a lot.
That's it in nut shell but there's a 9 minute build video just for kicks.....
-
ok, gives me a direction to go for.
I appreciate it.
-
Hey all,
Probably a dumb question and I call myself searching for the answer. Anyway, I'm pretty much done with a new gas forge build and I thought I would add a thermometer just for grins, kind of an after thought. But I'm not sure of the best way to install it. I've used it a few times and the rigidzer is cured with an added layer of kiln wash, I may add another thin coat. Should I just drill a hole toward the base and insert the thermocoupler or put it in through one end or what? Does positioning make a difference?
Point me to the thread with all the answers, cuz I couldn't find it, thanks for any help.
-
That is a great looking hat rack. Very well done!
-
Great pics! One question that I cant seem to find an answer too. Does the indention in the base directly under the hardy hole have a purpose for the end user?
-
On 8/24/2015 at 7:27 AM, John McPherson said:
Odin unleashed The Destroyer Mk II, bear suit of animated armour? No pic-a-nic basket shall be safe!
I was thinking something similar! Does look like cool bear armour.
Great sculpture, thanks for sharing the build pics too.
-
Good one Frosty! Merry Christmas too everyone.
-
That is pretty amazing. Gets you thinking.
-
Knife came out really nice! I always like a little of the file textur left on. Great job
Mini Karambit from "Agricultural Steel"
in Knife Making
Posted
Hey thanks. Yeah I think that's what I have heard on the 1095. They are pretty fun to forge with. I've got a crap ton of them too, a few different sizes. I've made a few knives out of them. First were throwing knives:
http://www.iforgeiron.com/topic/42348-forged-throwing-knife/#comment-434345
attached pics of a few others.
IMHO, half the fun of these is trying to get the most out of what steel there is. One of these days I'll try to make a "Damascus" billet out of some.
I'd like to see what you make out of them.