

DocsMachine
-
Posts
113 -
Joined
-
Last visited
Content Type
Profiles
Forums
Articles
Gallery
Downloads
Events
Everything posted by DocsMachine
-
Local fellow has an old (and very large) boat anchor, we figure roughly 2,500lb including the chain. It has about ten or twelve feet of badly rusted chain (much of it is rusted and scaled to about 2/3rds of it's original thickness) of loops some six or eight inches on the long axis with the old style spreader bar in the center. Is there a "nondestructive" way I can determine if these are wrought iron? I might be able to buy a couple rings off the owner (it's all sitting in his yard as a decoration) but I can't "cut first, pay later". Doc.
-

-
-
(Hopefully) fully repaired anvil!
DocsMachine replied to DocsMachine's topic in Anvils, Swage Blocks, and Mandrels
How to get (relatively) high carbon filler rod for your TIG: One, buy an unplated screen-door spring for $2.25 at your local hardware store. This one happens to have been made by Century Spring, and one of the guys on the Home Shop Machinist board suggested it's probably 1095. Next, get some pliers, a vise and a small propane torch: Heat the end- it doesn't have to be red, it'll soften and bend easily well before it glows- and straighten a bit you can grab with the pliers. Then, holding the torch flame sort of parallel to the wire, just pull. The coils warm and start to straighten, and as the wire moves closer to the flame, it heats more and lets more of the bend smooth out. A little practice and you can pull an 18" section, nip it off, pull another, nip it off, etc, until you have the whole thing unwound into a pile of pretty straight wire. This spring was only lightly painted, and I took the smut off (after they cooled) with just a few passes of a Scotchbrite pad. After that, they were ready to use. -I didn't. I'd weld intermittently 'til the anvil got warm to the touch, then set it aside for a while. This has been just a "side" project for a while, where I'll work on it an hour or two, then go on to something else, usually not coming back for a day or two, or even a week or more. The TIG keeps things controllable, and is much more focused than MIG or stick. I intentionally kept the beads small and fairly short, and moved around a lot to try and minimize stresses. Doc. -
(Hopefully) fully repaired anvil!
DocsMachine replied to DocsMachine's topic in Anvils, Swage Blocks, and Mandrels
-That's my last concern, how well all that's going to hold up. I'm not worried about the MIG, of course, since that's not hardened (though theoretically it should be a little harder than the wrought iron base.) But one whole side is a mishmash mixture of Stoody hardfacing MIG wire (applied with the TIG) music wire, miscellaneous springs and needle bearings, as I was experimenting trying to find the best wire and method. Places where the Stoody rod was more than three beads thick, cracked several times, which I variously ground out and repaired with other wires. It's entirely possible there's some tiny internal cracks, almost certainly a pinhole, bubble or other small void, or other fault in the welds that will progress into a crack as I beat on it. If so, I'll patch it as best I can. Fortunately I don't make my living at blacksmithing- nor have any plans to- so it's only going to get an occasional hobby-level beating. Doc. -
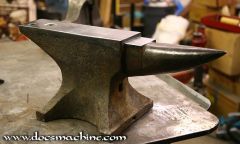
I picked up this well-abused anvil back in February or March, and with the help of this board, positively identified it as a circa 1885-1910 140lb Peter Wright. It was in terribly sad shape; still usable, to some extent, but in overall poor condition. The horn had been blunted, the table worn and dished to a full 1/4" lower than the top of the horn, all the face edges were chipped, cracked and worn round, there was a spalled crater back by the hardy hole (almost 1/8" deep) the middle of the face was "swaybacked" over an eighth-inch lower than the surrounding face, there were several chipped craters in the middle (one divot was about 3/32" deep) and the whole face was marked by endless dents, dings and scars. I looked into several different repair methods, including milling (would remove too much of the tool steel face) stick welding (expensive and poor results) and even, more recently, thermite. I settled on building up the missing metal slowly via TIG. This had the benefits of being very controllable, minimizing the heat-affected-zone around the welds (minimizing the amount of face that would get retempered by the welding heat) and precise enough to repair tiny individual nicks and pits. I tried commercial hardfacing wire (major cracking problems, and wasn't all that hard, probably low 50s RC) music wire (basically just high carbon wire) and even needle bearings. I finally found, by blind luck, an excellent wire, in the form of some unplated screen-door springs. Very good quality wire, one foot-long spring when heated slightly and drawn back out, produced some twelve feet of welding wire, for a total cost of $2.25. Kept to fairly small beads with the TIG, it landed file-hard (file couldn't touch it, hammer couldn't peen it, centerpunch couldn't mark it) and showed very low propensity to crack. (Though it did in one spot, where I'd had to gouge an existing crack out, and filled almost 1/2" deep, though part of that was with mild steel MIG wire.) Anyway, it took many hours off and on over the past few months, a bottle and a half of argon, and a pile of grinding discs, flap wheels and sanding belts, but it's finally (almost) done: I built up and redressed the horn, and then did it again a little later, to straighten the upper line and make it even pointier. It's now about an inch longer than when I bought it. I then welded up the table with four or five passes of normal mild MIG wire, and milled it flat, to bring it up to just a little above the top line of the horn. Last, I piled a little MIG on the bottom of one foot, so it'd stand on a flat surface without rocking. The face is still swaybacked slightly, but the two high "humps"- at the front of the face above the table, and at the back where the "crater" was- have been flattened, which levelled the whole face considerably. Oh, and I "colored" the newly-ground and polished areas, except the face, with "gun blue", a chemical cold bluing fluid for firearm work. That sort of "artifically aged" it to blend in the modified areas. Doc.
-
Let me ask you guys this- What is it ABANA does or offers? Serious question. While I come from a heavy fabrication/machinist/weldor background, I'm basically a newbie to blacksmithing. Plus, there's not a huge contingent of 'smiths up here- two of the three I'm aware of post to this board already. So besides the magazines- I've read one issue of Ring, and have considered geting a subscription- is there anything they could offer me? (Especially considering my location in Alaska.) Doc.
-
That is quite clever. I'm sure I'd have never thought of it... While I don't need any crosses, I can see that an equilateral X could be used for the base of stands (cup racks, bananna hangers, etc.) or even point and roll the ends for a raised set of feet. I'm gonna have to go try it... well, as soon as I make hardy cutoff tool or similar wedge. Doc.
-
-Yep. The references to train rail welding show pretty much exactly that; molds are placed around the rail, and a ceramic "bucket" full of thermite is placed on the top and ignited. After it's had a chance to react a bit, it burns through the base of the "bucket" and fills the mold. However, that's not an impossible technique to duplicate for a one-off project like this. Some fireclay, some fire brick, a few buckets of dry sand, lay the anvil on it's side so the metal can fill a void between the new faceplate and the body... Doc.
-
Personally, I think the idea has potential. And I say that as a guy that's already burned up a lot of rod and a full tank of argon trying to fix what might have been a fatally-cracked-anyway anvil. Yes, I agree it'll take some experimenting- unfortunately probably by someone with more time and money than I have. You don't need to experiment on anvils either, just scrap steel, or maybe old train rails or something. The "Grinder explosion" was eventually determined to probably have been closer to a dust explosion (but using the same components) than an actual thermite style reaction. The point is the same, though- don't grind both steel and aluminum on the same machine. Next, without trying to get too political, thermite had nothing to do with the WTC collapse. Neither the steel girders nor the aluminum aircraft were finely powdered, and while the aluminum burned (like a soda can in a campfire) the steel didn't. The entire thermite theory comes from a single report where someone analyzed the air around the collapse site, and detected elevated numbers of a daughter compound gas (isopropane or something, as I recall.) The conspiracy theorists did a Google search, and found that chemical was used in one manufacturers' relatively new thermite formulations, added two plus two and came up with "green cheese", and declared that thermite bombs had been emplanted to bring down the towers. Except that the chemical is consumed when the thermite burns, leaving little or none to detect; to get the levels detected would have required something like sixteen tons of thermite; and, most importantly, that daughter compound is easily and commonly the result of burning any one of several types of plastics- of which there were, of course, many tons of in the WTC. Stepping back off my soapbox, yes, the reaction is not controllable, but that just means you have to have a proper setup first. It'd be nice if it were as simple as a small clay or firebrick dam, pouring about a quarter-inch of thermite on the anvil, setting the new faceplate on top, and lighting it off. I don't think it'll be quite that easy, but I think it might prove to be easier and quicker than forge-welding on a new plate, or building it back up with electric welding rod. As for the soft iron alloy, again, I don't see a problem; Peter Wrights, Mouseholes and a handful of other well-respected brands are solid wrought iron, with a hard plate welded to it. If I can find a legal supplier of the stuff, or better yet somebody with some experience with it, I might give it a try (with some scrap, first, of course.) Doc.
-
That makes me wonder if it could be used to weld a new faceplate on... Say you had one with a badly cracked original plate, or wanted to add a new plate to a cheap cast iron body. Maybe something as simple as piling a generous layer between the anvil and a new faceplate, both preheated, and igniting it. If it were, indeed, more or less "that easy", that'd be a good way to patch up heavily damaged anvils, or improve some of the cheap import ASOs. Maybe a plate milled from S7 and quenched almost immediately after welding? Doc.
-
Zinc, aluminum, tin, magnesium, traces of copper, some silicon... It's called "pot metal" basically because they threw whatever thay had into the pot at the time. (The term dates back a century or more.) Today, on new carburetors (which basically means Edelbrock's Carter clones, Holleys and the Demon line) the alloy is much more refined, of course, but it boils down to, again, being predominantly a zinc/tin/aluminum alloy. It's a fairly low melting alloy, about 1200F or less, as I recall, but I'm also told you need to be really careful with it, as overheating it starts the various components boiling and seperating. I wouldn't recommend the alloy for anything other than decorative items- nameplates and such. Do NOT use it for anything more structural than a candleholder. Doc.
-
Plated Or Coated Steel
DocsMachine replied to IRon_FOrgerI22's topic in Blacksmithing, General Discussion
Depends on what it's coated or plated with. "Coatings" tend to be temporary and/or applied as an antirust while it's in transit. (At least, referring to typical industrial steel.) Basically think "thin lacquer" here, but it could be anything from a Cosmoline-type wax to automotive clearcoat. "Platings" are typically somewhat different, and usually refer to cadmium, zinc galvanizing or tin, but could also refer to copper (especially as in gas-welding rod) nickel or chrome. Copper and tin aren't too bad for you, if burned off in a forge, some people have sensitivities to nickel, and chromium's a heavy metal that can build up in the body, but I don't think is anywhere near as bad as mercury or lead. Cadmium and zinc galvanizing, however, are nasty, and should be ground off first, taking extra precautions such as vapor masks (NOT just cheap $3 dust masks from Home Depot) and doing the work outside- maybe even waiting for a windy day. Doc. -
Hot iron does not attract a magnet
DocsMachine replied to Glenn's topic in Blacksmithing, General Discussion
No. The molten core (molten iron) is not attracted to a magnet, but because it's moving, it creates a magnetic field. There's a difference. A spinning aluminum disc creates a magnetic field in response to a magnet- the disc is not attracted to the magnet at rest, but when spinning, because it's conductive, creates magnetic eddy fields that then interact with the magnet. The core moves and flows- the reason we've had magnetic pole reversals and why "Magnetic North" changes almost daily, and doesn't really line up with the axis of rotation- and as it moves, it sets up a magnetic field. Doc. -
where do you buy your steel?
DocsMachine replied to waianvil's topic in Blacksmithing, General Discussion
You mean you can ... buy steel? Last year, I was given- okay, I had to go get- about a third of a ton of 3/8" steel rod in 20' sticks. On top of that, I'd already had a half-acre of junk... er, fine treasures, out behind the shop. We've been into cars and recreational packratting for years. Before I ever got a forge or anvil, I had half a dozen axle shafts, three or four whole truck leaf spring packs,an assortment of coil springs, chunks of old chain, lots of angle and strap iron... I'm pretty sell set for a while. Now I just need to learn what the heck I'm doing. Doc. -
Yet another Anvil ID, if you please...
DocsMachine replied to DocsMachine's topic in Anvils, Swage Blocks, and Mandrels
Yes, but I thought cast would still be considerably softer than the centerpunch. I mean, it certainly is on engine blocks and cylinder heads. Is this anvil's cast iron "chilled", or whatever they call it? As far as the ring, well, they ain't much a'tall. I wouldn't call it a "dull thud", but it's certainly nothing you could call a 'ring' even if you squinted your ears a bit. So I guess it's cast iron all right... How durable can I expect it to be? I don't expect to forge much of anything larger than a knife (or perhaps a cleaver) and some small ornamental stuff, so I doubt I'd really stress even a really crappy anvil, but still, nice to know how good this thing is (or isn't.) The face is indeed quite hard- light taps with a ball peen don't show much bounce, but also don't mark it in the slightest. It shows some use and very minor nicks and dings, but is, all in all, very flat, very smooth, and all the corners are square and straight. Doc. -
Yet another Anvil ID, if you please...
DocsMachine replied to DocsMachine's topic in Anvils, Swage Blocks, and Mandrels
Are you sure it's cast iron? I tried a centerpunch on a few spots on the body, and while I could mark it, I also badly blunted the punch. (And yes, it's a reasonably hard punch.) Any easy way to tell the difference between cast iron and cast steel? Doc. -
Yet another Anvil ID, if you please...
DocsMachine replied to DocsMachine's topic in Anvils, Swage Blocks, and Mandrels
Thank you! From what few photos I can find online, it does indeed look Vulcanish. Mine's a little "taller" at the waist than the 100-lb one in the photo, but apart from that, the foot, horn and heel all look pretty much identical. But I also see that Vulcan had a cast-in, raised "arm and hammer" logo, whereas mine is unmarked. And both faces of the waist are as-cast, there's not the least trace of anyone having ground a logo off or anything. However, I did see a brief note on one of the bits Google dredged up, about Vulcan, among others, having cheap versions to sell through catalogs and whatnot. The reference suggested that the catalog versions were essentially factory rejects- ones that weren't quite up to standards. Which follows- as I said, there's some mild voiding of the casting, under the horn and on the opposite side shown, toward the heel. And considering the location where I picked this one up- a very small and semiremote community- and a rough idea of it's age (seller had had it for about ten years, previous owner had it for "quite awhile" before that) then it stands to reason it may well have been mail-ordered out of a Sears & Roebuck or somesuch. Doesn't explain how the logo, if there was one, got removed without leaving grinding or even chisel marks, but then again, it may just be that the foundry specifically cast unbranded anvils, as opposed to "unbranding" the rejects. That's all, of course, only slightly-educated supposition. Anyone else have any info to add to the fire? Doc. -
Fresh purchase, I'd like to know the maker and/or brand if at all possible. It has no markings save for the raised number "15" on the front foot. The face is pretty hard, but the whole thing doesn't "ring" much, if at all. It appears to be cast steel- at least it very much appears to be cast, as there's some slight voids under the horn and on the opposite side at the waist, towards the heel. There doesn't appear to be a seam where a "face" joins the rest of the body, although there's some... something where the face steps down to the horn that either suggests a weld/braze, or possibly where somebody spilled a dab of solder or something. I haven't taken a brush or pick to it yet. The body is probably all steel- it's quite hard in most places. Clearly harder than cast or wrought iron- it blunted a centerpunch, but the punch did leave a small mark. 1" hardy, roughly 1/2" pritchel. No obvious marks where a logo or brand was ground away or otherwise covered up. 150 pounds, almost exactly. Doc.
-
I float mine on a pool of mercury so it points to Magnetic North automatically. That way I always know which way to face when I pray five times a day to either Haphaesus or Inari, depending on what I'm making that day. Doc.
-
Be careful milling it, John. I don't know about yours, but the face of mine is hard enough that I'd need better indexible-carbide tools than I have now, in order to cut it. It's hard. Not that I will- I'm told the PW faces are only about 3/8" thick, and mine has an 1/8"+ deep swayback. If I milled it flat, I'd take a full third, if not half of the face off in spots. As far as the horn goes, I'm kind of surprised that this group of people who spend their days (or at least free time) in front of raging coal-fired or gas-fired 2,000-plus-degree infernoes, swinging chunks of yellow-hot steel around so they can beat on them mercilessly with large hammers, making chisels and axes and knives and tomahawks and fireplace pokers, has such an issue with one particular piece of steel being only slightly pointy at best. I don't know about you guys, but if I do something that results in an injury, I stop doing that. And Thomas, it's not an issue of "insurance", it's simply one of situational awareness. If you understand that you're in a roomful of potentially dangerous objects, whether they're merely pointy like an anvil horn, or truly dangerous like a 250,000-volt transformer, and more importantly you act as such, then the damger is minimized. Fire extinguishers, after all, merely put out a fire. But I think even you can agree it's much better to not let the fire start in the first place. Doc.
-
Don- Plain MIG wire. The PW is supposed to be pretty much straight wrought iron, so the MIG metal should be slightly harder, closer to mild steel than wrought. I'll let you know how it holds up. Doc.
-
'Couple o' things there WB: One, few anvils, even Peter Wrights, are any sort of "collectors item". They're in demand these days simply because new anvils are bloody expensive and even moreso to ship, but more and more home-shop guys like me want to try our hands at blacksmithing. As in, they're in demand as something to be used, not simply collected. There are "collectors", but they typically just want a display piece for the garden or the "Apple Barrel" type knicknack wall. And two, I didn't buy a collectors' item even if they were collected. I bought an anvil I intend to use, and will, in fact, be doing additional repairs via welding, in order to make it more useful still. Three, if you think any but about 2% of potential anvil buyers would even recognize an "improperly shaped" horn, you might want to run the exhaust fan a little longer. On the other hand, the existing horn was clearly broken- even to the disinterested outsider. The newly-rehaped horn is no longer so. Fourth, "resale value" is irrelevant, as I have no intention to sell anytime soon. And if I did, any decent anvil up here in Alaska sells for two to three times what a similar piece down there in the States would. Xxxx, I once sold a rough-cut train-rail anvil for $60, and the buyer was happy to pay it. If my mutilation of this fine example disturbs you that greatly, I'll be happy to entertain your generous offer to purchase it. Doc.
-
I've spent put'near my entire life in rooms full of pointy things, hot bits, improvised deadfalls and all manner of whirly-blades-o'-death machines. Still have all my fingers and toes, never so much as needed stitches. I think I'll live. Doc.
-
As delivered, my Peter Wright (Photo 1) 140-pounder had clearly seen better days. Beat, chipped, dented, spalled, rusty and probably high cholesterol. One problem was simply that it was missing an easy half-inch off the nose/horn: Photo 2 Probably broken off sometime in it's century-long life, by some klutz with more bicep than brains, or maybe it'd just been knocked off a bench onto a concrete floor. Who knows? I didn't like it for both aesthetic and utilitarian reasons, so it was time to fix it. Unlike the face, the horn was probably pure wrought iron like the rest of the body. Therefore to fix it, we needed nothing fancier than a MIG. Grind the stub clean of rust: Photo 3 Squirt on some hot steel... Photo 4 And a few licks from the angle grinder and an air sander restores the shape nicely. Photo 5 If only restoring the rest of the damage was as easy... Doc.