

DocsMachine
-
Posts
113 -
Joined
-
Last visited
Content Type
Profiles
Forums
Articles
Gallery
Downloads
Events
Everything posted by DocsMachine
-
Few months ago, I aquired a small collection of blacksmithing hardware, among them a 140-pound Peter Wright that's seen far better days. It came unceremoniously nailed to a large but crookedly-cut and much too short chunk of local Spruce. Nailed- as in large nails driven partway in, and then bent over the feet, sorta-kinda. Well, besides it being too short, too soft, and too crooked, it made moving the anvil all that much harder. It wasn't secured well enough to move it all with a hand cart, and added just that much more weight and bulk when trying to carry it by hand. Time, work and prior projects have kept me away from it for a while, but today was such perfect weather to work outside, I told everyone to get stuffed and pencilled in a bit of "me time"- the first since, oh, Thanksgiving, I should think. Six hours later, I had this: See attached photo It's slightly higher than the recommended "closed knuckle" height, and the anvil is "padded" with a fitted piece of 1/2" plywood in it's socket, to somewhat dampen the ring. Rather than making a simple box form, I "cut out" the space between the feet, so I could add in a cross bar to hang tongs, hammers and other bits therein. (The twisty pieces were leftovers from an old project I fiddled with the last time I had access to a forge and an anvil- right about 20 years ago now...) Last, there's four pair of pins to hang a few hammers right close at hand. Now, if my Dura-Blanket will just get here... Doc.
-
Swage blocks in the future
DocsMachine replied to the_sandy_creek_forge's topic in Blacksmithing, General Discussion
-That's called Wire EDM, or Electrical Discharge Machining. Basically acurrent is passed through an electrode (wire, a rod, bar, etc.) and as it comes in contact with the workpiece, thousands of tiny sparks are made. Those thousands of sparks erode the metal- ever seen the arc-spot where the ground clamp of a welder made contact with the workpiece? Same game, just on a smaller and more uniform scale. The liquid is simply a dielectric that helps flush the materil out of the cut. In a "ram" EDM, an electrode, usually made of graphite, is "pushed" into the workpiece, with the spark-erosion creating a cavity in the precise shape of the electrode. Molds for drink bottles are made this way. A CNC mill cuts a master that looks just like the bottle, out of a block of graphite. That master is then used to erode a female form directly into already-heat-treated blocks of tool steel. A well-equipped shop can go from a CNC program, to a production-ready mold in at little as a few hours. With the old way, just heat-treating the molds would take days or even weeks. In "wire" EDM, the electrode is a thin wire, run through some pulleys much like a bandsaw blade- except that, since the wire is also eroded as it's used (graphite is more resistant to the erosion) it isn't on a "band", it's taken off a reel, fed through the workpiece, then discarded out the other end. Wires- and this the cut 'kerf'- can be as small as 0.015 inch. EDM is slow, as most processes go, but among it's other capabilities, is that it can sail right through pretty much any conductive metal, no matter how hard. Bearing shell? No problem. And no heat-affected zone either. [/pointless rambling] Doc. -
Swage blocks in the future
DocsMachine replied to the_sandy_creek_forge's topic in Blacksmithing, General Discussion
For a swage block with just edge forms, a waterjet would be just fine. You pay by the pump time, though, and cutting 1" or 2" steel is very slow- I would wager the total costs might not be all that much different than casting. However, for swages with holes (not just grooves on the edges) the holes are intended to be tapered specifically for upsetting rod and bar. A straight-walled hole (waterjet will make a slightly tapered hole in steel that thick) would be almost useless. Also, the surface finish straight out of a waterjet is actually fairly rough- like coarse sandblasting, in addition to the usual "waves" and tracks from the jet wash. You'd need to do quite a bit of hand finishing with a sander and flap wheel to get good smooth working surfaces. And last, as above, the 'jet can't carve bowls or channels. Those would have to be ground, forged or milled, none of which will be easy or quick. Doc. -
Czech hammer handle...Resetting a handle-HELP
DocsMachine replied to keykeeper's topic in Hand Hammers
Over the past year or so, I've rehandled about a dozen hammers, ranging from 5-oz ballpeens up to a 4-lb hand sledge. My technique is a little involved and uses epoxy, but has so far proven all but indestructable. First, I degrease the hole in the head, and use a Dremel with an abrasive drum to deburr it a bit, especially around the hole where the handle's shoulder will rest. (Removing sharp edges so the wood doesn't get cut.) The abrasive also helps remove rust, paint and scale so the adhesive can make a firm bond. Then I trim the handle to fit. I typically use premade hickory handles from the local hardware store- they have a fine selection and they're inexpensive. I make the fit tight, but not excessively so. Next, I slather the hole and the handle with JB Weld epoxy, trying to get some inside the premade slot of the wood wedge as well. Slip the head on and tamp it firm. The JB gets messy, but if you wear some cheap surgical type gloves and keep a little spray brake cleaner on hand, it's controllable. (The brake cleaner and/or carb cleaner also works to degrease the hole, a recommended step.) I'll then saw off any extra handle above the head, and drive in the wedges. JB takes an half hour or so to start to set, depending on the temperature and your mixing ratio, so you have a little time. Don't rush. The wedges will possibly split the wood, so I make sure the JB epoxy is worked down into any voids or cracks. Once it's cured overnight (I leave mine in the warm furnace room in the house, as the heat helps the epoxy to cure) I'll saw any remainder off, and belt-sand it down to flush with the head. Last, I'll "seal" the end-grain of the wood with SuperGlue, which soaks in and helps firm up any cracks or splits. The sealed wood is prevented from drying out, and the epoxy fills any minute voids or gaps, so the wood has no room to work loose. The rest of the handle is already sealed with something, possibly a spray polyurethane of some sort, applied at the factory. Doc. -
Anvil, vise and blower ID help?
DocsMachine replied to DocsMachine's topic in Blacksmithing, General Discussion
Thanks fellas. Appreciate the help. On the Home Shop Machinist board, the vise was positively identified as a Cole vise, which, as I suspected, was more of a mechanics/plumbers vise. I already have a roomful of vises from cheapy imports to a 150-pound Wilton, so while this one isn't completely superfluous, it's not terribly vital either. (And, I need to recover both a little shop room and some cash- I brought home four truckloads of new tools just in the past couple of days. ) I figured the blower was pretty common, and yes, it's in good shape. I'm not yet sure whether it's basically new, or has been sandblasted and repainted. If the cast housing indicates it's fairly old, I'd suspect the latter. Fan blades looked pretty good, other than some surface rust, and it turns with no gear noise. I'm sure it'd make a fine charcoal forge, but at the moment I'm a machinist first, and blacksmith.... oh, about seventh. Maybe tenth. I have quite a few projects I've been wanting to make, or at least try, which will be far easier to forge than mill from bar-stock, and a propane forge will be somewhat easier, quicker, cleaner and won't take up as much storage room in the shop. Again, thanks for the info. Expect me to be back and asking some stupid newbie questions before too long. Doc. -
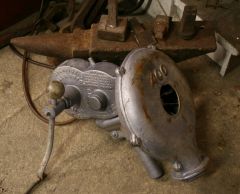 it might be a rivet forge blower rather than a blacksmiths', but it'd work for either application. I don't know if it's new/unused, or was sandblasted and repainted.
 -
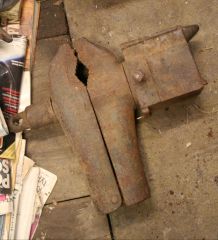 It's quite beefy, and there's a socket at the bottom for the leg or rod.
 -
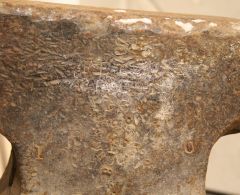 (I tried the flour trick, and then welders' chalk- the surface is far too beat up and actually made the lettering even more illegible.) But the third line is almost certainly "PATENT", and there's the ghost of some semicircular writing below that.
 -
 It's 139lb by my bathroom scale, and has been heavily beat on the side where the name was. Looking at this bloody great large photo, there's a semi-clear "P" and "E" with what might be a "T" after that.
 -
After quite literally years of trying to gather together some decent equipment, I lucked out and managed to purchase a fair collection all in a bundle. An anvil, a leg vise, a 5-gallon bucketful of tongs, another bucketful of hammers, plus a forge blower, all for less than I could have bought a new anvil for and had it shipped up to Alaska. Now, half the hammers are poor quality, and some of the tongs appear to be first-year apprentice work, but there's enough there to use and work with. Several of the hammers are very good quality, there's some good hardy tools, etc. I'm happy. Now, I don't necessarily need the leg vise- if it is a leg vise- or the blower, as I plan to build or buy a propane forge. So if you could help ID these and give me an idea of their value, it'd be much appreciated. First, the anvil. (Pics linked to save dial-up users.) It's 139lb by my bathroom scale, and has been heavily beat on the side where the name was. Looking at this side photo, there's a semi-clear "P" and "E" with what might be a "T" after that. The second line is almost entirely obscured. (I tried the flour trick, and then welders' chalk- the surface is far too beat up and actually made the lettering even more illegible.) But the third line is almost certainly "PATENT", and there's the ghost of some semicircular writing below that. Looking around the 'net, it's likely it's a Peter Wright, and by one reference, due to the ledge on the feet, it's post-1860. I'm presuming it's the three-piece wrought iron/steel face construction? Any way to nail down a closer date of manufacture? I'm also told PW's are pretty common, I assume I won't be ruining an antique if I refinish it, either by grinding or welding and then grinding? I'm looking for a working iron, not a display piece. Second is the (incomplete) leg vise. It's quite beefy, and there's a socket at the bottom for the leg or rod. I'll likely be passing this on to someone who can use it, so what might an average value be? It's not the classic leg-vise style, so it might even be some oddball plumbers vise or something. Any info here? And last is a Champion blower. Another quick look online indicates it might be a rivet forge blower rather than a blacksmiths', but it'd work for either application. I don't know if it's new/unused, or was sandblasted and repainted. But again, I intend to get a propane forge, so I'll be passing this on to someone who'll be working with coal. What's a fair price? Turns smoothly and the gears are quiet. Thanks for your time. Doc.
-
Rehandling hammers...
DocsMachine replied to DocsMachine's topic in Blacksmithing, General Discussion
Same thing you do when you have to replace it on something that has a fiberglass handle: Saw off the handle or stub, drill two holes through the remnant in the head, pop the rest out with a drift. In my case with these off-the-shelf handles, the part formed to go in the eye was too narrow to "fill" it. The upper portion would expand with the wedges, yes, but the lower portion really only had a good "grip" fore and aft. I think that's why my previous tries didn't work so well- that extra space gave the wood room to move and loosen. They're now well-wedged, and any gap is completely filled with epoxy. Unless I overlooked something- which is why I asked in the first place- these should last a very long time. Doc. -
Rehandling hammers...
DocsMachine replied to DocsMachine's topic in Blacksmithing, General Discussion
I set all three last night, looks like they'll work fine. On a couple, I deburred some forging flash from the hole, and made sure all of them were well degreased and clean of old handle remnants. Then I trimmed the handles to fit- more or less- and smeared them liberally with that friend of do-it-yourselfers everywhere, JB Weld. I also smeared some inside the hole, set the head on and rapped the handle on the floor until it was seated. Then tapped the wedges in, and spent a few minutes cleaning off the excess epoxy. This morning, I trimmed off the excess wood and filed it more or less smooth. They seem tight and strong, I think they'll work great. Doc. -
I picked up a ball-peen hammer head out of a "leftovers" bin at the local swap-shop, and figured while I was at it, I'd rehandle a couple others I already had. The hardware store had a selection of hickory handle and wedge kits for just a few bucks. I've rehandled hammers before, but not always with results I liked. This time I'm going to use some epoxy, in addition to the usual wood and steel wedge. Any reason I shouldn't do it this way? Doc.
-
Can this ANVIL be saved?
DocsMachine replied to kbebout's topic in Repairing and Modification to Anvils
Can that anvil be saved? Sorry, no. Please ship it to me, postpaid, and I'll see to it that it's properly disposed of in an ecologically-friendly manner... in my shop. Doc. :D -
Doublewide rail anvil; think it'll work?
DocsMachine replied to DocsMachine's topic in Anvils, Swage Blocks, and Mandrels
That's a great read, thanks. Looks like he made a really nice anvil. But as there are no scrapyards around here, and no shop I know of with CNC or even just a motorized patternfollower torch, it's kind of moot. Were I to order the plate commercially, I might as well just order the anvil itself and save myself about $300. He's got some great points on using the hardfacing through. Doc. -
Ebay for selling your product?
DocsMachine replied to elkdoc's topic in Blacksmithing, General Discussion
eBay is great if you have a bunch of cheap items to sell. That is, cheap in what they cost you, and cheap in what the customer pays. Or, it's pretty good for selling that one, large, unique piece. But for trying to sell "hand crafted" stuff at prices fair to you, the guy that had to beat it into shape? Nope, sorry. The problem is competition. eBay reaches millions, but you're placed right alongside the other 200 people trying to sell "crafts" and trinkets. The guy that just makes three curlicues in 1/4" cold rod, spotwelds on a candle tray, calls it "wrought iron" and sells it for $9.95 will soak up any sales you might get from the one you made with actual wrought and twisted legs for $35. If you're going to be doing it as a hobby- in other words, you're not looking to make a full-time living off eBay sales- the best way is to have your own website (personal, not a Geocities or Yahoo or MySpace type site) with a gallery of your works and capabilities. Make and sell a few trinkets per week, and make sure each eBay auction also has clearly labelled banners and links back to your personal site and/or gallery. Keep the gallery updated; mark photos with "available at $XX.XX" or "for sale", and if/when an item sells, either mark it as "sold" or move it to the "earlier works" gallery. Even better is if you can convince your wife (or husband) girlfriend, kids, neighbor kid, helper, neice/nephew or whatever, to run and maintain the page and auctions for you. You build the parts, they take a picture and upload it, and list the auction. Doc. -
Doublewide rail anvil; think it'll work?
DocsMachine replied to DocsMachine's topic in Anvils, Swage Blocks, and Mandrels
When I said I can get tons of mild, I didn't say it was free. Sure, if I wanted to pay for it, the college has some old 1,000-hp electric motor shafts roughly 12" in diameter. They don't know exactly what the alloy is, but they've been tested at 48 to 50 Rockwell C, and I'd bet they're extremely tough for their apparent hardness. But between cutting of a chunk, facing it and paying for it, I think it'd be cheaper to buy a real anvil. The benefit to this rail anvil is that it'll be largely free. As I said, I'm fairly new at this. I've used a gas forge once or twice before, and I've been beating on metal since I could hold a hammer, but really, it's the beginnings of a minor hobby at the moment. If the rail anvil works until I decide whether or not it'll be worthwhile to buy a "real" anvil, that'll be fine. But I still want to do it "right". Doc. -
Doublewide rail anvil; think it'll work?
DocsMachine replied to DocsMachine's topic in Anvils, Swage Blocks, and Mandrels
Glenn- That's the plan, to plate between the rail ribs to help tie everything together. Bjorn- I was thinking about that. Well, actually first I was thinking grout, mortar or cement, but I suspected it'd eventually be beat to dust. I do have some scrap lead... I'd guess given the volume in there, it'd add an easy 40lb in lead, pushing the finished weight to 150+ lb. Would it help any? Would it do anything except maybe dampen the ring a bit? I will have to carry this thing around on occasion. KSB- That's not awful. Looks pretty sturdy, actually. (Interesting stand, too...) I used to have some grader blade floating around, not sure where it all went. It was serrated though, like a comb- I wouldn't have gotten much usable width out of it. irnsrgn- I've heard the name 'stress proof', what's the alloy? I know both the metal supplier and the college shop have chunks of various alloys, though most of it is "mystery metal"- scrap from the local industrial plants. Might be some great stuff, might be some exotic alloy that takes special welding and tempering techniques else it shatters. (Don't ask me how I know that.) Mild I can get by the ton, but I was thinking something that could be at least a bit harder than that. Doc. -
Doublewide rail anvil; think it'll work?
DocsMachine replied to DocsMachine's topic in Anvils, Swage Blocks, and Mandrels
I was wondering about using the 4140. I went with that simply because the shop has stacks of it. What would be a better choice for the horn, then? My first idea was just to go with mild steel and hardface it with the welding rod, but as mentioned above, I'd heard it tended to crack or peel if you tried to build it up to any appreciable depth. Doc. -
Hello all. Followed a link over from the Home Shop Machinist site, and since I'm starting on a project, I thought I'd hang out a while. I'm in Alaska, and so shipping on heavy items like anvils can easily be equal to the cost of the anvil itself. And, there's a fair number of farriers, do-it-yourselfers and elderly metalbeaters around so that anvils are rarely sold, and when they are, they're bought up instantly and for relatively high prices. I'm looking to build myself a small propane forge, using one of the various designs out there (any recommendations?) and to go with it, I'd need an anvil. I'll just be doing small ornamental stuff, or the usual knives and whatnot, until I either get the hang of it and start thinking of bigger stuff, or I lose interest and go back to combat sportfishing. Now, what I have in mind is this, see attached photo: I had a section of heavy-gauge rail in the scrap pile, just over 20" long. I torched it in half, notched one end and trimmed the base so that the two can sit fairly close together. I then had the machine shop at the college run them through the heat-treating ovens to anneal them. From here, I plan to mill the two mating faces fairly flat (I have a machine shop) and weld them together. Probably with a normal rod like 7018, except for the topmost 3/8" or 1/2" of the gap at the face, which I plan to fill with hardfacing rod. Next, we also annealed a 6" by 3-1/4" roundbar of 4140, which I plan to mill down to a vague horn shape, and weld to the end of the rails. Filling the top of that gap with hardfacing as well, and probably with a decent gusset underneath made out of plain mild steel. I'll then "cap" the gaps between the rail web with plate welded in place. The whole mess will likely be just over 100 lb when done, and giving me a 6" x 10" top face and 5" long horn. That plan at this point is to anneal it again, to both soften the hardfacing rod, and relieve some of the welding stresses. I'll then flycut the top faces to dead-flat, and do a little cosmetic grinding and polishing here and there. Any questions or comments at this point? The last part I think will be a bit of a problem- I need to reharden the face, but the college's (electric) heat-treating ovens aren't suitable for spot heating, or heating and then allowing a quench of something this large. (In other words, I don't know how we'd get a 100-lb block of red-hot steel out of the tiny front-loading oven and into a quenching bath. Besides the fact quenching it in oil is right out- no proper ventilation, massive fire hazard and the ovens are right next to the teach's office.) Any suggestions? Doc.