

Gayle Brooks
-
Posts
323 -
Joined
Content Type
Profiles
Forums
Articles
Gallery
Downloads
Events
Posts posted by Gayle Brooks
-
-
nice! I believe I would just walk around with the key. Those hooks are wicked too!
-
what a cool idea! good job!
-
lol yeah if you can catch the dog he is yours...if he doesn't catch you first!
Thank you all for the nice compliments. These hooks were practice pieces for a frame I did not to long ago. I had not posted it but might as well. -
Thanks again everyone! Im making some cigar bowls now. Ill post pics when I got a few of em done.
I really like your Aspen leaf bowl. I was wondering if you actually "sank" this one on your press, or did you weld up the leaves into the bowl shape? Also Rory, when you do sink a bowl, what do you normally use in the top die? I think you said you use a 5" pipe in the bottom. This is sure nice work!
I attempted to weld it over a form yet found it easier to sink it later on. I used a swedge block and a hammer on the aspen bowl to sink it. Made sure my welds were done right and did it at a yellow heat. Didnt take much.
When I sink a bowl made out of plate, I have a couple of different versions. Typically the top die is a 1 & 1/2" sqaure bar shaft that is pressing down. The bottom part is a large piece of round stock that looks like a doughnut. So the center gets pushed, moves faster than the edges and sink its. Then there are some bowls that I use a piece of pipe and squish it the hard way. Using the pipe I could take advantage of the height it already has. The rest is heat control and getting the wall to move out and not in. Hope that answered your questions! Thanks again! :) -
http://isolatedreality.com/?p=1318
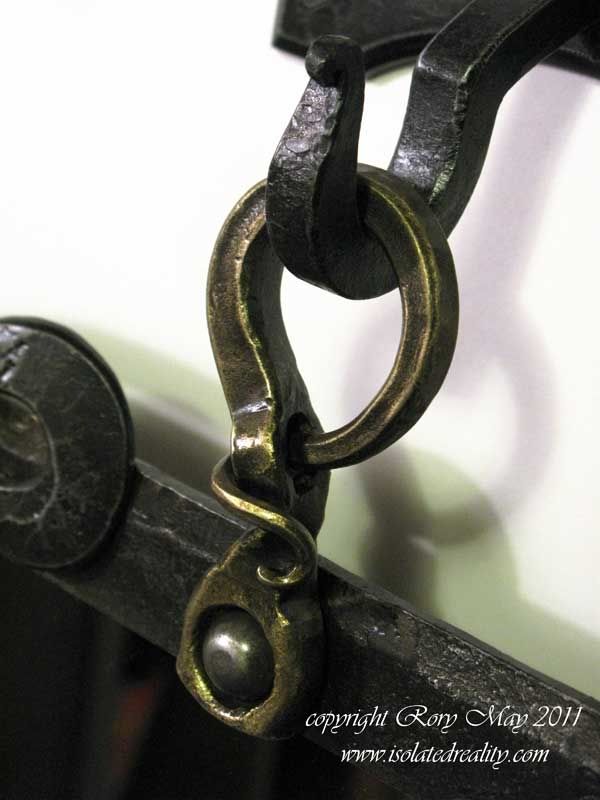
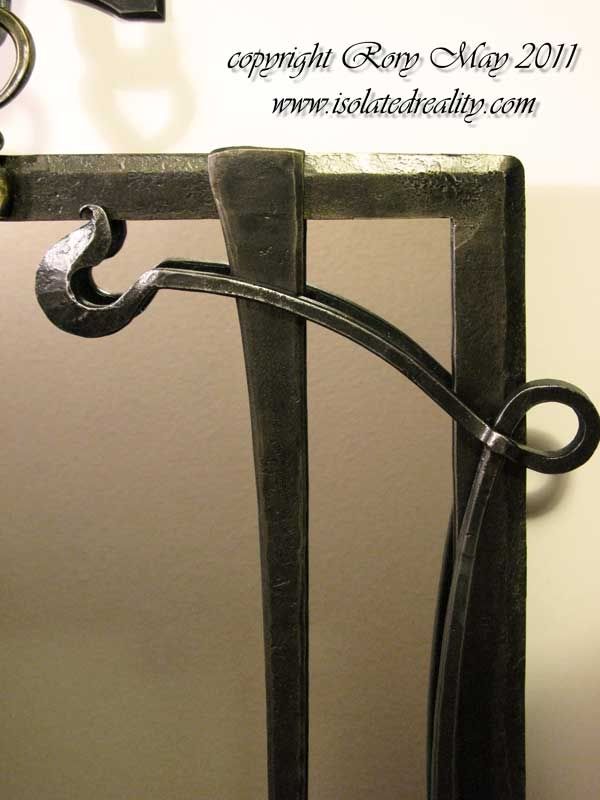
9.5″ x 26″ tall. Forged brass bracket hangs mirror from hook. It it riveted on and allows the mirror to center itself and hang level. Mirror also stands away from the wall by an 1.5″ weighs in at 22 lbs.
The hook have some decorative slit and drifted hole which they pass through, as well the as the brass bracket. Was tricky slitting that brass. Three coats of polyurethane and the mirror is set with silicone.
In progress picture. Ended up moving the lower left detail to the top left.
Forged Brass Bracket
Some light shots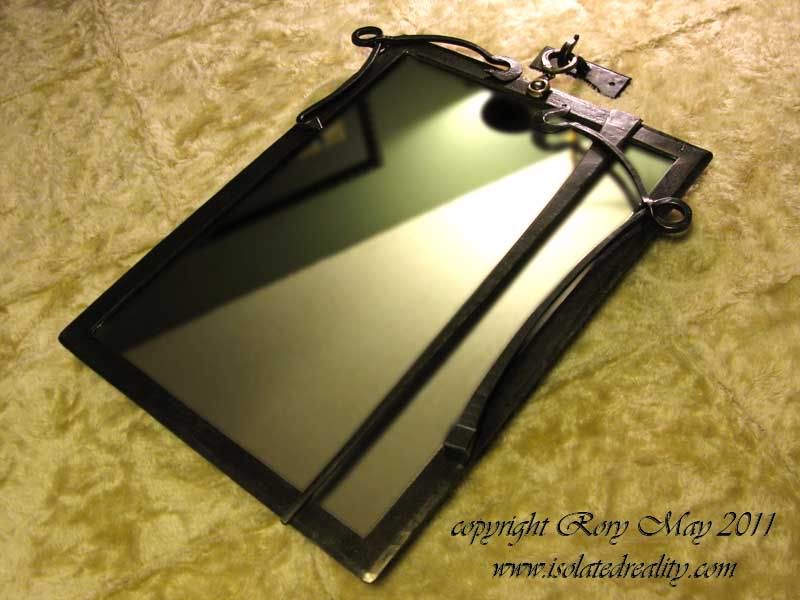
-
Thanks for the insight biggun. It defiantly something I need to research more about and look into local scenes, like you stated.
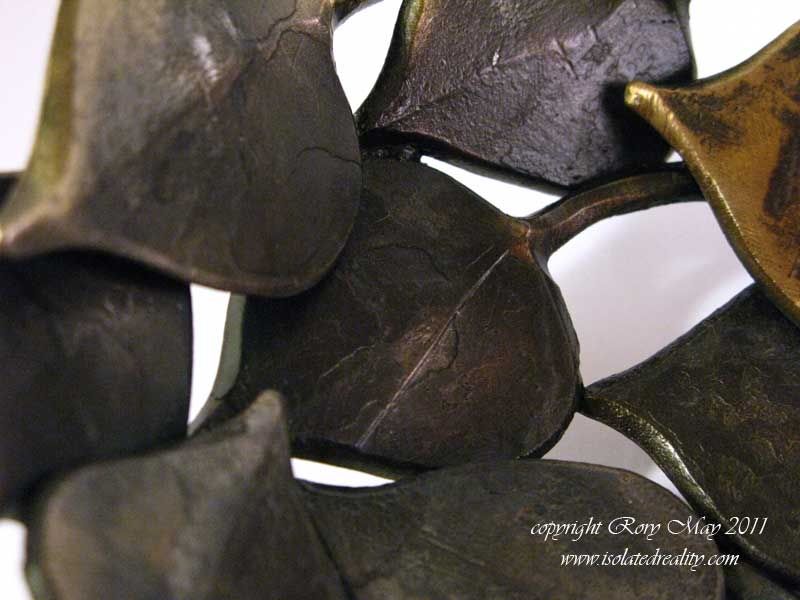
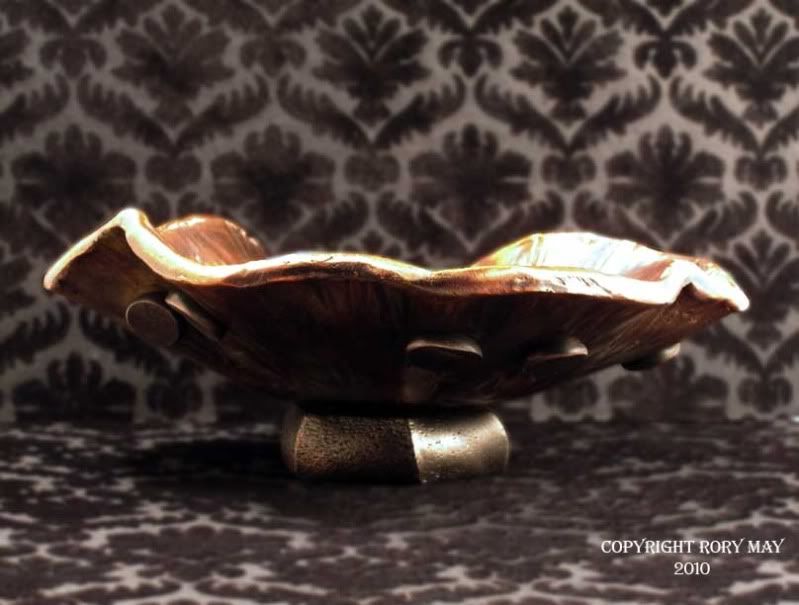
Latest On made out of Steel Aspen Leafs. 6.5" wide and almost 3" tall. All steel leaves with one copper leaf.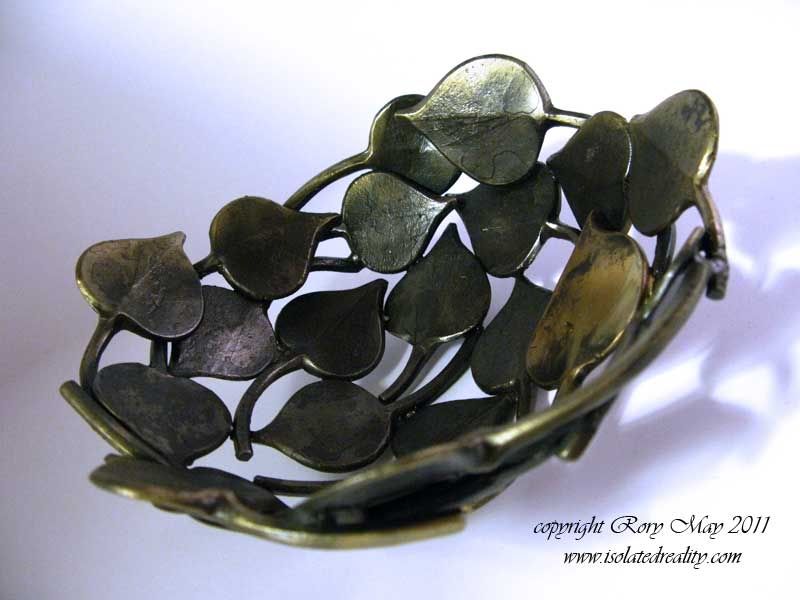

-
Thanks!

I did contact some online gallerys and they said my body of work not would fit well with what they have. None the less, work is going to pick up on Monday and wont have so much time to keep pluckin away on these little ideas. The latest was a cigar bowl. Think I got the kinks worked out to actually make these easily.
As always thanks again for the encouraging replies!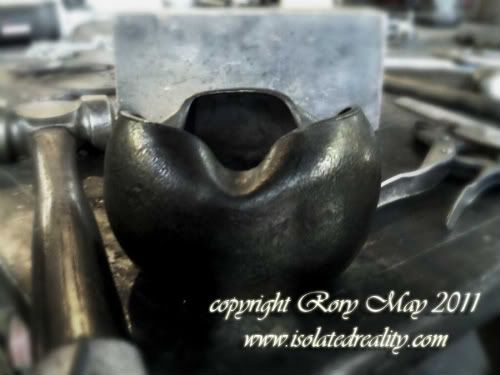
-
To cool!
-
I have done three and 2 of the three the bottoms set in well. I have some ideas to do something similar to like a dove and tail technique that is used in wood. I really had welding and grinding!
So I was waiting for a heat and was looking at the drop pieces from the punch we have. Decided in between heats I would weld these up and forge em flat, sink it and use a brass brush. I said no more...but this really didnt take long!
Thanks all for your feedback!

-
I think Im going to stop making bowls for a while! Have a little inventory of em now lol This last one was made from drop pieces and is a bit rough compared to the rest. Here is the last one:
-
love em!
-
thank you, Beth! Here is a video of my squishin the pipe to make the bowl. I cut out the bottom and pressed in it while I squished it.
turn down your speakers...its loud!
http://www.youtube.com/watch?v=M630dGvKMls -
Thanks Chrispy!
This was dads Christmas gift. It started out as a bowl that I squished out of pipe. Then I added the handles. Dad, doing what he does best, told me what would look nice on it and eventually a lid was discussed. Little did he know he was helping me design this for him. On the last day he was standing around and I asked if he would make a detail for me. I needed it for a "client" for one of the small gigs I got. So he did, which ended up being the handle for the lid.
He was surprised.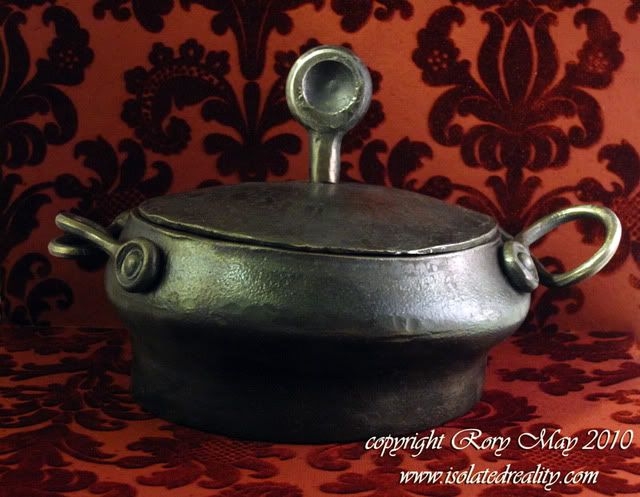
-
Thats great Randy! I added you to my circle thingy. I joined a little local gallery where I grew up. I recently made an etsy account now that I have small things to sell. My personal problem is I really like the things I make and have a hard time pricing them. My dad laughs at it. Said I either need to sell them cheaper or stop making things! lol Out of anything I have sold most of my stuff through facebook. Friends seeing it or the friends of friends.
-
The client got back and wants the baskets. So we pulled the hole grip rail out and now have it setup at the studio at the same rake it was installed at. Thought I would share the progress of adding on an element and the reminder that once the project is done, there might be something to do down the road.
So first thing was a piece of Masonite that we took with us and traced the tread, posts and where the actual post was on the tread. I then dropped a plumb bob from center of the cap down to the Masonite and transferred the line of the cap since my pickets will follow this. I used a permanent magnet to hold my line. The paper is there so I can easily pull the string if I need.
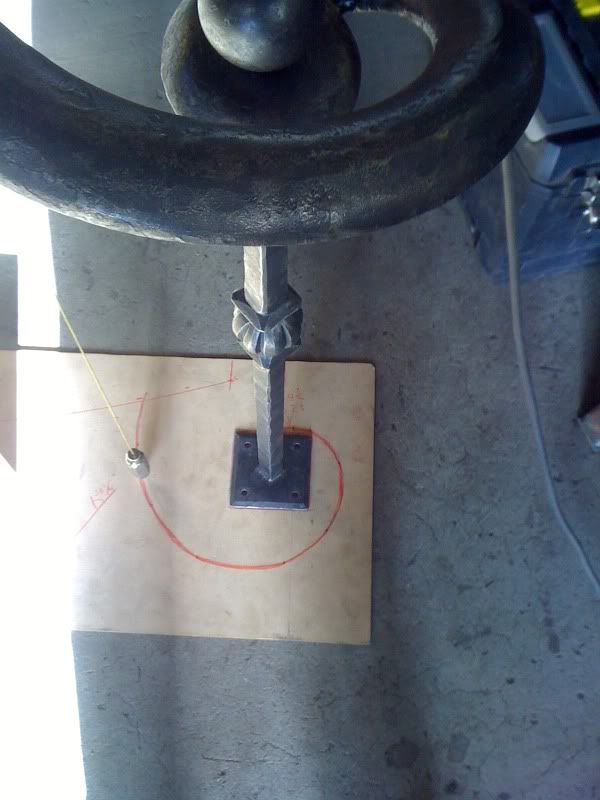
I tack welded some bar at the 4" gap marks to see how it would like. Since we are at the bottom tread outside of the main post code doesn't apply here. Though I am sticking with the 4" max to keep it consistent with the rest of the rail.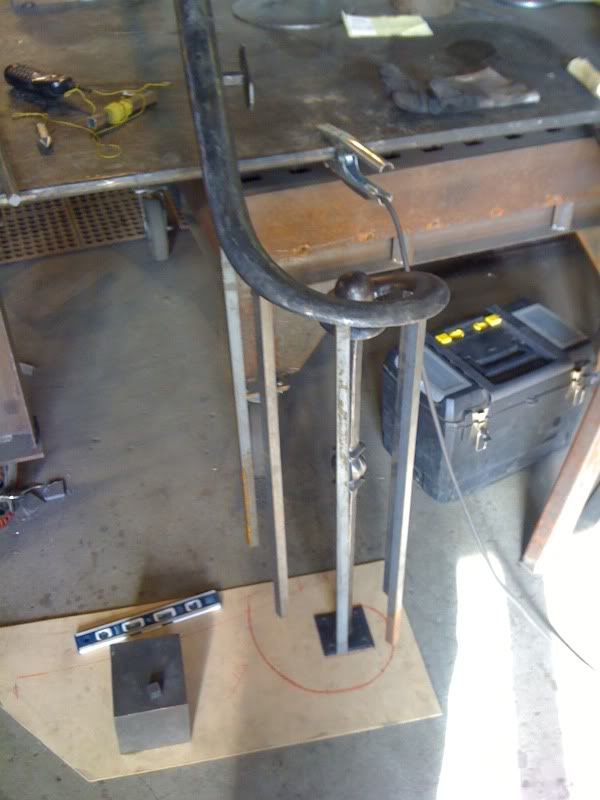
I had a scroll jig that was close to what I needed. I bent the pieces together then adjusted them out for the 3/4" square bar.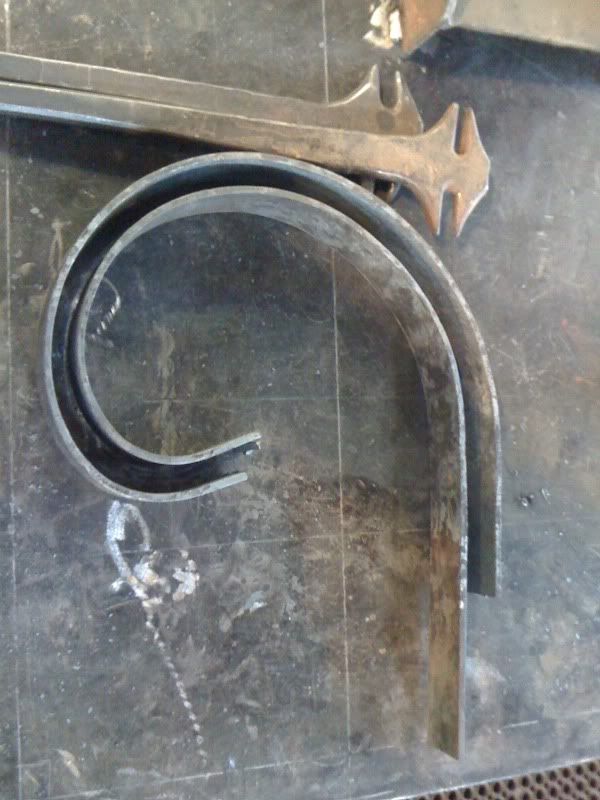
Step work of the twist detail on the pickets. Pretty simple. 2 flat twist.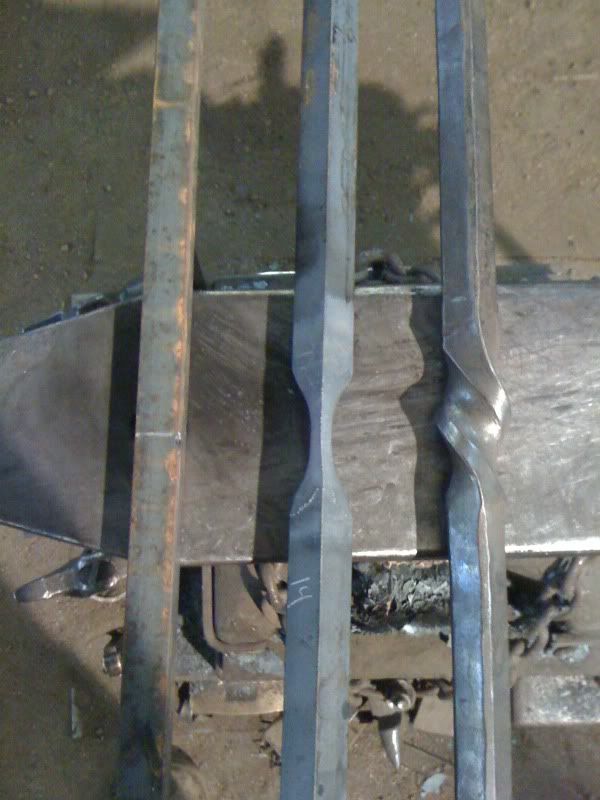
so in all I have my parts pretty much done. Some adjusting and a welded support on the top so I can remove it and rivet the bottoms. The other side will get the same treatment.
Thanks for reading! :) -
nice!
-
Thanks Danger Dillon! There alot of time in that website, hope it navigates well. I try to have a decent presentation and make it entertaining.
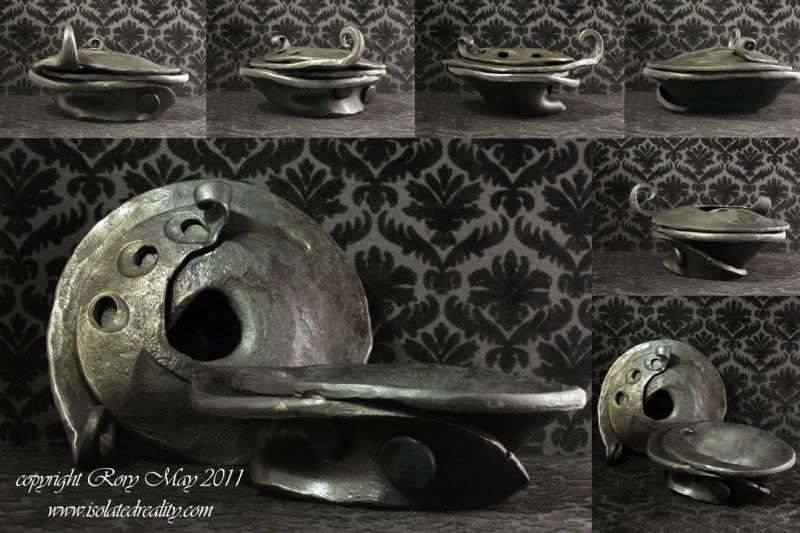
This was an experiment with the challenge of combining the non ferrous with the steel. We had a bunch of drops from some threaded pipe. I welded them together to make a pattern. Then using drops of brass, copper and bronze I used a torch and melted each drop into a void. At which point I soaked the whole thing in the gas forge until it was a decent red and forged everything flat. My welds held, the non ferrous didnt burn up and really looked interesting flat. I sunk it, mounted it and yeah...technically it was difficult. Design wise Im not to thrilled about it.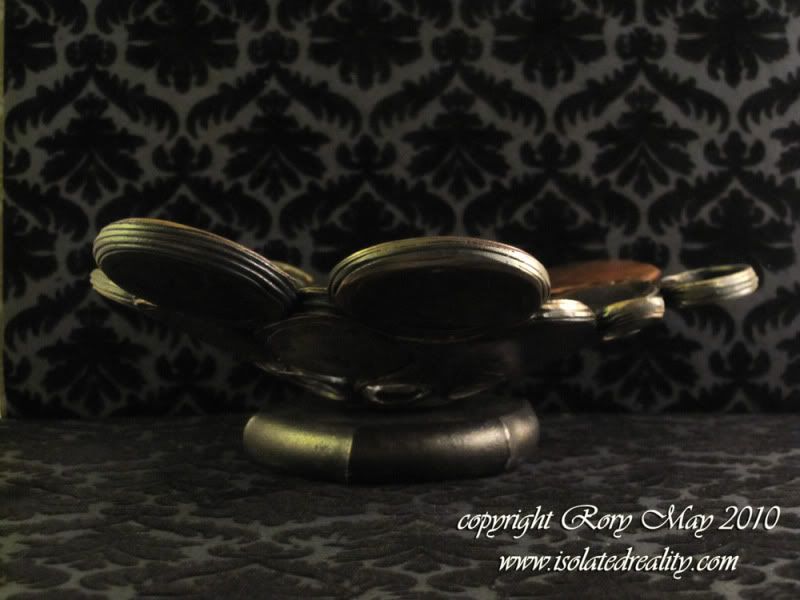
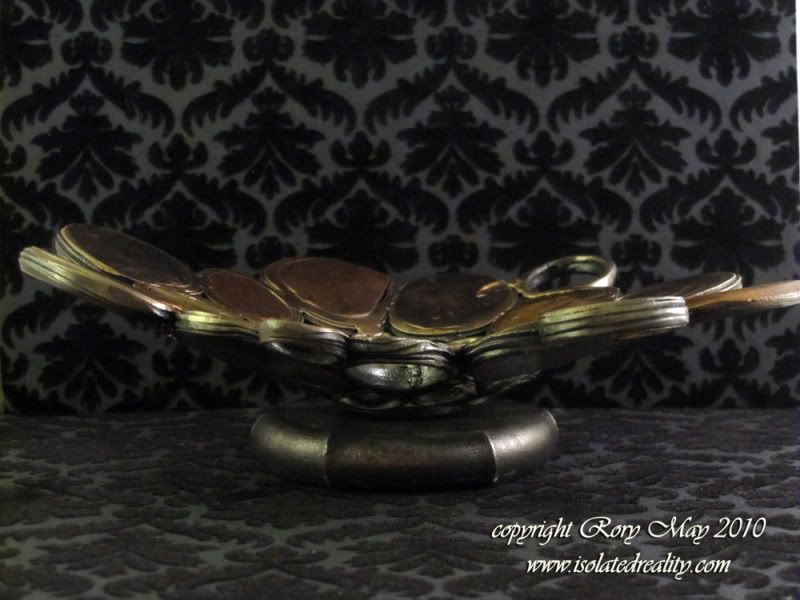

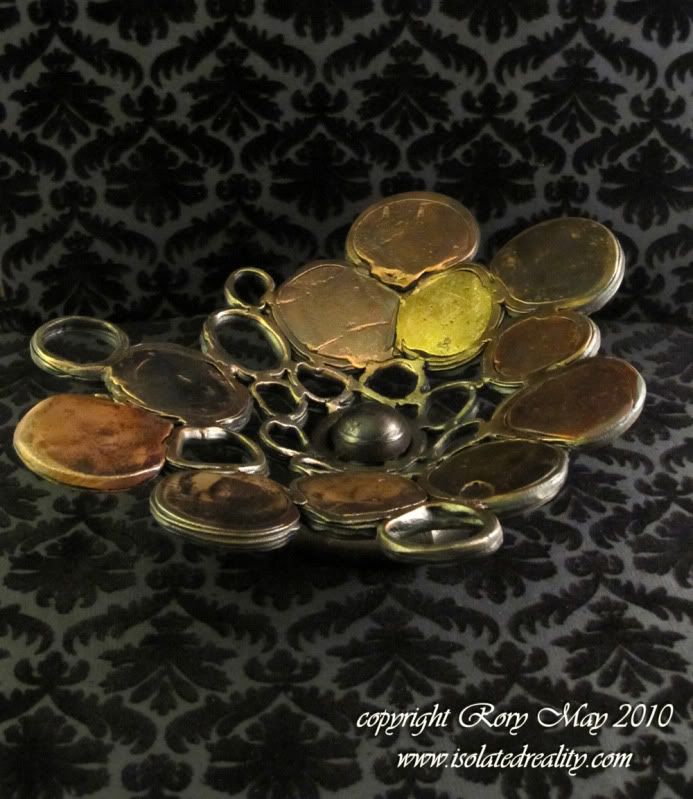
weighs 4 pounds and is 10" long 6" wide. -
Used a 250 LG to squish this into a plate. It gave the pipe a little belly with some love handles. I will put a belly button in there and open the top a little mroe so a beer can fit in. Call it "Beer Belly"

-
Thanks Beth! And as always you comments are quite pleasant to read
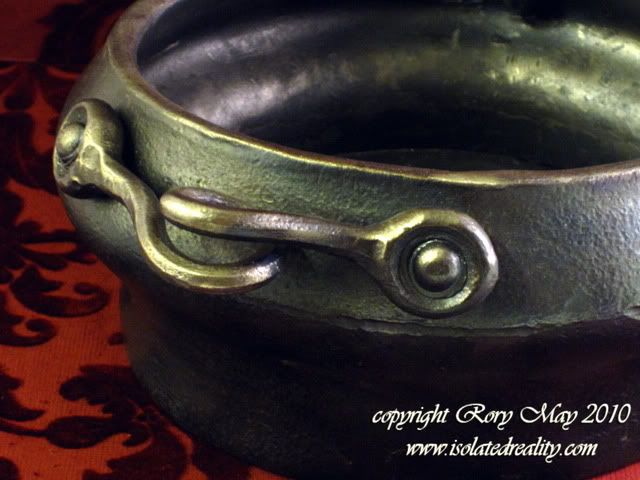
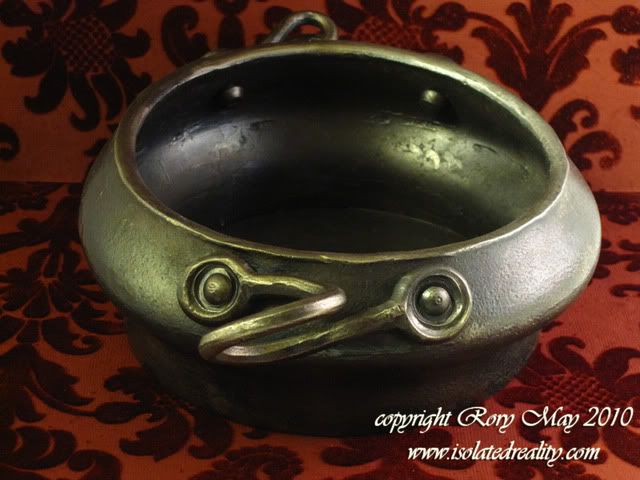
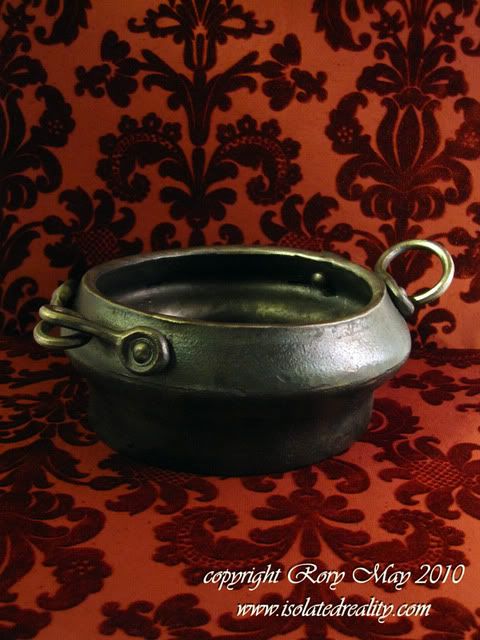
Latest one, though I think Im gonna make it into a pot with a lid and handles. Its about 7" wide,3 tall.
-
-
Thanks guys
As for texture the copper one was done with the help of a top fuller under the power hammer and a clean up with my cross peen. The rest were done by forging scale into the steel. With the bees wax finish it looks and feels like leather.
Once I get some of the tooling I have in mind I will mess around with a more patterned texture. Right now its mostly shape and form. I recently just made a spike hawk and some aspen leaf Christmas ornaments. Put them on my website and delivered them to the gallery. The aspen leaves are always a hit. At the studio we have some projects with short deadlines, as always right before the holidays, so Im not sure when Ill be able to make some more bowls. Hopefully no later than January. The next one will be have a design that is chased in it.
Thanks again for looking! :) -
Thanks for the replies. Dont worry about the $$ I have charged appropriately!
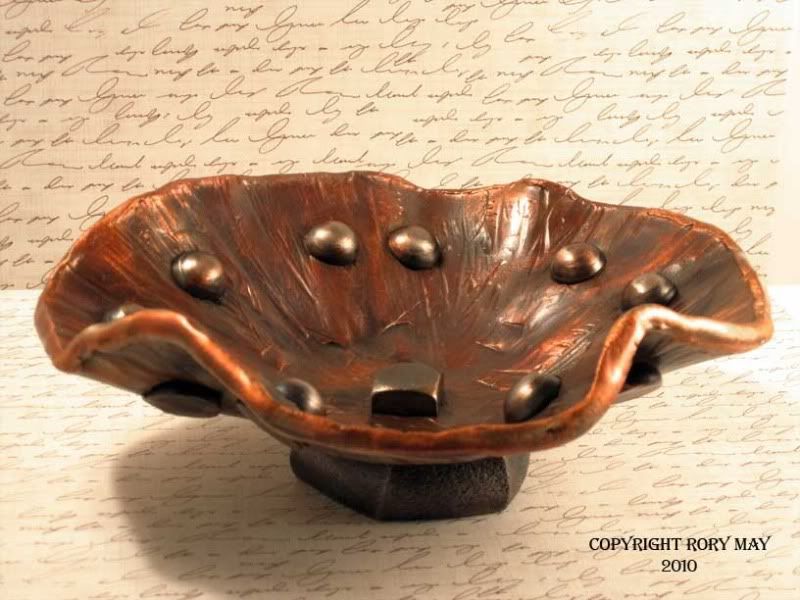
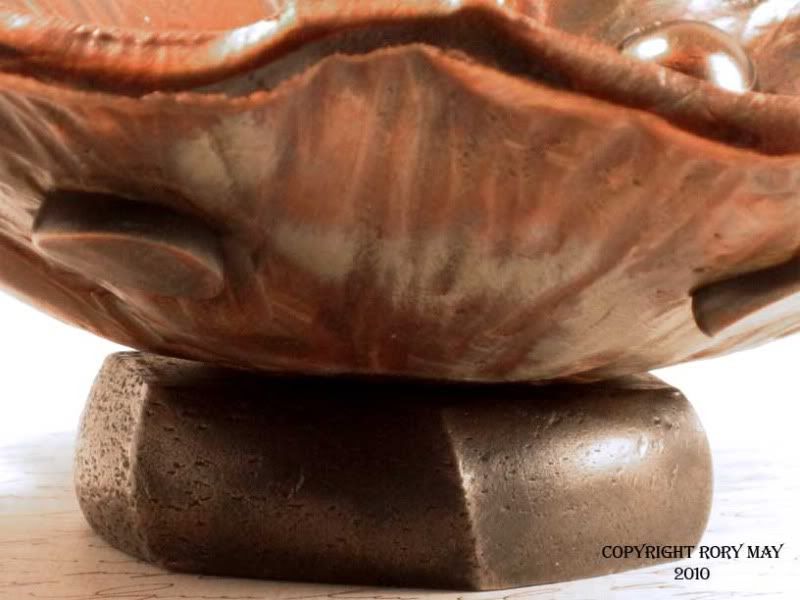
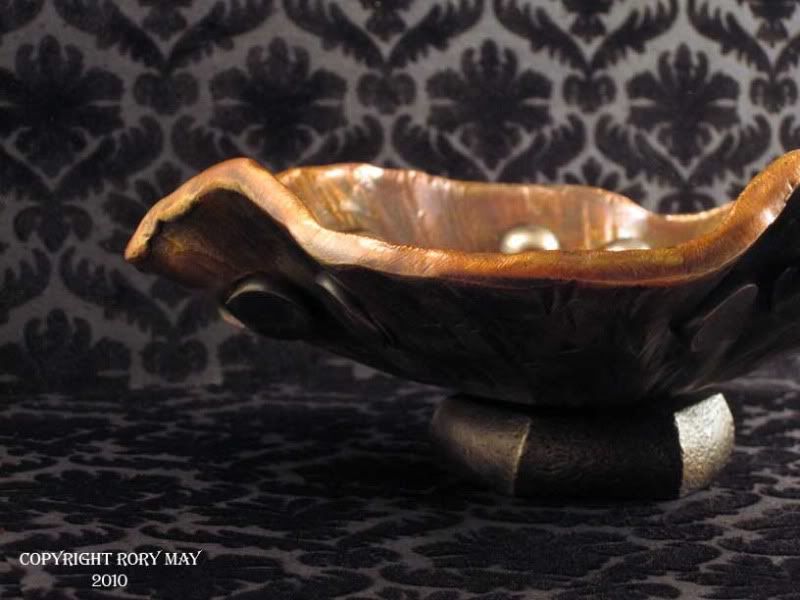
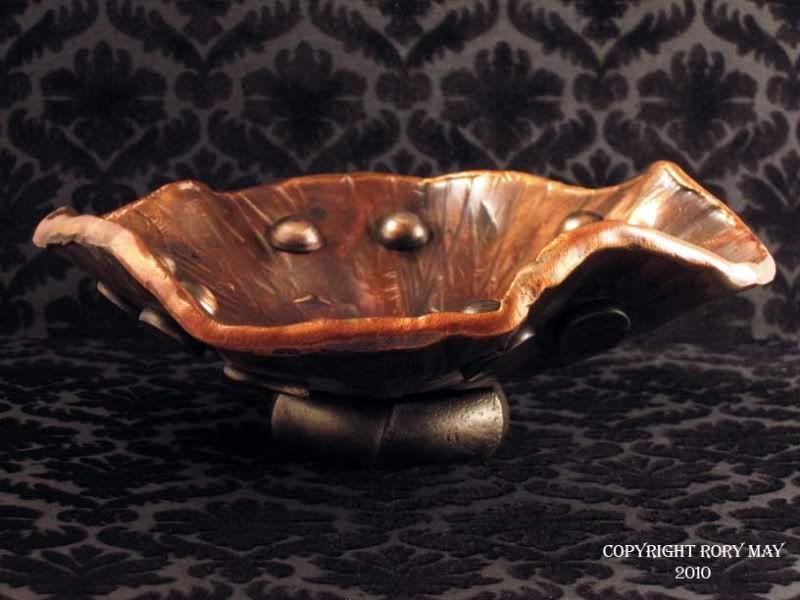
So I took a 10" circle, textured it by hammering scale using the 100lb little giant. I put a aggressive wedge tool on the press and stood the plate on edge and pressed the tool in. Was surprised I could actually control which side the steel upsetted to. None the less, here is the plate version of the bowl before it is sunk.
I did a rubbed brass finish and used some gun bluing to get different values. Sealed it with some paste wax.
Here are some studio pictures for it. Its about 9" wide, 3" tall. Looks different at every angle.


Thanks for looking! :) -
There was a previous post of a smith making a similar bowl. It was pretty inspiring, I changed a couple of techniques and added some of my own ideas. Finally got some time to finish it. Messed around setting up the picture. Enjoy!
Its about 7 1/2" wide, 3" tall. Copper with steel rivets and a steel base. I squished a piece of hex bar for the base. The color was done with heat painted with a clear lacquer.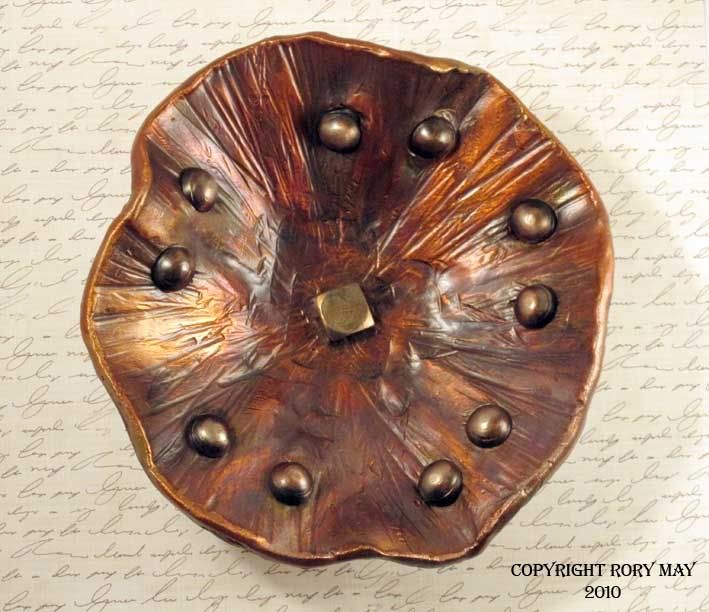
-
To Cool!
Catacombs picture frame
in Metal Sculpture & Carvings
Posted
This was a great little job and had an opportunity to design something totally new to me. The following are some sketches, progress pictures and the final result. The client had a 30″ x 40″ canvas picture and was looking to give it a decorative frame. The content of the picture was distracting at first and after meeting the client she had an attraction to skulls. Working with that, I tried to put some elegance and keep it appealing in the iron work. Thanks for reading and please contact me if you have any questions.
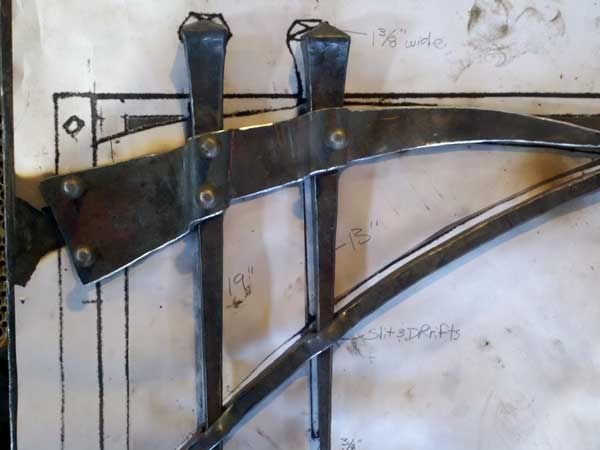
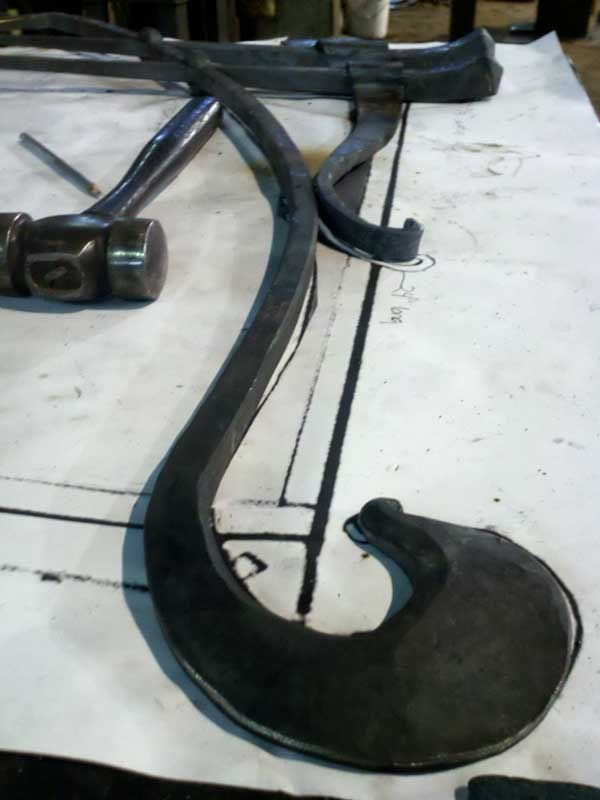
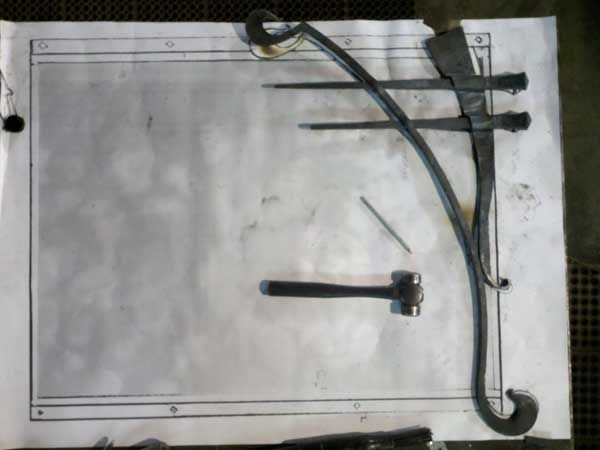

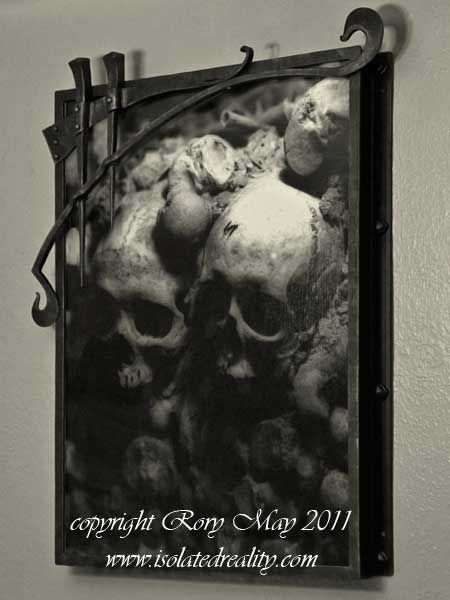
These are some pics of the process from conceptual to finished. About 30 hours of work and weighs in at 38 lbs.
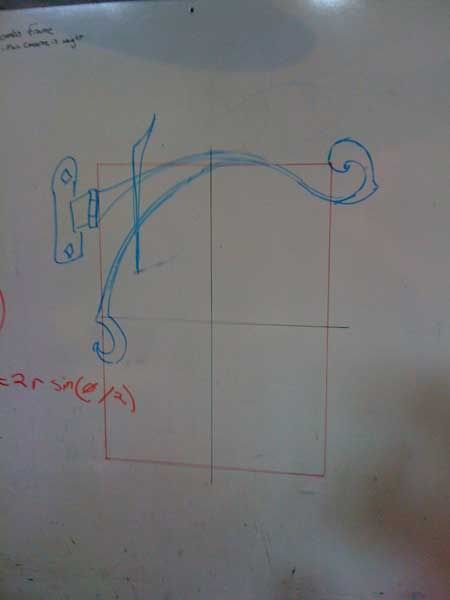
I have a large dry erase board that I sketch on alot. If its something I want to log Ill take a pic of it. There was an idea to hang the picture of to the side so that it could be mounted in a corner, but that got knocked out.
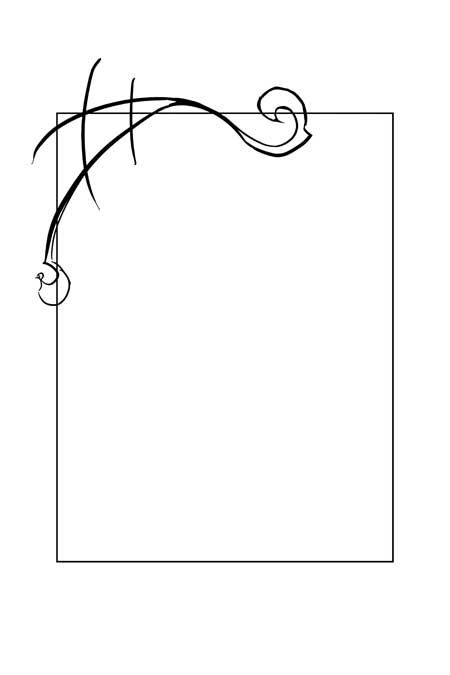
Again a rough version of the design.
She did send me a picture of the picture. I photoshoped her pic in my drawing and made it part of the proposal. Had a couple of designs ideas that were mostly cost driven. She went with the larger of the drawings.
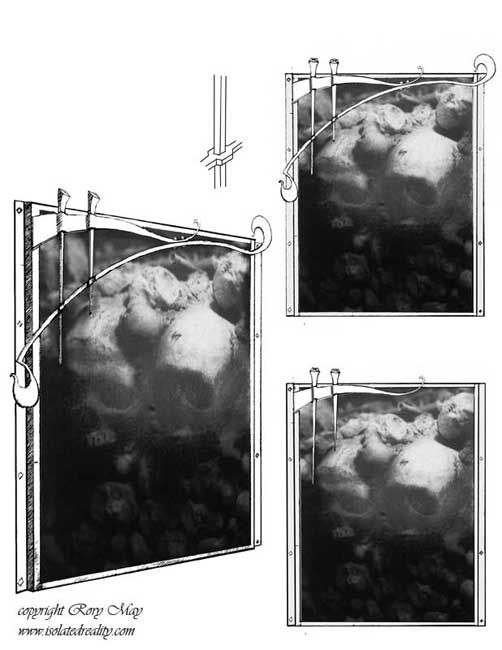
I had my design printed full scale and worked from it there. I could take it off the table if I needed to go back to work, but we were inbetween jobs and I was confident I could punch this out fast.
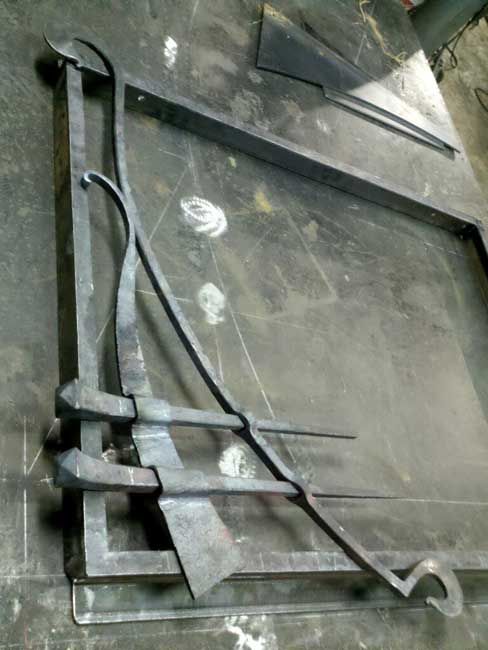
Dry fitting everything.
And the final piece.
thanks for reading! :)