

FieryFurnace
-
Posts
2,106 -
Joined
-
Last visited
Content Type
Profiles
Forums
Articles
Gallery
Downloads
Events
Posts posted by FieryFurnace
-
-
I have a brand new Miller Sycrowave 210 on the way. It includes the leads, gas gauge, foot control, multi-plug, etc.
I typically buy used because it's cheaper, but knowing little about these machines I figured buying new would be on the safe side.
This way I know everything is there and in working order. What happens from there is what I wonder about. :) -
Here is a Linde! Seller seems to think everything is there.
I'd prefer a more portable unit, but it's something to think about I guess.
-
I've been keeping a sharp eye on Craig's! I'm going to throw out some local inquiries and see what it turns up.
-
THAN YOU SOOOOOOO MUCH DSW!
You just gave me what a week's worth of study and online research failed to. I know that stuff takes a while to type out, and I really appreciate you taking the time. Like REALLY!
I'm looking at an older Miller 180sd with cart, torch, and leads. The guy is asking $1500, but I'm having a hard time justifying that when I can get a bran new Miller 165 tig welder off of ebay for around $1800. Plus, a lighter machine is appealing as I will be using the machine to fab boat parts.....so I may need to move around a bit.
I also ran into a guy at the steel yard yesterday with a Lincoln 175 tig/stick machine, but he is undecided about selling.
Once again, thanks for all of the info....it really helps focus my search! -
So I'm looking at Tig welders.
I want an AC/DC machine capable of welding up to 3/16-inch stainless and aluminum. If it welds bigger, fine, but 3/16-inch capable would be fine. A stick/tig combo unit would be great, but tig is what I'm after primarily.
The only name brands I'm familiar with are Miller and Lincoln. In any given fab shop I've walked in, those are the two brands you see lining the walls.
What about some other name brands? I've never even heard of some of these. Are they junk, pretty good, OK, or should I just stick with Lincoln and Miller?
Eastwood
Everlast
Thermal Arc
Longevity
Hobart
Good, bad, ugly?
-
I have seen a few smiths never pick up a brush. First is waste time and heat. As soon as you hit a piece of metal from the fire the scale flies off. Second any scale on the bottom side of the work will just pulverize and become a dust. Third Looking back at old blacksmithing books never mention using a wire brush in the forging process to remove scale.
I'm coming in late in the conversation, but try grinding and polishing a hammer that was forged without brushing and one that has been made with brushing.
I've done both, and I always brush.
In normal, every day forging operations, I'll brush at the end or maybe on the last few heats.
The finish on a hammer that has been brushed before forging is far better than one that was not brushed. This does not mean that one must always brush in every forging operation for the best finish.
It just means that I, working in my shop, with my tools, obtain a better finish on hammers, when using a brush.
-
The guy was undecided and I had another cash offer on the trailer so I sold it for cash! The guy offered to sell the welder to me for the cash price of the trailer ($1300) but I'm putting money aside to buy land, don't really have room for the machine, and would have to learn how to stick and tig from scratch.
I'll pick something up, later on down the road.
In the mean time, if anyone wants to loan me $50K to buy my dream property for sale 1/4-mile from my current shop, I would be rather grateful! Lol -
Hey folks,
I'm being offered a Lincoln V350 pro power welder on trade.
The welder is described as "nice," with a brand new mig welding gun, an almost new 40 pound role of .045 wire, with an IF-72 wire feeder.
Trade value is to a trailer I'm trying to sell for between $1200-$1500.
The Lincoln website says it will do mig, tig, and stick welding and will run off of single and three phase power.
Does anyone have experience with this model and what are your thoughts on Lincoln machines in general.
I have a Miller 175 mig welder. I'm wondering if the mig capabilities and welder quality will be comparable to what I have already or a step up. Stick and tig capabilities would be a huge improvement for my shop I know, but what about machine quality?
Thanks for any input!
Dave -
I would second the request for pictures. I'm thinking of building an air hammer from the ground up this winter.
My current hammer is set up with a roller valve, and has pretty good control.
I've been looking at cylinders and it does not seem that Norgren has a 2.5-inch x 12-inch with 1/2-inch ports, not to mention 3/4-inch. Did you just swap out lines and keep 1/2-inch ports?
More info would be greatly appreciated here!
-
I bought a new roller valve a couple years ago from granger. Been going strong, no problems! My hammer has a small 45 degree angle ground out of the corner where the head moves up and contacts the roller valve.
-
Woodweavil,
Having worked on and owned smaller (80-ish pound) anvils, and worked on and owned larger (200-300 pound) anvils, let me tell you that it is not so much size that matters, as the mounting job. Buy you a 100-150 pound anvil, talk to David Gaddis about how to properly build a stand, and then bolt or stake that stand down to the floor or ground like you are prepping for a tornado.
I've literally seen a 1000 pound anvil start to walk if it's stand because it was not mounted well, while I've also seen a little 80 pound anvil more solid than anything because it was fastened down correctly.
Having said that, making a 200-300 pound anvil on your own would be a fun project. -
I'm getting in Wednesday! Look for the Fiery Furnace Forge Banner. I'll probably be forging some Friday, at my booth, and will have tools for sale! Looking forward to meeting new faces and seeing the old ones.
-
I'll give it a whirl and let you know if it makes any difference for my application! :)
-
I punch up to 2.5 inch solids several times a week. I use peanut oil as a coolant for the punch. I've never used anything for lubricant specifically. I don't even cool punches if I'm punching bar smaller than 3/4-inch or so.
-
Here are the photos!


-
Neat to see this old thread revived. I was still smithing on a homemade portable shop trailer, under the trees in the front yard with nothing more than an anvil, blower, homemade forge, and small post-vise. Back then I had a grand total of two hammers and about three pairs of tongs. It's nice to remember those days, but thank GOD they are over! :) I don't miss frozen blowers, snow on anvil faces, etc, etc.
I have not used bees-wax or any mixture containing bees-wax, for a couple years now. I use linseed oil extensively. In my opinion it provides a better finish, when applied correctly, and is not tacky like bees-wax mixtures tend to be. I've been using it two ways. Applied cold, allowed to set, and then the excess is wiped off with a rag. Applied cold and then backed for 10-30 minutes at 200 degrees in an oven, the excess being wiped off while the product is hot. Both methods work very well.
I also use Krylon clear coat from walmart on a few items, but mostly I've switched over to clear, flat, powder coat.
For those of you using bees-wax mixtures or any oil mixtures, the best applicator I've EVER used, is an old Kevlar, heat-resistant glove. They cost a couple dollars from Airgas or another welder supply store, they are heat-resistant so they don't burn up when applied to moderately hot product, and you were just going to throw the one with holes in it away, anyway.
I made a steel handle and wrapped the steel around the wadded up glove. Works like a charm!
-
I did extensive wire wheeling and then heavy acetone rubbing everywhere.
I've got some more photos but I can't copy and paste an IMG link into the message body right now for some reason. I'll get 'em later.
-
I'm in Adair Co! Full time smith and not enough time to host or organize anything. When anyone offers to start a group the interest is high and attendence low. I think we are all too spread out and no one is able to step to the plate to boost enthusiasm, and organize group events.
-
I had the piece powder coated, and am very pleased. I set up and took some photos but I need to find someone to edit them for me.
-
:) that would be pretty good!
-
Ha, no bottle opener this time! :)
-
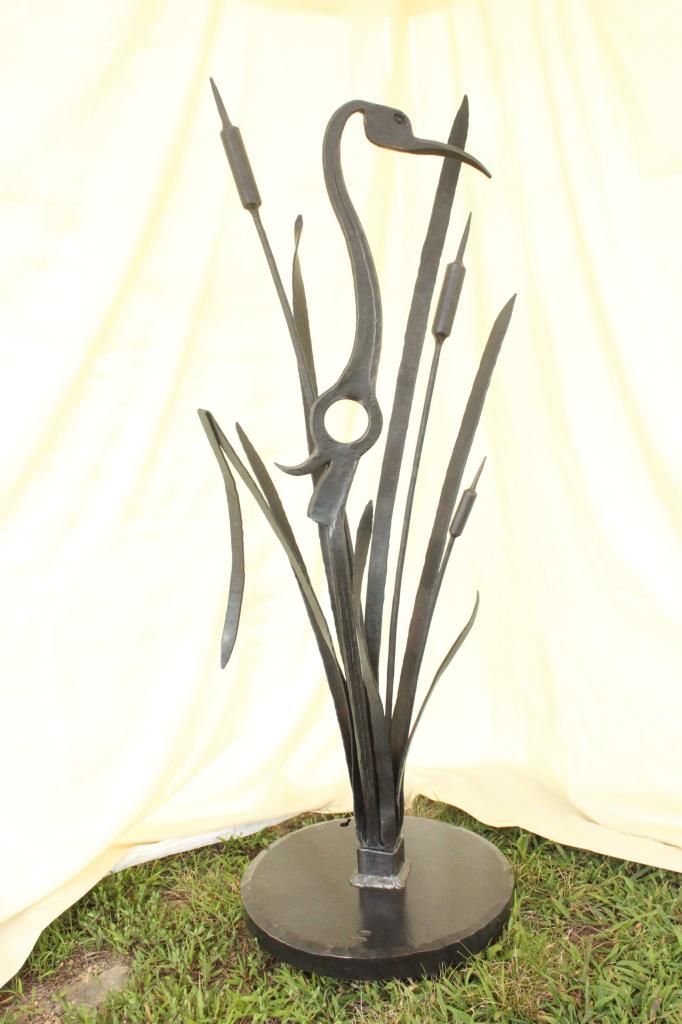
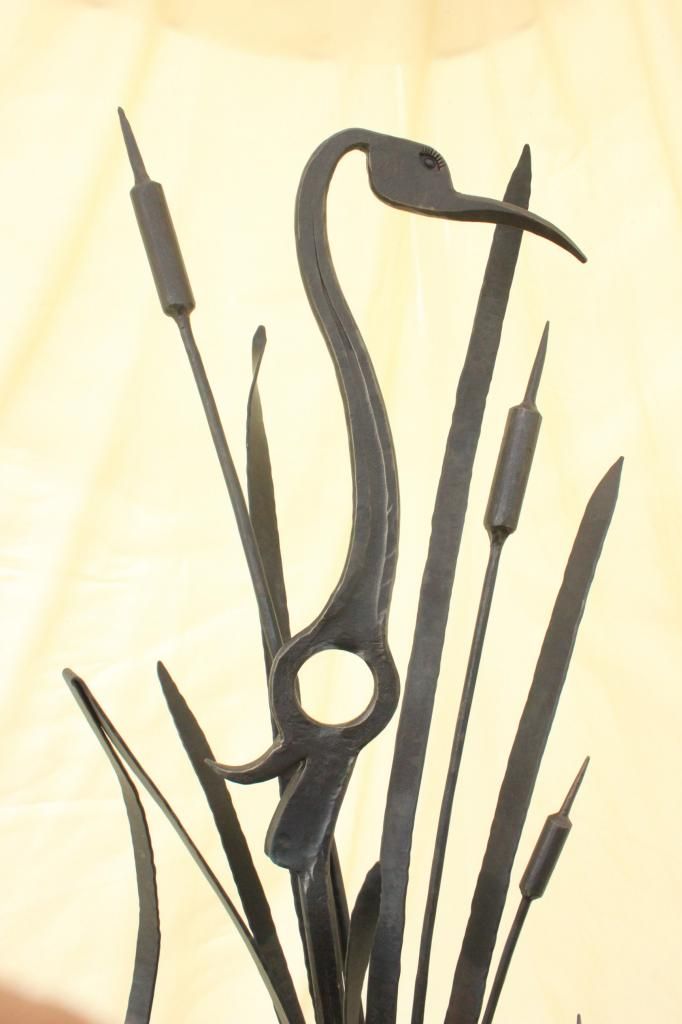
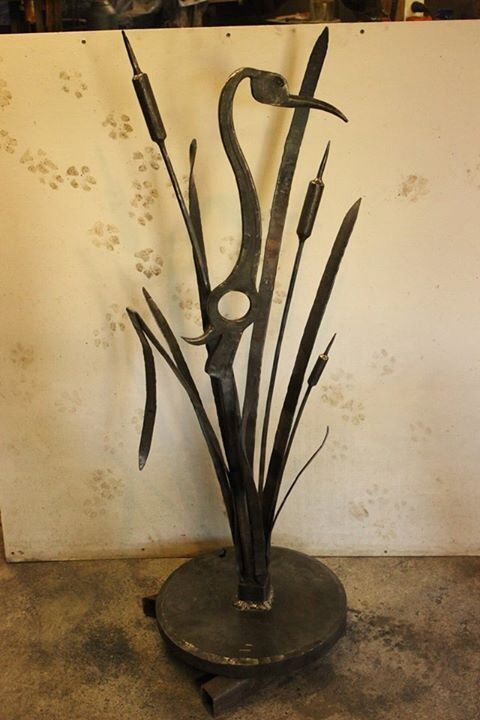
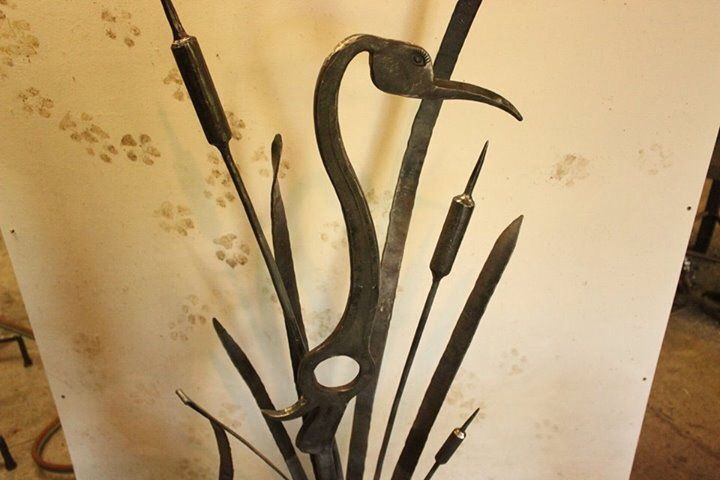
This is a Brian Brazeal inspired crane and cattail sculpture. During the young smiths 2012 trip to the ABANA, we made and demonstrated a couple crane and cattail frames. Since then, the International Young Smiths 2013 team did a larger crane sculpture (Don't recall if it had cattails or not,) and Alec Steel from England (both a 2012 and 2013 young smith and now hosting the 2014 team out of his own shop,) has done a fantastic large crane sculpture as a commission piece.
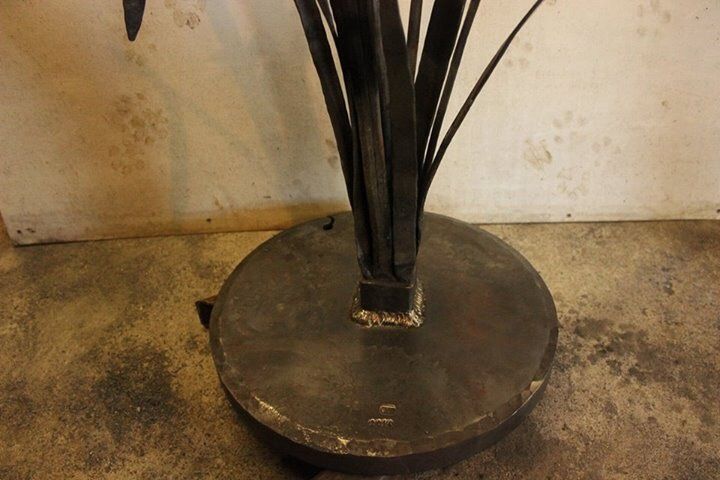
My steel yard recently got some plates in that are 1.5-inch thick, 16.25-inch in diameter, and weighing in at 88 pounds each. Sculpture base is the first thing that came to mind when I saw them.
So I bought a couple and did a crane and cattail sculpture over the last two days. There were two of us working on most of it and it took a total of 24 man hours to complete. (Too long I know, but my striker is not a blacksmith, and the largest crane I've done prior to this was made from 3/8x1-inch flat bar, so I was a little slow at one on this scale.)
Anyway, here are some specs.
The entire sculpture stands 48-inches tall.
I have not weighed it yet, but I'm guessing it comes in at about 120 or 130 pounds. Very bottom heavy, and stable, thanks to the base plate.
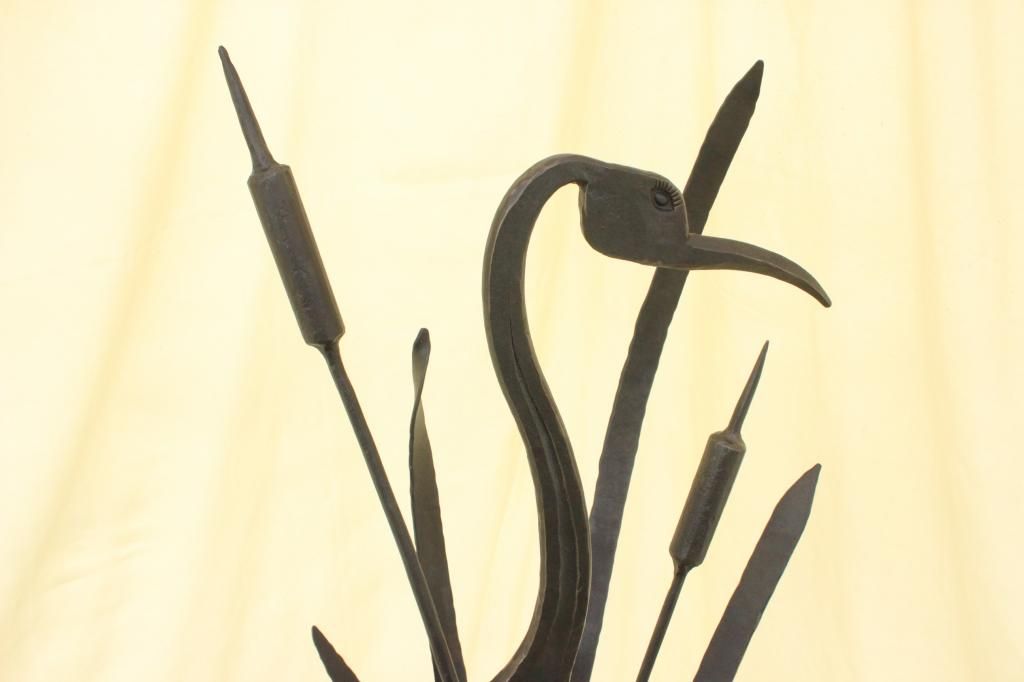
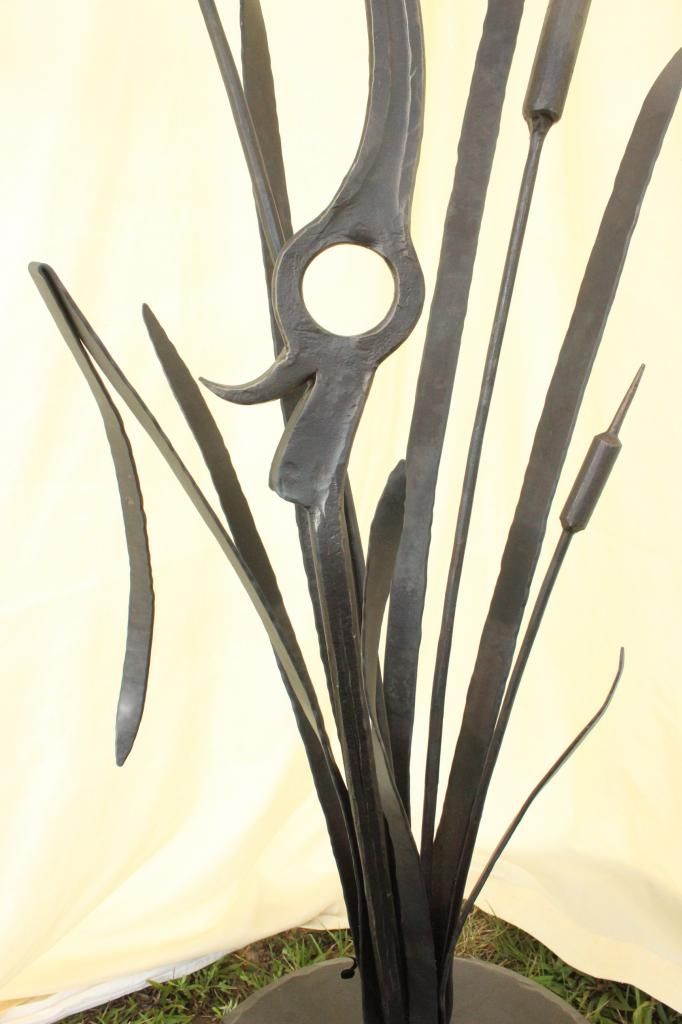
The bird is made from 5/16x2.5-inch flat bar, and yes, I intentionally forged and left the hollows in it. The hole in the center was punched, drifted, then forged, and is about 2.5-inches in diameter.
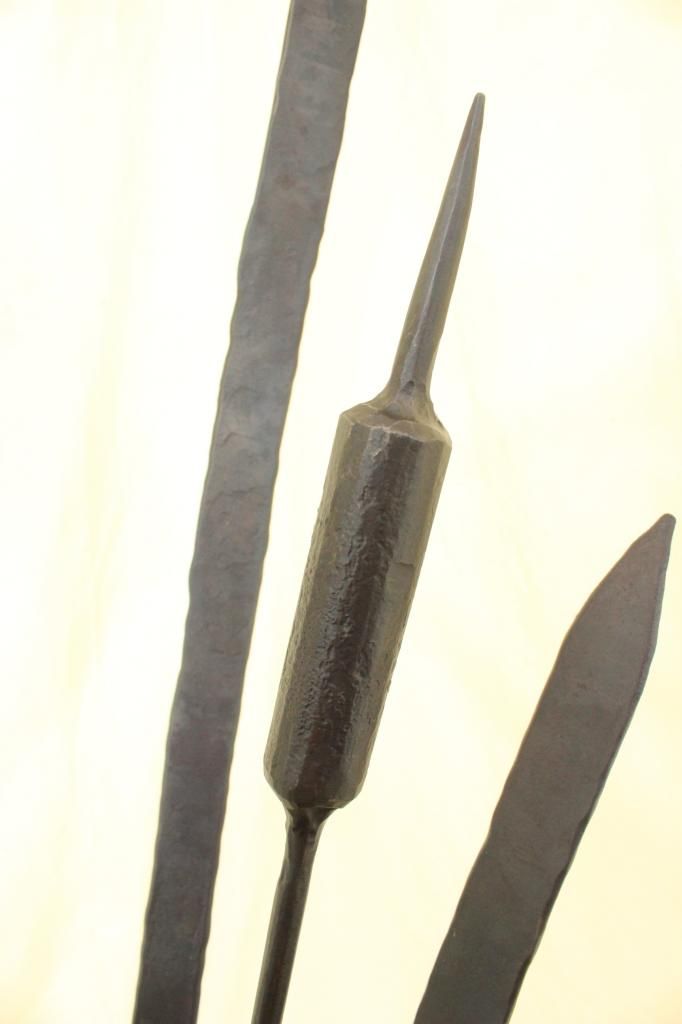
There are three cattails, one made from 5/8-inch round and the other two from 1 1/8-inch round.
There are seven reeds, three made from 5/8-inch square and the others made from 1/2-inch square.
All of the reeds, cattails, and the bird, come together in a forge-welded bundle. (Another Brazeal technique.)
The bundle consists of all of the sculpture pieces, plus spacers, to make it square, and then a collar. I tack welded (forge welded tack, not mig,) the pieces together, building up the entire bundle, Then wrapped and forge welded the collar on. Pre-collar the bundle was 2-inches square, and after the collar it was a bit over 2.5-inches square.
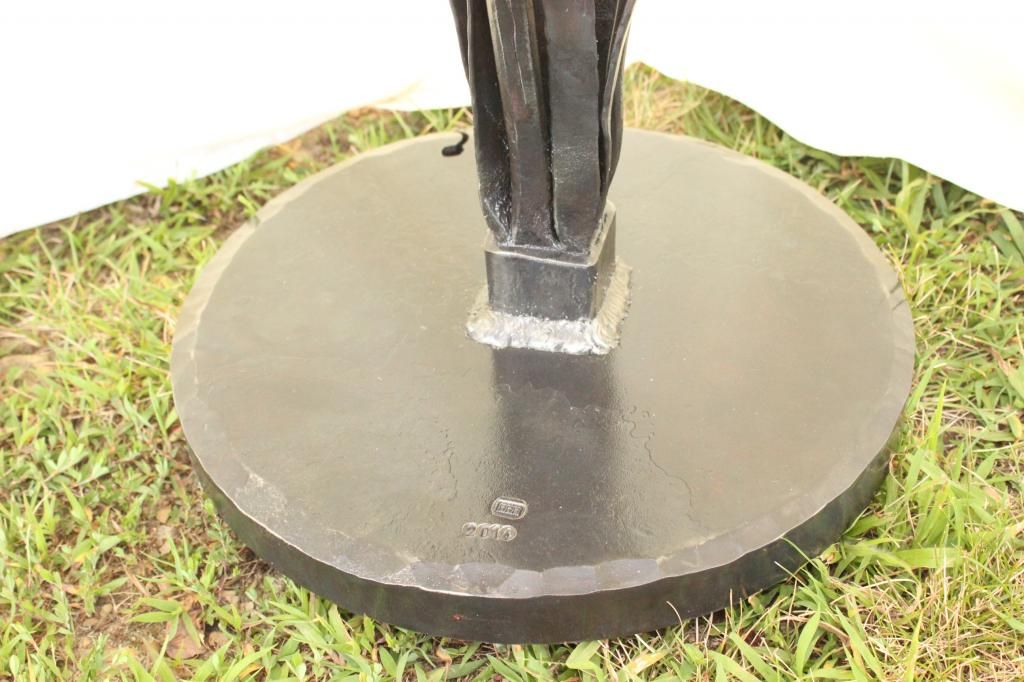
Yes, the sculpture is mig-welded onto the base. Get over it! LOL Deal with it! :)
There was no way for me to do a real mortise and tenon joint here, although I might could have done a mortise and tenon, and then welded the tenon from the underside. (Suggested after the fact by another smith.) However, I'm not sure if my drill press throat will drill the center of that plate. (I'll check and may do that on the next piece.)
And no I did not grind the weld down either. It's welded, and I don't mind people knowing it was welded. It is a metal working technique, and I do metal work. :)
The piece still requires some finish clean-up and some sort of finish coat. (Torn between oil and powder coat.)
-
On exterior items I use straight linseed, sometimes applied with the metal cold, sometimes baked on. (An old Kevlar, heat resistant glove makes an excellent applicator when you are working with hot material. Peanut oil is also good.
I also use clear powder coat on exterior items.
On interior items I use primarily powder coat, but sometimes items like renaissance wax, bri-wax, Johnson's paste wax. Occasionally I'll oil indoor items, especially things like pot racks, and anything more traditional in nature.
I have used plain old krylon clear coat from Walmart. (Use flat, not gloss! Gloss looks like plastic.) It is decent, but I rarely use it now that I have access to powder coat services.
If you want to get a real deep, even, black sheen, rub graphite powder on before coating with clear.
The various coatings all have their various applications.
A multi-millionaire probably will not want to go rub his 30 foot wide x 12 foot tall, forged gate and 50 foot of matching railing, with oil every six months, but the traditionalist with strap hinges on his barn door may not mind. -
EtownAndrew posted down in the events section, about Quadstate 2014.
I have been asked to be a demonstrator there and to pick a mentor or smith who has been an inspiration to me, to work with me.
I had a few thoughts on who to ask because there are so many that have helped me, and I've learned from so many. Some of the greatest inspiration I've received has come from people I've never yet even met.
A few weeks ago, I acted as Mr Clay Spencer's assistant instructor at John C Campbell, for his traditional joinery class.
Afterwards, I asked him if he would help me with the Quadstate demonstrations, and he agreed.
We are discussing possibilities of what to demonstrate, over the weekend. Right now, the only parameter I have, is to stick with traditional iron work.
We will have a total of 9.5 hours to work. 6.5 hours is official demonstration time with an additional 3 hours to finish up informally on Sunday.
So the question is, what would you like to see done? If you have something you would like to see us make, or particular techniques / elements you'd like to see covered, then let me know.
Include pictures if possible.
Thanks!


Question about 1045 for a hot cut
in Hot Cuts, Anvil devils, metal cutting on the anvil.
Posted
I have never used 1045 in that application.
I do use it for hammers. Cold 1045 is harder than hot steel and will hold up as long as you are careful to maintain it and obviously keep from hitting it.
I use 4140 for hot-cuts. Try getting car axles from your local scrap yard. They make good hot-cuts.