twodogzz
-
Posts
53 -
Joined
-
Last visited
Content Type
Profiles
Forums
Articles
Gallery
Downloads
Events
Everything posted by twodogzz
-
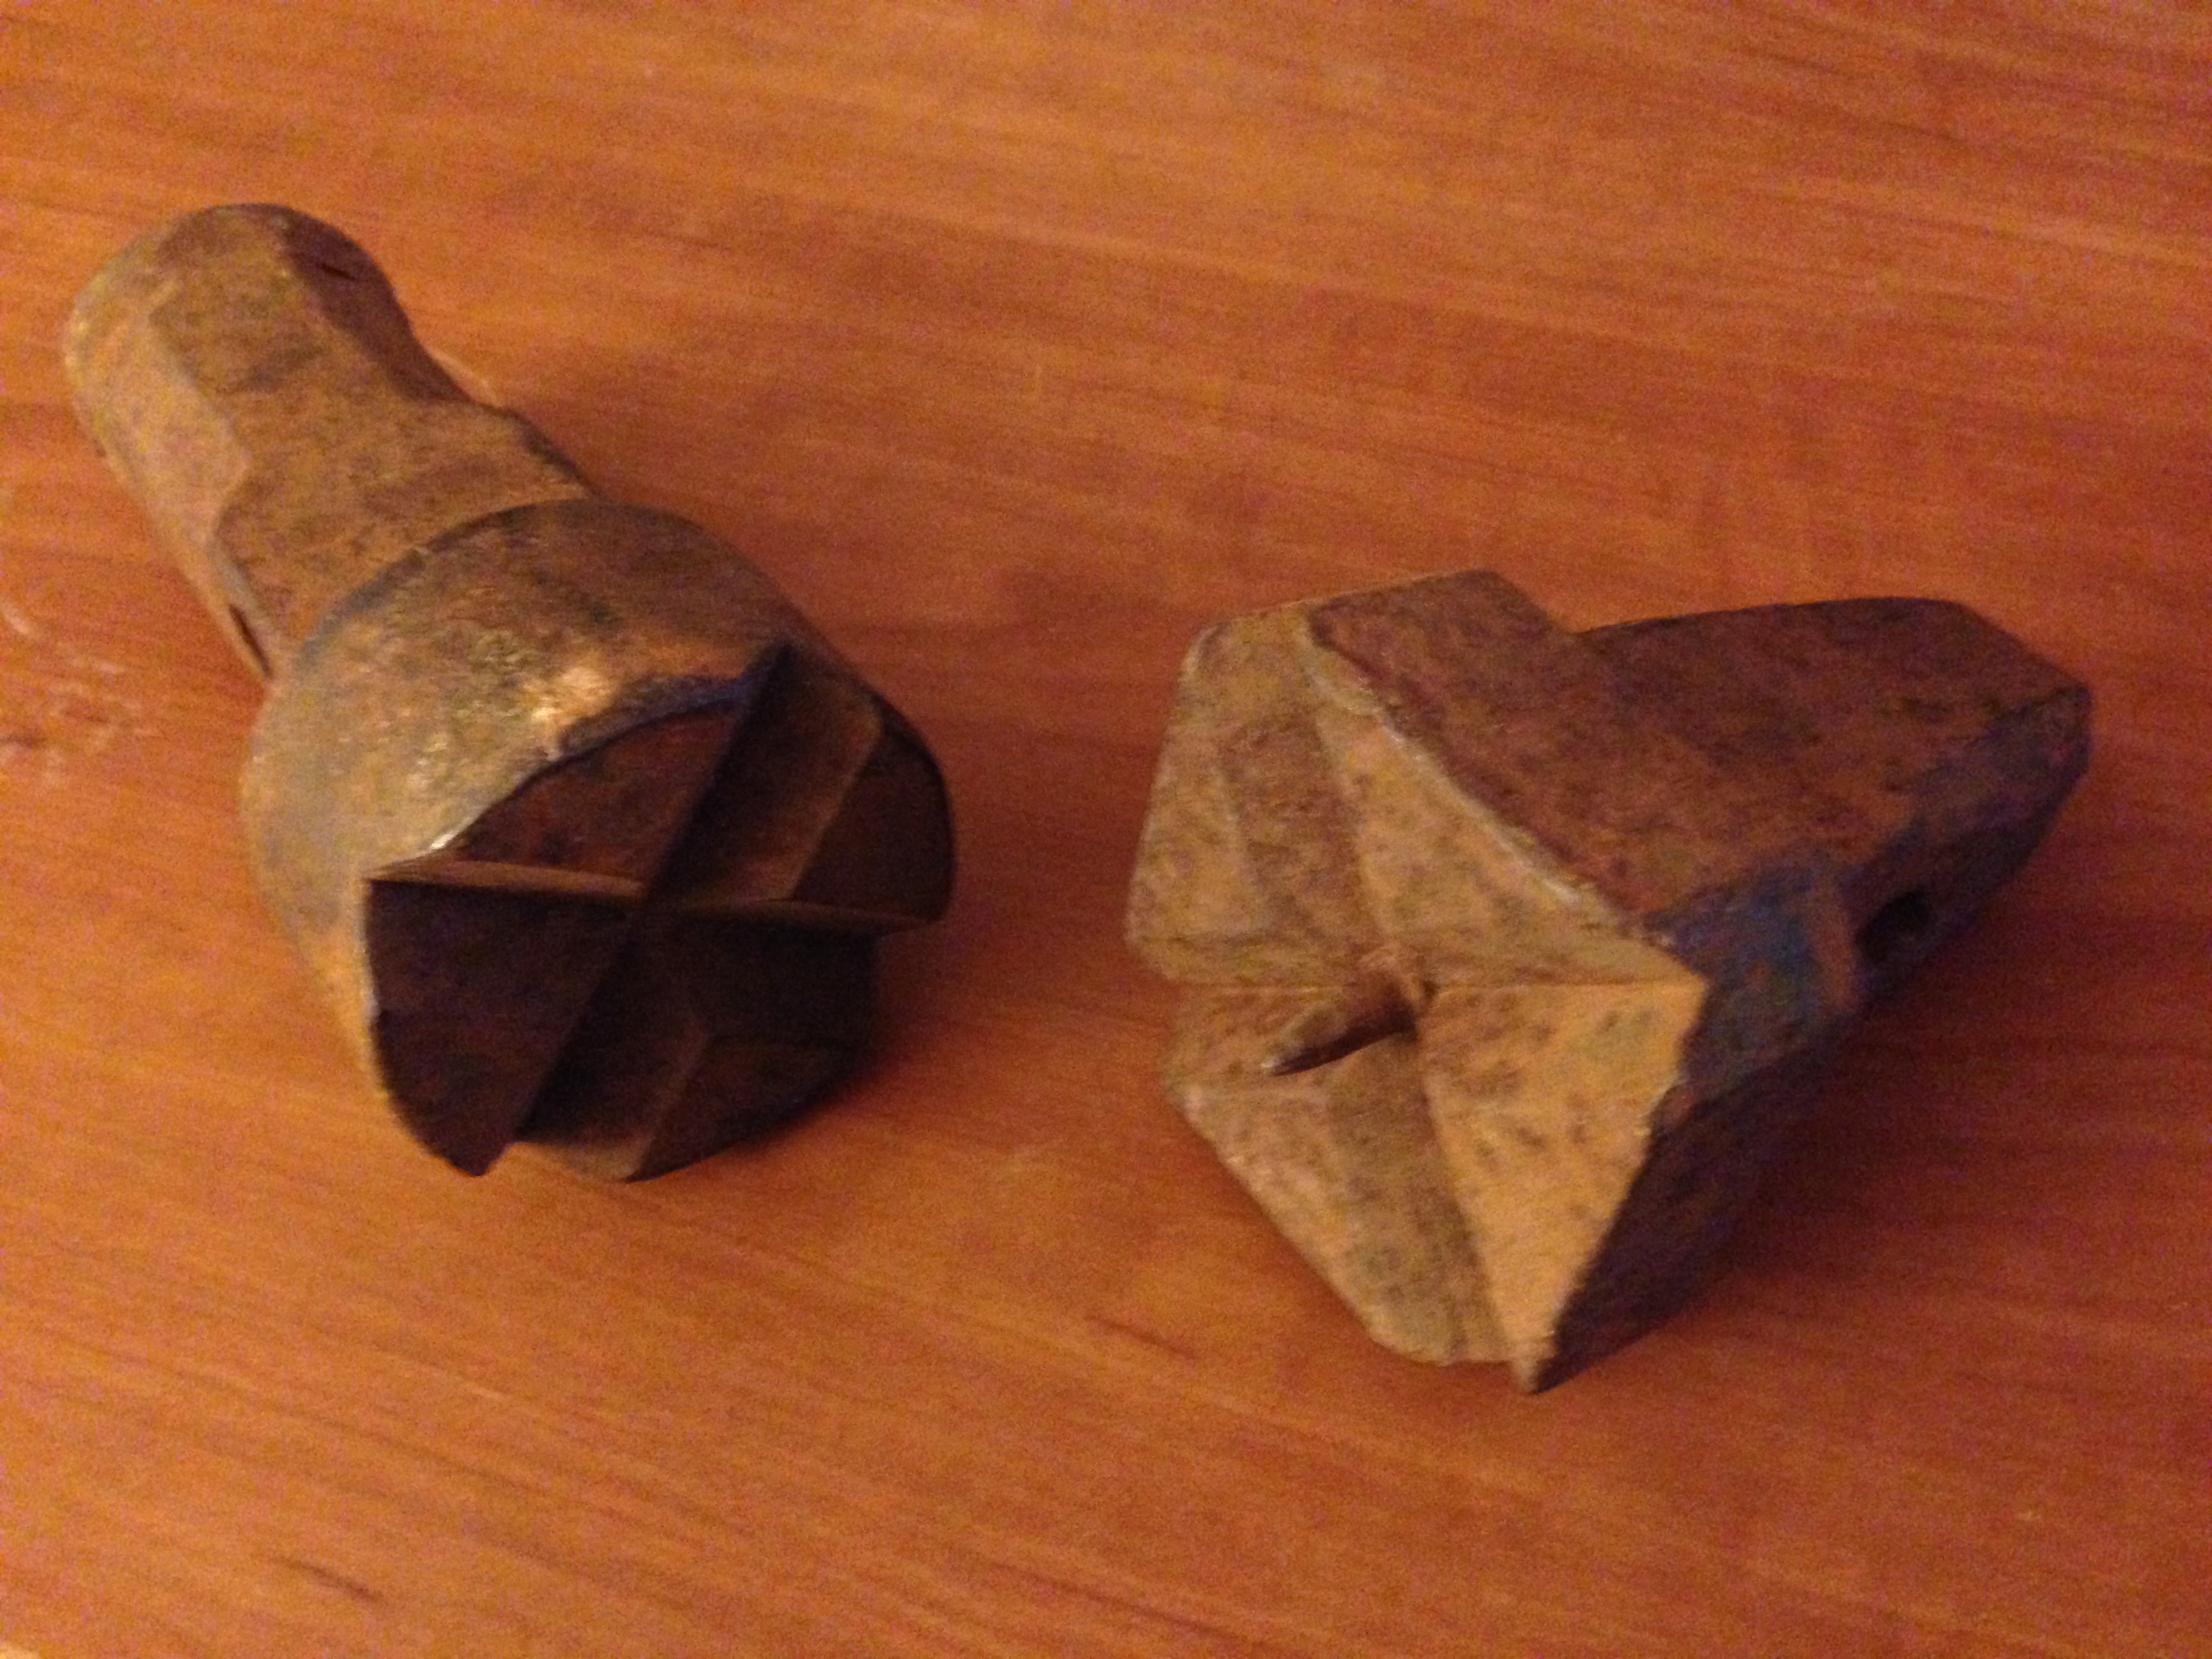
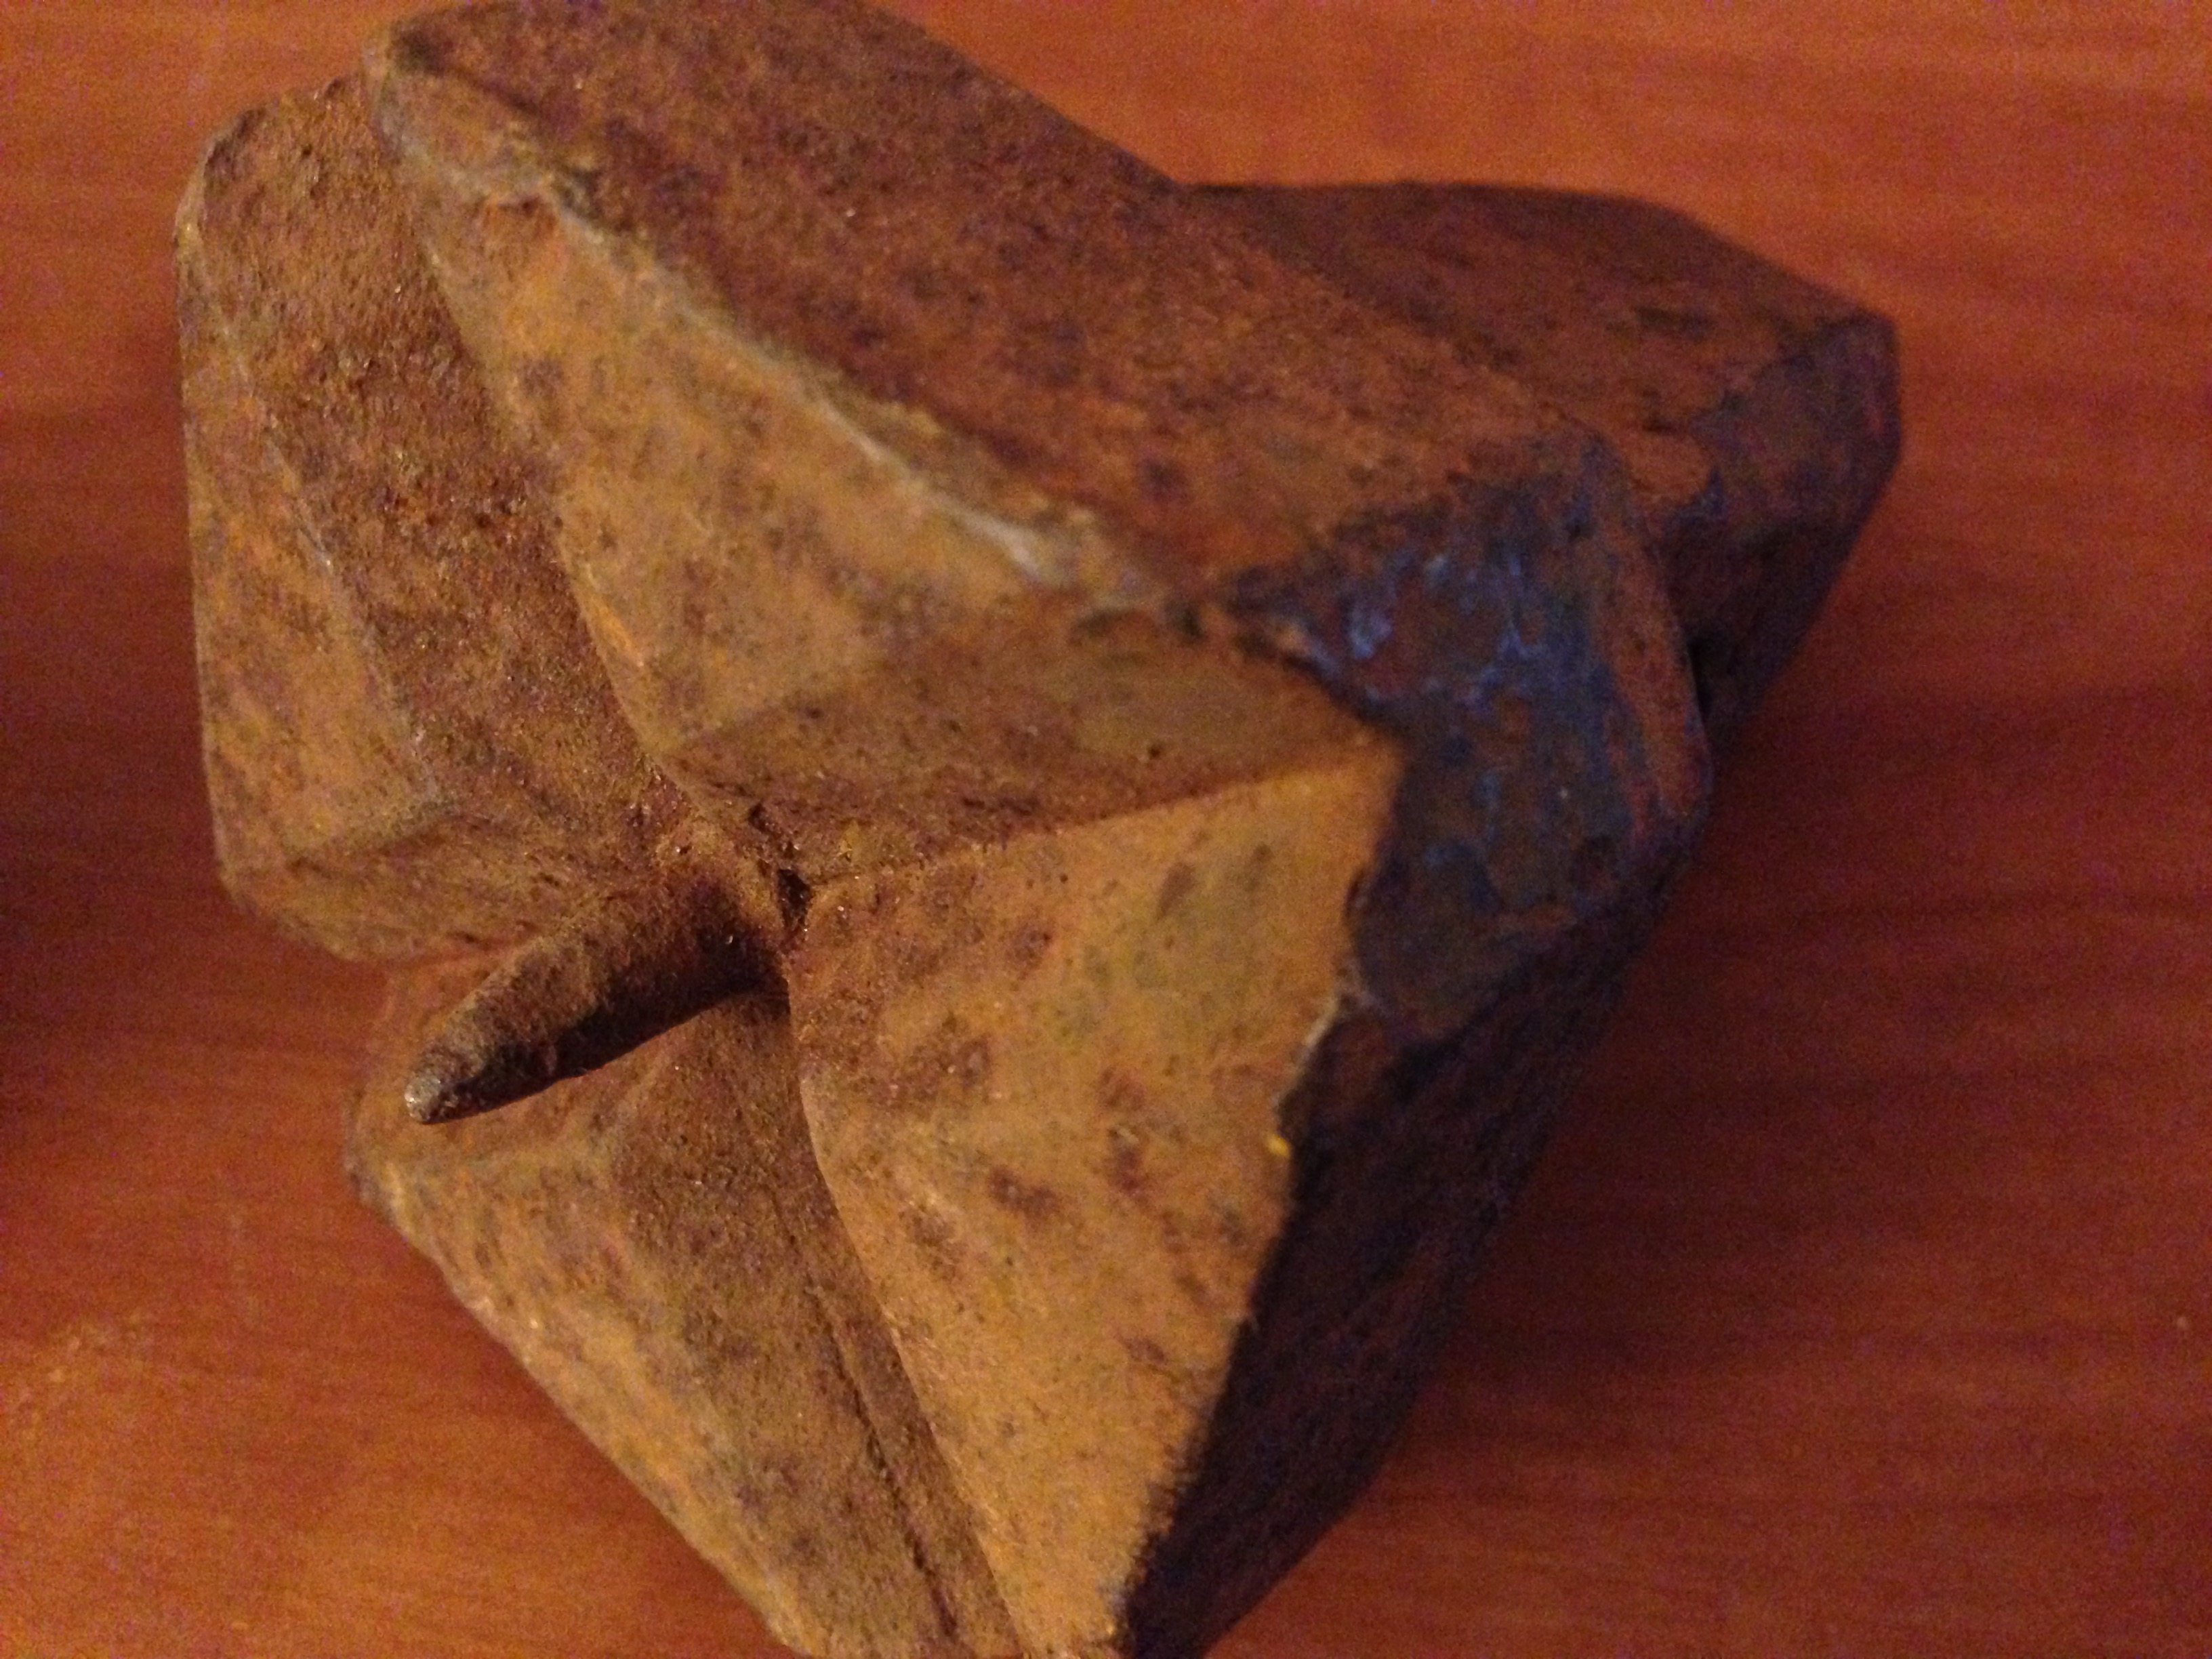
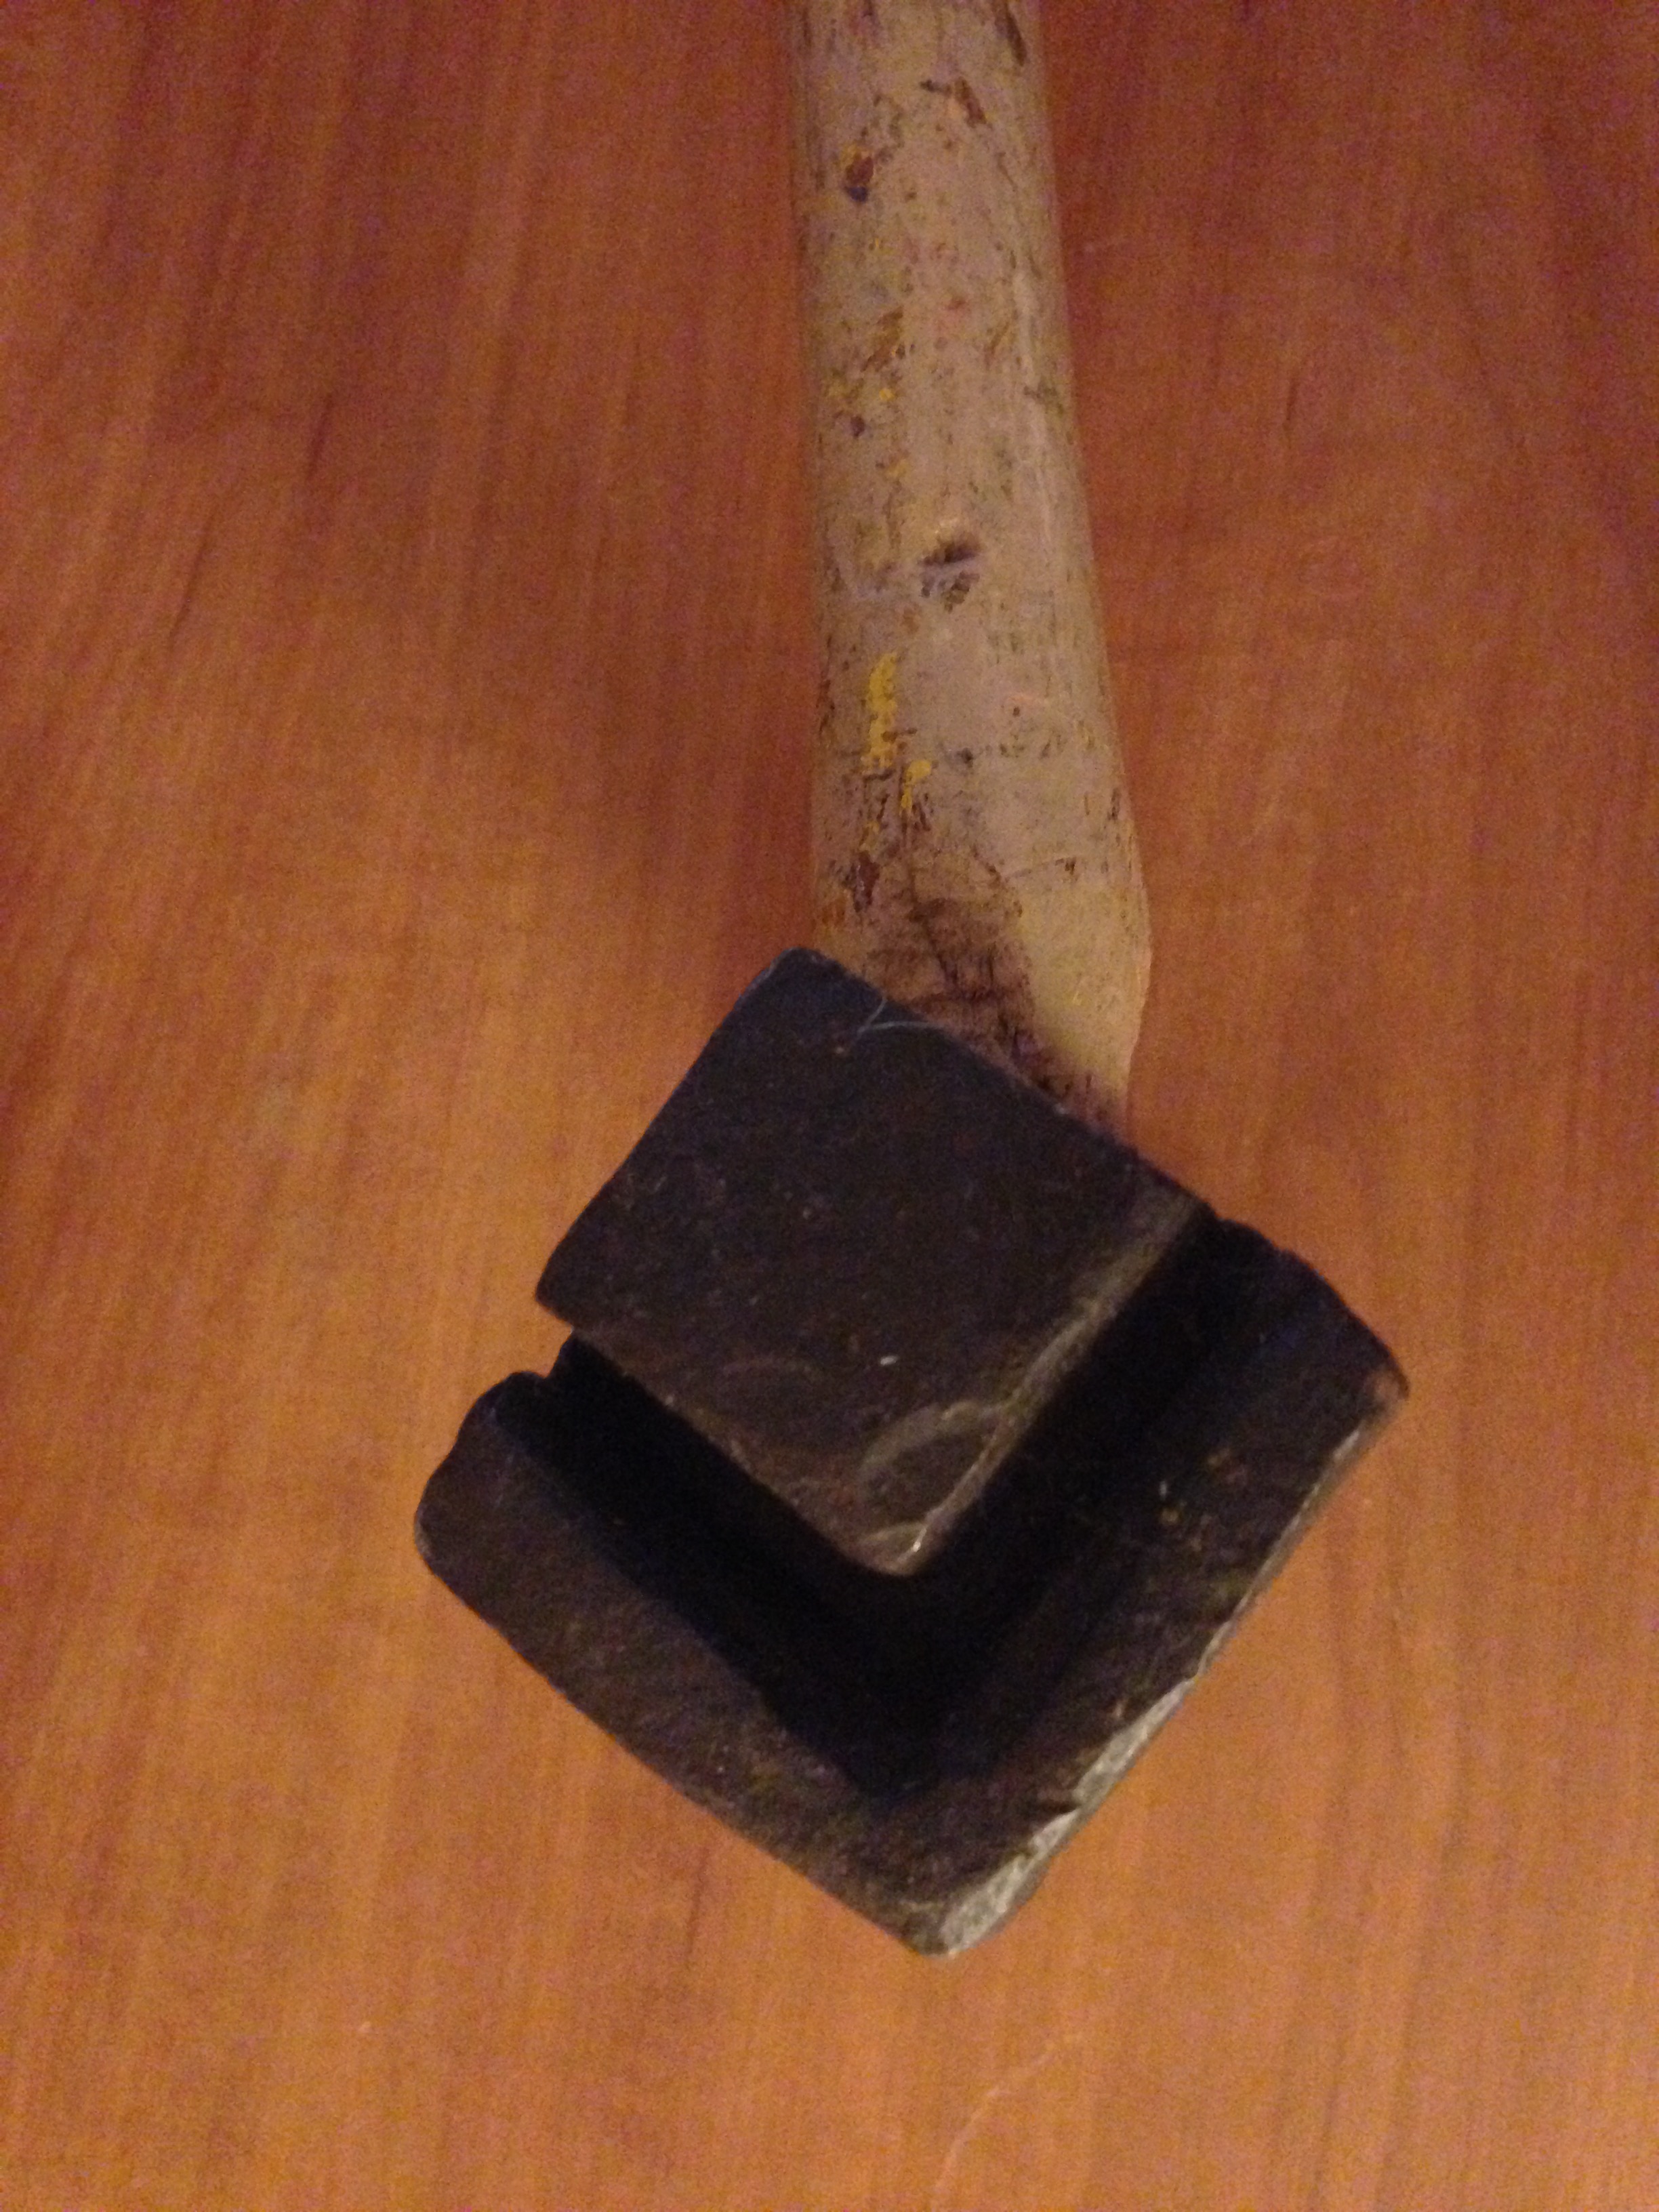
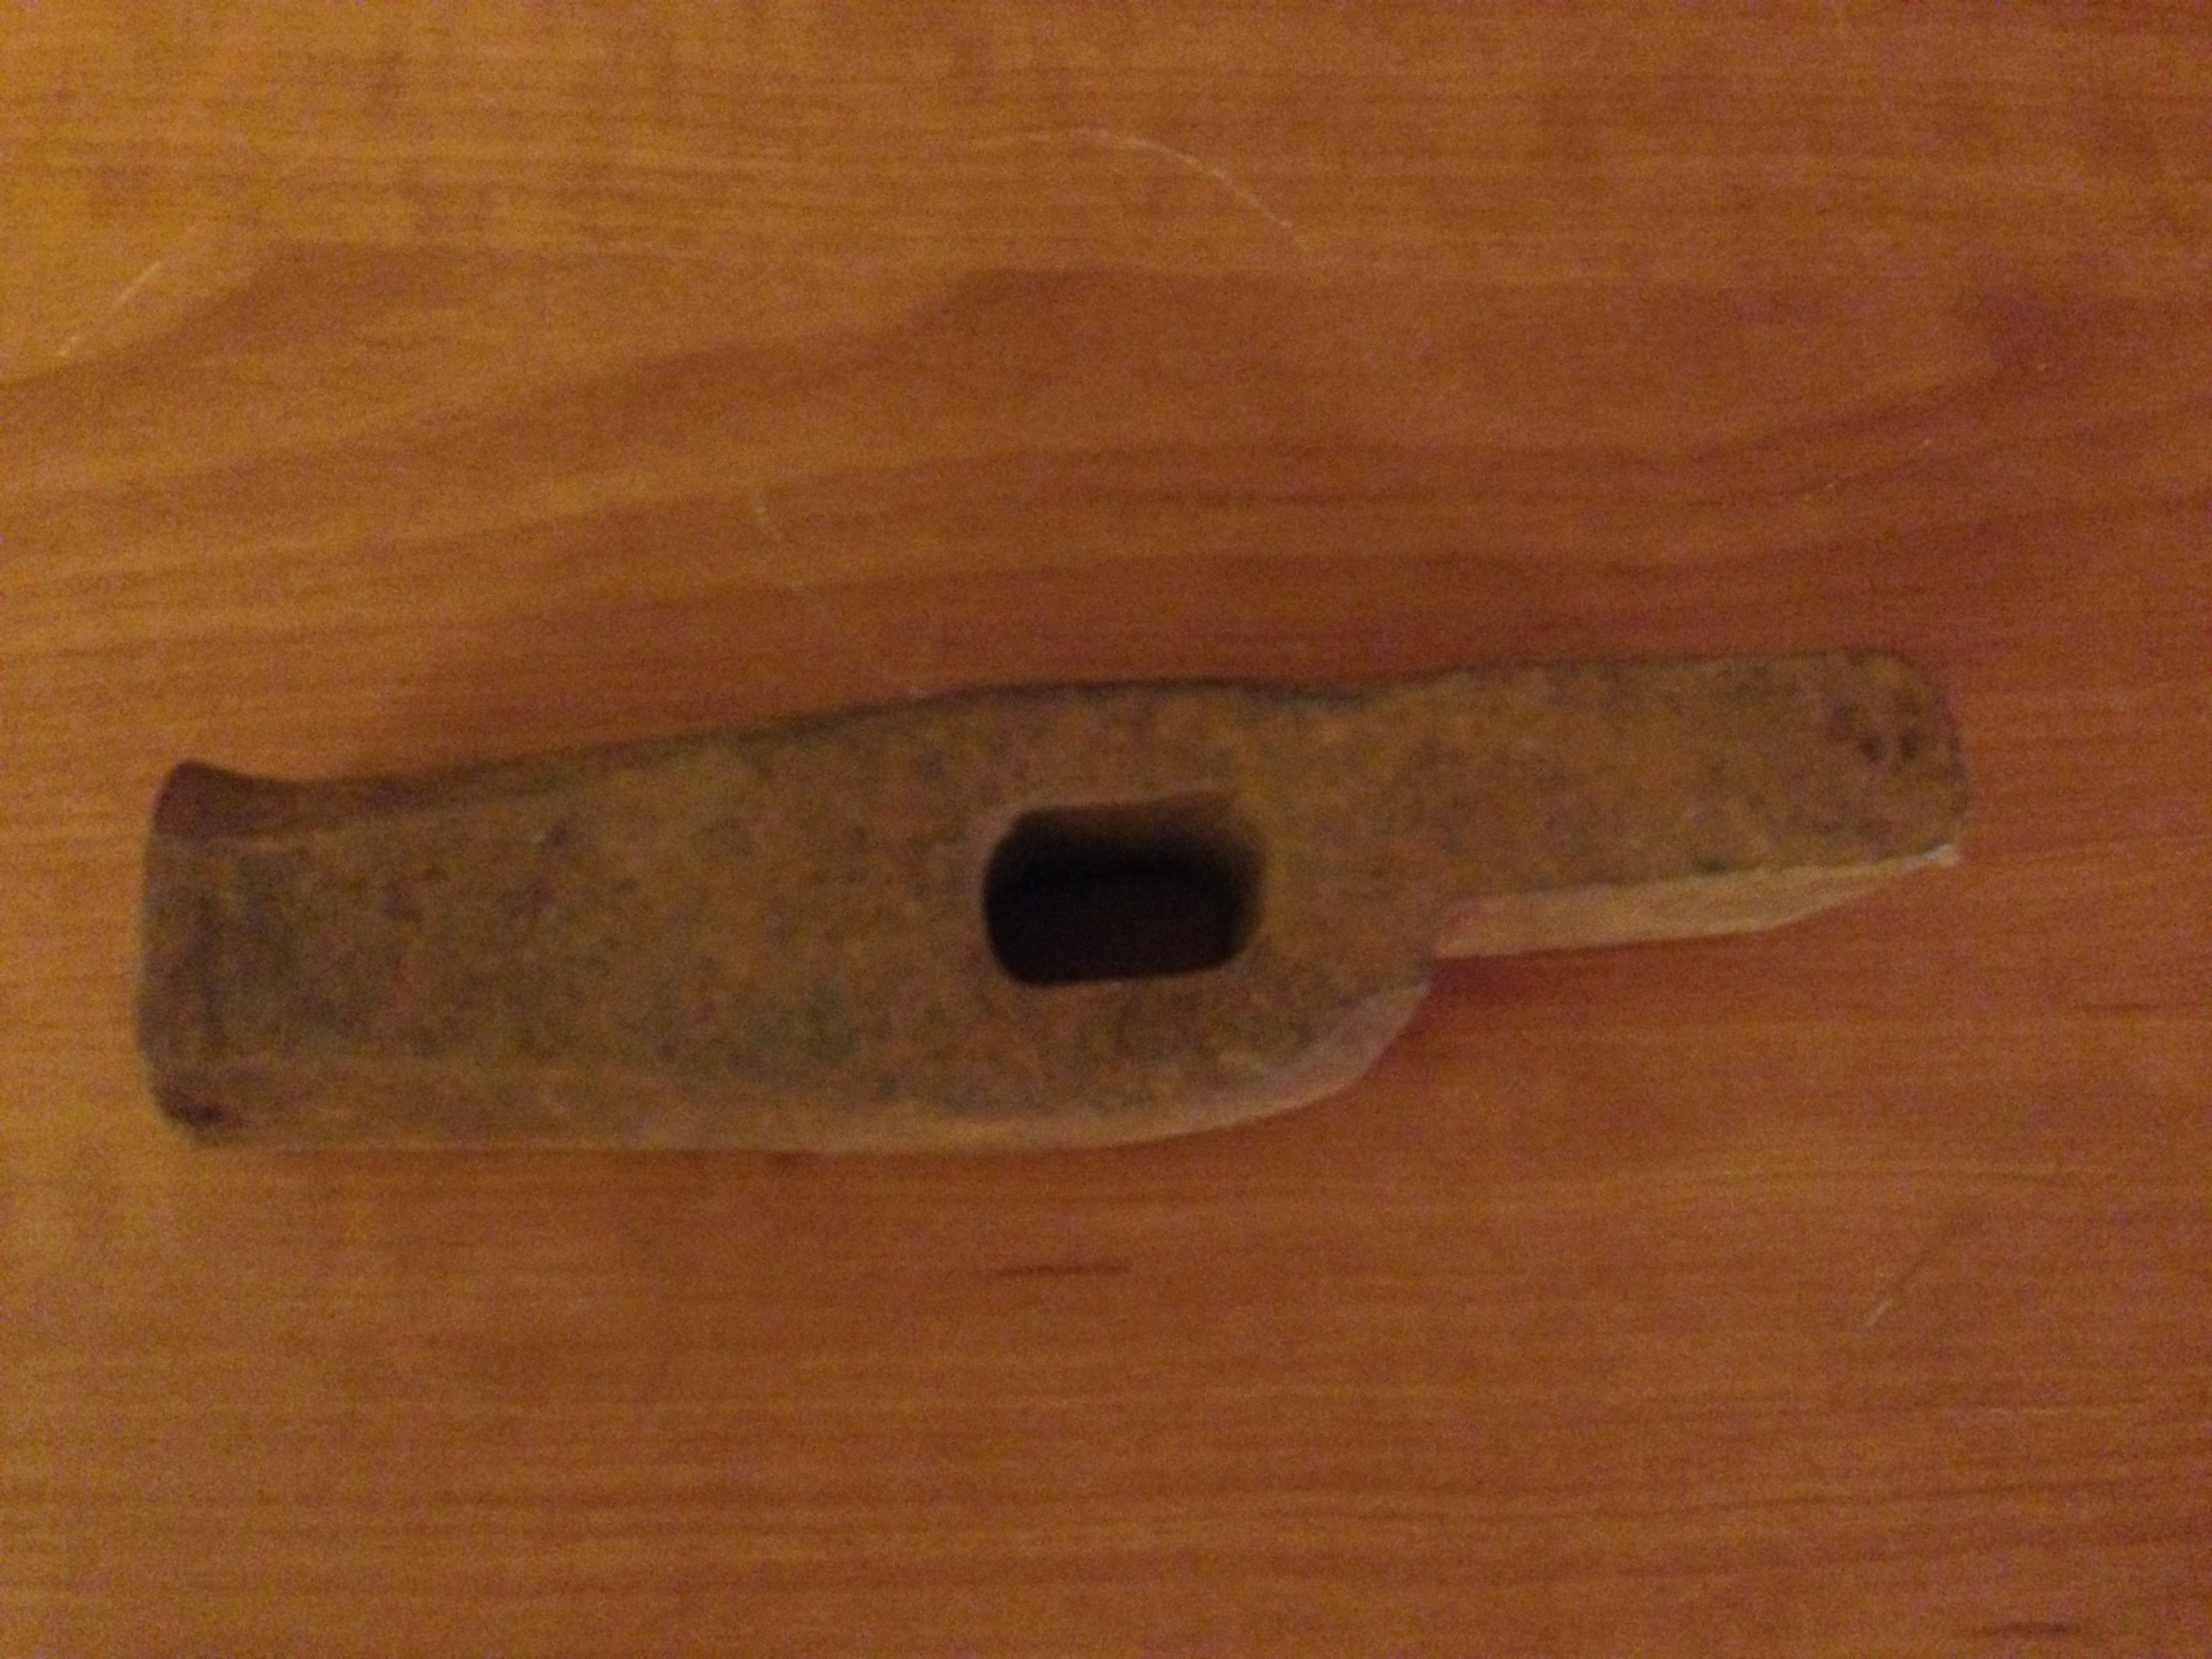
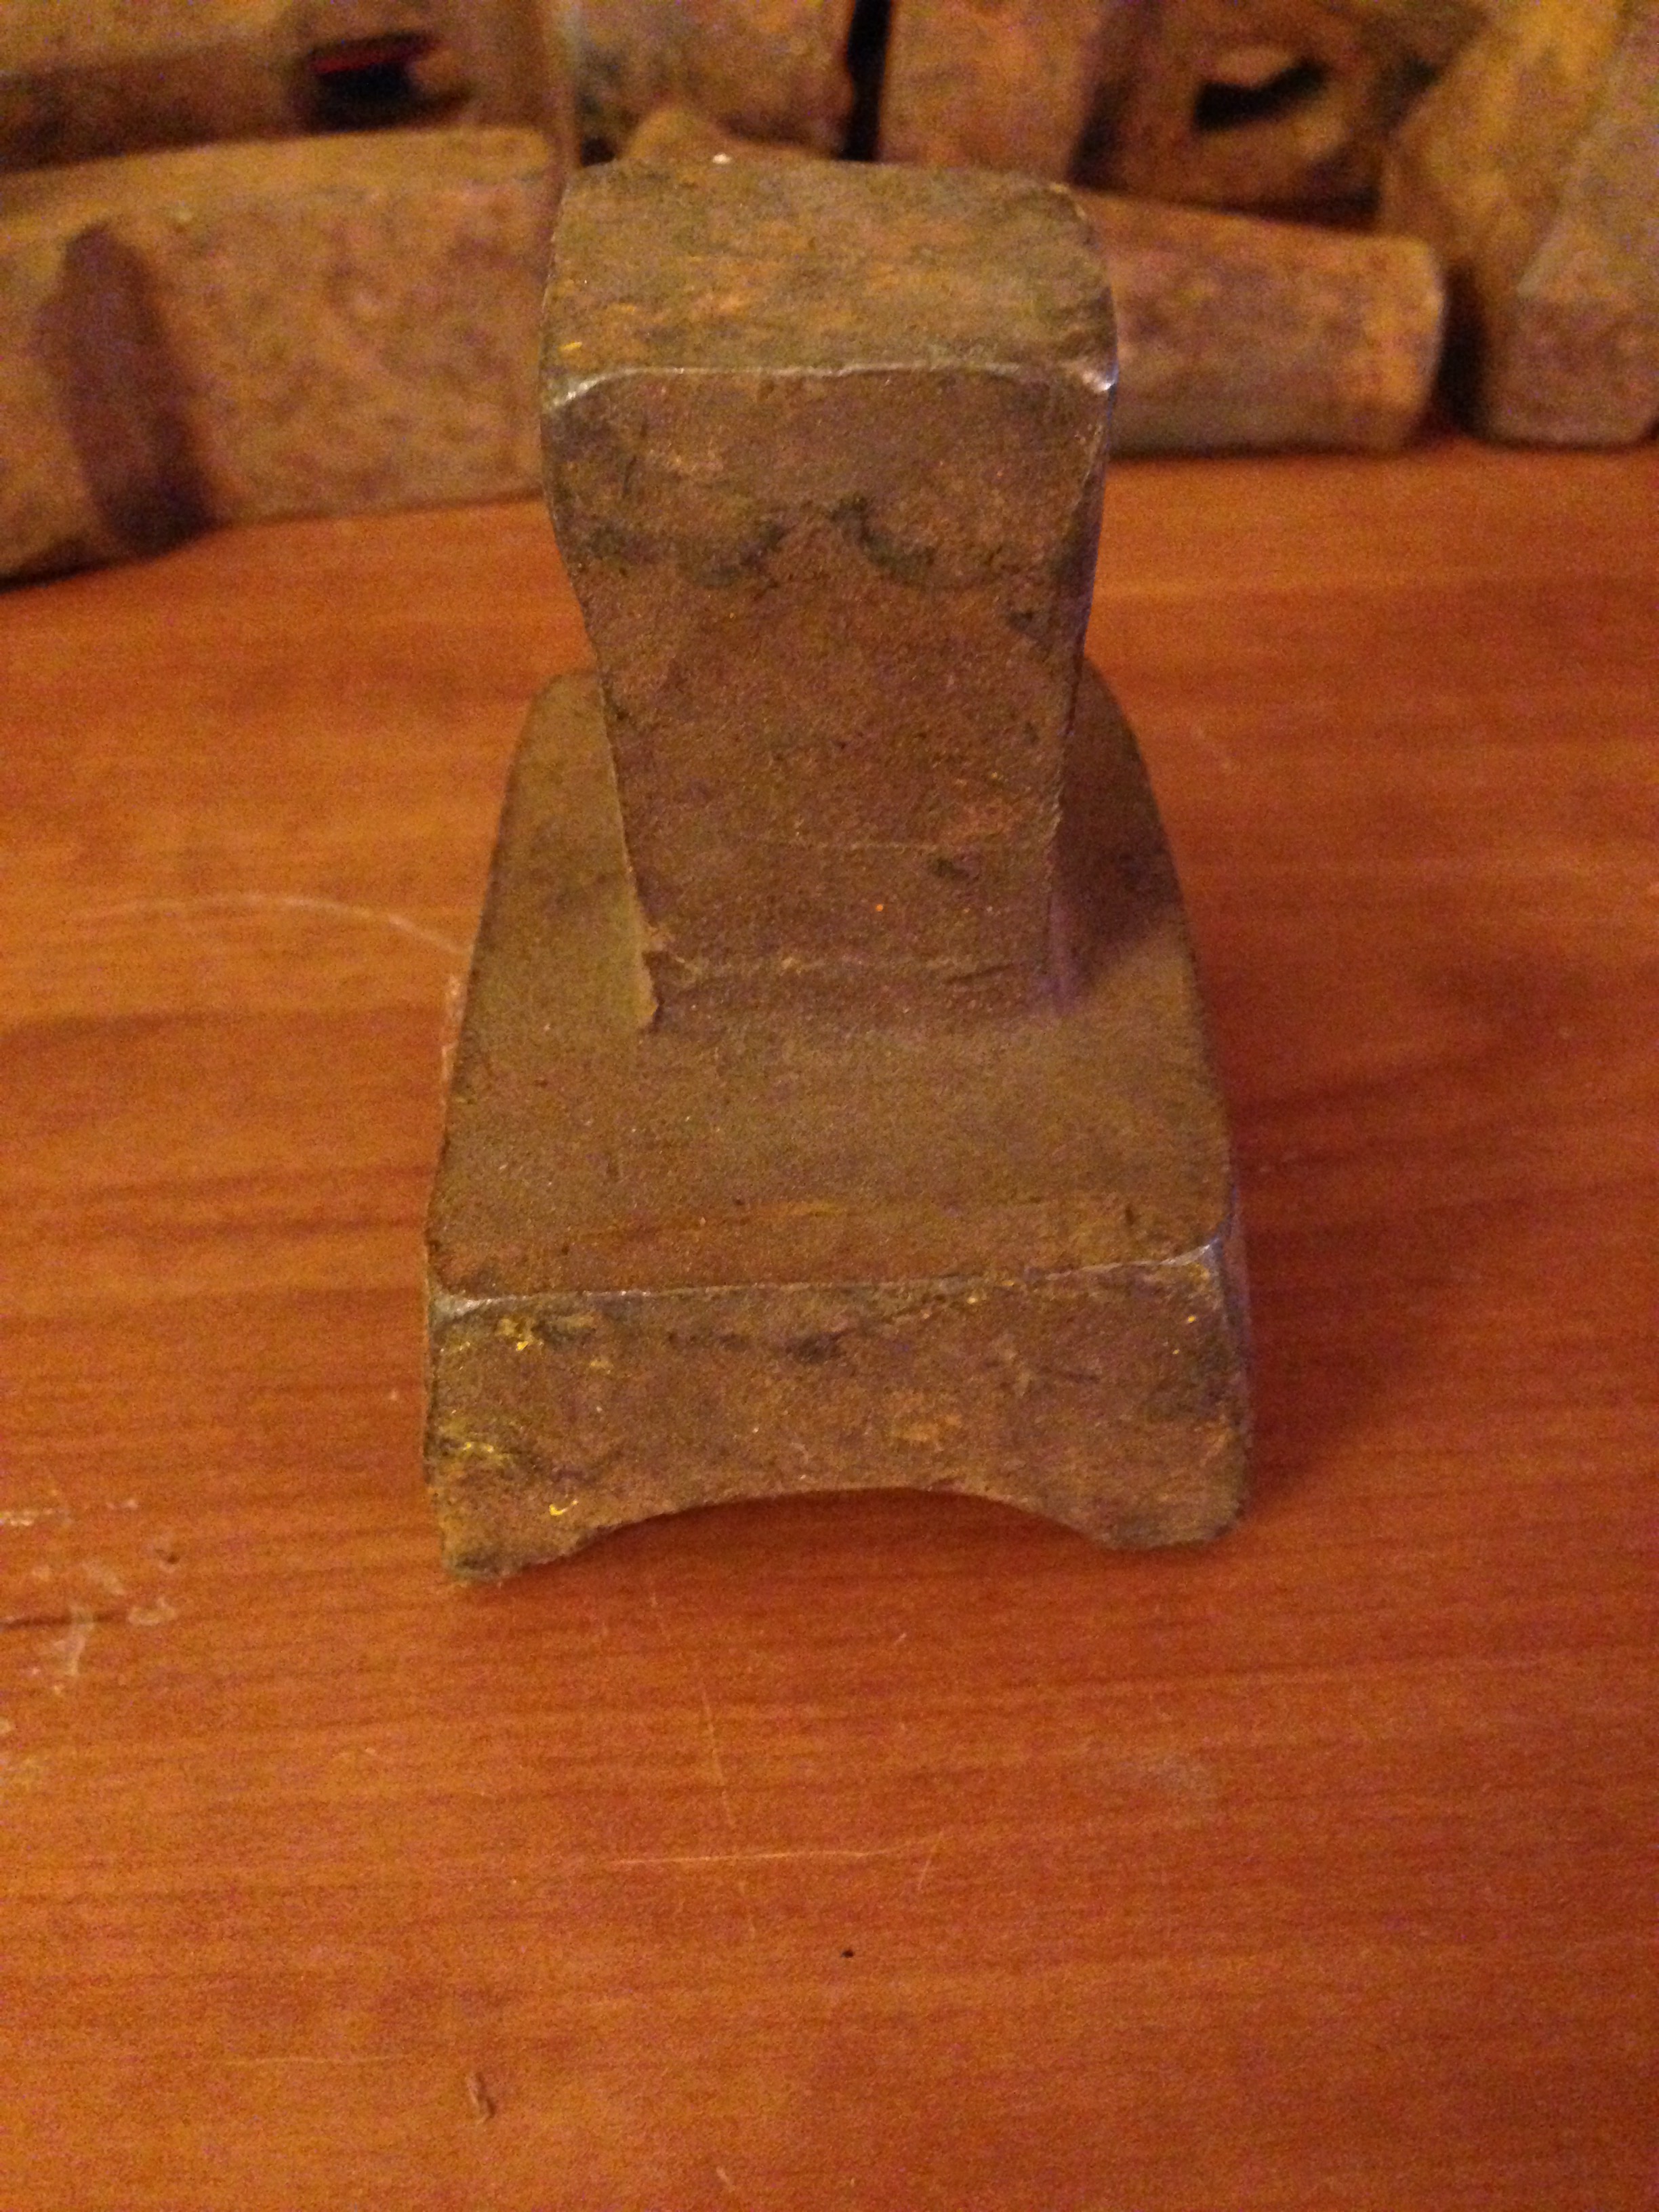
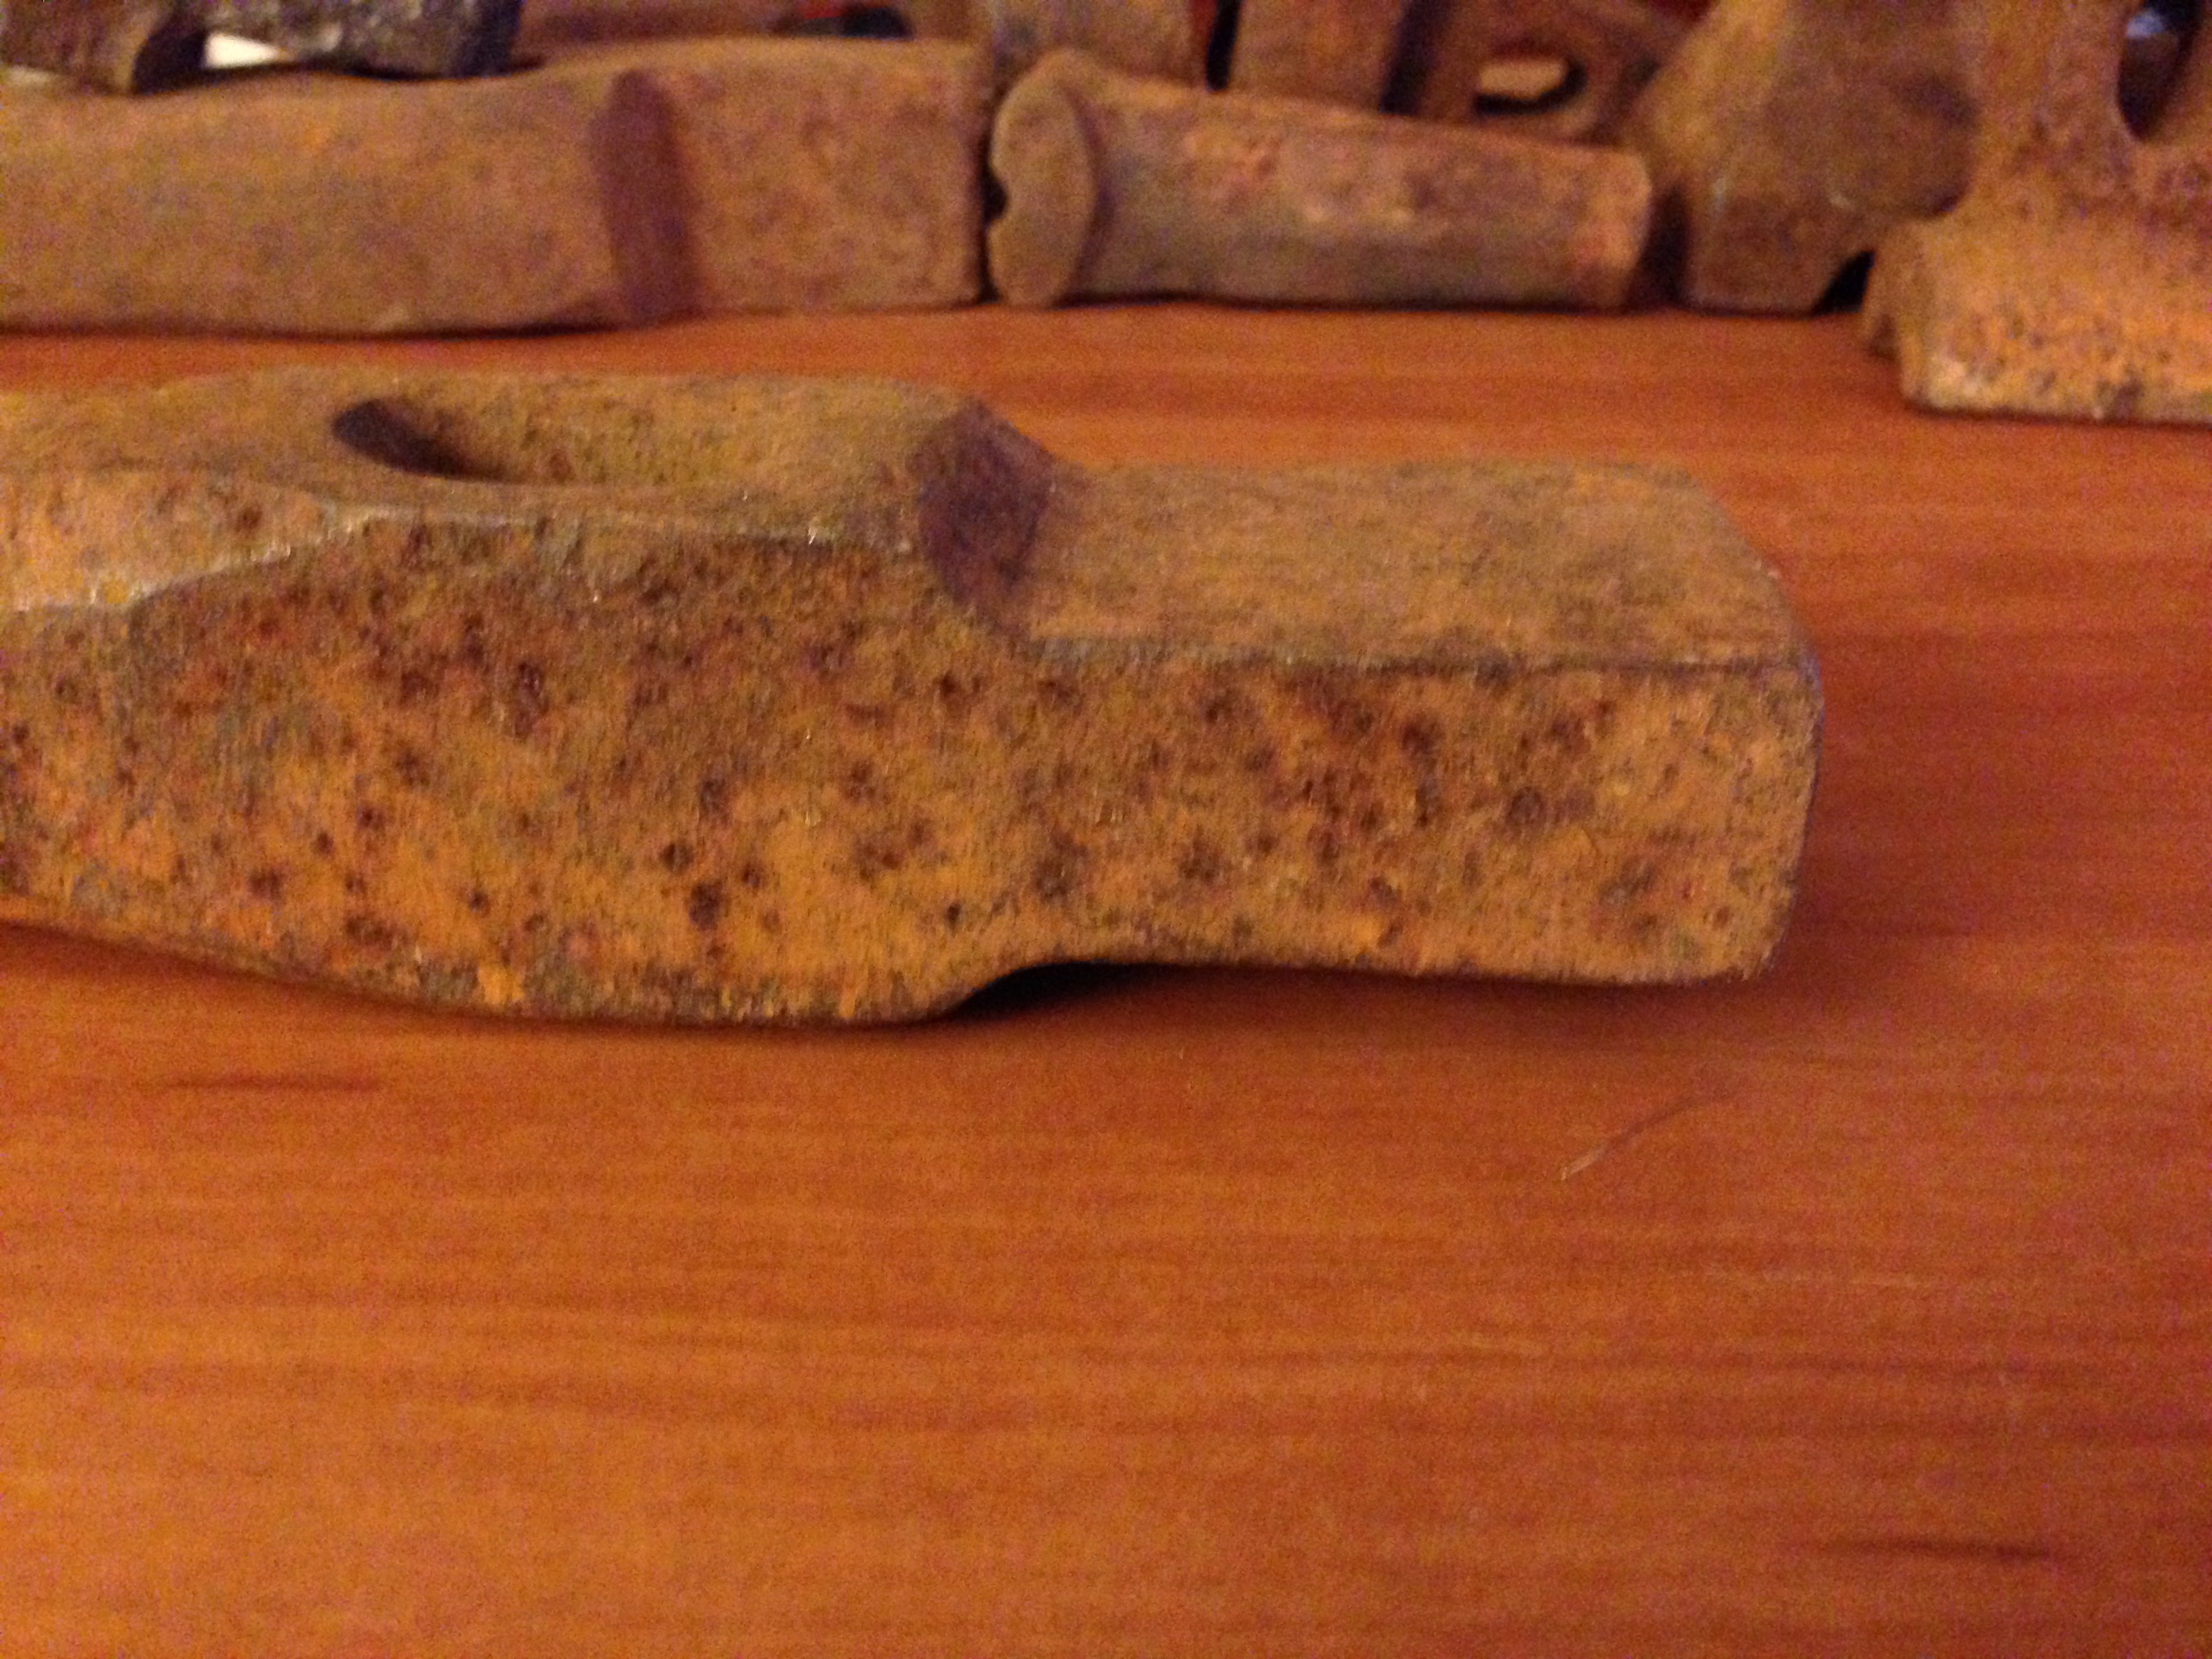
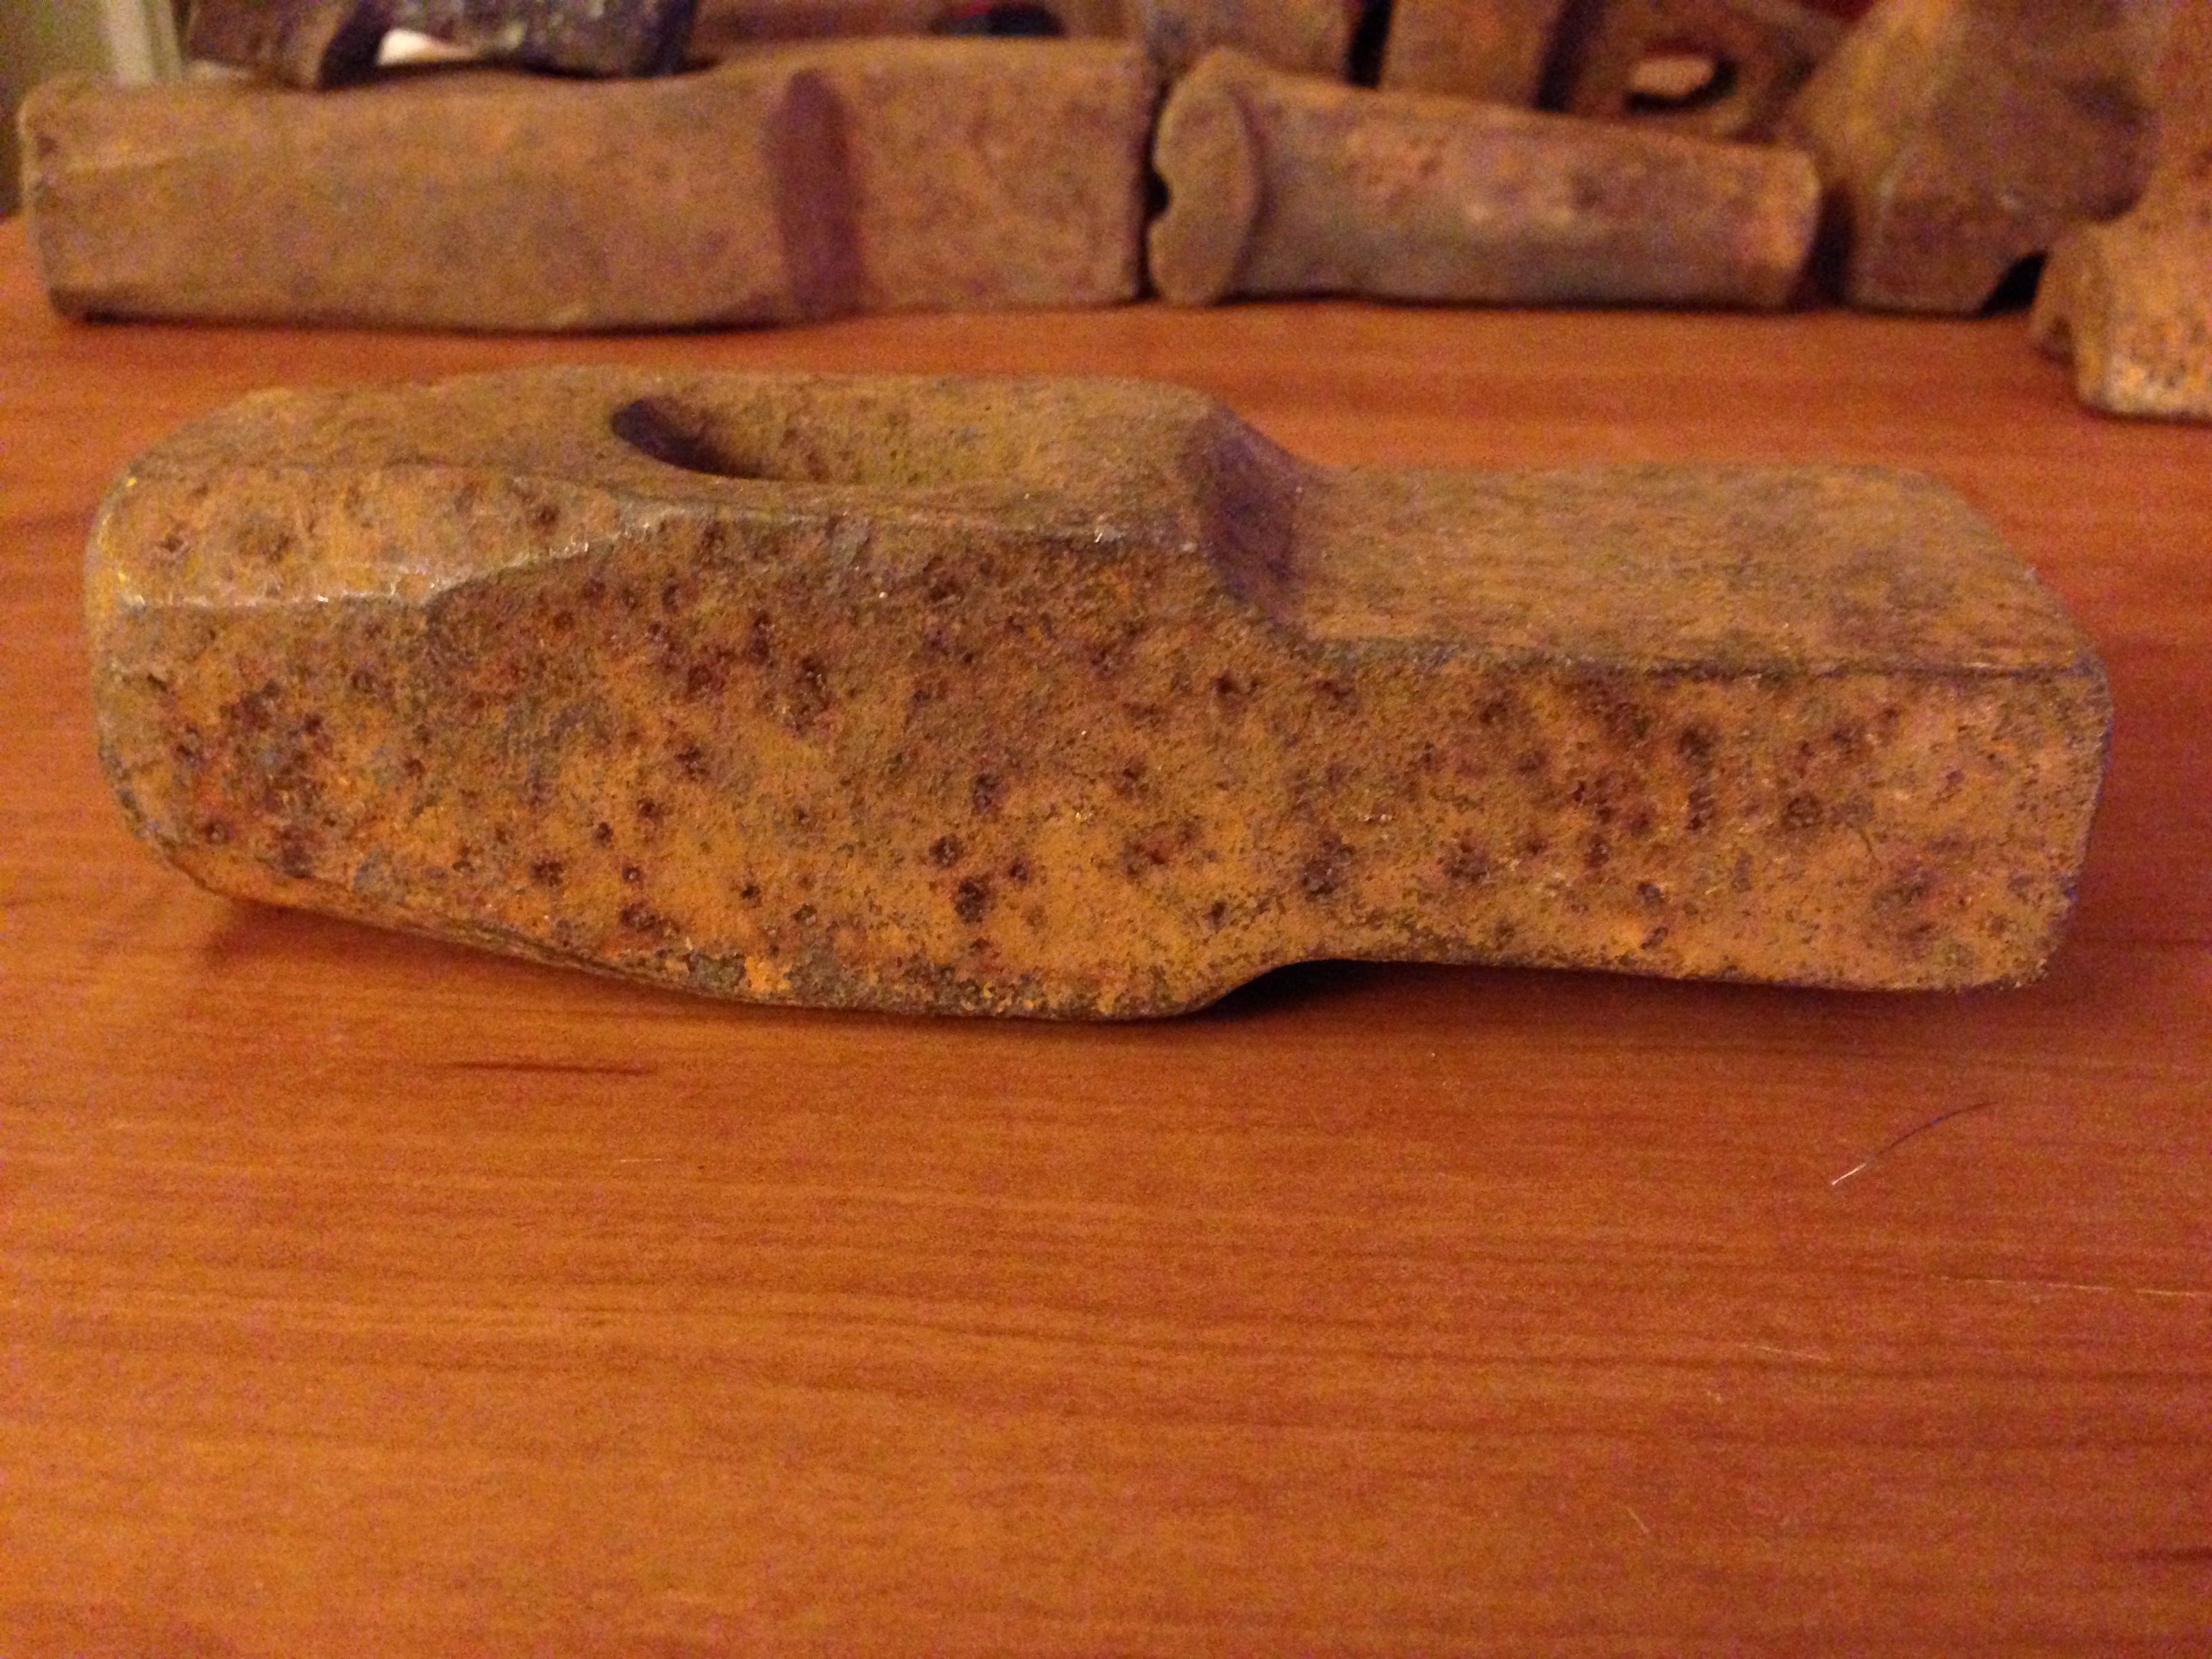
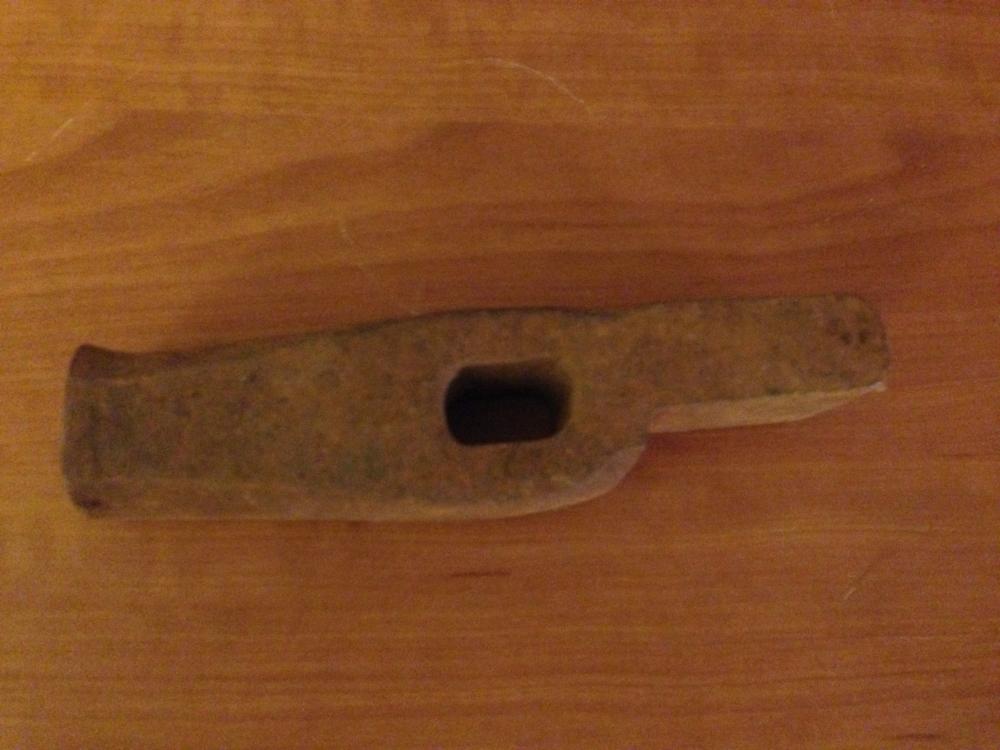
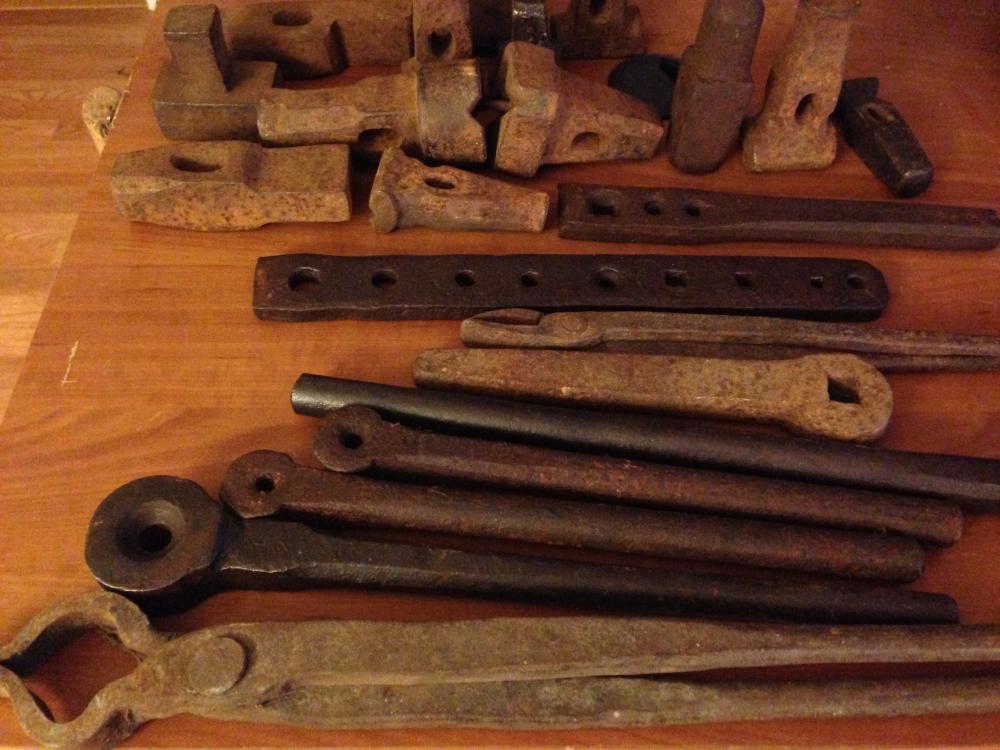
 I've been inactive for a while still building up tools to get the shop going. Scored a milk crate full of top tools, riveting tools, a couple of tongs etc. Some of these are head scratchers as far as what they are designed to do. First up is this beast. The pin in the middle is beefy, but I can't see it holding up if it takes much force. Perhaps it registers in an already punched hole. As for the V-grooves I can only imagine forge welding 2 bars on the 45 degree edge WITH a hole drifted through. Perhaps it punches (or registers a hole in round bar and squares it? The joinery for the crossed bars is a mystery to me. Any thoughts? There's another with identical dimensions but no center pin. It's not deep enough for the faces to meet without the pin interfering so they are not a matched set. And they are both top tools. Then there's this guy. The square face is about 1/8" proud of the outside edge. We're setting a good square corner for something but I don't know what or how. This one I just can't figure the offset. Should be a beefy fuller though. Thought this was a hardy tool and it might be, but the taper is backwards. Maybe just a handheld top swage? Ay special reason this one would be tapered back from the face? Here's the entire haul. I might go into the rivet making business. The large tongs at the bottom are 7 pounds and 29" long. I should have put something in the picture for scale. They are ridiculously huge. That's a lot of beef for some 1" flat-nibbed bolt tongs. I may cut these reins down a bit and draw out some of that meat to make them more manageable. These feel like they would wear out your arm faster than swinging a hammer all day and will, most likely survive the apocalypse. And the one that got cropped out on the right is basically a hardy hole on a stick. It does have a circular depression on one side but it's not deep enough for a header and the edges are pretty chewed up. Unless otherwise advised I'll use this as a bolster for making hardy tools and keep the heat off the face of my anvil. Third from the right of the top tools also cropped is a sweet, beefy countersinking puch. Only one touchmark I found on the "hardy hole header". It's a horseshoe with the open end down, with an "A" in the middle. Questions or comments welcome, and if you see anything you might find useful I'd trade a few of them for a nice flatter or tongs or a KMG grinder, or an air hammer.


-
following up... Saw the owner today and now ALL the lineshaft hardware in the mill is for sale. Details in tailgaing/buy/sell: http://www.iforgeiron.com/topic/34152-all-the-lineshaft-hardware-from-a-texas-mill-for-sale/?p=348279
-
Sweet setup.
-
Looking forward to hearing about it. This building is fantastic. I'll have to get some pictures of it and post.
-
You must have one XXXX of a shop. He has at least 2 wheels for it. I'd be more than happy to strap it to my truck and drive it up there for a small fee :D . The mill is in San Marcos. Apparently it had a one of a kind motor to drive the system that people still stop by to see if it's still there (it's not).
-
M&H Armitage Mouse Hole anvil - 1820-1835 (?)
twodogzz replied to twodogzz's topic in Anvils, Swage Blocks, and Mandrels
By grinding I meant with a belt sander setup. I'm talking about a 1/4" chipped area. It's a wire wheel for everything else. -
Doggonit I didn't look that close. .
-
That makes sense. Thanks
-
128 lb Mouse Hole Anvil (1820-1835) - $175 Columbia 5" Leg vise - $50 3 Tractor Seats (100% chance of bar stools) - $65 3 beading wood planes, 1 weird brace and bit, 2 spokeshaves - $75 Not a bad day... So yeah, some of those are wood tools but what the heck... Anybody know why that brace has that particular design?
-
M&H Armitage Mouse Hole anvil - 1820-1835 (?)
twodogzz replied to twodogzz's topic in Anvils, Swage Blocks, and Mandrels
It has a bit of a radius to the face toward the front and transitions to flatter towards the back. I think it's from design rather than wear. Edges are good except for a couple of chips that will grind out easily. The only edge that is chipped badly is at the front shoulder. I have a Hay Budden that is damaged the same way. BTW Timothy, I checked out your web site and your work is fantastic. -
Found this guy at a warehouse clean-out sale today and wasted no time reaching for my wallet when the seller said $175. If this post on the ABANA forums is correct, it dates to the 1820's-30's. I think I did ok :D. It should clean up nice. Markings are: M&H Armitage Mouse Hole 1 0 16 4 (on the foot)
-
Yeah true about the hammers. He's hesitant to scrap it considering it MIGHT have some more value as is. There are still shafts and pulleys in the rafters but I don't think he's selling anything still mounted.
-
Guy is clearing out this warehouse that was a 20's or 30's mill (check "it followed me home" later to see my haul). This is a shaft from the mill he would like to sell. It's ~20ish ft long, 2.5 or 3 inches diameter (nobody had a tape measure). First thing I thought was LOOK AT ALL THOSE HAMMERS!!! Anyhoo, can anybody put a ballpark value on it and speculate as to the type of steel? Probable origin?
-
Now I don't feel so bad about doing all my forging barefoot.
-
I don't think Jerry's were meant to b functional so you win the every-day user's category. Those are pretty cool.
-
It wasn't really so bad other than that stubborn pin. I just spent 3 hours of quality time with it, a couple of wire wheels, and some oil. I had to forge a new wedge for the mount (mine uses a couple of shim type wedges to snug up the mount). Can't tell from your picture but mine was painted and I'd assume it was lead based paint, so the respirator was not optional. There was so muc rust in the air that it still wold have been a must anyway. I like the way you mounted yours. I have a similar bench. I may steal that. Have fun.
-
Oops. I thought I had done that profile thing. Basics added, more later etc. Thanks, Frosty.
-
How `bout this one: Jerry Achterberg is the artist. A full gallery of his blacksmithing miniatures can be seen on the Balcones Forge website. click on the link and then go to the member gallery and select his page: http://www.balconesforge.org
-
oops, double post...
-
You win. After taking it to the wire wheel (3 hours of grinding off most-likely lead-based paint, yay!), said notches were revealed. Is that all there is to it or is it missing a spring clip or key or is it just held by friction? I believe you will be my go-to guy for info on this particular vise. Thanks, Jeff
-
And the winner is... Brute force. Just had to twist, punch and wail on it to break the friction and grime. There is no keyway. Just friction and weight held it in.
-
Thanks for all the input, folks. Doc, I'm taking it apart to do a full restoration. Removing all the rust, even in the hard to reach bits is part of that. As for a solution I hope Timothy is right. I prefer not to cut anything that will need re-fixing/replacing later ( i know, to some extent that is what we do and should be capable of, but...). The pin is not peened, lipped, nicked or gouged over the small flush end. There is about an eitgth of an inch side to side play. I'll be attacking again this afternoon. We'll see...
-
I guess it's hard to tell from the pictures, but if you look at the second one, it is not peened over. It's flush with the surface, so unless it's seating on a hidden shoulder underneath, it seems like it should just slide out with some persuasion. I'll give it more force in the morning. Too many people to wake up if I try it now. I only want to avoid cutting it because I'm still building up my shop and don't have a full complement of tools to get it back together quite yet.
-
Edit: Solution achieved Does this pin come out to remove the jaw? I lightly hammered it out a bit, but it finally took hold and I didn't want to force the issue. I can't figure out how it's seated, whether it's a keyway or something like that. An ideas? And while we're at it, does that horrible green paint say anything about its history by any chance?