
chyancarrek
-
Posts
1,022 -
Joined
-
Last visited
Content Type
Profiles
Forums
Articles
Gallery
Downloads
Events
Everything posted by chyancarrek
-
I'm in SW Washington and I finally got around to taking in a bunch of that "I'm gonna use that someday" metal (all iron). Going price was $170.00 a ton. My buddy and I took in two loads and we felt we were scaled light on the first load. The second load we had ourselves scaled at two different locations first then when we got to the shredder they weighed us in 500lbs lighter then the previous weights. We challenged the scale operator and he didn't hesitate to tack the 500lbs back on . . . makes you wonder.
-
Blacksmithing Superstitions
chyancarrek replied to Glenn's topic in Blacksmithing, General Discussion
At a barn raising or building of a house, the village smith drove the last nail where it would catch the rising sun - this assured good fortune for every new day. -
Have any of you noticed just how many movies have a blacksmith or a reference to blacksmith's in them? Most westerns are a given, but there are so many diverse movies that include smiths. I remember being at the movie theater with my nephew and him saying "look, another blacksmith" - I whispered back . . . "there's always a blacksmith". It's become a bit of a joke for us to see who notices something referencing smithing in a movie or TV show before the other does.
-
Thanks guys! It was a great project to do especially because the wood the client provided was from his wife's family property so it had a lot of emotional value to them. (The wife is now thinking of having me make a similar table to go in the tack room of her horse barn) Valentin - post the pictures of yours when you get a chance - I always love seeing things like that!
-
Nice job rfb! I know the feeling - I started with an O/A torch, a claw hammer and a bent piece of I-beam - Once you're bit . . . you're bit . . . You've come to the right place for all sorts o' great info and input! Have fun!
-
Hey Debra, Welcome! Outstanding Work!! Very well executed - Looking forward to hearing more from you.
-
Hey guys, Thanks! Appreciate all the great comments! Yeah, Mt St Helens - she's quite the ol girl - Whatta' show it was in 80' I made these out of fir - my client dropped 30 of them and built a barn and then some - Being fir they're not the best for a work bench top - I warned my client they'd get pretty dinged up. Might have something there with wanting to put 1/4" plate on them - not so pretty grain wise tho . . . It was one of those projects you love to do but they take over everything so you're SO glad when you finally get them out of your shop!
-
Here's my latest - Commissioned by a client to build him two matching woodworking benches made from trees he had tipped on his property then milled by band saw. 3 ft wide by 6 ft long by 37" high. mortise & tenon joinery with square pegs I was amazed how consistent the fella was with his mill - I went through 32 - 2 x 6's and 4 - 4 x 4's and none of them were more than a light sixteenth out of dimension. Sorry this is in the wrong section Glenn - I didn't see a forum for woodworking.
-
Puddle Aluminum
chyancarrek replied to Tyler Murch's topic in Smelting, Melting, Foundry, and Casting
Oops - pics didn't make it Let's try again -
Puddle Aluminum
chyancarrek replied to Tyler Murch's topic in Smelting, Melting, Foundry, and Casting
Hey Phil, For the goblets I lathed out a wooden master then made a plaster mold from that. Poured my wax with the goblet being one solid piece. Because I was making these for fire dancers to hold onto, I took the wax and separated it into two pieces - the cup as the upper section then the base/handle as the lower. This allowed me to drill and tap both pieces to accept the wick stem inside the cup and place a leather washer in between the cup and the vase to isolate the heat I built a small burn-out kiln from an old gas furnace body. I have a fuel regulating pyrometer set-up to control the heat during burnout and because I have to convert my space into a foundry when I want to cast metal, everything is on wheels. I roll the kiln out next to the bay door and use a vent stack that goes from 90 degrees horizontal to 90 degress vertical. (Like stacking a wood stove through a wall) That does a great job of taking the fumes outside. When I pour I just open up the whole shop and turn on my overhead fans - it keeps the area fume free. -
Puddle Aluminum
chyancarrek replied to Tyler Murch's topic in Smelting, Melting, Foundry, and Casting
Hey Frosty, Yeah, vertical lift furnaces are cool. I worked with some folk in a small art foundry in Portland that had a set up like that. Their pours were larger so the cruce's had to be yolked - the bottom of the furnace was on a trolly so it could be pulled clear of the furnace body then picked up with an overhead hoist. Hey Ron, You know, we gave the tutu idea some thought - but decided against it when we all had the simultaneous vision of all that frilly fabric in flames around our waists . . . -
Puddle Aluminum
chyancarrek replied to Tyler Murch's topic in Smelting, Melting, Foundry, and Casting
Hey Phil, I do lost wax so small molds like those for the goblets are just straight plaster I get from a pottery supply house in Portland Or. I make a tube out of roofing felt (plaster won't stick to it) put in a tube of chicken wire to give them a little extra strength, place the wax then pour the mix. For larger molds I use the plaster with silica sand and perlite to bulk out the mix. I never calculate the amounts - I just cook more metal than I know I need and pour the excess off into my ingot molds - over time I've gotten to where I can eyeball it to within about 25 percent - I've never been an exact sort o' fella. -
Puddle Aluminum
chyancarrek replied to Tyler Murch's topic in Smelting, Melting, Foundry, and Casting
Hey Saintjohn, The furnace you saw in the earlier pics is a blown (blower fed) diesel injected type. There's a pump on the blower assembly that injects the fuel into the airflow. The pic below is a furnace I made for doing small pours - it's a blown propane type running about 3-4 psi. Really, it's just a propane forge sitting on it's end. Very simple to make - I used a piece of cast iron water main and welded a bottom on. Lined with 2" Kaowool on sides and bottom with a soft brick top. Real quiet and well behaved. The crucible you see is graphite. I included a pic of the whole set-up. That's my brother pulling a cruce for an aluminum pour. Because I'm pressed for space, I put the whole thing on a wheeled cart so I can move it out of the way when not being used The goblets were done using this furnace and were a commission from some local fire dancers. I used scrapped aluminum sports car racing wheels. -
Puddle Aluminum
chyancarrek replied to Tyler Murch's topic in Smelting, Melting, Foundry, and Casting
Hey Saintjohn Frosty's tip on making the molds the same length as your cruce is deep is spot on - Nothing worse than having an ingot stick out and not being able to cap your furnace! As far as shrinkage goes - it will vary with the metal and alloy - say 2 percent to 20 percent. Pour your metal in a known size then compare it to the original. The ingots will pop right out of the mold if you flip them shortly after they harden but don't cool. When you make the molds make sure there are no cracks or holes anywhere otherwise the metal seeps in and you'll never get them out. The ingot molds you see in the pics are 3" angle with 1/4 plate welded on the end. Notice the angle on the ends - this assures the ends of the ingots will pop right out and not hang up -
Puddle Aluminum
chyancarrek replied to Tyler Murch's topic in Smelting, Melting, Foundry, and Casting
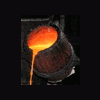
SaintJohn: Cast iron is fine - ladles in the forge work well for small amounts. A piece of steel pipe with a bottom welded on works but watch for contamination from the scaling of the iron If you want to pour clean, use a ceramic or graphite crucible - they come in sizes suited to any pour. Graphite cruce's are really affordable for someone just starting out. Here's a link to an outfit that's just outstanding to deal with - good prices, great people! budgetcastingsupply.com Farmer Phil, Man I gotta tell you - pouring three or four hundred pounds of molten metal like a hot cup o' joe is just the best! I've been working with my friend for so long that we just have each other's movements down. People who come out to watch say it looks like an industrial ballet - sans the tutu's of course . . . -
Puddle Aluminum
chyancarrek replied to Tyler Murch's topic in Smelting, Melting, Foundry, and Casting
One more bit - (I shoulda re-read your OP) You mentioned wanting thinner and wider - DON'T pour from a greater height! It'll only splash very dangerously - just pour with a smaller amount very quickly right next to the surface of what you're pouring into - it'll take a few tries to figure out the volume and speed but because what you want to do is really unsafe take your time to work out a good technique! I've attached a couple showing a breakout and one where I missed a cup by a bit showing how even just a few inches of height gets the metal flying. -
Puddle Aluminum
chyancarrek replied to Tyler Murch's topic in Smelting, Melting, Foundry, and Casting
I pour bronze for a friend of mine ( a sculptor in his 80's) and I always give "splashes" away as mementos to the people who come out to watch a pour. Some of the shapes they assume are incredible. The most interesting ones come from a "breakout" - a mold will be cracked and bronze will leak out of it onto the floor - when that happens we have someone standing by to pour silica sand in it's path to stop it from running under my feet ( I'm the only one who can't move as I'm in control of the crucible) - when the bronze combines with the sand it really takes on a great shape as well as some interesting texture from the sand. As Frosty said - make sure anything you pour onto (or into) is COMPLETELY dry - the slightest bit o' moisture will make frying bacon naked seem like a walk in the park! Even a small bit of latent moisture in a concrete floor will sends spatters way farther than you'd imagine! Also make sure that what you pour into is not undercut (small cracks and lips the metal can get under) - if it is you'll never get the metal to release it. Post some pics of what you end up with - I've never heard of anyone trying to sell them before - I'd be interested to hear how well they do. Have fun! -
Great work Dogvet - really beautiful! Angus - Here's a link for buying the magnets - Amazing Magnets I use them in the wooden bases for my serving dishes - drill a hole from underneath to within 1/16 of the surface put a plug in behind it . . . the magnet is strong enough to hold the dish in place but can't be seen. DogVet is right - watch how you handle them - they will bite you if you get careless
-
What is the best polish/rust protector/finish
chyancarrek replied to John Martin's topic in Finishes for Metal
I specialize in making hand hammered serving dishes and I get my patinas using successive coats of vegetable oil to create a food safe / moisture resistant finish. The secret here is to paint the piece with oil in thin coats - not dip it. This is especially important with thin sheet stock as immersing it cools the metal too quickly for the oil to carbonize and it leaves it with a translucent soft coating. Heat your piece in the forge to between 500 - 800 degrees - Use a natural fibre cloth (don't use polyester blends) dipped lightly in oil. Bring your piece out of the forge and begin painting it on the surface (it will smoke big time - make sure you have lots o' ventilation and it'll flash at the higher temps so be careful!) but continue to paint it on in light coats until the metal starts to cool and accept it - the cloth will carbonize and add to the black color of the patina. Continue this until you get the result you're looking for - If need be, reinsert the piece in the forge until the existing oil starts to smoke - remove it and continue. This technique works equally well with any oil. For my purposes I hand sand and buff the piece to get the hammered texture to show back (see attached pics) I then wash it down with rubbing alcohol to remove any residue. If it's going to be a food contact piece, I rub on a thin coat of vegetable oil - If not, I use a satin coat spray lacquer. No worries about the veggie or olive oil going rancid. The oil is thoroughly cooked (like cast iron cookware) and even a light coat of fresh oil is ok because unlike wood, the metal isn't absorbing a deep layer of oil that lies there and rots over time. Soaking in Muriatic acid to remove scale and etch the surface really helps for creating a consistent patina. Because I don't paint or powder coat my work, I always tell my clients that my pieces are moisture resistant - not water proof. It will rust if left to the elements - I instruct them how to clean up light rust with triple-aught steel wool that's been dipped in vegetable oil. It's been a great technique for me - I've been using it for years and never had a return or complaint due to the finish on a piece failing. -
Clean up with compressed air
chyancarrek replied to Glenn's topic in Blacksmithing, General Discussion
"just stirs up the dust but doesn't really get rid of it" Totally agree, but I got lucky - the way my shop doors are placed I get excellent airflow. When they're all open and I have the fans on, the majority of airborne dust heads right on out the bay doors and I've broken up those hard to reach areas that accumulate dust so quickly. -
Clean up with compressed air
chyancarrek replied to Glenn's topic in Blacksmithing, General Discussion
Hey Glenn, Because I have to share a common space between my wood shop and my blacksmith shop I have to be hyper-vigilant on keeping the wood dust under control (one golden BB from the BS side and it's all over). I divide my work up between disciplines so when I'm done woodworking I go through the entire shop with a shop vac. Once that's done I use an air hose and nozzle to blow off every surface in the shop. I agree it can be a respiratory issue but I open all my doors (2 roll ups and 2 man-doors), turn on the overhead fans then wear a respirator. Having done this on a very regular basis (a couple times a week) I've found that staying ahead of the accumulation makes all the difference. For the motors I use a method I learned from the owner of the custom furniture shop I worked in. I take the air nozzle and hold it about 10" away from the vents in the motor then turn on the machine and blow air through it while it's running to clean the motor out. He's done this for going on 20 yrs and I've been doing it for about 10 and I've never had a motor failure or any dust related problems with the equipment. As with all shop routines - staying diligent about clean up makes everything else work that much better. -
Welcome Steve! My ex had relatives in Port Alberni so we went through Nanaimo on many occasions when we'd go a-visitin' - Beautiful part of the world you live in. I just discovered this site myself this month and you're right - it's a great resource full o' good folk! Enjoy!
-
Hey Pete, For sheet 1/8th and thinner I use my variable speed jigsaw. I'm always cutting circles and irregular shapes so it works really well. I also rigged up a removable cutting deck for my metal cutting band saw that gives me a little more support area for cutting when the saw is vertical. It's pretty versatile for cutting a variety of shapes. Couldn't say for stainless. I only use a plasma because I've never had luck using a mechanical means to cut it.
-
Thanks for the Welcome Jayco! Seems like a great bunch o' folk here!
-
How/where do you store your drill chuck key?
chyancarrek replied to Glenn's topic in Blacksmithing, General Discussion
Mine's attached to a retracting key chain holder - I glued a magnet on the side of the holder then attached it to the side of my drill press. When I'm done with it, the key retracts up out of the way.