

intrex
-
Posts
166 -
Joined
-
Last visited
Content Type
Profiles
Forums
Articles
Gallery
Downloads
Events
Everything posted by intrex
-
Thanks for all of the help everyone, I finally got this all finished and like usual it was a little bit of a journey but everything turned out well. I tried to make some decorative clasps out of a copper pipe and some of the left over silver wire. The clasps looked great but I was unable to successfully weld them to the necklace. In the end I just flattened out two of the left over wires and then wrapped them around the end of necklace and heated each end until they just became molten. This completely fused the ends of the necklace together with the crude claps. Polishing the necklace and creating the claps was by far the most time intensive piece of the whole project.
-
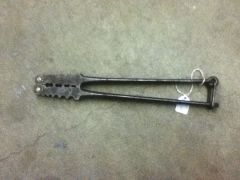 and a very nice crimping from the looks of it. Never seen one that old or one that you could flip over for more sizes to crimp.
 -
Are you using the ACE Green IR filter glasses? Those were the only ones I could find that were IR filtering and none of them were under $100. Is the main advanced with using the ACE glasses that the colors are supposed to be more realistic? It seems like a steep price to pay unless their is a huge difference in image quality. If I buy them it will be more than I paid for my Pole Vice :).
-
Thanks for all of the feedback, After doing lots of internet research I am kind of surprised at how little definitive information there is about what is actually given off from a forge. From what I have read by far the most dangerous aspect (other than projectiles) is the IR. It looks like flares and UV based issues are pretty minimal in coal but may be more of a possible issues on a gas forge with the reflective insulation. If IR is the main concern it seems like the green shaded welding glasses or any other IR blocking glasses are the best bet for protection. I also found some really nice glasses that fit like goggles for blocking IR for uses in laboratories with lasers but they are designed for certain wavelengths and I can't find any information about what wavelength IR a coal forge would generally produce. Do the green shaded glasses change the colors of a heated work piece and the forge fire?
-
Hey Steve, You beat me to the punch. I was just looking through all of the different didymium glasses and there are tons and tons of them with a huge swing in prices. I would be using these exclusively with my coal forge since that is all I have at the moment. I may end up getting a gas forge also but that is probably a way off down the road.
-
I am sure it is probably my technique. My arm is sore as xxxx today as well. Gonna give it a few days to recover and read about hammering technique in the mean time :). Most of the work I have been doing so far has been with 1/2" and smaller bar so I haven't really had to go after it to hard. Moving up to larger stock really pointed out my bad habits.
-
Nevermind about the smith goggles I found the Ace glasses you talking about at Centaur Forge. Thanks Steve, I haven't used the oakley glasses for extended periods of time. I just gave them a try to see if it would make a difference. After doing some reading it looks like I am going to be ordering some didydium glasses for sure.
-
Are you talking about smith ox goggles? I actually have a pair of those for snowboarding.
-
Hey Everyone, I have been wearing clear safety glasses while forging and noticed that looking into the fire when it is white hot causes very temporary sun spots after looking away from the forge. I tried using my nice oakleys and the effect completely went away. Do most people use tinted glasses when forging? Do you all have any suggestions for a good pair of goggles. I have no problems spending 50+ dollars if that is what is needed or best to use.
-
Hey, I had the longest forging session I have tried so far yesterday. I was trying to draw a 2" round high carbon bar. I spent about an hour pounding it very hard and started to notice that the tip of my pointer finger started to get more and more numb. Nothing else hurt at all but I stopped after the feeling didn't go away for several minutes. It has been about 12 hours and it still feels a tiny bit strange but pretty much back to normal. I am thinking about wearing some type of glove that has some padding it like a bike glove next time I forge some. Do anyone use padded gloves or have any other recommendations to stop this from happening? Thanks,
-
I finally have everything ordered and on the way. It is going to end up being 4 silver rods and 3 copper rods with an end cap to solder on. Do you all have any suggestions for hard solder? From what I have been reading it seems like I should be able to melt hard silver solder with my map pro torch.
-
Hey Rich, Thanks for the Tip. I used a specific jewelry grade finish on the last pure coper piece that I did. It was a large flat braclet and the finish made that wearable for more than 8 hours straight without any green skin. I am hoping that the copper and brass being twisted and intermingled with silver won't have enough skin and oil contact to make the skin green. The plan is not to finish it with anything but I guess that is what will happen if she gets a big green ring around the neck. That will be pretty good for a laugh if it happens :).
-
Hey Chinobi, The bracelet was actually using 11 guage steel wire (I think) but I can't for the life of me seem to find 11guage silver so I thought 12 would be close enough that she wouldn't notice :). The bracelet is about 3/8" at the thinest part I could find and about 1/2" at the thickest. After talking this through I am deffinitely going to get extra wire and try a few different ways to seal off the end to see what will work.
-
I am not sure what to do with the ends. With the steel twisted rods it was so hard that you didn't need to worry about the end uraveling and all I did was cut the freyed ends and then round and smooth the cut. I could easily put the ends into the forge and then try to just flatten or ball the wires together. I haven't tried to do anything like that yet and am kind of worried about trying it on this. I may just get extra wire than I need and see what happens when they are hammered together red hot. Maybe just heating back an inch from the end and then twisting untill the wires break would be a decent seal for the twist?
-
I am planning to make a twisted metal (copper, silver, brass) necklace for my wife's valentine present. I forged a twisted steel rod bracelet last week that turned out great and wanted to make a nicer necklace to match. The plan is to use 7 pieces of 12 gauge wire (2 silver, 2 brass, 3 copper) and twist them all together like the bracelet. I am hoping the metals are all close enough in melting point for this to work. Putting these into the forge seems like a recipe for an expensive disaster and I don't have an oxy torch so I am planning to use my cheap map-pro torch. I used for a small copper project a few months ago and it worked fairly well. The silver wire for this is going to be pretty pricey so I want to make sure to get this right the first time. Have you all done anything like this before? Got any tips or things to watch out for so I don't ruin $100 worth of silver :)?
-
Coal won't start ??? Suggestions
intrex replied to Jim Coke's topic in Blacksmithing, General Discussion
I have been using a weed dragon to start the forge up lately (http://www.walmart.com/ip/6435919?wmlspartner=wlpa&selectedSellerId=3&adid=22222222227010046964&wl0=&wl1=g&wl2=c&wl3=42066771310&wl4=&wl5=pla&wl6=34439695870&veh=sem). I have been meaning to post to see if anyone else does this. All you do is put the torch on full blast directly over the coal for about 15 seconds until they get nice and orange. Then turn the blower on and push all of the orange coal into a ball. I can be up and running at forge welding temps in about 1 minute :). Probably not the best method for conserving coal but it has given me more time to work at the forge which was sorely needed because I usually only get 1-2 hour chunks of time I can spend. -
Here is the final result.
-
Thanks for all of the sugestions. My options for the resoration were pretty slim after I left the box in the forge too long and melted half of it. I ended up using a house jack that was the same diameter. I had to do some serious cutting and grinding to get the receiver to fit but everything is working well now. After grinding all of the crud off I found an iron city steel mark on the vise. Will post pictures next time I am at the forge.
-
Hey Fatfudd, Thanks for the link. I have already found a few of these on ebay that are the exact same outer diameter as the existing screw on the vise. I think I am going to cut the existing screw where the threads start and cut the screw off of one of those jacks then forge weld it to the original handle. Using fairly new screw threads as a guide I feel pretty confident I can make the threads for the box and braze them in. If all goes well this will allow me to keep the vise close to the original design without serious machine shop time or trying to recreate the screw threads by hand.
-
Hey Thomas, Thanks for the advice. This has been a really good learning experience about leg vises. The guy I bought it from didn't really even know what it was. He just knew that it was a large vise that he could barely carry :). I am thinking about repairing the box and screw by chiseling away the existing threads and forge brazing new ones as shown in this post. '?do=embed' frameborder='0' data-embedContent>> I am hoping that the threads on the screw are going to be brazed so I can chisel them off as well but I know there is a good chance they will be machined.
-
I recently got my first leg vise from a craigslist find. When I was getting it off the guys truck who was selling it everything looked good and seemed to work. The Jaws were open pretty far and I tested closing them about an inch. I didn't realize until I got back to my house that the screw was in good condition until you got to the section of threads were the jaws were about 2 inches apart. The rest of the threads from there on out were completely worn out and you can't close the jaws anymore. I have read the topic about how to forge braze new square threads into the box. If I want to go that route I think I am going to have to forge new screw threads and box threads. I would really like to keep the original historical design of this vise and recondition it to be functional but am nervous about trying to take on this project. I am a very novice smith and not sure if I will be able to tackle a project like this. It seems like getting the original threads off the screw and out of the box is going to be a serious job in itself. Has anyone on here done this before? What stock did you use for the threads? What filler would you use for the braze? Should I abandon the idea of forge brazing threads and just get a large acme threaded rod and bolt? Any ideas or pointers are greatly appreciated.
-
Hey Dale, This was the very first time I fired it up and was dieing to get it going so I definitely cut some corners. Those have all been soldered and shrink wrapped now. I am building some attachments onto the forge and am going to eventually mount the controller there as well. I ended up modifying my welder which put the forge project on hold. In a few more weeks I will probably have it all wrapped up and will post the final results (right side up this time).
-
Judson made a very good point that I should have spoken to also. As an engineer you would do this in a fully to spec 3D model so that the final design could be handed of to a machine shop that could produce your pieces to exact specs. This means that you will have to precisely define every curve, how the curves meet, along with every dimensional aspect of each part. This might not seem like a huge deal until you try to do it. You would also be pretty confident that your design would work because of your assembly fitting correctly in the model. You could also do stress and strength test analysis depending on the materials you choose to use. This entire exercise is usually geared towards mass producing something and you don't mind spending weeks of an engineers time (or thousands of dollars) building a perfect model of a finished product you are going to make hundreds of thousands of dollars selling.
-
Hey Plane, Before I got into software design I was a mechanical engineer and spent a fair amount of my time doing 3-D mechanical drawings with AutoCad, Pro-E and SolidWorks. With the geometries of the pieces you are trying to create I can't imagine you are going to be able to do this without using something like one of those applications. The cheap or free Cad programs are probably not going to be powerful enough to do what you want. it is also going to be a serious undertaking and learning curve to try to do this. If you haven't done something like this before I would expect it to take you at least 40 hours (and maybe longer) to be able to fully model this. There will be a ton of trial and error with creating each one of those pieces. With most of those CAD programs there are a multitude of different ways you create each piece and there is no "correct" answer for how to go about doing it. If you have your heart set on doing this yourself go to ebay or search around the web for an education version of SolidWorks. It is probably the easiest to use professional level 3-D modeling CAD application. You can create each one of the pieces as a 3-D model then build an assembly of all of your models Since I haven't been doing this in a while I don't know if you can import 2D models from another application and then bend and or extrude them into a 3-D model but I would bet SolidWorks can do it. If you are able to get this working I would love to see the full 3-D rendering. You could render the whole assembly in a steel finish and add automation pretty easily once the model is built.
-
 I tried to fix it after I realized it was upside down and there is no option to rotate the image :(.