
loneronin
-
Posts
92 -
Joined
-
Last visited
Content Type
Profiles
Forums
Articles
Gallery
Downloads
Events
Everything posted by loneronin
-
beatiful!
-
no problem, I'm working on the clip and I'll forget the bolts! ciao!
-
yes, I will post them but you need a lot of patience my friend! btw, when I started with this clip I made a quick search and, usimg the numbers and letters on the clip, I find out the composition of the steel: http://www.jysf-otw.com/ch/pdf/60Si2Mn.pdf
-
yes, I know about the clips! actually I'm working on one of it. I streighten and flatted one. now I'm working to sand it flat. it seems really a good steel to me. can you tell me how have I to heat treat my clip knife when it will be ready??? I assume I have to bring it to non-magnetic, quanch in the warm oil and temper it twice in an oven at 200
-
here I am. the pic of my RR bolts. the first one has a rectangular head and "95", "S.S." on the round part of the head; "24 m UNI" on the rectangular part. the others "SEI", "00" on the round part; "22 UNI" on the square part.
-
thank you for your help guys! UnicornForge, if I'll decide to make a knife with these bolts I'll follow your suggestions to grind the thread to avoid cracks. I hate the cracks!!!!!!!!! nitewatchman, tomorrow I'm going to take a pic of the heads and post it here so you will be able to check them. Thomas and Frosty, ASAP I'll try the "breaching test" and I'll let you know the result.
-
do you know which kind of steel is used for the RR bolts? I found some and I'm wondering if it's a good idea to try to make knives from them. I read in the US they use the RR spikes getting medium quality knives. the steel of the bolts is close to the one of the spikes? I also noticed there are different numbers on the head of these bolts. what do they mean? are they referred to the steel used? perhaps the carbon content??? someone already tried this road?
-
really clean and elegant. I love it.
-
here it is the result. seems good to me but I'll know if it works fine only at the run test (don't know when...) :confused:
-
I'll try to keep it as simple as I can. thank you so much! :cool:
-
Thank you everybody for your precious suggestions! probably this sunday or the next I'll try to work on it. I'm gonna use 2
-
I'm trying to make my own tracking wheel for my KMG clone. now, my question is about how to crown it. I thought about three kind of shapes (please take a look at the pic). I presume the angle and square shapes would stress more the belt... so my choise would be the round shape. in your view, which is the best shape for our purposes? and do you agree on the angles I would use?
-
I found this about railroad clips steel 60Si2Mn composition: http://www.jysf-otw.com/ch/pdf/60Si2Mn.pdf
-
sure Messerist! please do it and post some pics... I will check your vise and steal your improvements :p
-
I started thinking a simple way to build a reliable knife vise with little or no welding work as my skill in welding is orrible as you can see. :mad: I used a base 4"x4" (10x10cm), a scaffolding joint ad tow pieces of 2" (5cm) diameter pipe. it can be easily clamped to the workbench. very simple and adjustable. this is the result. I still have to improve the wood jaws with a piece of rubber to lock the blade an add another nut where you see the holein the first pic. but you get the overall idea. it works great! :D
-
I'm happy. soon I'll be in New York for a short trip to Manhattan! I imagine I can find everything in NY so I'm wondering if you could suggest me some interesting shops/places for materials, tools, sharpening stones, of course knives, etc. etc. in Manhattan. :confused: I possibly want to spend some money in good stuff. ehehehehe moreover is it possible to carry in my shipped baggage a knife or tow when I'll fly back home? ... possibly avoiding prison :rolleyes:
-
it seems really a deep etch (good point in my view). how long did you let it "on"?
-
woody, can you send me a copy also? gianluca666@gmail.com
-
it's a good idea for Xmas gifts! do you know the steel? C40 like the railroad nails?
-
-
-
here it is my first "real" etching on the blade of a stake-knife. I used the DC output to etch deep: 5V, 2,40amp, water and salt as electrolyte, pole + to the blade, pole - to the pad (felt over a stainless steel plate) for 10 min, then I changed the transformer to blacken the etch AC, 12V, 1,00amp, same electrolyte for 2 min. I like the result but next time I'll etch in AC with longer rests to let the blade and the stencil better cool down as I noticed some stencil damage and some little black scrubs also over the letters. moreover on my knives I'll use smaller font, maybe 3mm (these are 5mm)
-
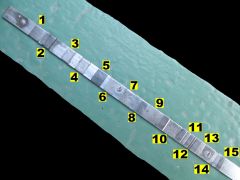
... some other test results. I followed some ads like use a real felt and not toilet paper on the pad, put a piece of stainless steel plate under the felt, etch small areas and try shorter etching time with higher voltage. 1 - 9 - see post #1 of this thread 10 - output: DC, 5V, 2,40amp; distilled water and salt; pole + to the blade, pole - to the pad (felt); etching time: 30 min; no stencil/mask/pad damage 11 - output: DC, 5V, 2,40amp; distilled water and salt; pole + to the blade, pole - to the pad (felt); etching time: 10 min; no stencil/mask/pad damage 12 - output: DC, 5V, 2,40amp; distilled water and salt; pole + to the blade, pole - to the pad (felt); etching time: 5 min; no stencil/mask/pad damage 13 - output: DC, 20V, 3,25amp; sulfuric acid (from an old car battery); pole + to the blade, pole - to the pad (felt); etching time: 5 min; no stencil/mask/pad damage 14 - output: DC, 20V, 3,25amp; sulfuric acid (from an old car battery); pole + to the blade, pole - to the pad (felt); etching time: 3/4 sec on - 5 sec off 10 times; no stencil/mask/pad damage 15 - output: DC, 20V, 3,25amp; distilled water and salt; pole + to the blade, pole - to the pad (felt); etching time: 3/4 sec on - 5 sec off for 5 min; stencil/mask/pad damaged
-
I used only tape to mask the 9 areas edges. I would like to cut my stencils but I'll probably buy them to get the right sizes (to mark my blades I'll need really small stencils) to use the wax could be a good possibility but I probably prefer a stencil to get always exactly the same mark
-
well, i spent some time to test my etching kit and these are the results. first of all let me introduce you my kit: a - the transformer (I tested 5 of them) b - 3 office clip (1 medium and 2 small size) c - a scrap wire d - a small electrolyte container to wet the pad e - a piece of wood to support the pad f - the pad (toilet paper) g - the electrolyte (I tested some combinations) h - stencils/scotch to mask the balde the pad assembled: I used a piece of stainless stell I found in the scrap pile as balde, with some sand paper I make it even and I clean it with alcohol. and these are the results I obtained with the following combinations: 1 - output: DC, 5V, 2,40amp; electrolyte: warm water and salt; pole + to the blade, pole - to the pad; etching time: 25 min; no stencil/mask/pad damage 2 - output: DC, 5V, 2,40amp; electrolyte: distilled water and salt; pole + to the blade, pole - to the pad; etching time: 25 min; then I inverted the poles: pole + to the pad, pole – to the blade; etching time: 12 min; no stencil/mask/pad damage 3 - output: DC, 5V, 2,40amp; electrolyte: vinegar, lemon juice and salt; pole + to the blade, pole - to the pad; etching time: 25 min; no stencil/mask/pad damage 4 - output: DC, 20V, 3,25amp; distilled water and salt; pole + to the blade, pole - to the pad; etching time: 12 min; some stencil/mask damage, pad a little carbonized 5 - output: AC, 12V, 1,00amp; distilled water and salt; pole + to the blade, pole - to the pad; etching time: 12 min; some stencil/mask damage, pad a little carbonized 6 - output: DC, 5,7V, 0,80amp; sulfuric acid (from an old car battery); pole + to the blade, pole - to the pad; etching time: 15 min; no stencil/mask/pad damage 7 - output: DC, 12V, 1,25amp; sulfuric acid (from an old car battery); pole + to the blade, pole - to the pad; etching time: 15 min; some stencil/mask damage, pad carbonized 8 - output: DC, 5V, 2,40amp; sulfuric acid (from an old car battery); pole + to the blade, pole - to the pad; etching time: 15 min; no stencil/mask/pad damage 9 - output: DC, 20V, 3,25amp; sulfuric acid (from an old car battery); pole + to the blade, pole - to the pad; etching time: 6,5 min; stencil/mask damage, pad carbonized I would like to make other tests but my conclusion, not surprisingly, are: use 5V, 2,5amp DC output (the higher the V the higher the temperature) to get a deep etching use quite long etching-time to get a black etching use an AC output press your stencil/mask to let them paste well to your blade to avoid deburrings water and salt is enough for a deep and sharp mark-etching
