

stromam
-
Posts
84 -
Joined
-
Last visited
Content Type
Profiles
Forums
Articles
Gallery
Downloads
Events
Everything posted by stromam
-

© Adam Strom
-
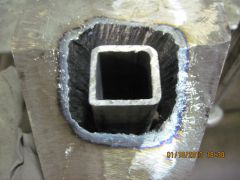
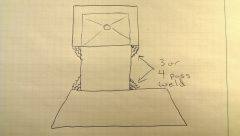
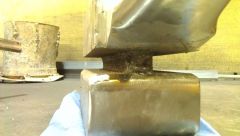 Showing the method of welding. 1" square stock in the center, full penetration weld will be completed to the edges.
© Adam Strom
-
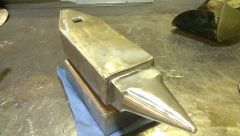 Welded to middle section
© Adam Strom
-
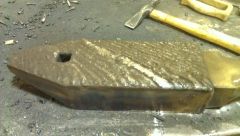
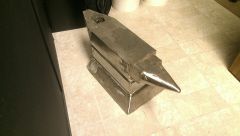
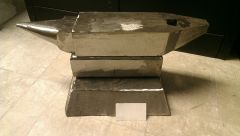
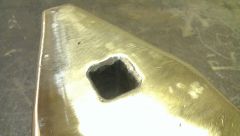 Finished grinding hardfacing, showing finished hardy hole
© Adam Strom
-
 Beginning the grinding process.
© Adam Strom
-
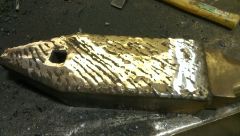
 2nd layer (forgot to take a picture of the first layer).
© Adam Strom
-

© Adam Strom
-
© Adam Strom
-

© Adam Strom
-
 Probably about 8-10 hours up to that point, I've probably got another 6 or 8 until its finished.
 -

My first anvil build - looking for advice
stromam replied to stromam's topic in Anvils, Swage Blocks, and Mandrels
Could anyone post a link to that fork lift anvil face? Did he show how he did the full penetration weld? I think I'd be less hesitant to do it if I could see some pictures. -
My first anvil build - looking for advice
stromam replied to stromam's topic in Anvils, Swage Blocks, and Mandrels
I've got access to both, our maintenance manager is going to teach me and said that you should always learn stick first, then mig is no problem. I only have 10 lbs of 7018 1/8" stick to work with. If i did use the 1/2" square stock and weld fully through, would 10 lbs be enough? Dodge, I didn't see your link? -
My first anvil build - looking for advice
stromam replied to stromam's topic in Anvils, Swage Blocks, and Mandrels
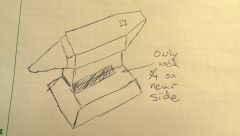
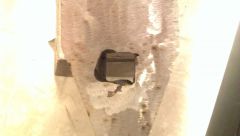
Here is what I have done this week, and this is basically how I think I'm gonna weld it up. I have a couple questions at the end. Here is my first question. Looking down through the hardy hole (which I will be fitting with a piece of 1-1/4" square tubing), do I need to be able to see all the way to the floor? In other words should I cut a notch out of the anvil base, or slide the anvil top down a bit? My second question/thought is on the welding. I made a couple sketches below of my plans for welding. I am planning on cutting another inch or so off the middle piece so that it is narrower than the top (see picture below). Does that look like a good way to weld? I really don't want to do a full weld like described earlier. I dont have (any) welding skills yet and don't want to try to attempt something like that. I would think this would be plenty strong. Lastly, I was thinking about leaving part of the near side unwelded (or maybe just one pass) so I can have a nice sharp corner to use for upsetting. Does that seem like a good/bad idea? Does anyone with blacksmithing experience think that would be a nice feature to have on an anvil? See sketch below. Thanks again guys. -
© Adam Strom
-
© Adam Strom
-
© Adam Strom
-
© Adam Strom
-
© Adam Strom
-
© Adam Strom
-
My first anvil build - looking for advice
stromam replied to stromam's topic in Anvils, Swage Blocks, and Mandrels
Just ordered the Lincoln Wearshield 15CrMn. I left a message with their application engineer and asked him which would be better. He called back and told me that the 15CrMn is awesome, he would definitely recommend it over the ABR or the 44 for severe impact. Now I just have to learn how to weld :) Thanks for the advice in the earlier post! I would say that being about halfway through with this project, i doubt I saved anything over buying a decent used anvil (the hardfacing was over $100, plus all the grinding wheels, gas, etc), but I've learned a bunch of important shop skills, so it will definitely be a worthwhile venture. -
My first anvil build - looking for advice
stromam replied to stromam's topic in Anvils, Swage Blocks, and Mandrels
Wearshield 15CrMn is manganese work hardening rod. It is deposited at 18-24C hardness and when work hardened, increases to 40-50C. I was considering using that until I talked to the Lincoln guy who recommended the Wearshield ABR (I suppose different technical guys would have different opinions like anything else). I am still kind of up in the air on the two. One can be heat treated and quenched to any hardness/toughness you want (which I admit would not be easy on a completed anvil). The other has to be pounded on to get it to turn hard. I like the idea of the work hardening material, but does it take a lot of beating/tapping to make it hard? Does it get hard enough to become brittle? -
My first anvil build - looking for advice
stromam replied to stromam's topic in Anvils, Swage Blocks, and Mandrels
I have reason to believe it is A36. It is only holding molten lead at 700 F, so it is unlikely it is any kind of special steel. I am definitely planning on heat treating the top before welding it to the rest of the pieces. I found a hard facing that looks suitable for welding on if the heat treating doesn't do the trick. Its called Wearshield ABR from Lincoln Electric and they recommended it for hardfacing an anvil. It is also easily forged and heat treated. -
Hard facing an old anvil.. sugestions ??
stromam replied to Norseman C.B.'s topic in Anvils, Swage Blocks, and Mandrels
Just got off the phone with Lincoln Electric. They recommended either: Wearshield ABR or Wearshield 44 For both good impact resistance and ability to withstand direct hammer blows without denting. The ABR looks more interesting to me because it specifically states it has good forging capabilities (could be also used to hardface other tools like hammers). If you click to the "typical operating procedures" tab on the left it also give heat treating steps. -
My first anvil build - looking for advice
stromam replied to stromam's topic in Anvils, Swage Blocks, and Mandrels
Sorry for the bad formatting on the last one, I guess smartphone posts dont allow new lines. -
My first anvil build - looking for advice
stromam replied to stromam's topic in Anvils, Swage Blocks, and Mandrels
Thanks guys, you all have really great advice/ideas. I love the idea of the lazy Susan anvil. We may be replacing another pot in the next year or two so ill think about it. Right now I wouldn't have any place to put anything that big anyway. I think for now I'm gonna try heat treating it, even if it only brings it to 35C that should help. If I need it harder later I think I'll weld on a plate. For the upsetting block at the base I have two options. I can center the top and have two 1" upsets on each side or put it on the far side and have one big 2" upset on the near side. Thoughts? My problem with going bigger was cutting out the right pieces. It's hard to tell from the picture, but that whole plate is bowed and warped from the electric heating elements under it (think of it as the bottom of a gigantic kettle). The bowing is actually the reason we replaced it. I'll be sure to keep you all posted and I'll start another build thread when we replace the next pot. The bowing and warping may give me stone interesting features to play with.