stromam
-
Posts
84 -
Joined
-
Last visited
Content Type
Profiles
Forums
Articles
Gallery
Downloads
Events
Everything posted by stromam
-
© Adam Strom
-

© Adam Strom
-
© Adam Strom
-
© Adam Strom
-
 Much higher temperature range for its color transformation.
© Adam Strom
-
© Adam Strom
-
© Adam Strom
-
-
© Adam Strom
-

My first anvil build - looking for advice
stromam replied to stromam's topic in Anvils, Swage Blocks, and Mandrels
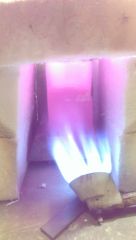
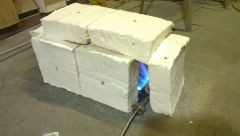
I just finished heat treatment (pictures to come) and didn't do a rebound test prior to heat treating, but I can say the surface was VERY hard relative to the mild A-36 steel underneath it. That being said, I could still grind it if I needed to, it just took a lot of work. I had to heat treat it for two reasons. One I wanted to make sure the welds got stress relieved, two I needed to soften the hard face. I was afraid that if I tried to drill my pritchel holes I would have eaten up some expensive magnetic drill bits. Talking to the expert on the manganese wear-hardening steel he said that the only way to un-work-harden the steel (which is what happens when you grind on it excessively) is to heat treat it to austenitization temperatures. Now it should be soft enough to drill. -
My first anvil build - looking for advice
stromam replied to stromam's topic in Anvils, Swage Blocks, and Mandrels
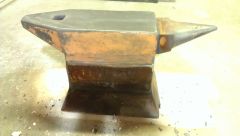
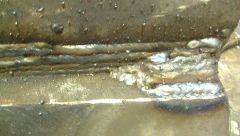
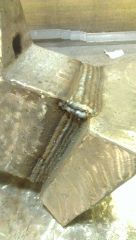
Some more updates, I'm very close to being done now. Here is the full penetration weld finished on one side. The top pieces ground and lightly polished (I don't know why I keep polishing before I'm finished, I just keep getting weld spatter all over and having to re-grind anyway). I decided to use 1" bar stock around the base to fill it in instead of doing a full penetration weld. I only did this because I wanted to add a few more pounds and an extra inch of overall height (2" total including the fill penetration weld). Here is is finally all in one piece. Finished filling in the bottom weld When a great idea struck. I'd do the type of welding I mentioned in an earlier post, then blend it into the upset block at the base to give me some extra curves to use. Here is the basic weld before grinding. And after grinding. It is kind of hard to tell what it looks like, but the right portion is a smooth fillet which blends in concavely to the right angle of the left 3/4 of the upset block. It makes kind of a spoon shape. Next I'll finish grinding and polishing, then heat treatment and drill the pritchel hole (I'll explain on that post why I waited til the end). On that note, can anyone recommend one or two sizes of holes to drill if you had to pick? -
© Adam Strom
-
© Adam Strom
-
© Adam Strom
-
© Adam Strom
-
© Adam Strom
-

© Adam Strom
-
© Adam Strom
-
My first anvil build - looking for advice
stromam replied to stromam's topic in Anvils, Swage Blocks, and Mandrels
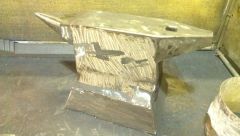
I had ZERO fabricating experience before I started this project, but I am surrounded by about 100 years of fabricating experience in our maintenance department. You guys gave me the ideas, they taught me the skills to get it done. The brazeal would have been much easier, but that wasn't what I was going for. I wanted something that would provide me with lots of experience and give me a "show piece" I guess if you want to call it that. I am currently planning on mounting it to a stump. I was actually thinking about just trying to liquid nails it. I think it will work since the underside of the base is very rough from grinding and there will be such a large surface area. I think it would make for a very cool look too. If it works I hope to get a lot of "how the heck is that thing attached?" I do plan on planing/routing the top of the stump (something I saw in another stump forum), but I'm gonna add my own twist. I plan on routing 3 "legs" on the stump with one of the holes on the near side of the anvil cut deep enough to get my foot underneath it so I can stand close to my work if I need to. I'll post pictures of the stump build in another forum thread. -
My first anvil build - looking for advice
stromam replied to stromam's topic in Anvils, Swage Blocks, and Mandrels
Thanks! I figured it out eventually, the reason I used a 1" square bar was to add some height and weight, I'm going to do the same when I weld it to the base section, which should get me well over the 200 lb mark. -
My first anvil build - looking for advice
stromam replied to stromam's topic in Anvils, Swage Blocks, and Mandrels
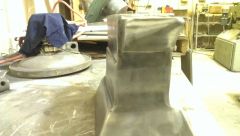
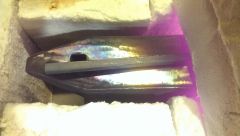
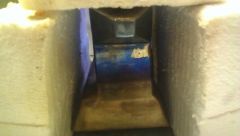
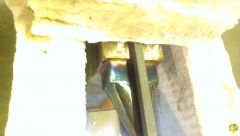
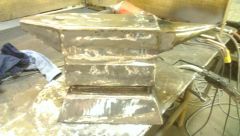
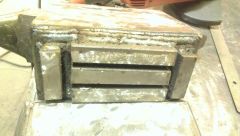
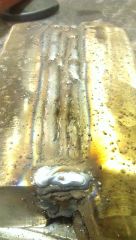
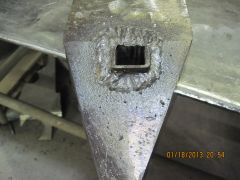
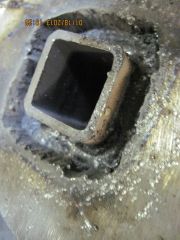
This post shows where I stand today. Hope to finish up the welding this week and take a day or so next week to polish everything up. Here is the second layer of hardfacing (forgot to take a picture of the first). The first layer was done perpendicular to the horn, not sure why i did the second layer at an angle, it just seemed to make sense (but was way more difficult, as you can see the lines are not straight). The hardfacing was nasty to weld. I'm glad I was wearing a full NIOSH P100 respirator, because the fumes were absolutely awful. This was the manganese hardfacing, Lincoln Electric 15CrMn for 15% Chromium, 15% Manganese. On the bright side it was very easy to grind down, not much more difficult than mild steel. But there was a LOT to remove since my welding skills still needed some improvement. Looking back I think the problem I had was going too fast, the welds build up in little mounds. Here you can see the final polishing revealing the finished hardy hole. I had to clean the inside of the hole out a bit with a hand file and round the corners a bit. A 1" square bar fits inside very nicely. Here I have it tack welded on the middle section with a 1" square bar running down the length (next picture). You can see there are still some pits in the surface, but by the time I got it ground down this far the face started work hardening quite a bit so I decided to call it good enough. And finally here you can see how I am doing the full penetration weld. I am glad I decided to do this because it gave me plenty of time to practice my stick welding. Once I get it build up a little closer to the sides, I'm going to switch to MIG to finish it up. I originally tried MIG from the start, but the tip couldn't get close enough and i was getting terrible worm holes. -
My first anvil build - looking for advice
stromam replied to stromam's topic in Anvils, Swage Blocks, and Mandrels
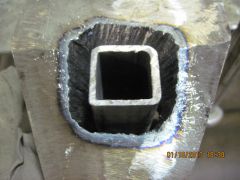
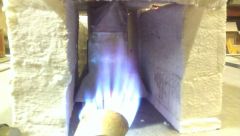
Alright finally some updates: Here is the burnout widened up a bit to make welding easier. And with the 1-1/4" 1/8" wall square tubing mocked up. The welding half done (did stick and there was A LOT of slag removal and flipping the piece). The slag removal was made much easier with the use of a pneumatic needle scaler. And finally the welding complete. Just needed to grind down the excess weld/tubing to make it flush (didn't take a picture). All the above pictures are from the underside of the anvil. The finished hardy hole will be in a future post. -
© Adam Strom
-
© Adam Strom