locky.au
Members
-
Joined
-
Last visited
Everything posted by locky.au
-
This is very sad news....cant believe it. My sincere Condolences to his family.
-
The reason for being able to attend this course from Australia in the first place was taking advantage of a work paid conference in Las Vegas & then tacking on some personal holidays. My intention in attending the training with Brian was always to learn process & methodology and not about producing project items. I did have some specific requirements for home such as a hot cut hardie for my 330lb anvil (1 5/16” / 33mm hardie) & ultimate tongs but was always focused on learning how to forge & the actual techniques. The by-product of which should result in tools & project items. This concept was absolutely in alignment with the way Brian teaches as he wishes to expose individuals to correct techniques & forging methodology. He will always ensure students walk away with tools & project elements. A case in point, on day 3, Brian asked what I wanted to do next I replied your “ultimate tongs”. Brian looked over his glasses with a facial expression that said this is going to be challenging! We discussed how I would like to go about it & I believe the process agreed was perfect for learning. Brian provide material for two sets of tongs, demonstrated technique & process in a staged & step by step approach; sending me away to produce mine after each staged instruction & illustration. This was a great learning experience which resulted in two sets of Brian Brazeal “Ultimate Tongs” now in my smithy in Australia! After ten days Brian, Lyle & I had produced the following tools; 2 hammers (1 rounding & 1 fullering), Habermann style hammer tongs, 2 X Ultimate tongs, 2 Hot cut hardies (one large to fit my 33mm hardie), handled hot cut, drift, handled punch, 2 handled fullers (1 ½” & 3”) with matching (2) hardie fullers, hex edge tool (hardie), cupping tool (hardie), hump tools, 15 punches & a fire rake. Total of 33 individual tools and an estimated conservative retail value of $1000! In terms of projects & templates for learning this included, a trivet, 4 X scroll jigs, 1” X 1” 3D horse head, 2D story board of how to make horse heads, Seahorse, Crane, Cross, Leaf, Calla Lily, Cable Knife & various attempts at these techniques. In fact I had to get a second suit case to transport back 62lb of tools & projects to Australia (thanks Lyle Wynn for the suit case!). Brian is passionate about Blacksmithing who lives & breathes this wonderful trade. He is very humble, generous & enthusiastic about passing on knowledge. In fact the analogy I use is that it’s like drinking from a fire hydrant being around Brian Brazeal! For those who take the opportunity to learn from Brian, my tip is take lots of notes, photographs & video to maximise your learning experience because you can only drink so much. I did all of these (including pictures of chalk diagrams on the shop floor) & use them to reflect & practice the things I have learned now that I am back in OZ. He has a lot to offer the Blacksmithing community & this is clearly evident and demonstrated time and time again as illustrated through the various posts on this forum & demonstrations at various events. His work ethic is very high & is the same way I like to work; day one 7:30 am to 8 pm. In fact I actually arrived late afternoon the previous day from the work conference & Brian had me in the shop even before the course started striking to make a hot cut hardie! Over dinner & late into the evening we would talk some more about all different aspects of blacksmithing. He shared his experiences & time (approximately 12 months in total) with Alfred Habermann one of the great European artists of our time. Thinking about my comments here, this is Blacksmithing boot camp . You can clearly see many years of harden skill as you watch Brian forge. He is very particular about correct forging techniques because if you follow these; as Brian would say “it practically makes itself”. The final observation I will make is that Brian is a perfectionist, an incredible eye for detail, composition, proportions & perspective. I have always considered myself a perfectionist but over the years I have allowed this to wane for commercial reasons. Having watched how accurate he is from making out to grinding & polishing; I will be reinstating my attempts for perfection. Even if I slightly fall short I will be so much closer than most . There is so much to learn & I have a lot of information to digest & put into practice from my time in Brandon Mississippi. The southern hospitality is absolutely all that is said about it & Lyle Wynn (LDW)is the epitome of it. Lyle would visit the shop each day & contribute to my learning’s in many ways. Brian & his wife Karen are wonderful generous hosts whilst I there with them that made my learning easy & a very comfortable stay. Karen’s support was terrific from pick up & drop off at the airport, to meals & sometimes conversations other than Blacksmithing . I believe I have forged a friendship with them & Lyle, & thank you all for my stay in Mississippi.
-
Here's mine.... Locky
-
Thanks mate, great step by step.....
-
Thanks guys appreciate the feedback, like a lot of people here I too would like to contribute in some way to the craft of Blacksmithing and I do hope these type of step by step guides help some. Cheers, Locky.....
-
Nice work mate, thanks for the post......
-
Thanks Ian, it was fun and to use it the first time at home was great!
-
Hey mate, no pictures :)
-
Thanks Rob, the blower is leaking oil a bit so I will need to recondition it soon but it works very well. I was concerned about the size of the gap between the firepot and clinker breaker but all good; heated up the coil spring in no time.
-
What a great video of forging history....
-
Okay its been a while.... I have uploaded another series of pictures showing air gate & control, ash dump, motor & blower mounted & my first fire in my Album Gallery "Fabricated Coal Forge". There are 56 pictures in that album including design diagrams for your reference. Fabricated Coal Forge - Blacksmith Photo Gallery This was a great project with lots of challenges including today when I was sitting on the floor lining up the air gate mechanism when the bloody very heavy handle decided to move hitting me square on the head...... Well I saw stars, you know the feeling it hurts that much you can't even swear Air Gate Handle Fully Opened - Blacksmith Photo Gallery Enjoy....
-
Okay its been a while.... I have uploaded another series of pictures showing air gate & control, ash dump, motor & blower mounted & my first fire in my Album Gallery "Fabricated Coal Forge". There are 56 pictures in that album including design diagrams for your reference. Fabricated Coal Forge - Blacksmith Photo Gallery This was a great project with lots of challenges including today when I was sitting on the floor lining up the air gate mechanism when the bloody very heavy handle decided to move hitting me square on the head...... Well I saw stars, you know the feeling it hurts that much you can't even swear Air Gate Handle Fully Opened - Blacksmith Photo Gallery First fire - http://www.iforgeiron.com/gallery/showphoto.php/photo/16917 http://www.iforgeiron.com/gallery/showphoto.php/photo/16919 Side draft hood pending - another day Enjoy....
-
-
 Forged rod for clinker breaker
-
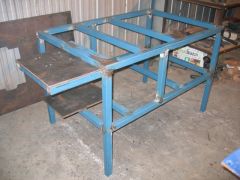
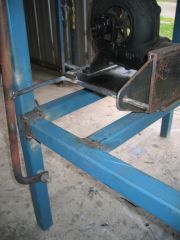
 Frame with top mounted
-
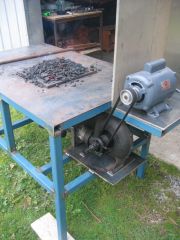
 Frame with Motor mounted - End View
-
 Frame with Motor mounted
-
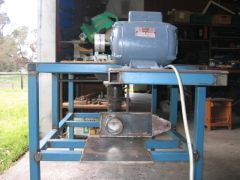
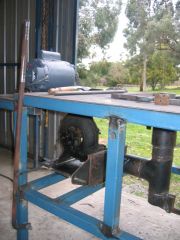
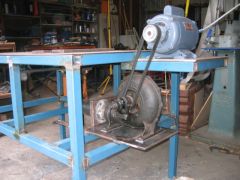 Frame with Motor & Blower mounted
-
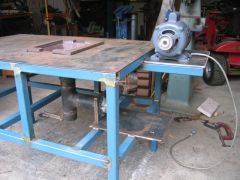
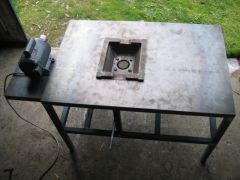 Frame with motor and firepot mounted
-
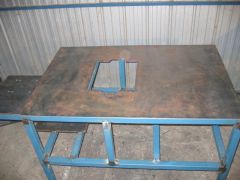
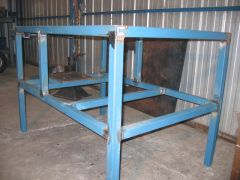 Coal Forge Frame - Constructed...
-
 Coal Forge Frame - Constructed...
-
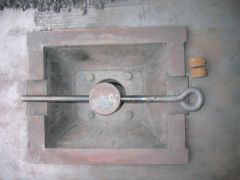
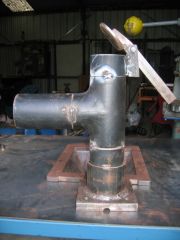
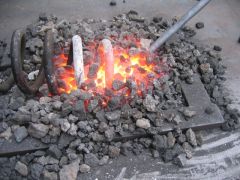 Coal Forge - First Fire - testing on coil spring!!!!
-
 Coal Forge - First Fire!!!!
-
 Coal Forge - First Fire!!!!
-
 Air Gate Handle Fully Opened - Different View
-
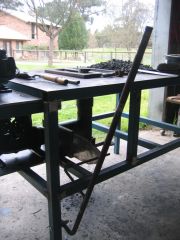 Air Gate Handle Fully Opened
-
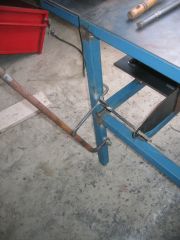
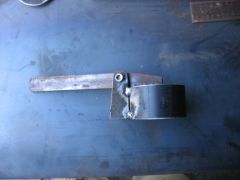
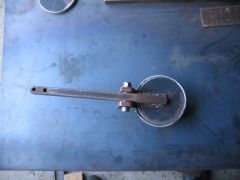
 Air Gate Handle
-
 Air Gate Handle Manufactured
-
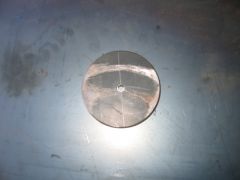 Ash Dump Disk
-
 Ash Dump Side View
-
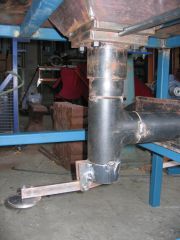 Ash Dump & Tuyere Mounted to Firepot
-
 Ash Dump Welded to Tuyere
-
 Ash Dump Top View
-
-
I don't have any cracks in mine just the edges of the anvil need fillings, I would assume not as large of a project as this. Thanks for the additional information. In terms of the stump, thank you I will check out "Bowerbird Timber".... Yellow box is such a hard gum, that will last you too. Hopefully I can find something similar. Cheers, Locky
-
You should get another couple of decades out of it Can you tell me about the welding process? What rods did your mate use etc? What was your clean up process to keep the anvil face flat? Is the welder local in Victoria running a busines? I ask as I have an anvil in need of some repair also..... I also notice a very nice Red Gum stump..... Where did you score that mate? Regards, Locky
-
Thanks guys appreciate your comments... I will attempt to keep the pictures coming until completion. I just require some time to buy some steel to mount the blower and motor, complete all welds and give it a test run. I can't wait! Locky
-
Hi, here is mine being fabricated at the moment including some plans... Hope you get some ideas... cheers. Fabricated Coal Forge - Blacksmith Photo Gallery Locky
-
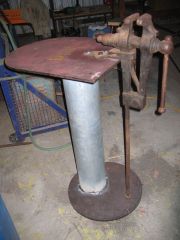
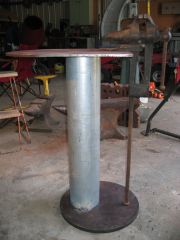
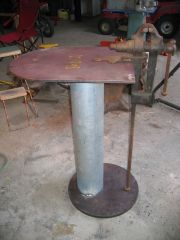
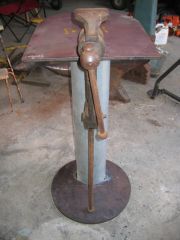
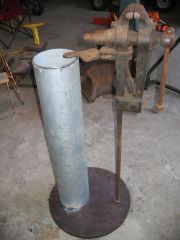
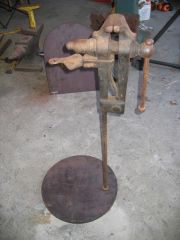
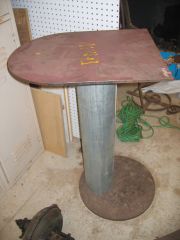
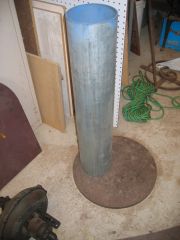
Hi he is a mobile one I built recently, 20mm plate base.. Hope it helps Post / Leg Vice - Blacksmith Photo Gallery Regards, Locky
-
I have to agree with the consensus thus far on Uri Hofi and would like to suggest Mark Aspery with his detail in presenting a methodical edification of Blacksmithing techniques through his books, videos and classes.
-
Yep went a bit overboard Dodge My mates joke that I am like "Tim the Tool Man Taylor" from the TV show "Home Improvements" Bigger, more power etc.... The fire pot's base is 40mm (2 X 20mm plate) to facilitate the clinker breaker and the sides are 15mm; think I should be able to pass this to my youngest son...... Locky
-
Hi Jeff, I have recently placed some pictures and design documents in an album; link: Fabricated Coal Forge - Blacksmith Photo Gallery Hope it helps.. Regards, Locky
-
Thanks for the comments guys, appreciate it. I will keep adding pictures as I add an air gate, ash dump, motor and blower etc.... In terms of the venting at some point, after I have played with it a while, I will add a side draft hood etc. In the mean time I will put it in the open with plenty of ventilation but under cover to protect it. Cheers, Locky
-
G'day guys, brand new to smithing only had one day introduction so far and in the process of building my shop and gathering equipment etc - time permitting. I absolutely have the bug and cant wait to have my shop set up. I took leave (holidays) over Christmas 2008/2009 just to spend time in my shed to get a coal forge built. Achieved a fair bit and have uploaded pictures to my gallery. This site is awesome by the way! I live in Langwarrin, Victoria and have a job where I travel around Austraila and a little overseas. Not alot of time other than the odd weekend to get into this, so in between times lots of reading and learning. Cheers, Locky
-
G'day guys, please find attached a picture of my leg vice stand. There is a series of pictures in an Album in my gallery if you wish to see the stages of fabrication.
-