
Dillon Sculpture
-
Posts
1,578 -
Joined
-
Last visited
Content Type
Profiles
Forums
Articles
Gallery
Downloads
Events
Everything posted by Dillon Sculpture
-
Steam Hammers
Dillon Sculpture replied to Dillon Sculpture's topic in Power Hammers, Treadle Hammers, Olivers
Video? I was hoping to get some seasoned power hammer men down here for a weekend or so... I would love to get all four machines running some serious stock at the same time, of course that means a bigger forge! Anybody have thoughts on using pvc to pipe the exhaust outside? -
Steam Hammers
Dillon Sculpture replied to Dillon Sculpture's topic in Power Hammers, Treadle Hammers, Olivers
All dress up and no where to go... Got it wrapped, set and formed. Looks a bit anal but I'm having to dump the concrete a yard at a time with a rubber tire loader (it's good to have a friend in the grading business) The driveway up to my shop is 300' at 20% grade, just don't want to chance a 30 ton truck popping the crete all the way up. -
If you didn't pay much or somebody gave it to you is the only way it would make sense to ship it across the country. If thats the case maybe you should consider selling it for a profit and finding something closer, I know someone here that would be interested.
-
Steam Hammers
Dillon Sculpture replied to Dillon Sculpture's topic in Power Hammers, Treadle Hammers, Olivers
Yep, -
Steam Hammers
Dillon Sculpture replied to Dillon Sculpture's topic in Power Hammers, Treadle Hammers, Olivers
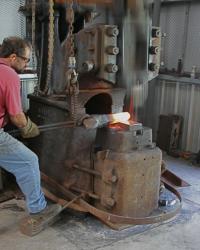
Wood is sealed, rebar done, set in the wood and anvil tomorrow and form it up. The 200 has landed, bolt it down and add air. The ram to anvil ratio had been bugging me so I pull the ram out of hiding and gave it a way in, 500 lbs. with the top die. The piston is also part of the weight rating on the hammers which we calculate at 200 lbs. Seems like an odd weight and it really doesn't help the anvil ratio quandary. I guess since there is no surviving information on Niles Bement Pond steam hammers it will be a mystery. -
Amazing machine skills there John, I love the big stuff :rolleyes:
-
Steam Hammers
Dillon Sculpture replied to Dillon Sculpture's topic in Power Hammers, Treadle Hammers, Olivers
Well Ric, I guess that is a advantage of the steam hammer. My hammer only weighs 15000 or so total and it disassembles into sections that can be easily transported and lifted with a 5000 lb. forklift. Moving and setting the 6B with a total weight of 38000 lbs. is a whole other story and in comparison, I would think rigging, transportation and installation would cost more than the foundation itself. I have $300 in equipment rental, $200 in rebar and $1200 in crete for both hammers, the wood was milled here from clearing the land for my shop. Of course my time will add up sooner than later but if they aint working their not working... -
Steam Hammers
Dillon Sculpture replied to Dillon Sculpture's topic in Power Hammers, Treadle Hammers, Olivers
The closest 6B to you RIc is at Machinco, go fer it! You need a few for machines :blink: A bit of encouragement to you as well Woody! You won't be diappointed. Found some fiber asphalt foundation sealer today that should work nicely for the wood, it weighs in at 1800 pounds. -
Steam Hammers
Dillon Sculpture replied to Dillon Sculpture's topic in Power Hammers, Treadle Hammers, Olivers
Good idea Smith, I hope I never see the day but it's good to prepare. Just measured 3" from the safety line to the point of bottoming out, makes sense because the bottom air port still needs room to send the ram up. -
Steam Hammers
Dillon Sculpture replied to Dillon Sculpture's topic in Power Hammers, Treadle Hammers, Olivers
Thanks, The wood is red oak, was under cover with good air flow, no sign of rot but it definitely has bugs. The whole block is tapered from bottom to top just in case removal is necessary and I will add a 1/2" layer of foil covered styrofoam sheathing around the entire block to separate it from the concrete. At his point I am shooting for 1/2" before the safety line, (manufacturers line marked on the guide that shows safe distance from bottoming out the ram) As I remember it has another 1" before bottoming after the safety line but I double check. I was hoping to pour a foundation outside for a 1 ton 20' jib crane at the same time as the hammer foundation but with all the rain I might have to delay the pour. Looks like the 200 gonna go in first so I can figure out the design for my treadle link on both hammers. I can probably run it a bit without risk of damage to the footing, should be fun B) -
Steam Hammers
Dillon Sculpture replied to Dillon Sculpture's topic in Power Hammers, Treadle Hammers, Olivers
As per the book, most of the on end orientation are set under the drop hammers, I feel that more shock absorption is important in my application, when I had it set up before it literally shook the ground for 100'. My soil quality is great and the monolithic pour will capture everything as a unit without the risk of seperation. I am thinking about a cam actuated lever on the throttle link in Art's drawing that would raise the ram in instead of the ball valve as in Grant's set up. -
Steam Hammers
Dillon Sculpture replied to Dillon Sculpture's topic in Power Hammers, Treadle Hammers, Olivers
Well John my research is a bit spotty at best and I tend to go things head strong without much regard for history, found this book over on the machinist forum. The wood was not kiln dried but has been covered for years, considering different types of sealer for the wood at this time, any preferences would be appreciated. Back to the linkage I found this drawing by Art. -
Steam Hammers
Dillon Sculpture replied to Dillon Sculpture's topic in Power Hammers, Treadle Hammers, Olivers
Not tied to, just sitting on, you could take it bit further. It's sitting on the earth so thats 13,169,533,693,875,800,000,000,000.0 pounds soooo thats 1.75593783 × 10²² TO 1 :P -
Steam Hammers
Dillon Sculpture replied to Dillon Sculpture's topic in Power Hammers, Treadle Hammers, Olivers
Hey Ric, thats blister, he shows up after the work is done :lol: Actually, one of the hardest working person I have ever met, has his own shop, goes to school for machining three days a week, works for a machinist gets in trouble around my shop and only 20yrs. old to boot... -
Steam Hammers
Dillon Sculpture replied to Dillon Sculpture's topic in Power Hammers, Treadle Hammers, Olivers
Alright, I just weighed the anvil, sow block and bottom die to be 5500 pounds. Thats just over 7 to 1 ratio. I haven't weight the wood but calculating 60 pounds a square foot the 3'x4'x3' oak base would be another 2000 which would be 10 to 1. In addition I poured almost 5 yards (4' thick) under that, another 15000 pounds which equates to 30 to 1. -
forging a shovel head
Dillon Sculpture replied to Larry H's topic in Blacksmithing, General Discussion
Wrong kind of Shovelhead... Forged aluminum. -
Tup to anvil weight ratio science
Dillon Sculpture replied to macbruce's topic in Power Hammers, Treadle Hammers, Olivers
As well as the information I found on the application of wood under the anvil this book speaks about anvil weight ratios and why, both of which John and Ken concur- http://www.archive.o...ge/538/mode/2up -
Steam Hammers
Dillon Sculpture replied to Dillon Sculpture's topic in Power Hammers, Treadle Hammers, Olivers
Matt, the first picture of a foundation plan I saw was on Anvil Fire, but here is a better source- http://www.archive.org/stream/machineryfoundat00crof#page/538/mode/2up Even shows how to install on the FOURTH floor! :o I am probably a bit light on the concrete but I won't be running 3 shifts unless you count the snaggletoothed coke-addled minions B) -
Sweet hammer Sam. My precious :huh:
-
Do you listen to music while forging?
Dillon Sculpture replied to 34557564's topic in Blacksmithing, General Discussion
XM all day... -
Steam Hammers
Dillon Sculpture replied to Dillon Sculpture's topic in Power Hammers, Treadle Hammers, Olivers
It was the first time I used my router for wood, I had bought it when building a large drive gate in aluminum. Pretty rough in the carpentry department, I just don't like sharp stuff! No problems with the threaded rod or drill but thanks for the tip and link (that is a coupler nut with a bolt in it, used with a strap to pick up the block). I have quite a bit more wood left from clearing the land to build the shop, been considering using some in my sculptures. I am curious of your position at Birds Eye, the work is amazing! -
Steam Hammers
Dillon Sculpture replied to Dillon Sculpture's topic in Power Hammers, Treadle Hammers, Olivers
Done with the big one, three 12" layers with a 3" cap, after milling flat I got 38" overall. Over 7' tall with the anvil and sow block. A bit more rebar then I'll be able to set this in and pour it up flush. Still have to mill the 8 1/2" of wood for under the hammer but I'm getting there. -
Steam Hammers
Dillon Sculpture replied to Dillon Sculpture's topic in Power Hammers, Treadle Hammers, Olivers
Ken, I would be done soon if you come down here and work some linkage magic B) Back on wood duty after a week of building sand castles and drinking beer :P Shooting for some more mud end of week, might even set the 200 just for a look see. -
Amazing work, impeccably crafted! I would really enjoy seeing some of the process if you have a chance, thanks for sharing.
-
Great work Beth, your smithy has been running well!