HWooldridge
Members
-
Joined
-
Last visited
Everything posted by HWooldridge
-
Nolano, Bob Patrick is one of the best smiths I have seen at forge welding. He takes the two pieces and pushes the scarfs together before picking up the hammer. The parts have a tendency to stick a little and can then be gently hit until they are stuck properly. He also does this without letting them touch the anvil, which sucks the heat out pretty quickly. You might also try a dot of MIG or stick weld on the side to hold the pieces together before finishing. If it's a good forge weld, the rest of the scarf will close up - if not, it will break apart. After you get used to seeing what a good two-piece weld looks like, you can go to putting separate pieces together.
-
IMHO, it is a very good firepot and I would not hesitate to buy the forge setup if it's a reasonable price.
-
A picture would help but if my memory is working properly, I think it was made by Champion. If it's the one I am recalling, it is very heavy wall and has three slots in the bottom with no movable breaker - made for coke. Is that the right description or does it have a clinker ball?
-
I read an article some years ago about adding glass to iron inside punched holes. The author just crushed beer or soda bottles and put the dust in the hole, then heated it with an O/A torch until it started melting. As it cooled, it would often flake a chip or two, which added to the look.
-
People have a real short attention span. Do things that are quick and show the end object. Many people make nails but I prefer S-hooks and J-hooks over anything else. I did a big Friedrich cross one time and it took about an hour to make but there was no one around from start to finish. If your buddy is the main demonstrator, watch him and follow his lead. You can also work the fire, get coal, cut stock, etc. Whether forge welding or not, I am a fanatic about roping off the area because I've had lots of kids come charging up and put their little noses right in the way. If the rope is there, the parents will usually work to keep them behind it - if not, they'll complain that you should have protected little Willie from the mean old hot metal. :?: In regard to dress, wear whatever is period correct and comfortable. I almost always wear blue jeans, a black T-shirt or blue chambray work shirt, leather work boots, red suspenders and a cap. I have a pair of safety lenses with no correction in an old wire glasses frame so it makes me look the part but is eye-safe at the same time. However, it's funny what people think a smith should look like - I have a friend that works with me at folk craft fairs and he dresses in 18th century clothes with a wide brimmed floppy hat. People invariably go up and start talking to him as the "blacksmith". Have fun but don't BS anyone - it's amazing who might be in the audience. At the same folk festival where I made the cross, I looked up to see a nationally known smith watching me. Needless to say, my knees started knocking but he graciously stepped up and made a few leaves for the crowd then quietly left. We joked that the recipients never knew what those leaves were really worth... :lol:
-
The nice thing about welding a guide bar to a grooving tool is that you can quickly and very accurately set the distance between the two, i.e., if the border needs to be 3/8, set the bar to the creaser accordingly and weld it - maybe not pretty but done. I like Ed's version but it probably took longer to make than simply flattening a spike and welding a bar on the side - course, Ed's a pretty fair smith and quick to boot so it'd be a good race... BTW, I have many pairs of tongs shaped like what Ed shows for holding. All my set tools are approximately the same length and fit in one of three different size tongs - depending on what tool is used. I much prefer this over either punching a hole for a handle or wrapping wire or fullering a groove, etc., etc.
-
Mesquite is near Dallas (about 4 hours from Houston). I am 3 hours away near San Antonio HABA's (Houston Artist-Blacksmith Assoc) website would be a good place to start for places and people to go and see. MD Anderson is an outstanding cancer center - you will be in good hands - best of luck and God bless.
-
I "think" I remember seeing some reference on Anvilfire to a home made design that everyone liked. I'm sure Jock D. can provide the details.
-
Thanks to all for the kind words. I'm nothing if not open minded and was also studying on a collar since there has been some good discussion on fastening methods. I think it would be much more work than a simple rivet because the frame is 1-1/4 and the scroll is 5/16 square (forged from 3/8 round). If I had to do a collar, I believe I'd punch two rectangular holes in the frame and push a separate "U" over the scroll and thru the holes, then fold down the ears in back. Would have to relieve a depression so it would sit against the wall but that would not be too tough. I'd like to hear other ideas on collaring methods.
-
No, they are not hardened since all I hit is hot steel. However, they are WC/HC spikes so higher carbon than mild steel and resist deformation a little better. If you want to harden a spike, try heating to a dark, pulsing, cherry red (sounds like one of those Internet spam sites, doesn't it?) and quench in water. It should almost slide a file at that point and you can draw back to whatever hardness you want. It must be a WC or HC spike - mild steel spikes won't get hard enough.
-
I don't have an adjustable creaser but there are several ways if I was gonna make one. The first one that comes to mind is to drill a hole in the chisel, insert a bolt and stack washers between chisel and material stop, then tighten with a nut. I'm sure there are other ways to skin that cat...
-
Ralph, I started another thread on the tools.
-
New thread for tooling: The creaser is nothing more than a railroad spike flattened into a chisel shape with a piece of flat stock welded on the side to provide a stop. Can make several of these pretty quickly for a variety of sizes or put some time and thought into a nice adjustable one - you can see which direction I went. This idea came out of Otto Schmirler's book Werk and Werkzeug des Kuntschmiedes. The rope tool is the head of a railroad spike forged into a rectangle. I used a small jeweler's hack saw to mark the lines (could also use a cold chisel or scribe the lines) and then filed out each mark with a 6" fine cut. One could make a right and left - but I only have the one tool, so applying it to both sides of a piece will show results in the same direction. In use, you heat the stock, apply the creaser for whatever length you like and then come back with the rope tool. Don't worry too much about overlapping the little ridges, it will look appropriately random and the average person won't see any mismatch.
-
Yes, you can see the MIG dots on the other side - they are small but I didn't try to hide them. I also thought about drilling a hole in the frame and welding from the back but that would not have worked on the top fastening. If I was of a mind to do so, it would be pretty easy to install rivets now and grind the welds away but of course the finish would need to be redone. This was an exercise so maybe I'll do rivets on the next one. Not that it applies in traditional work, but I was in an art gallery last week that carried quite a bit of iron and the appearance of welds was evident everywhere. Almost everything was done cold and the only hot work was mashing a few pipe legs on tables. Very little texture, lots of glass and shiny brass or stainless knick-knacks welded on here and there. The dealer said the stuff was flying out of there.
-
Ed, Thanks, I think that was one of two identical garden gates I did for a local contractor. After I worked for a couple days applying a clear coat, they installed and promptly painted them black - oh well. Also my first gates and the largest things I had then done to date. It was purely coincidence that it was in an issue with the song 'cause I ain't moosical... :cry: In some issue prior to that, I wrote a long boring account of restoring an anvil but I can't recall what year or issue - probably mid to late '80's.
-
Glenn and Ralph, I agree about collars or rivets on the bracket - I just got tired and took the easy way out. I'll take a pic of the grooving and rope tools and post them.
-
Final stage of development and where I used the element. For anyone who might want to create something similar, the basic steps are as follows: 1. Bend double a piece of 3/8" square and forge weld for about an inch. (2 heats) 2. Take a large fuller and draw the nose out then use a bob punch or ball peen to make the 'ears'. (2 heats) 3. Heat the whole thing and cool only up to the ears, then pull the legs out. (1 heat) The legs can then be finished however strikes your fancy. No filing done anywhere on the piece - left in as-forged condition. I used the MIG to tack the element to the sconce and candle cup was fastened with 1/8 rivet. Piece was finished by sand blasting, followed by gun bluing and light abrasion with grit cloth, then a coat of clear satin urethane. I listed the heats for the trilobe element only to illustrate how much time might be needed if you had to do a bunch. Edit: photo resized, detail added
-
For anyone who has built or plans to build a home made belt grinder, please inspect your used casters carefully. I built my junk yard grinder several years ago with used parts. No telling how old the casters were. Couple days ago, the idler wheel decided to throw a quarter sized piece of urethane at me. Fortunately, it was as I was turning so the chunk hit me in the side just above the belt line - my deep rolls of fat protected me from serious harm - but it did draw blood and leave a nasty bruise. Today, I chucked the wheel in the lathe and turned off all the remaining rubber, then trued the caster and crowned it again. The plastic was still soft but there was enough embrittlement to cause the failure. Hopefully, it won't throw a piece of aluminum anytime soon.
-
Don't know what a footy is - unless it's a local bar :wink: ...but some folks consider copper to be poison in a welding fire. I have heard pro and con on whether it makes a difference but in any case, I don't put pennies in my fire.
-
Strine pretty much hit the salient points and either a chain link or faggot weld is probably easiest. People sometimes forget that the old time smiths almost always had some help for two part welds so a guy working by himself must be quite skilled (watch Bob Patrick sometime if you get a chance). I like to demo welding by taking a piece of 1/2" square, nicking over the hardy and folding back only about 5/8 or so in length. Bring it to temp, flux, weld, forge into a square lump and finally shape into a round snub. It will split if a bad weld. We have a fellow in our local group who has taught several people to forge weld successfully and he always starts with a chain link, then has them make at least 5 assembled links. By that time, the student should understand the basics. Adding to what has been said, a clean fire is important (coke or coal), proper flux and moving promptly when the time comes. Remove any clinker before starting. Proper fire color is entirely dependent on an individual's eyes so is a little hard to describe - to my eyes it is when the fire is a bright white-yellow and the material is the same color. Some people use the flux appearance - when it is flowing freely, time to weld. It's also very convenient if your gas forge will get hot enough because that eliminates all the problems with solid fuel fires. When it's hot enough the weld will be incandescent and almost always makes a "SPAT!" noise when struck. It also feels soft under the hammer - not like when typically forging. If it is sparkling like the 4th of July, it is burning and probably will not weld - in fact, it likely won't weld on subsequent tries either. Once it sticks, don't forge down to size below a bright yellow. The metal is moving around and can be split by cold hammering - even if it was a good weld to start. It is also perfectly acceptable to take a second or third heat to finish. These thoughts are for mild steel - I hope JPH relates his knowledge on damascus and pattern welding.
-
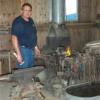
Might be hard to see from the picture but the first shape on the left is a butcher for setting shoulders, the next is flat, the next is a very large radius fuller and the far right is a smaller more aggressive fuller. Almost everything they did was on the middle fuller and flat surfaces. Using a sledge to assist, they drew 1" square down to about 5/16" in one heat.
-
These pics are to test my abilities to resize a couple of jpgs, but they are also good examples of the setup that the Brazeal brothers used at their now famous demos. Shows that you can employ something besides an anvil shape to do very good work. They only used the little anvil's horn for turning - all forging was done on the edge of the plate. BTW, the top one is supposed to be 660 pixels and the bottom is 440.
-
Sorry about the picture size. These are fairly small .jpgs so I don't know why they are coming out so big. I live on a caliche hill, which is about all we have around here. It's normally used in road base and makes a very fine dust when dry, which is probably a health issue but about the only thing I can do is spray water or oil (not recommended) on it to settle the fines. I meant to add earlier that a very serviceable job can be done refacing anvils with a big (7" or 9") right angle grinder using cup wheels or a coarse disc. Put the anvil where you can lean with your body weight and try to stall the grinder... :wink:...in other words, make the sparks fly. When it's where you want it, get some fiber sanding discs and finish to your liking. 80 grit is fine for a last pass unless you want a mirror finish.
-
This Peter Wright got a completely new faceplate about 20 years ago and has seen regular use since. Note how high the step is and if you look at the hardy hole, you can see the plate edge. I wrote an article for Anvil's Ring many years ago that provided a complete description BUT like Woody said, it is a great deal of work and one can often do more harm than good. The horn is easy to fix because it is not hardened but my recommendation is to find another anvil in better shape and trade the battered one off if you just can't stand to work on it. Edit image resized
-
I haven't seen your forge but I assume it doesn't have flanges on both pulleys (maybe just the fan and the big one is crowned) so you can glue the belt loose and then roll it on the pulley after it's dry. Have made several clinker breakers and the easiest seems to be to take a piece of 1-1/4 or so shaft, cut to length and flatten into an oval. Drill a hole thru long ways for the shaft and a small hole perpendicular to thread for the lock screw. This will typically fill most forge pot tuyeres.