

ede
-
Posts
254 -
Joined
-
Last visited
Content Type
Profiles
Forums
Articles
Gallery
Downloads
Events
Posts posted by ede
-
-
More than you probably ever wanted to know about Silica .
It appears that while diatomaceous earth is also amorphous like fumed silica, the particle size is much larger in the micormeters vs nanometers of fumed silica. That would be to easy if we could just buy some diatomaceous roach powder at a big box store.
-
On 4/6/2017 at 3:00 PM, timgunn1962 said:
I got a density of 1109 grams/litre. I don't think it's critical at all, but it gives a starting point.
At 1109 g/l, it suggests that there is a little over 100g of fumed silica per litre of water: about 2 Oz/pint. Checking out prices for the West System 406 over here, it looks like it would cost as much to homebrew using the West stuff as it would to buy the commercial rigidizer, so I'd suggest checking out generic fumed silica products.
That's a little higher than I expected it to be. What did you use to test the density?
-
There are some people that build these that weld the baffle plate between the plenum and the burner bock. They then braze and or press fit short stainless steel tubes in lieu of crayons into said baffle plate. I'm guessing they drill and countersink the baffle plate before brazing or welding it into place, followed by pressing or brazing. Is this to seal any gas leakage between the block and the plenum? I don't know for sure.
-
Hi Alan,
Great idea on ordering replacement O ring seals. Yes, this one is a Smith brand, which I believe Miller Welding has bought. The Smith brand, as far as I know, is still made in the US. You have quite a collection of torches and even Victors before they started being manufactured overseas!
You will never hear me complain about being reminded on Safety. Thank-you for that!
-
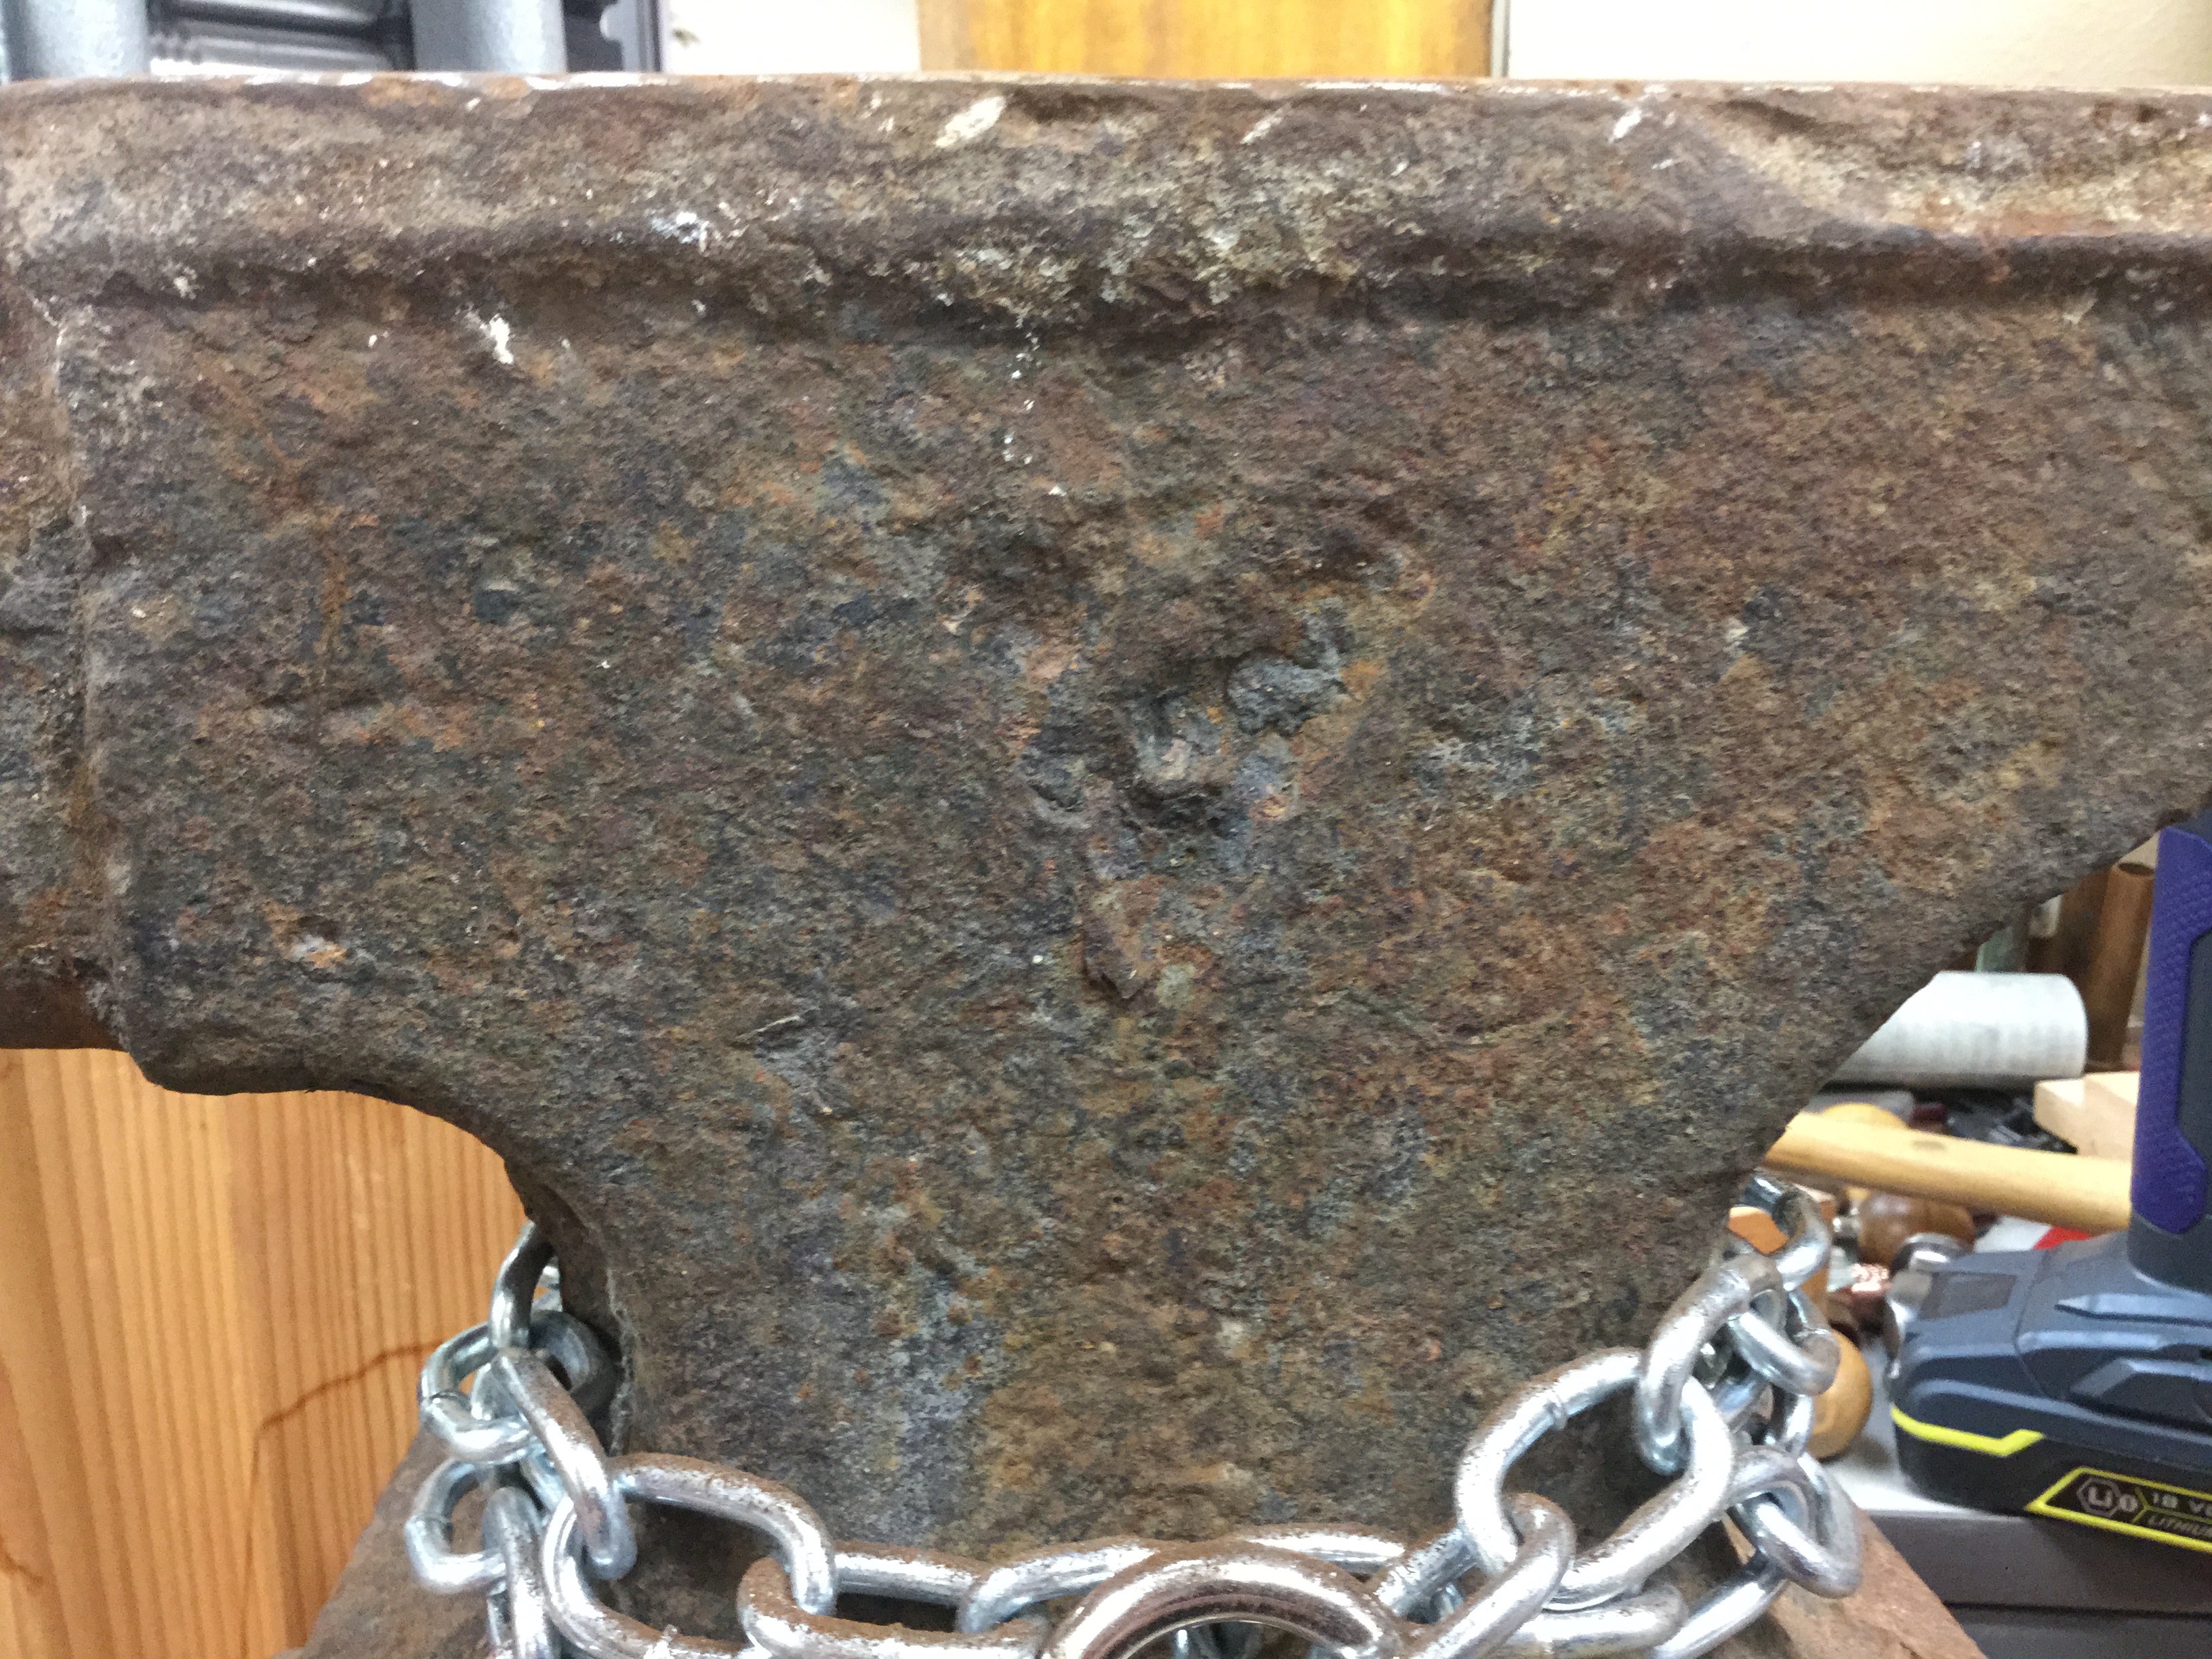
Got this off of craigslist for $30.00. Has some light pitting but all it's missing is some hose and a rosebud. Everything else is there. I looked at a comparable one off of cyberweld and they are going for about $400.00

-
12 hours ago, John in Oly, WA said:
Thanks ede, I didn't know that. Wasn't trying to claim it, just live by it.
Excellent, I'm fond of Huxley so just giving credit where it's due.
How about this one, "art isn't what happens to a blacksmith, it's what a blacksmith does with hot metal."
")
~by yours truly.
Carry on Mikey!
2 hours ago, rboughton3rd said:Thanks for the link, but I ordered the book anyway. We gotta keep Mikey's tinkering funded so he can keep teaching us new stuff..
Precisely why I got mine from Centaur Forge as well. Plus, having an actual book as a reference is priceless.
-
Daswulf had a good idea with the lights inside. This picture is from outside the local art museum in Austin.

-
John, I believe that quote is attributed to Aldous Huxley.
-
Mr. B,
To help clarify, no they are not "Mikey Burners". If you look within iforgeiron, there are innumerable pages on forge building with experts all around the world. It's easy to ask, but you can do the same thing with the search bar and I guarantee, you will find your answers.
Regarding youtube, and Mikey telll me if I speak out of turn; why should a published author make videos on how he make his burners, especially if doesn't manufacture them for sale?
The truth is, there is all the information you need here. I for one am sick of the so many self proclaimed experts on youtube. There's millions that are doing it, but a handful that are doing it right. Go to the source and don't waste your time with amateurs spoon feeding what they don't know.
-
On 9/6/2011 at 10:18 PM, Frank Turley said:
"Die Kunstschlosserei" the original book, is written in German and has much more in it than forged leaves. The publisher was Charles Coleman.I found a copy of this recently, but the price tag is kinda high. I will keep my eyes on it. I need to brush up on my German.
-
I Like your title much better here than the former "Raiding a Bladesmith shop". Nice tools and Respect!
-
Case in point about dealing with idiots or people that just don't care to help. I went to a welding supply house recently to buy black flux. As I perused, I asked the one of the guys behind the counter, "where do you keep your flux", to which he replied that they didn't carry any. I asked him a second time to which he replied, "what are you soldering", to which I replied I was not soldering, but brazing stainless steel which is much higher heat than soldering. He replied again with a quick "NO" to scoot me out the door and I retorted, "you really don't have any Black Flux to braze stainless steel?!?!"
Guess what?
He had it in the back all along. He went to the back without a word and brought me a new container of black flux, albeit a leaking one. The moral of the story? Some times the people behind the counter need more help then us.
-
You bet Frosty, glad to pass the video along!
-
On 3/19/2017 at 6:01 AM, Mikey98118 said:
Drilling small deep holes in copper
EDM tubes are made of copper with tellurium in it (a “free machining grade” alloy), and half-hard brass EDM tubes are about as easy to drill as it gets. But most MIG contact tips are made of industrially pure copper, and are about as hard to drill deep holes into as it gets; it is famous for gumming up the drill bit, and/or digging to deeply into the bit’s cutting edges; resulting in seizing and snapping off drill bits; the smaller the bit the tougher the problem gets. There are several things you can do to alleviate the problem:
(1) It is crucial to use a drop of milk (or Rapid Tap cutting fluid) now and again to ease the drilling action and keep the copper from swelling against the bit from heat gain.
(2) Use “peck” drilling in place of long drilling periods; set your quill stop to move down only a few thousandths of an inch at a time). Keep cleaning the drill bit of burrs. Stop if you hear any sudden noise, clean the bit, and use more fluid.
(3) Split point cobalt drill bits are better for drilling copper than standard single point drill bits.
(4) Or, use a diamond coated flat jewelers file, under a magnifying glass to flatten out the angle of rake in a standard metal drilling bit’s leading edges to neutral, to combat the bit’s inclination to “grab” the leading edges, and snap off.
This video illustrates your point well:
(5) Use bright finished stool steel bits; not black oxide bits, to help keep the bit from binding in the hole.
"Stool steel bits", I will have to ask for those next time at the supply house

(6) Keep the speed slower and feed pressures higher than normally used in metal drilling.
Finally, you are boring an existing hole out to a larger diameter, the less material yoy need to reduce the less likely you are to run into trouble; so spend a little more time purchasing the best match up in a MIG tip or EDM tube, instead of buying quick and working harder to match it up with a capillary tube. Also remember that the bit only has to match up within a few thousandths inch to the capillary tube, and the MIG tip can be finished a few more thousandths with torch tip cleaners.
-
I've wanted some boron nitride for burner nozzle coating for awhile. I suppose this cubic silicon nitride would be ok. I mean I guess I could use it for a little side view forge window.
"Cubic silicon nitride is transparent and stable up to 1400 degrees Celsius."
-
Not sure of the logistics, but I'd be interested too. Any idea what tonnage you are shooting for?
-
That looks like it would make a nice programmable heat treat furnace. Are the wires all jacked inside? What is the size of that thing?
-
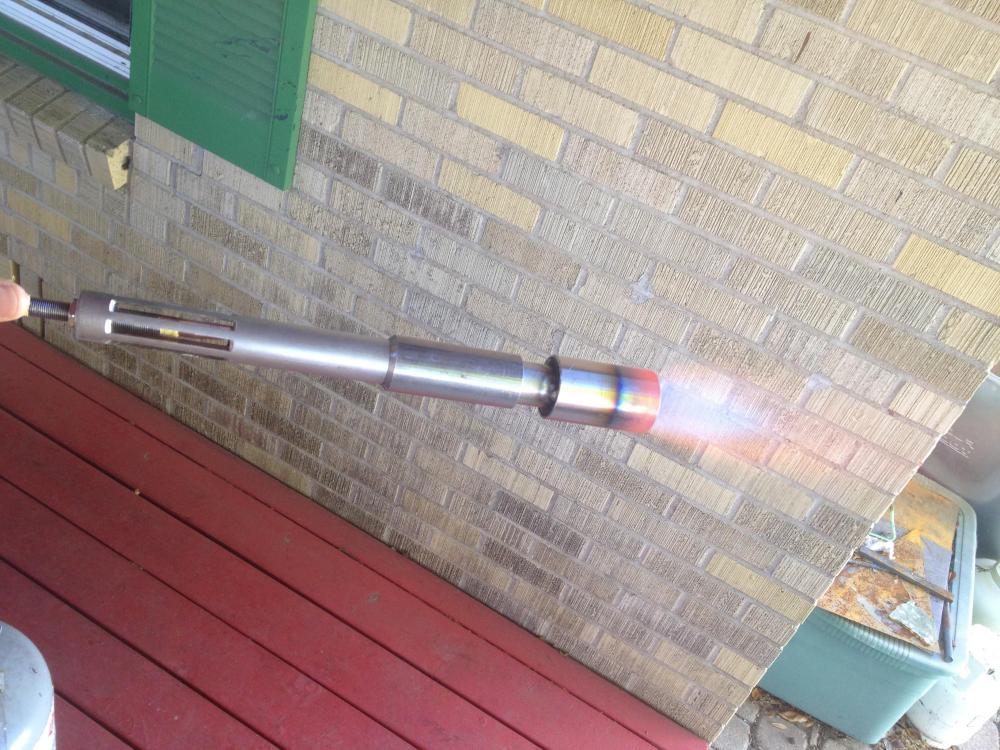
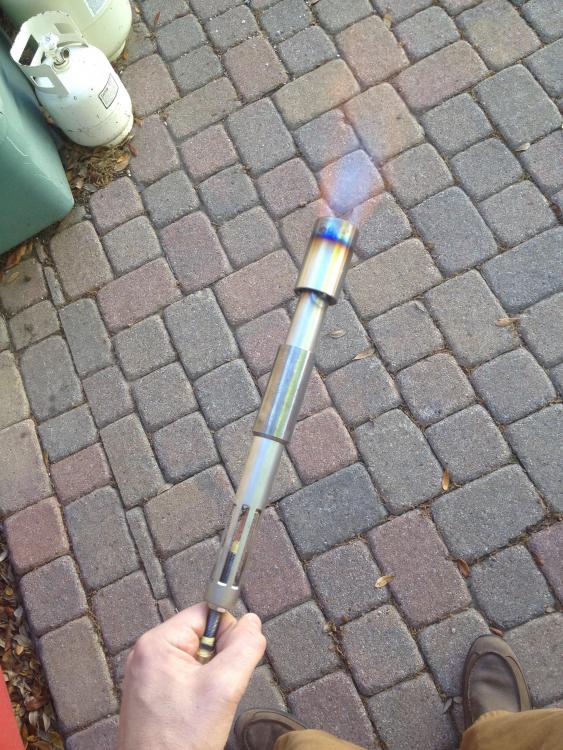
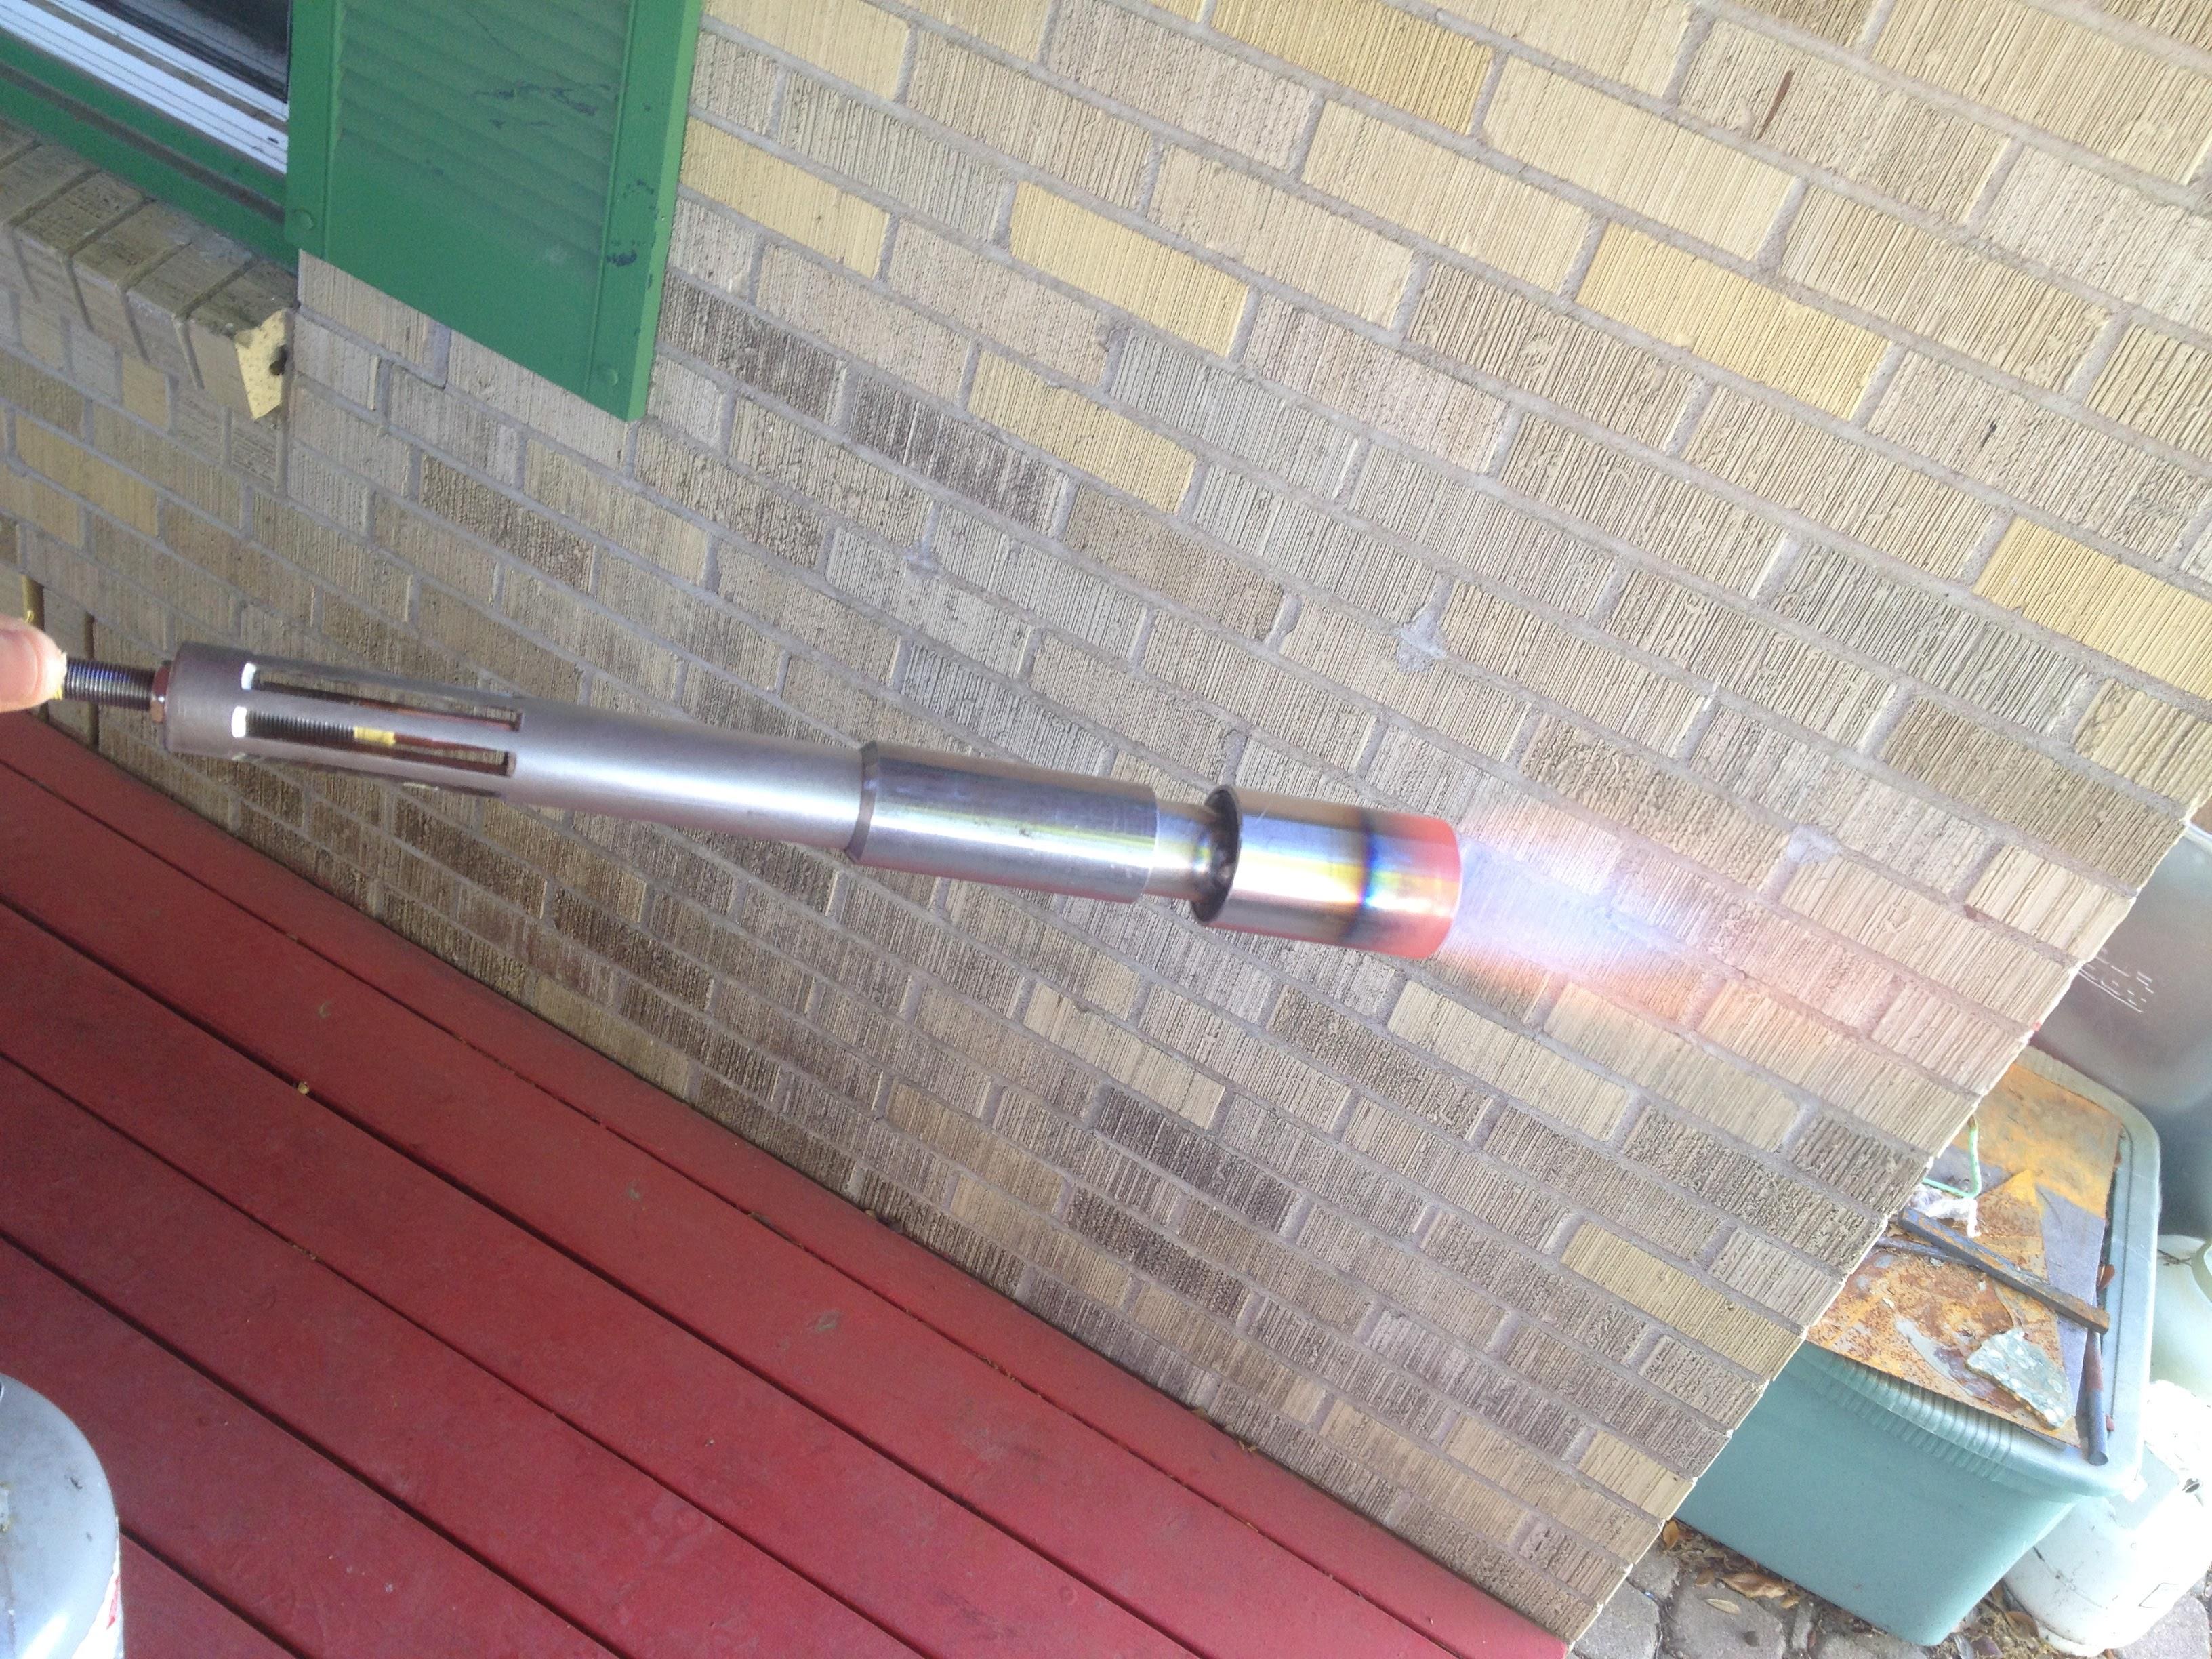
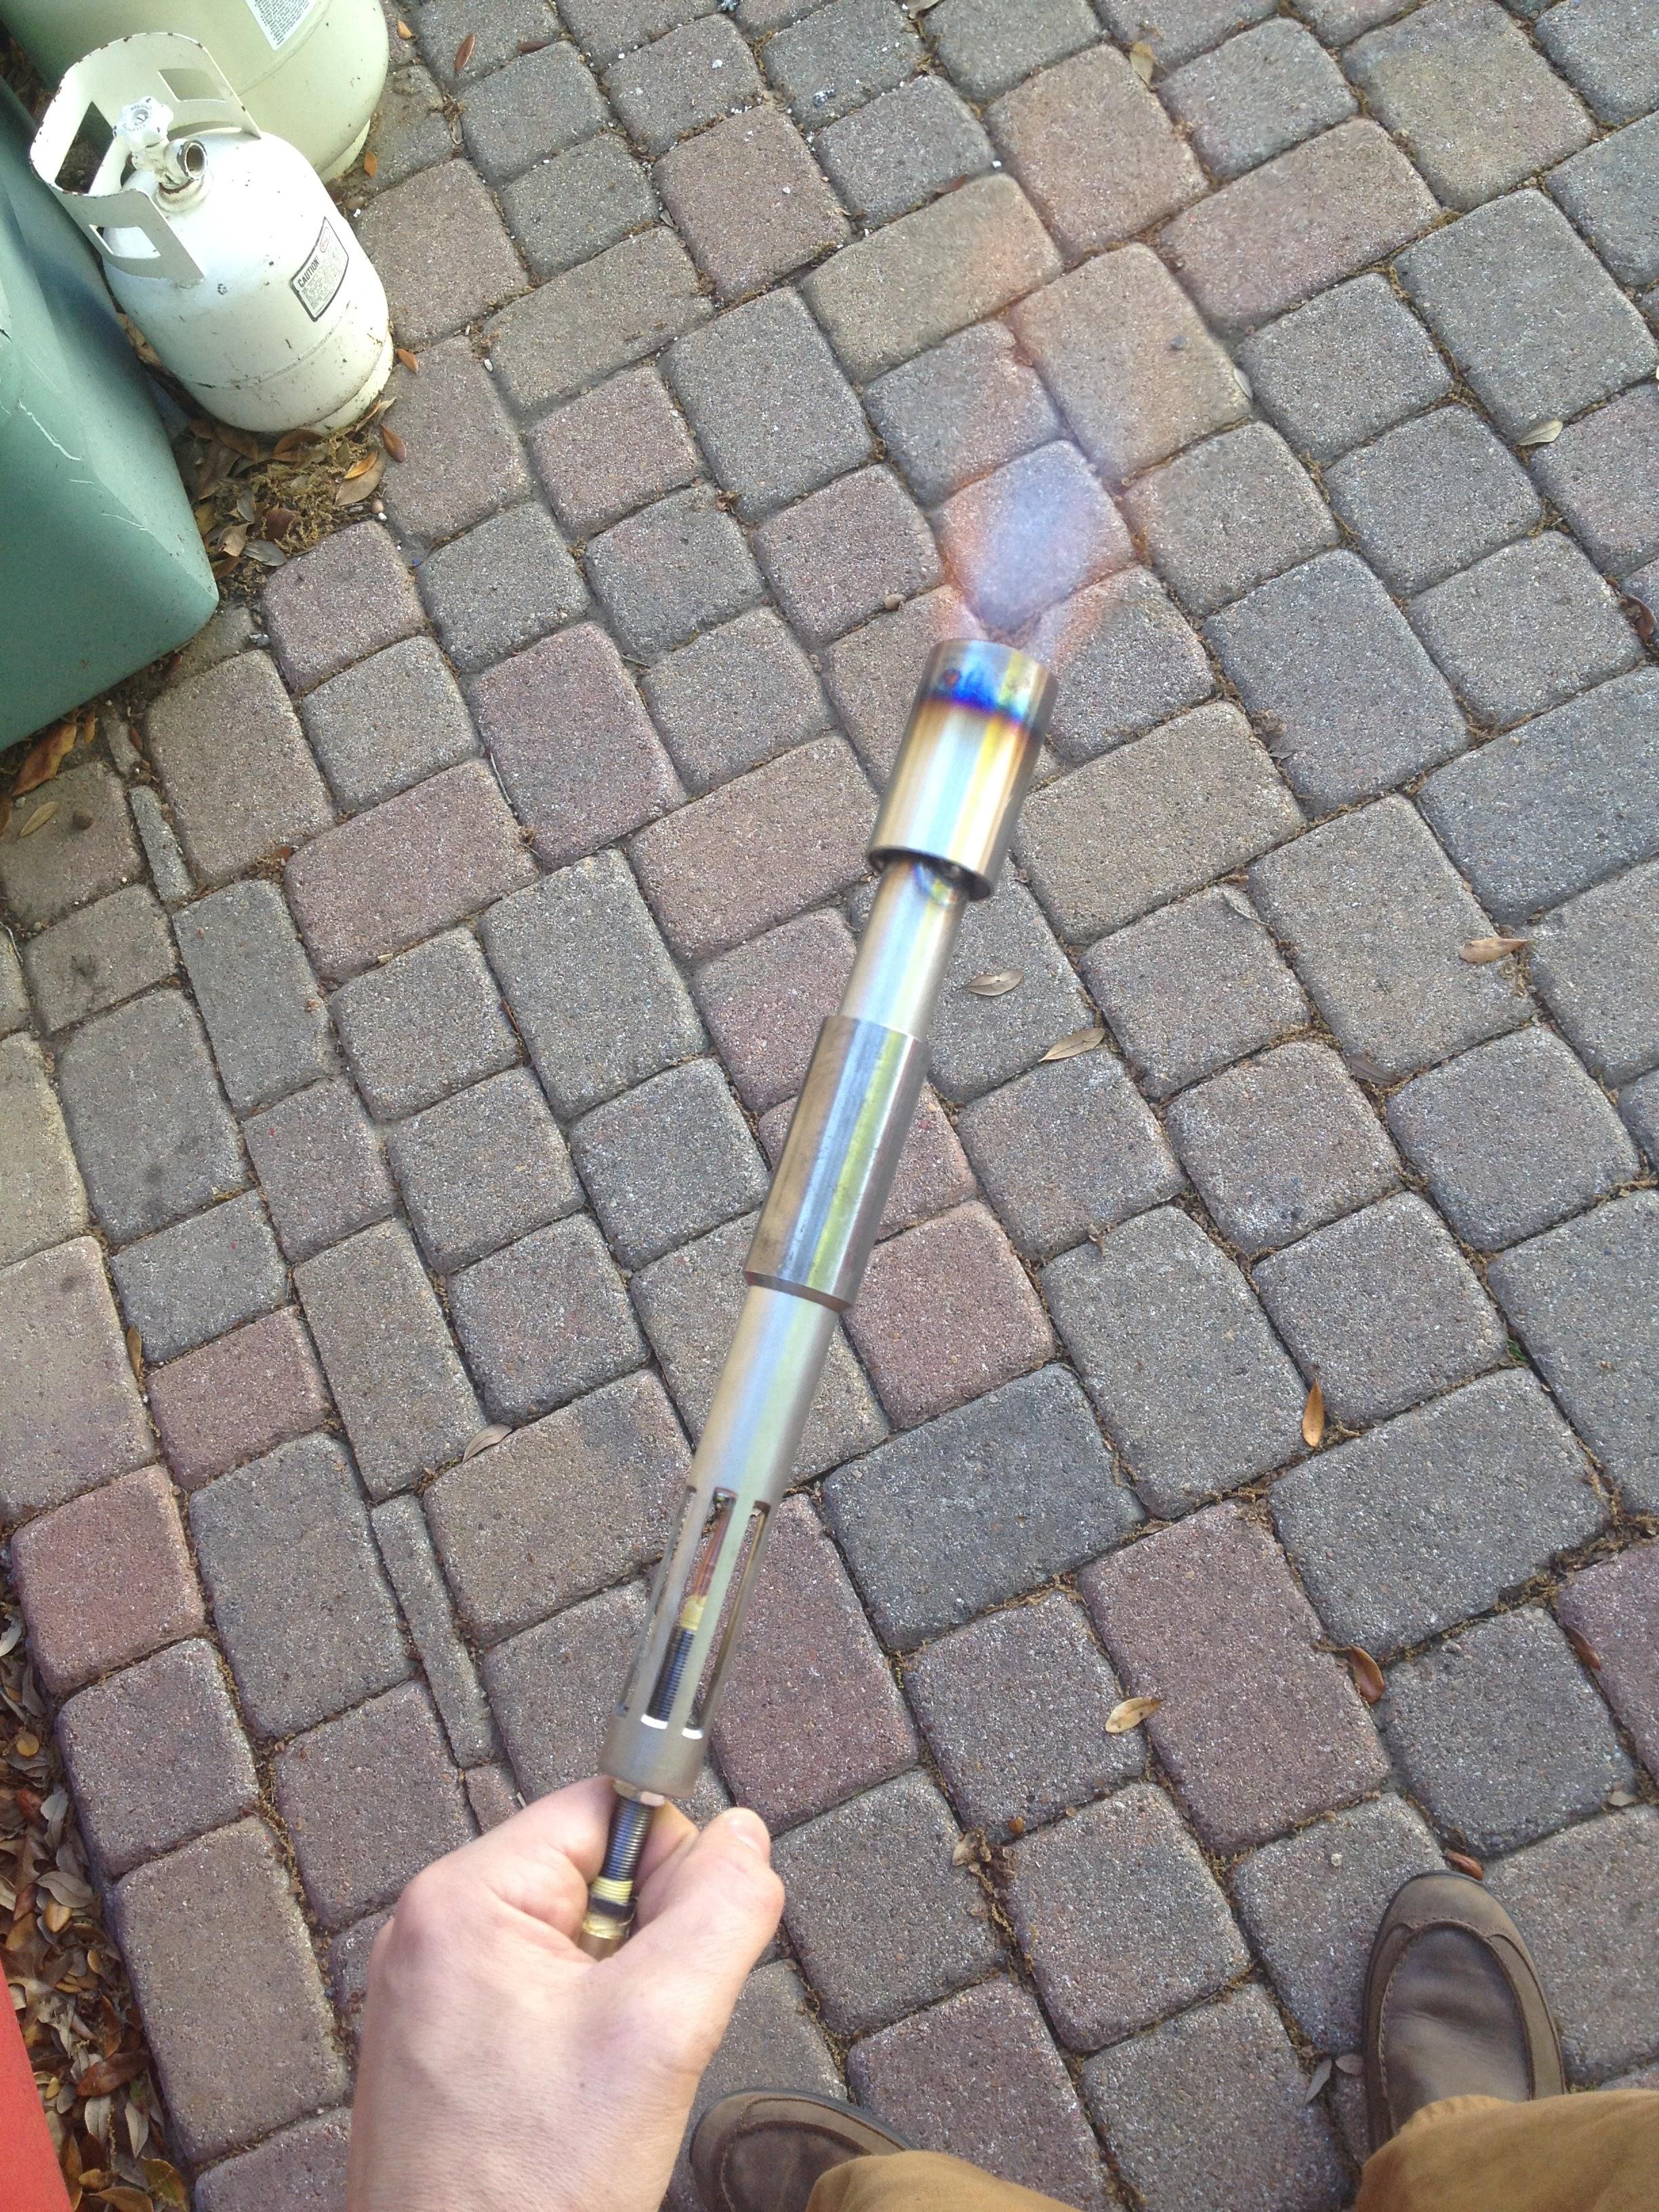
Here's one that I made recently that is a 3/4" Mikey Burner. It has an interesting orange streak around the flame.
-
Thanks for re-uploading these!
-
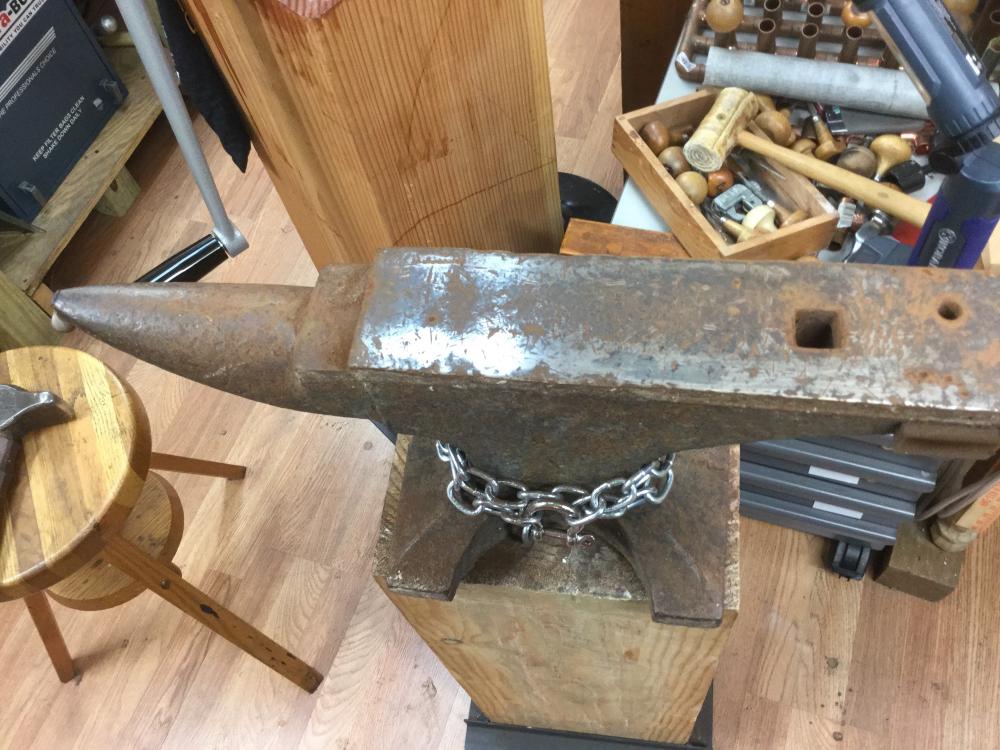
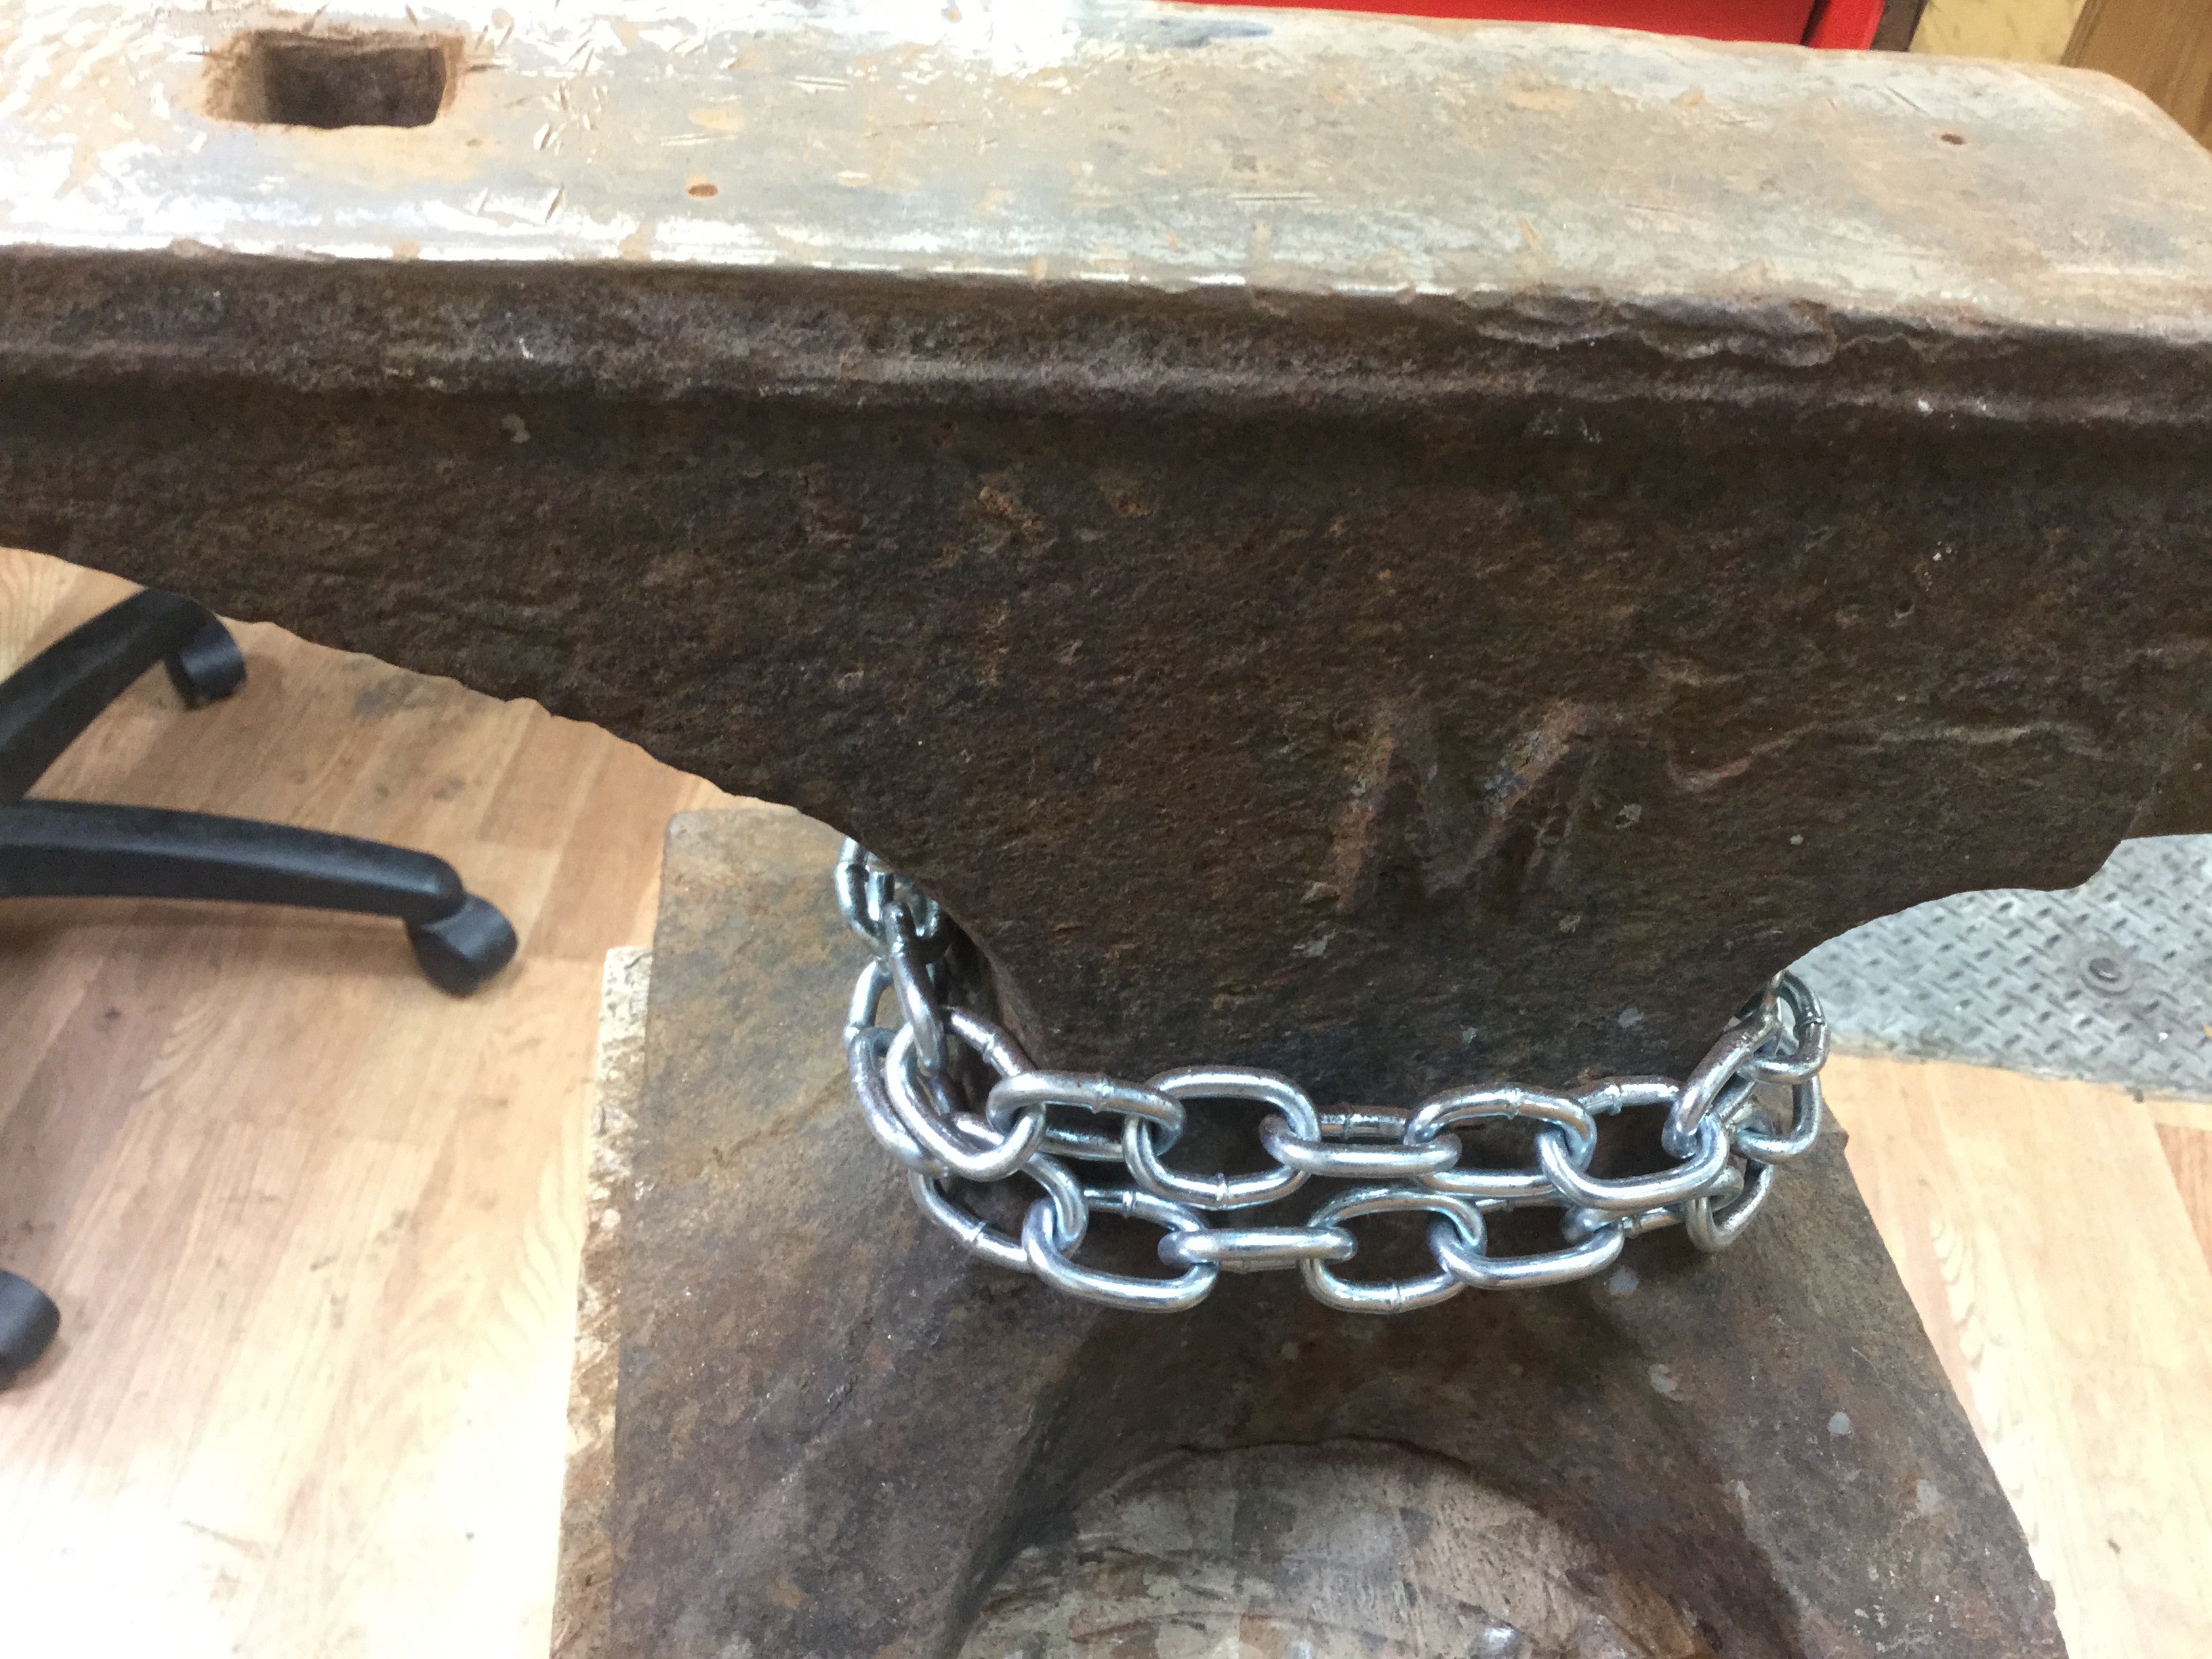
Yes, they are cast steel. When I had mine, it definitely rang loud. Also, the casting was rough with some voids in the horn and face. It also had a had a HORRIBLE swell at the bottom from the casting that would rock like it was resting on a beach ball.
Good rebound though, about 80%. I believe what looks like a tool steel plate is in fact just the way the model/mold was designed. Note: the anvil was on this timber for photos only.
On the other hand, I've seen a very heavy continental pattern Columbian that was super clean and well proportioned. YMMV


-
Is that where Tom's Ozark school was? Sounds like a piece of history frozen in time.
-
Hmmm, I like the idea of having the leg rest in the outer perimeter hole, especially since the outer ring makes flat contact. I will have to see if it is cast or not. Thanks littleblacksmith!
-
While I haven't combined sodium silicate with alumina hydrate, I have used alumina hydrate along with Kaolin and Zirocpax. It--the alumina hydrate--effectively sloughed off and proved to be very dusty.
Let us know how your experiment turns out!
-
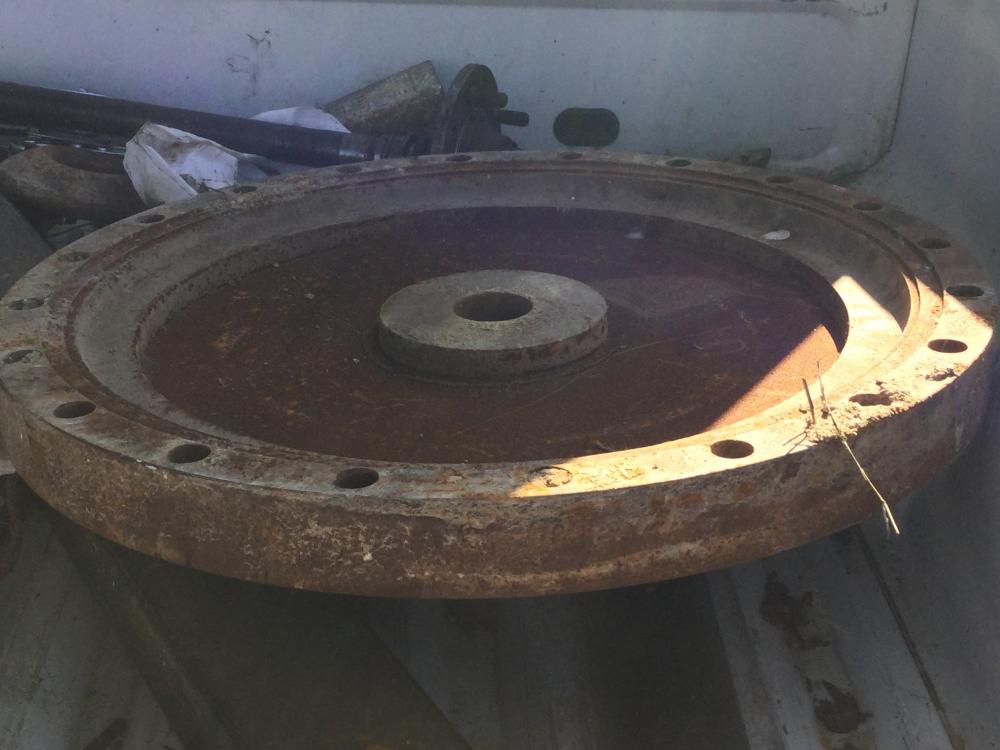
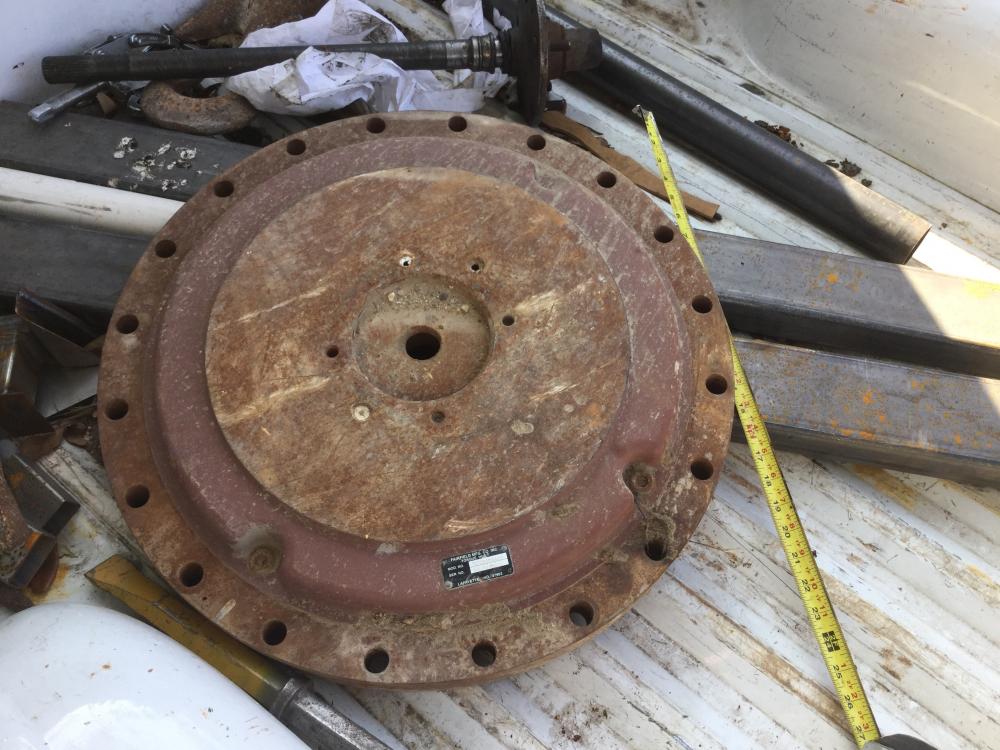
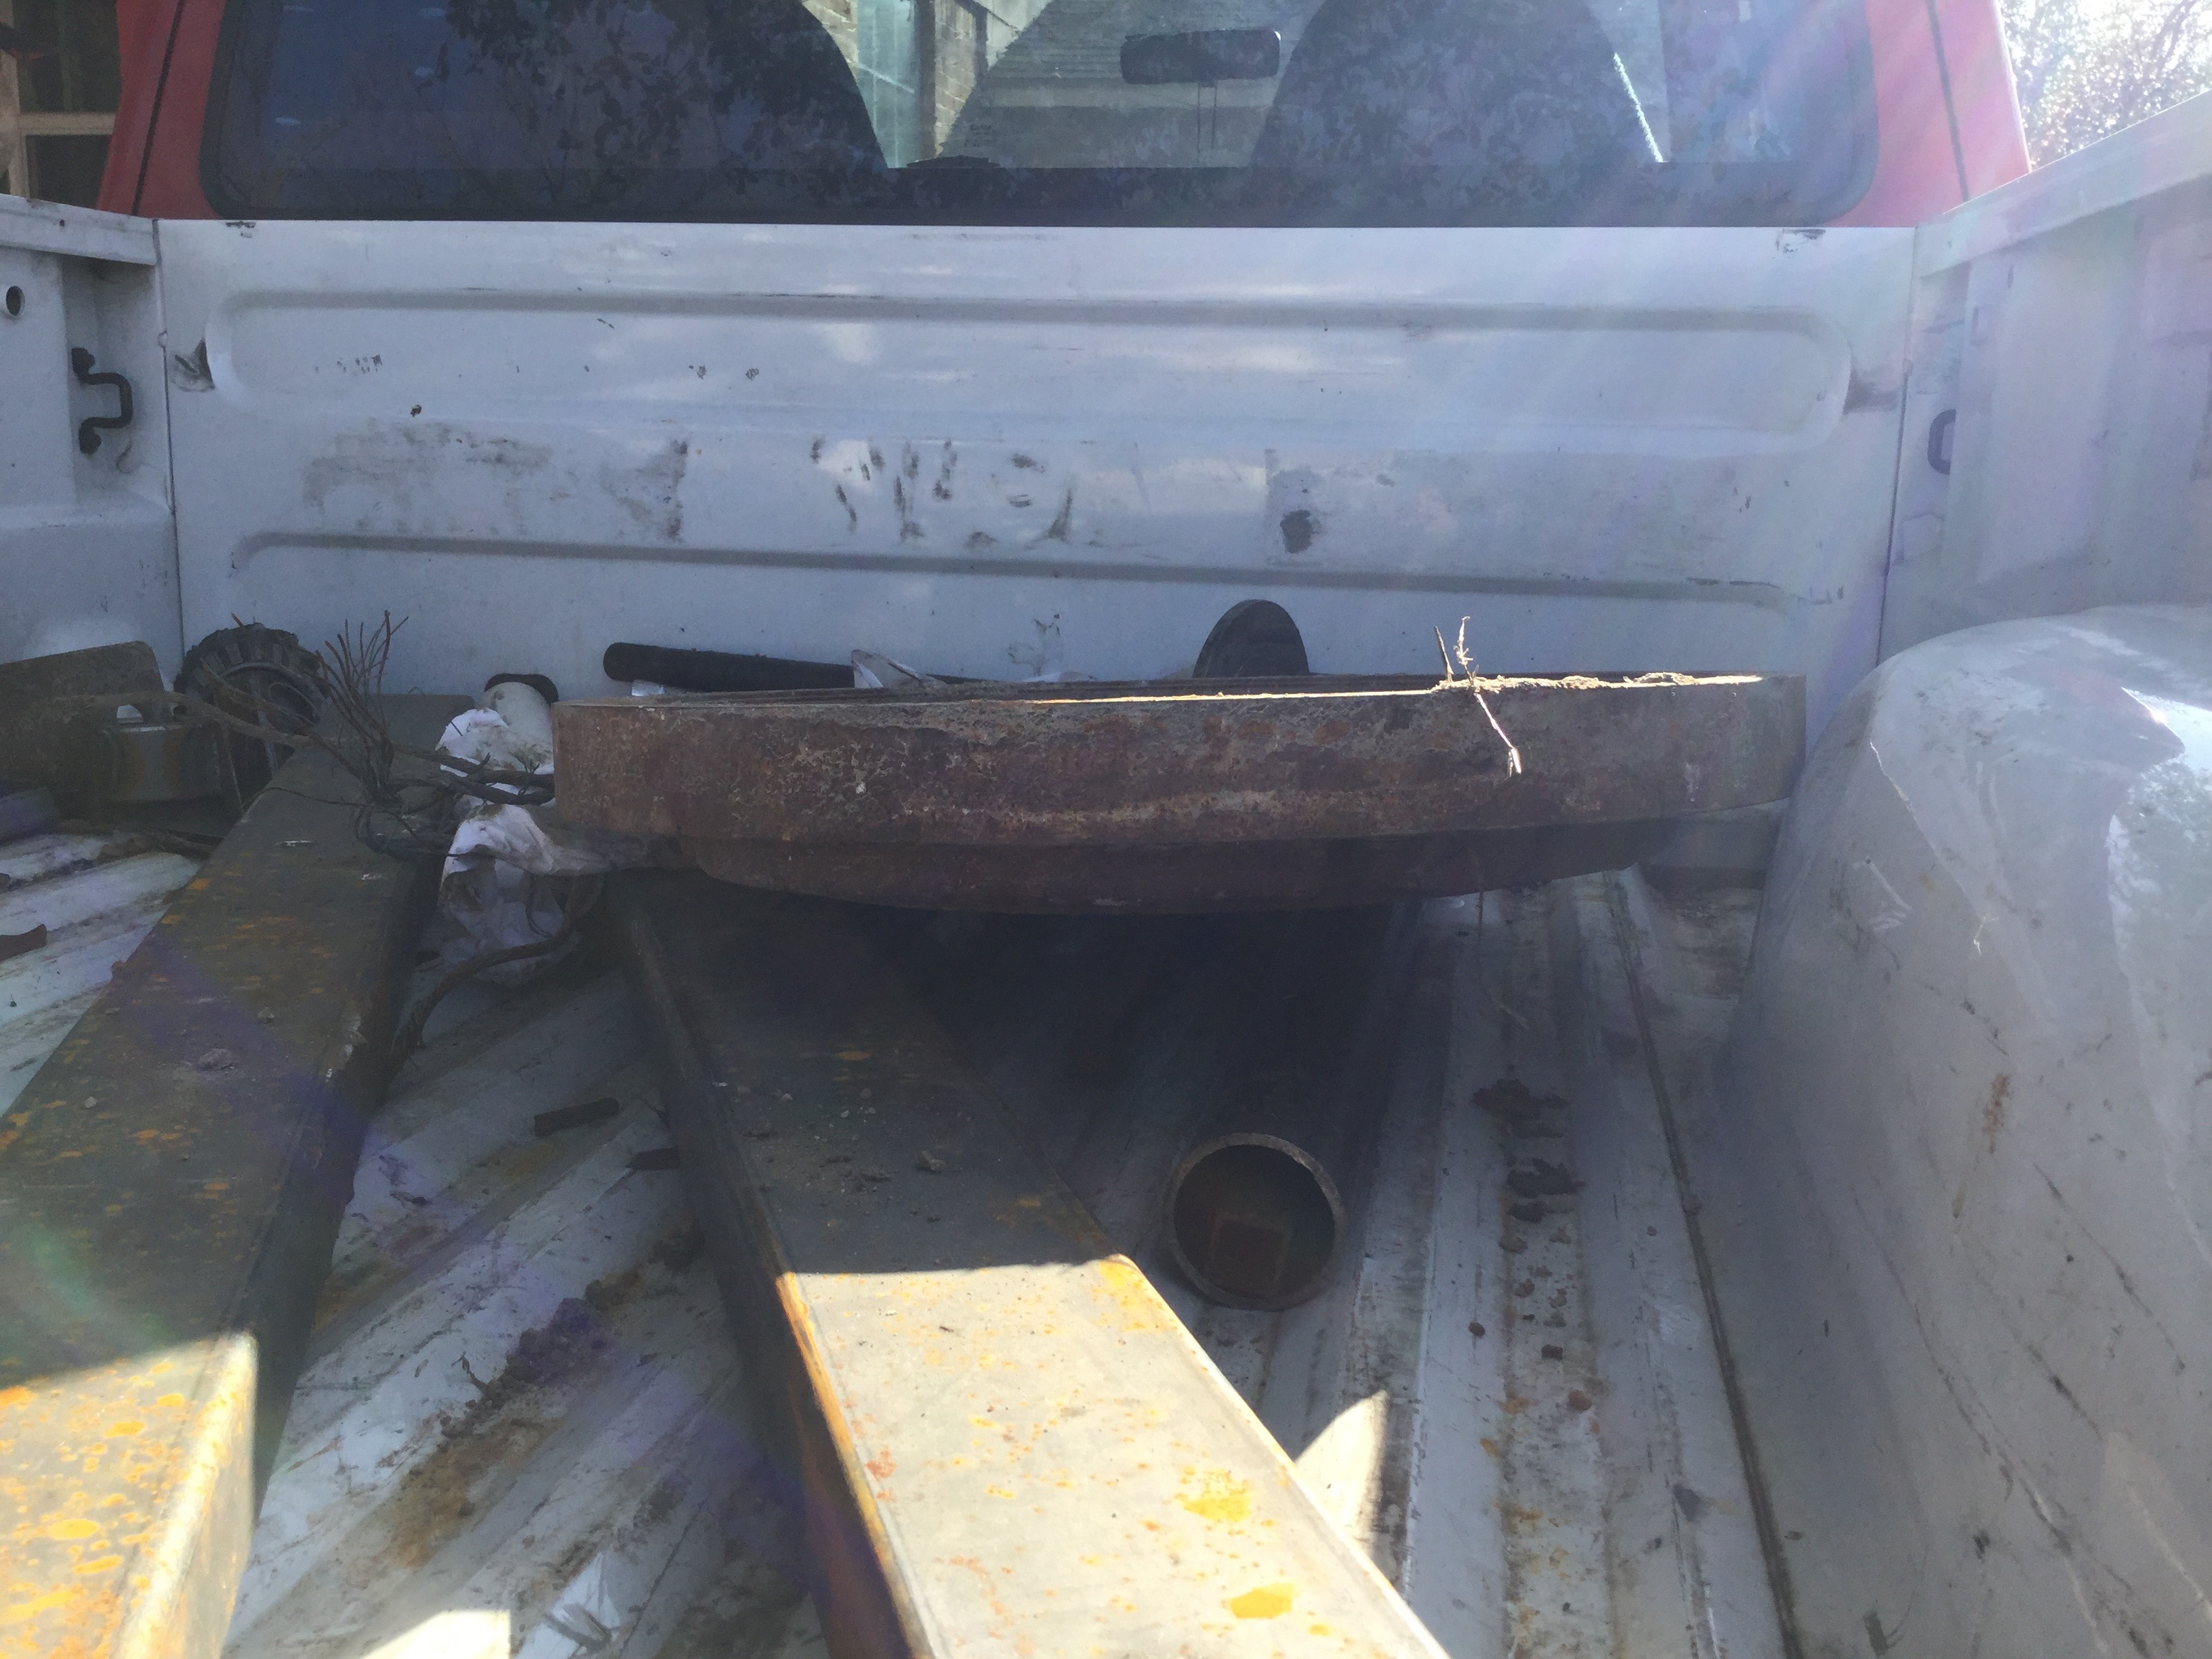
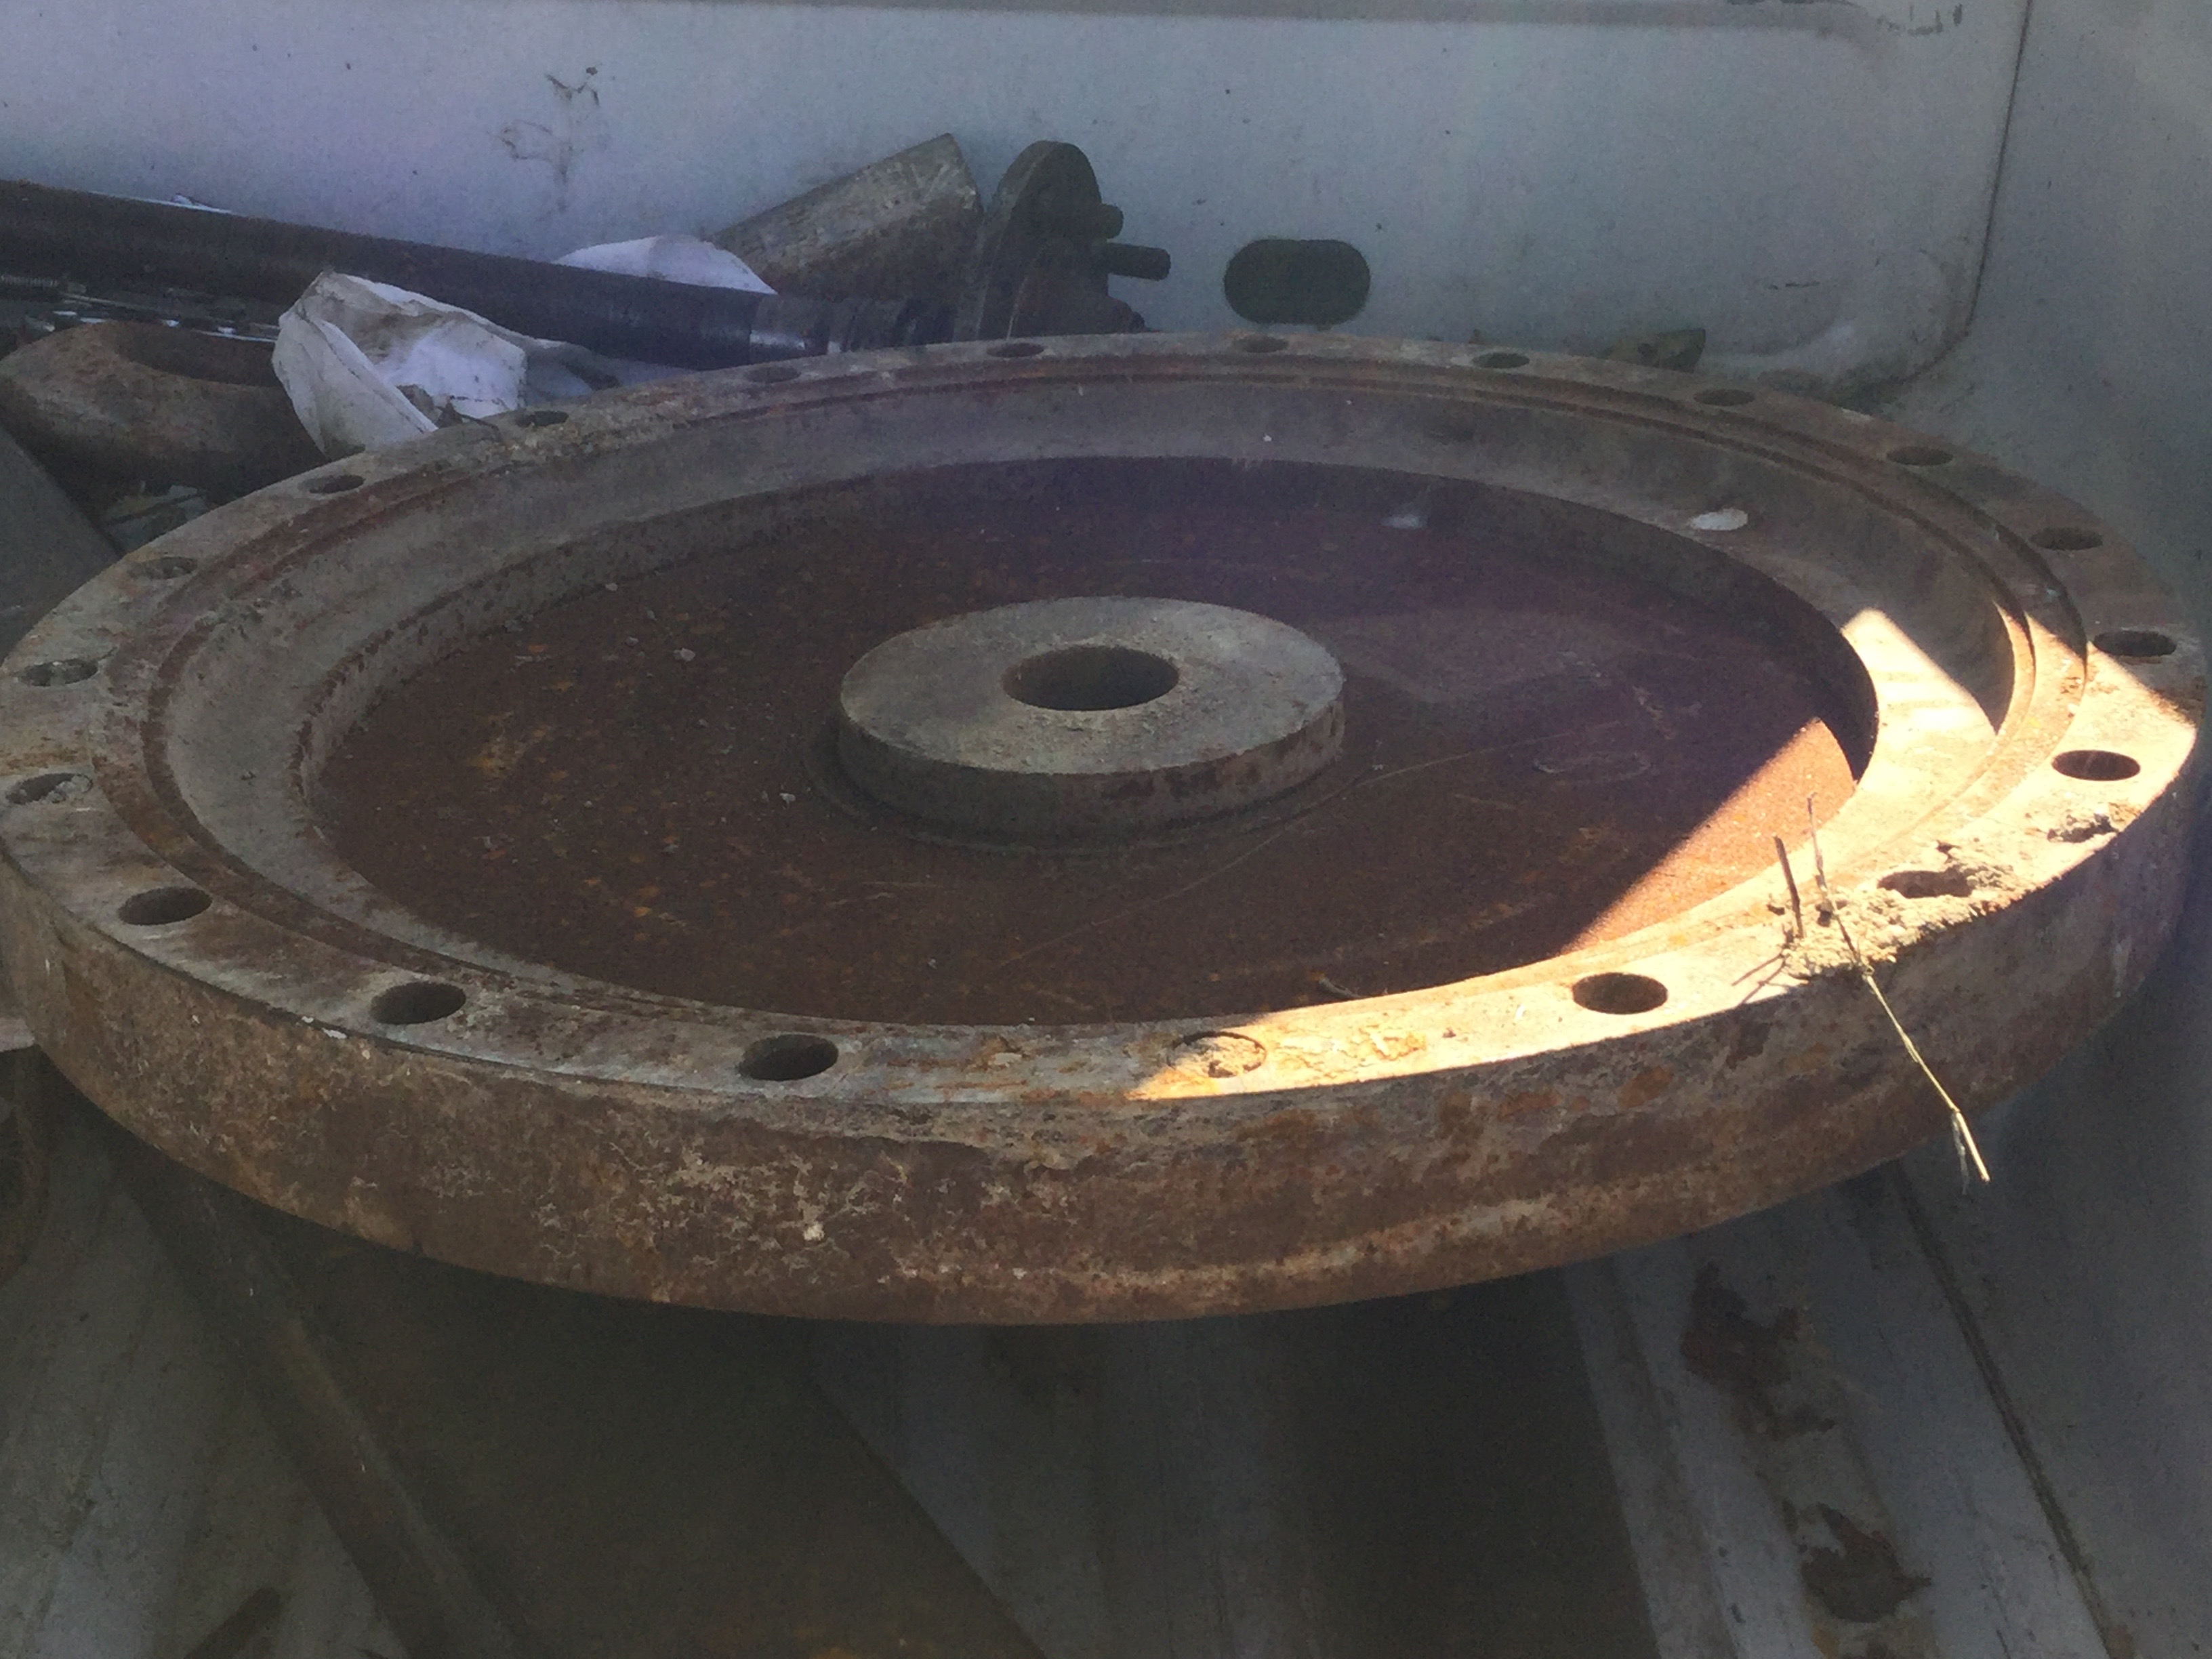
I picked up this massive disc yesterday. It was a hub on a gear reducer for a drilling rig in the oil/gas industry. I'm not sure what to do with it, I know it weighs at least 100#'s. I was thinking it could be a base to mount a post vise. However, it has a hollow area underneath.
The dimensions are as follows: 23" diameter, 2 1/8 thick base, 3 1/2" overall height, hole size 3/4". When I picked it up yesterday I thought this weighed about a couple hundred pounds. The guy that gave it to me said it's only 75-100. I just weighed it and it it's at 208#!
Would this be practical to use as a base for a post vise, or what other uses would this have in a shop?


Request for Refractory Casting Form Methodologies
in Gas Forges
Posted
I have read of iforge members that use sonotubes for refractory perimeter casting instead of the plastering method. I've also heard of members that use sections of linoleum. I've even seen photos of wood forms used for end pass throughs on end caps that turned out really well. I am interested in seeing some step by steps, process shots and write ups on the matter for advanced form building in gas forges. There have been some great castable refractory form builds on this forum, I think it would benefit the community to see more on your approach to this subject. Anyone care to share their approach?