

TomN
-
Posts
312 -
Joined
-
Last visited
Content Type
Profiles
Forums
Articles
Gallery
Downloads
Events
Everything posted by TomN
-
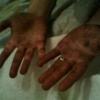
Sorry for the double post! Here is an image of the bits of metal, after 2 days in cola and a hard scrub with a wire brush. Much cleaner and I will give them a quick going over with the angle grinder and a grinding disc as well.
-
Thanks a lot Colleen. Its ugly, but functional. Bit like me really. One the bottom of the legs at the moment are some adjustable legs, which will help me place it somewhere and stop it wobbling. Luckily when it comes to moving things i'm a pretty strong lad. Managed to lift my anvil on my own! I've got a load of the rusty bits of metal cleaned up and got some paint to paint them with. I also got a grinding disc for the angle grinder, so may well have a go with that on them as well. Below is an image of them after sitting in cheap cola for 2 days and then given a hard scrub with a wire brush. Tomorrow i'm aiming to move some stuff over to my 'workshop' and hopefully saw my log to size. Sadly I haven't been able to fix my friends chainsaw, so its going to be old fashioned grunt with a hand saw.
-
Heres an image of my tool rack that I finished. Sorry its at an angle! Theres two slots for toold and then a cetnral bar for putting tongs on. The wleding is ugly, but I will grind it all nice and flat and then paint over the top of it.
-
As promised guys, here is an image of my hammer heads and paraphernalia, before I put them in the bucket of coke. I will post up another picture later of them, after I have had a good go at them with a wire brush.
-
Thanks for the further information guys. I took a photo of the rusty hammer heads tonight and dropped them in a bucket full of 4 litres of cheap cola. Cost me a total of 40p. Unfortunately I left my wire brush somewhere else (where i'm putting my workshop together), so won't be able to brush them down till the weekend. Might take a photo tomorrow morning to see how the cola does on its own.
-
Tonight I hope to get the first stage of the cleaning up of the heads done. Going to give them a quick wire brushing then leave them to soak overnight in some cheap cola. Got 4 litres of it from Sainsburys for 40p. Once thats done, its back to grinding and welding my tool rack. Last night I got the first section completed and dropped 3 hammers in there and it worked nicely. I might make some wooden wedges out of one of the hammer handles that I cut off of a broken hammer.
-
Thanks a lot for all the info guys. Its massively appreciated. Dee J - Thanks so much for registering just to give me that info on the really local place. A big help. Not too far of a drive either! Just got to finish a few smaller projects and then i'm free to start collecting up bits.
-
Ah yes, I did get the sheet from the course John. But thank you for reproducing it for me. I'm up in the mornings trying to get things done before work and am slowly making progress in all my little projects. Learnt how to weld and use an angle grinder. Steep learning curve, especially with the welding. All good practice though. I'll post up some images as I go with this!
-
I'm new to blacksmithing. Done a basics course and a tool making course. Just wondering what would be a good source of mild steel that I could get my hands on? Or alternatively how much could I be paying for stock? I've got some springs and a truck leaf spring for my tools steel, to make tools out of. However when i've got some tools made, I already have a few requests of things that people want making. (Thanks Mum). Would like some mild steel to make a few items out of. Just trying to gather some information on possible sources for mild steel. The more of it I can get hold of, the more I can practice! Thanks in advance. Tom
-
My hammer handles don't have a split in the top and I don't have any wooden wedges, just metal ones. Do I need to make a split myself and get some wooden wedges, or can I middle through with just the metal ones?
-
Thanks a lot guys. I'm looking to do this over the weekend, if I get time. Got some welding and things to get out of the way first though! Lots to do to get set up. I will try and put up some pictures if I can, of this process and maybe it can be made into an article for future reference for others?
-
Hi All, I recently got a load of hammers and hammer heads that are rusted. I'm looking to clean the rust off and put new handles on all of them. I've already got some handles and some metal wedges. Just looking for some general tips really. I found an article on it online, but it had tiny pictures and couldn't get them any bigger. If anyone can point me in the direction of a good one, i'd be grateful. Cheers.
-
Very nice video and a fantastic seax at the end. That saxon horde was an incredible find. I remember seeing it on the bbc news website and couldn't believe Time Team weren't all over it like a rash. Great to see the work of someone from hundreds of year ago re-emerge from the ground and then be recreated by a modern smith.
-
Its Brize. Up in Carterton! I will see if I can sink my stump into the ground. Would be great if I could get it in there.
-
The stump is more to get it up to a workable height and means I don't have to make another thing. I'll give it a go and see how it goes. I'm guessing its around 100kg. Haven't been able to weight it. It feels roughly about what a 100kg deadlift feels like. Luckily I can lift at least 130kg! Here are the photo's of my benching that i've cut up. As you can see i've cut off the cross bars that were left on there when it was originaly cut up and then grinded the paint off to leave a nice clean bit of metal to weld the parts to. I've got 4 pieces cut to act as end pieces and then roughly cut out 2 central bits. Will leave me with 3 sections to place tools in, that will be just under 2 inches width. Loads of space. I also got the sides cut for another thing as well. Going to mount the sink I got on top of it to act as a quenching bath. Below is an image of a load of stuff I got at a car boot sale for £2. Some great stuff here and I got a bucket for free. Brilliant! Think i'll just clean up the hammers and g-clamps and then paint them to protect them from rust. Can anybody help me identify what the other stuff is? I know one of them is a carpenters axe. Might mount that up and use it as a large slitter.
-
The anvil came from a school apparently. So it won't have seen much heavy use. Edges are nice on it as well. Still got to get the log chainsawed to size. The set up is down the bottom of a garden, but it backs onto an RAF base, so shouldn't be a problem with noise. There will be lots of noise from planes etc, so I doubt the locals will moan about the noise from me. Hopefully!
-
I managed to cut up my benching over the weekend, and just have to weld them together now to form my tool rack. I also went to a car boot sale and got a load of old tools and metal for £2, with a free bucket. I will post up some pictures of them tonight. I also have some images of the benching cut up and made ready for welding.
-
a hoard of Viking axes.......
TomN replied to basher's topic in Axes, Hatchets, Hawks, Choppers, etc
Absolutely fantastic! They look great and theres plenty of variation there as well. The last one's beard is almost over the top, its great. I love it! Do you teach?....... Sadly a bit beyond my skill level at the moment. -
Looking forward to seeing this project progress and the final product take shape. Its also teaching me many things as well, so its helpful as well as inspiring!
-
Very nice indeed! When we got married my wife had these in her boquet. This has given me an idea for a wedding anniversary present.
-
Toolmaking weekend Oct 2011
TomN replied to John B's topic in Blacksmiths and Metalworkers Association of the South West UK
Thanks for that description John. I was next door and catching up, so missed a few of these useful tips. Some flat tongs are on my 'too make' list. -
Toolmaking weekend Oct 2011
TomN replied to John B's topic in Blacksmiths and Metalworkers Association of the South West UK
The weekend obviously inspire you Beth. Those tongs look very nice indeed. Can't wait to have a go at making some of my own soon. Arthor was indeed the chap with the ring in his lip. We went to a pub and had a few ales together on Saturday night. One of the several reasons why I was out like a light when I got into bed at 10pm that night. Nice to see you got on here Arthor. Hope your drive home was alright! -
Thanks guys. My next set of jobs is to chainsaw the log to size and level it. Then try and clear the workshop site of clutter and weeds/grass etc. Then i'm going to start cutting up my steel table bits and try and make a tool rack and a stand to mount my quenching sink on. This will give me a load of practice with an angle grinder and with welding, which will be good experience. My friend is going to help me, as its his gear and he wants to learn too. I also need to get a blower for the forge and set that up and I will get a load of cheap clothes from an army surplus shop to forge in, so I won't care if they get wrecked.
-
Toolmaking weekend Oct 2011
TomN replied to John B's topic in Blacksmiths and Metalworkers Association of the South West UK
Was nice to meet you too. Shame I ended up next door on the other forges. A forge welding course would be usefull for me and yes we can definately car share, or collaborate in the future! I never realised you heart stamped the rivet on your tongs. Genius! -
After a trip down to the Westpoint forge and a course on toolmaking with John B, I managed to get hold of an anvil and a forge. I am now setting up a workshop at a friends house, who lives a little more remotely than myself. I thought i'd keep a log of what i'm doing and people can offer advice, or general mockery if they so wish. Today I went to my friends and he showed me the area at the bottom of his garden that I could use to set up a workshop in. There was a small wooden shed that I could store valuable stuff in and padlock, as well as a larger storeroom made out of breeze blocks. The storeroom is much larger, but doesn't have a lock on the door. So I decided to store my box full of tinder in there and possibly mount my vice in there as well as its a short walk to if needs be. Here is an image inside the storeroom, with the vice in rough place and my box full of chopped up pallete to act as tinder for lighting the forge. There were also several large bits of metal about that have come off of trucks which I can use. Hopefully they will be useable.... Here are a few images of my forge, which I bought from John. Top Bottom Fire pot And here are a few images of my anvil. I believe it weighs 100kg. And a top view Edges ----------------------- After clearing up some of the random stuff about, I packed my things away in the shed and locked it up. I also bought myself some safety gear from Screwfix as well. I think getting into good safety habits near the start is a sensible idea. After getting home I took a few images of my things that still need taking there. Here is my tree stump, that needs sawing to height. Once the top is sawn off with my friends chainsaw I will place it on a paving stone to keep it level, then plane it off flat and treat the wood to slow its splitting. The top piece that is sawn off will become a chopping block for the chopping wood. The following image shows a load of tables from work that were hacksawed apart and were going to be skipped. I took them away (after getting permission I might add) and aim to make some tool racks out of them. The spare stuff will go on to making a stand that will hold my sink, and act as a quenching recepticle. More images and info to come, as I progress with things!