

Michael
-
Posts
1,062 -
Joined
-
Last visited
Content Type
Profiles
Forums
Articles
Gallery
Downloads
Events
Posts posted by Michael
-
-
My drill press chuck key was hung on one of those retractable keychain reels, clipped on to the belt housing. I'd tighten the chuck, pull out the key and let go, the reel would handle the rest.
replacement DP has a keyless chuck.
-
I usually see braces, slightly more modern versions of the pic you posted, for $5 and under at most flea markets and swap meets. Not trying to disuade you from a project you want to do, just pointing out that this is a tool that is readily available on the second hand market.
The style you posted is sometimes referred to as a Gentleman's or Gent's brace. A smith made version is usually all metal, with a "cage" style pad (top handle) similar to this.
That said, this could be a fun project, akin to making your own hacksaw frame. Drifting the tapered square chuck and getting everything aligned would be key I think.
And once the braces are done, it would be a snap to make some center bits
I just made a square tang tool for a friend who needed a specialty brace attachment and was surprised at how easy getting the square tang taper was.
-
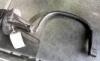
lifting the weighted chain that holds hot work on the anvil. Funny burn marks on your fingers you have to explain for days afterward.
Spray painted the foot of chain that runs over the anvil bright orange as a warning. The paint in the middle has all burned off, but either side still acts as a warning.
-
I was quoted $145 for the box with the end closed and the 12 inch duct ring, by a sheet metal place in San Francisco. i think anyplace else would be somewhat cheaper.
-
Nicely thought out door, much better than the firebricks I pile in front of my gas forge.
-
Nice, love the angled hammer rack. That's gonna get heavy, fast!
-
Following a losing sports team builds character! I got to use a can of bacon grease as coolant/lube for a hammer eye punch a few weeks ago, burning coal AND bacon smells, that was a good day!
-
I was gifted some cable sections and a flatter, a unused flatter. I've never seen one of these tools without some wear on them.
Always wanted to try welding cable, but when I see cable at the scrap yard its in big, rusty coils.
The flatter has very modern 'wear safety glasses' and 'made in usa' stamped on it, and a factory grind on the working and striking edges, like it was made in the same place those fiberglass handled sledges at the Home Depot are made.
Happy holidays, hope everyone got coal who wanted it. Looking forward to lighting the forge during the long break from work


-
If I have wood charcoal, I half fill a BBQ chimney, stuff two sheets of newsprint under it, light and when that is going good dump it on the tuyere and mound the coke from the last fire around it while supply a gentle blast of air with the blower, leaving a hole in the top for smoke.
Haven't been BBQ'ing much lately, so a dry, 3 or 4 inch section of 2x4, split into kindling with a fixed blade knife and gentle hammer taps on the spine, knife edge on the end grain, gets a small bundle of kindling in no time. 2 sheets of newsprint (have to keep it in the house so it doens't get too damp) TeePee pile of kindling, then same as the charcoal. Light, mound the coke around, leave a hole and a gentle air blast.
Starting with either you get a hollow under the coke so its important to knock the burning coke down around the tuyere before getting to work.
-
What are you going to be punching? Hammerhead, top tools, don't bother heat treating, you'll only lose the temper. For thinner stock you could temper to straw color,but punches on hot steel don't really need a heat treatment.
-
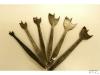
Looks like a very cool old pattern. Point out the rusty head and "cracked" handle you'll have to replace, see if you can get him down to $20. I was picking up sledges every chance I could get, got a nice 12 lb straight peen (on the far left in the pic)
 that I didn't think would get much use, till I took a class and learned how to strike.
Now the 12 lb is the go to sledge for tool making and I keep the 7,8 and 9 pounders around for others to use.
-
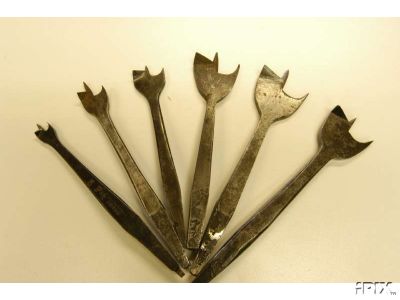
I'm interested in how that's going to work Bill, long strips off WI stock. It might work, but i've only ever used a cold cut on bar stock.

-
Yep, that's a cold cut, why are they always so rusty?
I use mine to put a nick in a cold 1/2 inch bar on all four sides so I can break it without too much of a bend in the bar.
Always seems to notch when I try it with round stock, should probably harden it.
-
Ausfire, that's orange spray paint on the foot of chain that goes over the anvil, to help remind me of the parts of the chain I shouldn't grab! (Don't Ask Me How I Know This)
paint on the part that goes over the anvil burned off pretty quick, but the rest of it serves as a reminder.
In practice, I usually hook my hammer under the chain to lift it.
-
A decade ago I had some free time the day after Thanksgiving, and a cobbled up brake drum forge to try out and every Black Friday since, I've fired up some version of that forge and hammered off the previous days feast.
The connection between the consumer free-for-all and black boogers/sore arms kind of day was lost on ours truly until the teenaged daughter pointed it out to me.
This year I invited a friend I met at a class and a conference earlier in the year, and while waiting I fired up a bucket of coke in the forge and reshaped a mangled carraige bolt into a sort of rams horn thumbscrew for a pencil marking gauge.
Dovid drove up with a bucket of hammer making tools and after we straightened out the drifts with the flatter and cleaned up the punches, a nice billet of 4140 got punched and drifted into a cross peen hammer that, after grinding weighs in at 2 lbs, 5.5 oz. I was shooting for two and a half pounds, (to replace a 2 lb cross peen that recently 'walked away') so I'd call that perfect!
Neither of us had ever made a cross peen before, only rounding hammers, so we were kind of winging it. A longer bar of steel would have made shaping the peen easier.
We did put touchmarks (a real one for Dov, letter stamps for me) on the cheeks, but managed it upside down. So before the heat treat I might run a drift through the eye again to get it right side up.

-
GBF 132 is the part number for the Feed Ratchet Block
here's a link to the manual with a better parts diagram
http://www.vintagemachinery.org/pubs/detail.aspx?id=4354
(Hoping this doesn't violate posting restrictions, I don't think so)
-
I'm pretty sure all the parts except the vise are still available from Sears.
I have the same model sans the vise and ended up replacing the vise with a largish drill press vise.
Good saw, not as fast as a horizontal bandsaw.
-
I'll second L. Smith's desire for TIME. Time to forge, time to practice, time to take a class or go to a demo.
I'm told that acres of time show up as the nest empties, here's hoping.
-
Loving this thread! I've been trying to make colonial era spatulas as a way to get more forged work into the house, kitchen gear seems a good bet.
cutting and riveting a blade is a way to go, but does anyone have experience forging the blade and handle from a solid peice of steel? I've make some attempts, isolating stock for the blade and handle. In all of my attempts, I've made the handle stock too thin, so that when I move onto thining and spreading the spatula blade, I crack the handle.
Better sequence, leaving the handle stock thick while spreading out the blade would probably help.
-
I've a few Atha tongs and hardys from garage sales and they are excellent tools
-
I started out with 2x10 lumber, bolted together with all thread and the boards staggered to form pockets in the stand to hold tools. those pockets end up being of limited use. On the other hand, an old cookie sheet from the Goodwill, siliconed down to the stand and the anvil hold downs just hammered thru the sheet, was very useful as a tray under the anvil, held tools, water can for cooling off punches etc.

Then a live oak stump became available, a friend had a few acres, some downed trees, a big chainsaw and a backhoe to move the log. Once I got that home (a tale in and of itself) I hacked off the back, flattened either end with boards screwed to the sides of the stump and a router.

Made a hollow to fit the anvil, sunk it about 3/4 of an inch and routed three feet on the bottom of the stump.

As the log has dried it has cracked some, good opportunity to make a few staples to span the crack. Had a few bug issues, found that a thick wash of borax (we all have some borax don't we?) brushed all over the stump kills whatever was leaving little piles of sawdust next to the stump.
Now the stump has a long staple across the front, for tongs and a couple of rings on either side, for hammers and hotcut. A motorcycle chain is nailed to the front side of the stand with a heavy sash weight on the other end of the chain that hangs behind the anvil as a hold down. I had the weight on the other end, so it hung at the front of the anvil, but found that the weight got caught on the tong rack too much, there's less to catch onto when it hangs over the back.
-
Got a full picture of the sledge? Those old school sledges with the octogonal stock and fullers around the peen are aesthetically much nicer than modern cast sledges.
-
Looks great! can you describe a bit of how you made it? Most times I've attempted something like this I either break an empty bottle that I'm using for fitting or try to copy a wire model in steel with limited results.
-
I have a sheet of cement board, the kind you put up tile on, behind my forge where its close to the wooden (outer) wall of the woodshop.
It's leaned against the wall so there is an air gap, the top of the cement board is flush to the wall so sparks cannot get behind it.
The smooth face of cement board is not half bad as an impromptu chalk board as well.


I beam anvil
in Anvils, Swage Blocks, and Mandrels
Posted
If you stayed over the center web it wouldn't be too bad, loud though. Stood on end and working on the small bit where the two plates join would get a lot of mass under your work too.
Also started off with a section of I beam, about 75 lbs with really thick webs. Drilled a pritchel and ground out a notch for bending. Clamped a jackhammer bit to it once for a horn as well, and worked like that for a year till I found a Peter Wright
Nice idea with the offset hardy shanks. There's times I'd rather have a bottom swage over the anvil's waist rather than at the heel.
That I beam is holding my slack tub at a convenient height now.