

rusty_iron
-
Posts
91 -
Joined
-
Last visited
Content Type
Profiles
Forums
Articles
Gallery
Downloads
Events
Everything posted by rusty_iron
-
hack tool according to blueprint
rusty_iron replied to evfreek's topic in Blacksmithing, General Discussion
Gday Evfreek, I'd say your on the money with setting it firmly in the handle. Mine moves and it can be annoying. You could 'burn' it into the handle before you heat treat, so it will have a slot rather than be pushed into a hole. Its better if the hack doesn't move, its safer and easier to keep your cuts straight. Please let me know how the S7 holds up, I've not used it, but would love to try. Kind regards Rusty_iron Brisbane, Oz. -
Gday Mlmartin15, I start by using a set of cutting dies in a guilliotine tool, cutting partway through the stock to the approximate thickness of the rivet shank, cut all the way around the stock, flat side of the cutter to the rivet head. Use flat fullers or butchers in the guilliotine tool to start to draw the stock down. Then I use a set of spring fullers to draw the shank to the final thickness. Then I use the cutting dies to partially separate the rivet from the parent stock, leave just enough metal to keep the rivet on the parent stock. Reheat rivet to a yellow and poke it into the rivet header, snap off the parent stock and hammer the head to your desired shape. one rivet :-) its slow, but makes good rivets. Regards Rusty_iron Brisbane, Oz.
-
Sam, A suggestion, nextime try laying it out on cardboard and folding that up. You can bend it to see "What if???", its easy to trim and when your happy with the result you have a pattern to cut too. Also you can move the bits around for best fit to the material your cutting up, see which bits best fit which drops. Less time, less waste, less fixing misteaks ;-) (pun intended) Think model. On the drops note, got a nice pile of drops/offcuts tonight, from a fab/repair shop that rebuilds mining equipment. Now to use those 4" thick bits. Suggestions are welcome. Any suggestions for "Bisalloy" (if thats how to spell it??) I know its used as wearplate. Rusty_iron Brisbane, Oz.
-
Dale, Take the handbrake off next time :-) BTW I liked your anvil/vise setup. Regards Rusty_iron Brisbane, Oz
-
Gday Greg, Acid. A friends father ran a galvanizing plant. They used hydrochloric acid (pool acid) to strip gal off things. The solution thats left can apparently be used as a flux for soldering. He didn't say how strong to mix it, sorry. I have used phosphoric acid (the acid in rust converter & coke) to remove gal, it works but not that fast, I probably should have mixed it stronger. I imagine you can use any acid, including vinegar, it will just take longer. An option would be to take it to a galvanizing plant and ask them to put it through the acid bath to strip it. Be careful. Perhaps put it on an open fire after you have striped it with acid, to remove anything left. Stay well away from the smoke/fumes, they WILL KILL YOU!!!! Regards Rusty_iron, Brisbane, Oz.
-
temper colours & stainless???
rusty_iron replied to rusty_iron's topic in Heat Treating, general discussion
thankyou gentleman. Regards Rusty_iron Brisbane, Oz -
Gday all, Had an interesting conversation the other day with a jewellery artist who uses industrial supplies to make jewellery. We were talking about stainless steel and heat colouring. So does stainless show temper colours? I know, I should just throw a bit in the forge and find out...... Regards Rusty_iron Brisbane, Oz.
-
Rams and Hummingbirds
rusty_iron replied to J W Bennett's topic in Blacksmithing, General Discussion
John, very nice work. Did you split the horns first / form a long flat taper and split that or weld them on? I've not seen the humming bird before, are they difficult? Regards Rusty_iron Brisbane, Oz. -
Perlite, Silica Sand, and Fireclay
rusty_iron replied to mandoro's topic in Insulation and Refractories
Gday all, can I add my 2 cents worth??? Many years ago I had a friend who trained as a boilermaker/blacksmith when they made boilers. He trained in England, building steam trains among other things. He told me that I could use sand, clean white sand was best, but any would do. The british smiths mostly used sand he said. Anyway to back this up, I just looked in "The General Blacksmith" by Malcolm Paine, 2007. He is a smith who trained in England and now calls Oz home. Page 80 "A silica sand is the best to use for a flux. The colour is of no importance. If, when rubbed between the fingers, it feels as if the grains are sharp, it should be alright to use. Avoid beach sand if possible. Borax is used in the same ways as sand, and they can be mixed together to make a flux." He says to dip into the sand or borax. hope this helps. I've not tried the sand, but plan to. Regards Rusty_iron, Brisbane, Oz. -
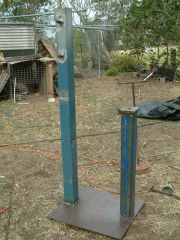 Column welded in place. Anvil post placed for welding, but base plate warp not corrected yet.
 -
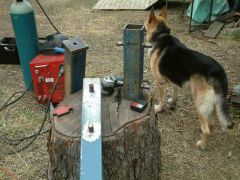 Arm pins welded in place, the welds cleaned up. The bottom plate is welded in place on the anvil post. Faithful hound in the way as usual.
 -
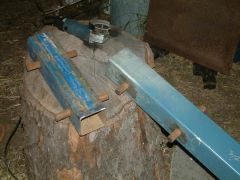 Pins for hammer arms in place to be welded.
 -
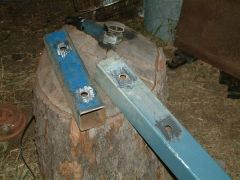 Pin holes drilled and ground for welding, in both column & hammer head.
 -
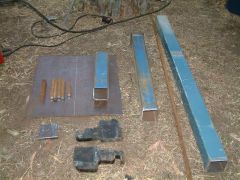 Treadle hammer to be built from this pile of scrap. Materials cut to size, execpt bracing, hammer arms & anvil plates. Cost so far AUD$38.
 -
Gday all I tried the gate valve (tap) idea and found it too slow. Yes you have very fine control over the airflow, but you can't instantly cut the airflow to the forge as you step away, it takes time to twist the tap closed. Perhaps a ball-valve might be a better option here. I'm updating a forge at the moment - yes it has the gate valve - and instead of building a sliding airgate I purchased one from a woodworking supply house. They come in standard 3", 4", 5" & 6", I also found a 2"to2.5" on the shelf which was not listed in the catalogue. You can get them in plastic, aluminum & 20-gauge steel. I found mine in the JET catalogue under dust collection and it cost a whole AUD$15, heres a link to their online catalogue: JET
-
-
-
Gday all, Thanks Jr Strasil for your blueprint #56 on bolt tongs. A friend challenged me to make a set, so I looked at your blueprint and it work first go. Well everything execpt the "Drop the tongs" weld, Sorry Frank, but I'll have to work on that one somemore. Thanks for a great and useful site. Regards Rusty_iron Brisbane, Oz.
-
Sorry, forgot to add, don't forget to Normalize after forging. doing so can prevent a whole host of problems.
-
GDay Waianvil, too hot on the hardening temp - cherry red - thats a dull red not bright and you need to temper. Try a 2 step harden and temper. easier to get it right if youask me. I never liked the onestep, do it all in one go idea. I like to drill a starter hole and then drift to size, so I tend to use shorter drifts, the longer they are, the more they tend to bend - especially if you are making them out of mild steel. I often make a drift out of the material that I intend to put in the hole, so its the right size. By the way, thats just bad luck. Try again, and keep having fun. Regards Rusty_iron Brisbane, Oz.
-
A Guillotine tool question
rusty_iron replied to rusty_iron's topic in Blacksmithing, General Discussion
Thanks Ed, thought it would be something like that. Regards Rusty_iron Brisbane, Oz. -
Gday all, Ok owners of the various types of guillotine tools, how do you use them to work on one side of the iron only? eg. fuller one side only. Is there some special bottom tool like a flat plate so that only the top tool impacts the iron? Regards Rusty_iron Brisbane, Oz.
-
Ideas for making a mushroom stake
rusty_iron replied to JimCrawford's topic in Blacksmithing, General Discussion
Oops, Sorry didn't knoiw that the H word for that hot flamey place would get sensored. -
Ideas for making a mushroom stake
rusty_iron replied to JimCrawford's topic in Blacksmithing, General Discussion
GDay All, how about cutting a chunk of railroad rail, just cut away as much web as you need too, and forge the top as thin/flat as you need. Its a tough as xxxx, and you shouldn't even need to heat treat it. I make fullers, hardies and cutoff hardies out of rail. Regards Rusty_iron, Brisbane. -
Gday Paul, I had a similar problem of removing Gal from steel. I used Phosphoric acid -its what i had -, thats the acid thats used to eat rust in ruster converter, its also found in food and soft drink or as you seppo's call it pop. I asked a friends father who used to run a galvanizing works. He said use Hydrocloric acid, thats the stuff you put in your swimming pool. Interestingly, he said that the solution thats left can be used as flux for soldering. I have not tried this. As to the comment on not using gal material and waiting for black iron to turn up, well sometimes its just not available or too expensive. I was building burners for a gas forge. Initally black iron pipe fittings were not available here in Australia, only the gal fittings. When I did eventually find them the price was too high, gal bell fittings were about $4 and the black iron was over $30 each. Thats what you get when there is only one supplier. Etching the gal off was the only reasonable option, and seemed to work quite well. Oh don't light a match or smoke near the etching process, if I remember correctly it probably produces hydrogen which will burn. Have fun, Rusty_iron Brisbane, Australia.