
jayco
-
Posts
975 -
Joined
-
Last visited
Content Type
Profiles
Forums
Articles
Gallery
Downloads
Events
Everything posted by jayco
-
Thanks for the tip, Jerry! I never thought of using 'em for bean stakes........clever idea! My son has brought in some longer pieces of iron from his work, and yeah, it's quite usable 1/4 in. round stock. I guess it might seem 'weird', using stuff scavenged from cemetaries, but all of it would wind up in the landfills...........I think of it as my contribution to 'recycling. James Flannnery
-
My son has a lawncare service. Part of the work involves doing mowing/cleanup for several local cemeteries. There are always old flower arrangements to be disposed of. The flowers themselves go to the landfill, but I can hardly bring myself to throw away the little wire frames. I always thought they should be useful for something. Then it occurred to me.........they're tool hangers! James
-
Looks more like a cat storage problem to me. My mom always said "It's good luck for a cat to come to your home" By my count, you're gonna have lots of good luck!:)
-
For now, I took the easy way out and used the WD40 on the selector switch. It worked! The switch has loosened up nicely and I can change amp settings without problems. Another thing I did while I had the machine apart was to use some sandpaper to clean the contact points at the pivot of the selector switch. The two copper bars (visable in my second welder picture) must be clean to carry current properly. The bars in my welder were pitted and burned. After cleaning and reassembly, I noticed that the old welder was easier to strike an arc with! A definate improvement! Whether this is a 'permanent' repair or not, I cannot tell at this time.....but I'll see. The hardest part in working on these machines is the tiny screws that hold the sheetmetal housing together. Ridiculously hard to get all the holes lined up for reassembly. If you decide to clean or work on one of these things, be sure to disconnect the power first! James Flannery
-

I dont think people understand.....
jayco replied to KYBOY's topic in Blacksmithing, General Discussion
Over the years I've made more than one piece with a lot of 'sweat equity' in it that didn't sell......or nobody wanted(same thing, actually) At first, I got angry about it, then I realized that griping about it didn't do any good. At was at that point that i realized there was as much art and skill involved in selling as there was in forging. Learning that lesson helped me. Now I actually enjoy trying to figure out what the customer ( the public ) wants. -
Jon, welcome to Iforgeiron. Lots of information.....lots of friendly folks here, too. Enjoy!
-
Old quilts, blankets, heavy curtains, canvas tarps hung in strategic locations can be a big help. Just make sure they're nowhere near a fire!
-
I dont think people understand.....
jayco replied to KYBOY's topic in Blacksmithing, General Discussion
When I was a kid, I remember old folks talking about their 'home made' clothes, tools, wagons, chairs, etc,........and how they were glad to get 'store bought' or 'factory made' items as their economic situations improved. They had a clear belief that whatever was newer was better. Of course, that is not always the case, but I suspect that the owners of stores and factories had much to gain by weaning folks from their self sufficiency. That bias has been in place for many years. KYBOY, I think you're right that people don't understand what is required to produce a handforged item........believing instead that "faster + cheaper = better". I can't offer any really good advice on the subject, since I don't sell a lot of stuff myself. I have a small group of customers who come around from time to time wanting repairs or wanting me to forge something for them. A while back, I came up with the idea for an easy to make' Christmas Tree ornament' ,showed it to a few customers , friends, and neighbors........now I have orders for a bunch of them...........Who would've thought!?! James Flannery -
While we're on the subject of guillotines, I have a couple of questions; When did the guillotine become a blacksmithing/metalworking tool? Also, I remember seeing something in one of the old books about making a guillotine tool using two large gears laid on their side........opposing each other as posts. You used one of the slots between the teeth on each gear as the guides. Has anyone ever made/used one?
-
Who gets your tools, and equipment when you pass away?
jayco replied to LarryM's topic in Everything Else
My blacksmithing tools will go to my son and my grandson. I trust that they will use and take care of them well enough. JAFO, I like your signature....kinda aggrees with my philosophy. -
That old '88 Ford with the funny tailgate handle has 216,000 miles on it.......nothing done to the engine in all those miles, and still runs good. I also have an '80 model 3/4 chevy pickup with 350.......79,000 actual miles.........but it LOVES GAS! Lately, the chevy stays close to home.
-
Glenn, the guillotine I made is a small tool. Posts are 5 in. high, the tool is only 4 in. wide. It accepts stock up to 2 in. wide only. I will use it for light work, I think. I,m already thinking about a larger one, soon as I figure out what I have in the resource pile to use as posts and dies.........scrounging for the materials is half the fun! ChrisB, you're right, I've got to organize the tools some way. There's nothing more distracting from the work than having to stop what I'm doing and hunt for the tool. (I know that thing is in there.........somewhere!?!?) Frosty, that's a good idea! Thanks!
-
Kyboy, I've had those days when nothing went right. It took me a lot of years to learn to just put it down for the day. A new day brings new thoughts and ideas. Apparently you learned quicker than I did.:)
-
Sam, the guillotine tool would make a nice nut cracker using the flatter dies. Thanks guys, for the tip,.......I love 'multi-use ' tools! Of course,........I could always make a BIGGER ONE!:D
-
Chris, in my crowded little shop, the only place I have for my hammers is on an 8 in. wide shelf behind the anvil. There are also flatters, hot sets, etc, in the precariious heap you see in the pics. Yes, I need to get the new, larger shop built........soon!
-
Bruce, I used an angle grinder to shape the dies I've made so far. Larry, I've been using my fingers to raise the top die to insert stock........I haven't tried the springs yet, but that's an option. Frosty, as soon as I got this thing to the point it would work, I had to try it. And yeah, I've got to radius some things, and smooth some things on the dies I always 'hot-forged' my spring swages and never had much problem with sharp edges, but this is a new tool for me.....and I must learn it! Thanks for the comments, guys. Any tips for improvement are greatly appreciated. (I need all the help I can get!) I've already discovered that I must weld a little more metal to the baseplate.....it tends to spread a little with heavy hammering. Here's a couple more of the dies; a flatter die, and one for round stock. Yeah, I know, the 1/2 in. round die on the right ........won't work.....already found that out.:)
-
Here's some pics of a guilotine tool I made. It's based on Irnsrgn's BP0065. Since I don't have any machine tools, I had to make some changes to construct it. I had to weld up stock to get a proper size for the guide channels. My post guides are made from 1/2 in. square, with 1 in. flat on each side. That creates a 1/2in. square channel for each post. Since I have plenty of it, I made this one to use 1/2 in. x 3 in. leaf spring as dies. So far, I only have four sets of dies (don't have pictures of all of them yet), but I soon found the need to have a strong box to keep everything in. As I need them, I'll be making more dies and building a bigger box! I'm just learning how to use this thing: how to make the dies I need, etc. I've already learned that it's necessary to round/sand the sharp edges of the dies to avoid leaving die marks on the work piece. The last pic shows 'v' dies in the tool. These dies work so well that I had to stop myself before I turned all my flat-jawed tongs into 'v-bit' tongs! Many thanks to Irnsrgn for his fine blueprint! James Flannery
-
Well, it took me long enough I reckon, but I finally got around to posting a pic of the now finished pond my neighbor had built........or is that 'dug'? Anyway, he has a nice 75 ft. x 200 ft. pond with many bags of bentonite on the inside of the banks. A combination of time and the bentonite cured his leakage problems. At one point, last fall, during the dry season here, he had devised a plan to put himself and some bags of bentonite in a small row boat and have two volunteers pull him and the boat, (erie canal style) back and forth across the leaking areas of the pond with ropes so that he could pour the bentonite in 'just the right places'. It's truly a pity he could not find those volunteers.........I would have liked to have been there and watched.........and maybe snapped a few pictures.
-
Here's a picture of my dad, taken in 1958. He was a true 'jack of all trades........farmer, logger,carpenter,equipment operator, mechanic.etc. He also kept a little forge behind the barn that he used to repair farm implements. Helping him was how I got interested in blacksmithing.
-
 An old picture of my dad when we lived in Troy Ohio....1958
 -
-
-
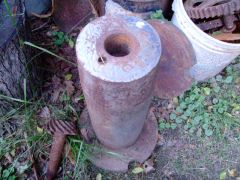
From the album: anvils
This is a large pivot pin from a track hoe or loader. A guy gave it to me to use as a seedbed roller. It's far to heavy to use as that, since it weighs around 150 lbs. 20 in. tall........6 in. across. -

From the album: anvils
This is a large pivot pin from a track hoe or loader. A guy gave it to me to use as a seedbed roller. It's far to heavy to use as that, since it weighs around 150 lbs. 20 in. tall........6 in. across. -
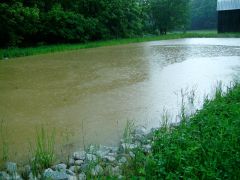 There was discussion some time ago about using bentonite clay as a pond sealer. This is my neighbor's 75 ft. x 200 ft. pond that he used many bags of bentonite to seal........it worked!
 -
Welcome to IForgeiron, Drew! Here's an idea I've thinking about for some time, since I have a 109 lb. anvil on an oak stump. (This would work with any London pattern or similar anvil) Back in my logging days we used fairly large log chains and binders to hold loads of many tons in place on trucks. With a large enough binder and a 'cheater' pipe, it's possible to crush the outer fibers in green oak logs.........that's pressure. Over the years, I've tried bent over nails, lag bolts, and other things to hold anvils securely in place. These things work for a while, then begin to work loose, allowing my little anvil to bounce around.......which, of course, causes my hammering to not have the impact it should. Anyway, my idea is to put a large spike near the bottom of the stump(front and back), place a log chain 'necklace' around the waist of the anvil, and use the binder to hold everything tight. And if I want to move the anvil, or reposition it, all I have to do is loosen the handle. Should work. James