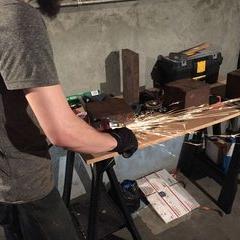
Elvirth Posted August 29, 2015 Share Posted August 29, 2015 Hello again peoples. So, I picked up my theoretical future starter anvil today. A local guy sold me three 7x7" blocks of some unidentified steel. I have a few spark pictures so I'm hoping someone can give me a bit of input on that as to the carbon content of the metal, roughly speaking anyway. They also came with another chunk that is about 2x9, estimated. Didn't bother to measure since I'm not actually sure what I want to do with that piece yet.Ok, so here are the three as I bought them. The guy who sold them said he got them from a local machine shop. I think he might have had them cut to dimension.I apologize for crappy quality, my phone camera only does so much. Anyway, onward. I ended up working on the far left block.This is how it looked when I started. The rebound in this state using a 2 1/2 lb cross pein is... well, pretty minimal. My workbench probably didn't help but the hammer only bounced back about an inch and a half, maybe two inches. Didn't bounce more than twice with a loose grip.Anyway, took an angle grinder to it. Started with a 36 grit flap disk to remove the rust and what I assume was mill scale, then moved to a 60 grit to get a tiny bit of polish going. I also ended up choosing a different side that was ever so slightly flatter and had less protrusions. Ended up looking like this. There are still some small pits in the surface and a few scratches (I'm not terribly experienced with flap disks). In this state my hammer does dig into it just a bit, but the hammer face also needs to be dressed so that might have been part of the issue. Ok, on to spark testing, which I actually did before the polish. (For any safety minded people, I was wearing earplugs and safety glasses, as was my photographer, and yes, I should have been wearing long sleeves but I was just a little overexcited to get into the project)This is just about the best photo I could get of the sparks. I was comparing to a rough diagram of common spark appearance based on metal type and by my estimate it's most likely medium carbon but I'll leave that up to more expert-ish opinion. Anyway, if someone could help me out with a carbon estimate that would be great. Also, I'm considering whether or not to try and heat treat or harden the surface, since that would entail dragging this thing about 100 miles south to where my friend and co-conspirator on this could help me slap together a coal pit and stuff. I don't have any experience heat treating anything, much less a BLOCK of steel, so tips would be appreciated as well. Also just kind of wanted to showcase that I'm not just sitting around trying to keyboard commando all this stuff together. Thanks chaps! Quote Link to comment Share on other sites More sharing options...
Frosty Posted August 29, 2015 Share Posted August 29, 2015 Those'll work just fine. Yeah sitting on the bench took a lot of rebound out of the test. How high it rebounds only counts as a comparison to how high you dropped it from be it bearing or hammer.Put some radius on a couple edges, sharp edges are NOT your friend. A stand will be your next project, something as solid directly below the block as possible. Wood block is okay but those are light enough I'd go steel for the rigidity.Remember you'll be beating HOT steel on it so it isn't going to ding up forging well, except when you miss but don't worry. If it gets too beat up flip up a new side radius the edges and shine it up.You can grind all kinds of useful shapes into the 2" thick piece, A fuller for a start and a couple swages. It's a bit thick for a hardy or fuller though but useful for sure and certain.Not a bad start at all, I've worked on worse.Frosty The Lucky. Quote Link to comment Share on other sites More sharing options...
Elvirth Posted August 29, 2015 Author Share Posted August 29, 2015 I consider myself lucky to have found these for so cheap, 30 bucks for this much steel, I could make two other anvils and sell them to pay for other supplies, or experiment with making the second one better.I sort of started doing a radius on two opposite edges. Like I said before, I have very little experience with the flap disk on my grinder so getting a rounded shape is a little difficult. I might try tackling part of it with my bastard file tomorrow evening, just so I can take it slow and get it looking even. I forgot to mention how I wanted to mount it- my initial plan that I've been toying with is to get a nice log round slice, cut a square hole out dead center about 8 by 8 or a bit bigger, pour a bit of concrete in, then set the block in the concrete. That way it's got weight, but not so much weight that I can't throw it on a heavy duty hand truck and move it if I so desire. These blocks weigh probably close to 70 lbs apiece, by my gasping, grunting lift estimate. Don't have a scale, otherwise I would weigh it. Quote Link to comment Share on other sites More sharing options...
DSW Posted August 29, 2015 Share Posted August 29, 2015 A 70 lb "anvil" is a decent size. I'd be very happy to have all three of those blocks to let the Scouts work on. Flap wheels are soft and can "blend" things well. You might find a hard disk a bit easier to get a good radius with. Take your 90 deg corner and knock off the edge, so you have a 45 deg chamfer. On a small radius, you might be able to just round it out from there. If it's a bit bigger, split the difference on each of the 45 deg corners T so you have 4 22 1/2 deg angles. TA this point you should be able to bend things in with your file pretty quick.If I have big things I need to get flat with a grinder, I use a big grinder and keep the wheel as flat as possible. I see this a lot at the tech school when they have to grind bevels on test plates. Many guys want to use the edge of the grinder, and you have a small contact area. I keep as much of the large wheel in contact with the plate as possible, and that helps me get a nice flat surface. I can usually grind the pieces so that you can't see light between the two plates held up to the lights if I keep the grinding wheel flat. The same basic principals apply to big blocks as they do to edges of plates. Quote Link to comment Share on other sites More sharing options...
Randy Bill Posted August 29, 2015 Share Posted August 29, 2015 How about adhering the three together for a 210# anvil 21" tall with a 7"x 7" face. Quote Link to comment Share on other sites More sharing options...
Frosty Posted August 29, 2015 Share Posted August 29, 2015 When you're using a grinding disk resist the common tendency to move it back and forwards quickly, that's what the motor is for. Just a slow steady movement and it'll cut faster, cleaner and the disk will last longer.Rounding the corners is is the same in principle as forging a round, start square, knock the corners off, then knock those corners off then round it up. Same process different tool. A rasp is probably too aggressive to start with, chamfer the corner with a coarse bastard and once you have a flat switch to the rasp.Heck, forge a sen and scrap the edges round.Don't use concrete in the stand, the impact energy from hammering will break it up quickly. Just mortice it into the block, if it jumps around too much drive a couple wedges at 90*. LIke I said earlier I like a steel stand, especially for this anvil and you can secure it with set screws.Frosty The Lucky. Quote Link to comment Share on other sites More sharing options...
Elvirth Posted August 29, 2015 Author Share Posted August 29, 2015 When you're using a grinding disk resist the common tendency to move it back and forwards quickly, that's what the motor is for. Just a slow steady movement and it'll cut faster, cleaner and the disk will last longer.Rounding the corners is is the same in principle as forging a round, start square, knock the corners off, then knock those corners off then round it up. Same process different tool. A rasp is probably too aggressive to start with, chamfer the corner with a coarse bastard and once you have a flat switch to the rasp.Heck, forge a sen and scrap the edges round.Don't use concrete in the stand, the impact energy from hammering will break it up quickly. Just mortice it into the block, if it jumps around too much drive a couple wedges at 90*. LIke I said earlier I like a steel stand, especially for this anvil and you can secure it with set screws.Frosty The Lucky.I would use a steel stand, but I'm not equipped to make one. That picture of my workbench shows every tool I own. I'm not set up for welding or anything. I will try the chamfer technique with my grinder and file later, see where that gets me. I'm not in a really big hurry, since my log round for mounting might not show up for a while. My friend is sourcing that and he's a very busy contractor, so hopefully he can get up here with some stuff that we split the cost on soon. I'm not really interested in stacking these up for a really heavy anvil, mainly because I need to be able to move it without using a hydraulic jack or something. I'm limited on space and I live in a duplex so I need to be able to stow my whole setup if the weather gets bad enough. Quote Link to comment Share on other sites More sharing options...
DSW Posted August 30, 2015 Share Posted August 30, 2015 It might pay to talk to the teacher at the local high school votec center. They may be looking for projects for the more experienced kids to weld up. It's a little bit of real world experience compared to simply welding up coupons. You supply the materials and dimensions, may be a few bucks extra or buy lunch for the class, they weld the project up for you. There might even be a kid in class who has gear at home who is willing to do this for a few bucks if you supply materials. It never hurts to ask. Don't forget many of these schools run both day and evening classes. If the day instructor won't help, maybe the night instructor will. They often are not the same person. Stop in one night before class and talk to them. Also it doesn't have to be the weld shop. Often auto body classes have welders as well and might be an option. If you were closer, I'd probably weld it up at night if there was an open booth in the night program I help out at as long as it wasn't too complex. Quote Link to comment Share on other sites More sharing options...
Elvirth Posted August 30, 2015 Author Share Posted August 30, 2015 It might pay to talk to the teacher at the local high school votec center. They may be looking for projects for the more experienced kids to weld up. It's a little bit of real world experience compared to simply welding up coupons. You supply the materials and dimensions, may be a few bucks extra or buy lunch for the class, they weld the project up for you. There might even be a kid in class who has gear at home who is willing to do this for a few bucks if you supply materials. It never hurts to ask. Don't forget many of these schools run both day and evening classes. If the day instructor won't help, maybe the night instructor will. They often are not the same person. Stop in one night before class and talk to them. Also it doesn't have to be the weld shop. Often auto body classes have welders as well and might be an option. If you were closer, I'd probably weld it up at night if there was an open booth in the night program I help out at as long as it wasn't too complex.Like I said previously, I'm also trying to keep weight just below a certain threshold. This is meant as a temporary solution for my living situation until such time as I can actually have a larger shop-like space in which to set up my stuff. Thus, I'll probably opt for wood just because I can probably get a log round with a nice square mortise for cheap or possibly nothing at all. Well, I ground some basic radius shapes on two opposite edges of the anvil tonight. I think I might just leave the other two edges as they are, just in case I need a specific shaping method using a sharper edge. Quote Link to comment Share on other sites More sharing options...
Frosty Posted August 30, 2015 Share Posted August 30, 2015 You have a hand drill and a hack saw don't you? You don't need to weld a stand together it can be bolted and secure. You don't need to leave the anvil in the stand to move it either., Just a little nylon webbing and you can make a slip on handle. Move the stand separately.Frosty The Lucky. Quote Link to comment Share on other sites More sharing options...
Elvirth Posted August 30, 2015 Author Share Posted August 30, 2015 I was thinking about just wedging the block into the log round with shims, but do you think it would be alright with just a fairly tightly measured mortise? Quote Link to comment Share on other sites More sharing options...
Charles R. Stevens Posted August 30, 2015 Share Posted August 30, 2015 Tight mortis will work, beding it in silicon calk helps, otherwise one can chisel a sloped notch and use wedges (forged steel with a lip, wack the side of the anvil and pry up the wedge to relese) get used to your trio of 70# blocks and you may not be in a big hury to trade up. Quote Link to comment Share on other sites More sharing options...
DSW Posted August 30, 2015 Share Posted August 30, 2015 I was thinking more about simply welding up the stand vs welding all the blocks together. Personally I'd leave the blocks separate myself. You may find the connection itself with the school / instructor worth quite a bit. It may be a future lead to material or maybe an "in" to learn to weld, or access to equipment you don't have that the school does. If the night instructor finds this of interest, he might make available the schools plasma or OA torch on occasion, or maybe offer to shear or bend something on their iron worker for you. Quote Link to comment Share on other sites More sharing options...
Recommended Posts
Join the conversation
You can post now and register later. If you have an account, sign in now to post with your account.