Gundog48 Posted March 15, 2013 Share Posted March 15, 2013 After doing a rather large aluminium casting for my last school project, I'm afraid to say that I've caught the bug. This next project is a promotional product for which I intend to cast an anvil-shaped paperweight. I've made an MDF blank like the one pictured, but I'ts since had it's shape refined and been sealed. I intend to cast it using the lost wax process. After getting interested in foundry work, I'm working on my own furnace at home which I hope to have done in time for this product. If I don't get it done in time I'll be limited to casting it from aluminium when I'd really like to do it from brass. This is due to a number of health and safety reasons and limitations of their furnace. Anyway, this is my plan so far: Create a two part mold of the anvil from plaster by putting it half way into a piece of clay, adding a few dents so it'll line up, add the sprue, plaster over the blank, wait for it to harden, pop it out, put it into the plaster half and remove the clay, then plaster the second half With my plaster mold created, I'll 'cast' the wax by melting and pouring. I know how much wax likes to shrink, any suggestions as to what to do about this With the wax investment done, I now have two options. I can either put in into a sand mold, or plaster over it. I'd be interested in using plaster, any comments on this or advise on what plaster to go for? This is where I'd heat it up and pour the wax out, however my teacher assures me that this is not necessary as the molten metal will simply melt and 'push' the wax out. Now to me, it sounds like bad practice, but he has a lot more experience than me and has done it in the past, so I didn't say anything. Any opinions on this? I can see how it may be difficult to melt the wax out of a large sand mold, but a plaster one should be quite easy With the metal poured, it's just a case of cutting off the sprue and riser then finishing and polishing which I think I'm okay with! I'd appreciate your opinion on my current plan and any advice you give me. As much as I respect and value the input of my teacher, he is not an expert metal caster, but a technician who has to deal with just about everything from woodwork to laser cutters. I know you guys have a lot of practical knowledge of casting and you may be able to help me out! But generally, I'm quite looking forward to more casting in the future and my main priority is on keeping it safe and having some fun along the way! Quote Link to comment Share on other sites More sharing options...
Chinobi Posted March 16, 2013 Share Posted March 16, 2013 not a pro but im seeing a few 'easy' ones so ill toss in my 2C 1. you have a model of what you want, and you want to create a two part plaster shell to generate consumable wax models. have you considered using a silicone mold to create a flexible mold shell to pour wax into and not have it stick? i think plaster is too porous to be able to extract a wax model from without destroying one or both. you could try oiling or otherwise finishing the inside of the plaster, but i still think you would be better served with the silicone. 2. i dont have enough experience with casting anything that large to be able to provide any technical insights on the shrinkage at that size, i was instructed to create the wax model larger than you need so with shrinkage and cleanup/finishing you wont end up undersized 3. if you have the option of doing a sand mold (oil sand? greensand? delft clay?) you can skip the wax part entirely. make a two part frame and set your MDF model into the sand/clay/whatever, then you can open it up again, remove the model, and cast directly. even better, you can turn around immediately after that one, reset the mold and do it *again*. no curing, no burnout. you can find a lot of good videos on youtube and good info here too, search youtube for 'sand casting' or similar searches and skim through the related videos after you finish the first. i remember seeing a couple of good photo heavy sand casting threads here as well. http://www.iforgeiron.com/topic/27618-casting-in-the-form-of-sand/ 4. you want to 'pour out' the wax and it sounds like your teacher is advocating leaving the wax in to pour? i really hope im reading that wrong. if the wax is solid then the mold is cold, and you risk your pour freezing in the sprue, or being riddled with bubbles and inclusions, plus that volume of solid wax will severely impede (if not outright block) pouring and make for a dangerous situation to be in. more importantly you want to achieve burnout not meltout. there is another thread in here not too deep that describes casting into plaster with and without burning out the remaining wax and the effects it had on the mold and ammount of final cleanup after the cast. you want the wax to actually be burned out of the mold to prevent it from vaporizing (read EXPANDING, and quickly!) which can crack molds and leaves the potential for molten metal to get sprayed around (extreme case) again, if you are using a sand mold i really dont see the point of using a wax model. actually, the thread i was going to reference for burnout/vs meltout is one you started as well about casting brass for a sword, read Bentiron's post at the bottom http://www.iforgeiron.com/topic/28793-casting-brass/ 5. yep, thats pretty much the last step consider carefully how you orient the model with respect to gravity and where you will be pouring to reduce the potential for bubbles and allow you to add vents to let the air out during the pour. maybe try your hand at a smaller version before you commit the time and resources to the full size to flush out any rough spots in your plan and execution. definitely read through the sticky at the top of the sub-forum if you haven't already as well. sounds like a cool project, casting is very fun, and if you screw it up you can always melt it again for the next attempt! Good luck and doccument the process well :) Quote Link to comment Share on other sites More sharing options...
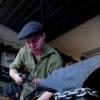
Fe-Wood Posted March 16, 2013 Share Posted March 16, 2013 Wow! Melt out the wax by pouring in Bronze or Brass? REALLY a BAD idea!!! It will erupt like Pompeii!!! I heard of that done with foam but NEVER wax. I poured the one in the picture below many years ago from a wood master (bottom of the picture). I like the idea of making a wax part from plaster first. This will give you a good idea of how much shrinkage you will get in the center of the Anvil. You can make the reservoir bigger by carving it out in the mold if you need to. I added a ball reservoir with a hefty sprue to help with the shrinkage in mine. I made it almost as big as the waist of the anvil with a very short sprue. I did mine in green sand. Good luck and show pics! I should add, this anvil weighs about 30 pounds- Quote Link to comment Share on other sites More sharing options...
Gundog48 Posted March 16, 2013 Author Share Posted March 16, 2013 Wow, that's beautiful work you did there! Bear in mind that this is very small, only 5" long from horn to tail! I thought that idea regarding the wax sounded like a horrible idea, now I have to convince him that it's better to burn it out beforehand which will be no easy feat. The original plan was a 2 part sand mold, but apparently I'd need to cut the model in half which would reduce the width too much. I don't see why I can't set it half way down in the drag, then pack the cope on top and do it that way. However, my teacher is convinced that it would not be a good way of doing it and that an investment casting is the only way. I think you can see why I'm eager to get my own foundry! I agree with your concern at using plaster as a wax mold, although I've seen it done before where they soaked it beforehand. Do you think modelling clay would work, perhaps left unfired? I'll have an experiment in the morning and see how it goes. Any idea on using a type of plaster as the mould for the metal? It's probably what I would choose if I was casting at home, partly because it would be easier to burn the wax out, but I don't imagine everyday plaster is what they have in mind! Quote Link to comment Share on other sites More sharing options...
Chinobi Posted March 16, 2013 Share Posted March 16, 2013 pretty slick Fe, i like it :) how long is it nose to tail? i wouldnt cut it in half, i would do like you said, set it part way in the lower half of the mold, set the top part, then pack the rest of the sand. split and remove your model. i cant add anything meaningful regarding the particulars of soaking the plaster or the specific mix (though i have seen it come up here before several times) when you say modeling clay, do you mean pottery clay (fired in the thousands of degrees F) or like femo/scupty craft type clay (fired around 200-300 F IIRC). in either case, if you use malleable clay that is left workable you will need to reform it around your MDF prototype after every time you make a new wax model, which is why i recommended using silicone, it is elastic and will return to its original shape after every use, though you may want to back it inside a rigid frame to prevent it from sagging under its own weight and distorting the wax model. Quote Link to comment Share on other sites More sharing options...
Fe-Wood Posted March 16, 2013 Share Posted March 16, 2013 I guess the next logical questions are, How many pieces do you want to cast? How much time do you want to spend chasing the cast piece? How smooth do you want it?What type of facility do you have access to? Do you have access to a sand Muller? Will you be adding wider feet to the body? Your answers will help me and others understand your needs and offer better assistance. My anvil is 12" long, cast in Bronze Quote Link to comment Share on other sites More sharing options...
Gundog48 Posted March 16, 2013 Author Share Posted March 16, 2013 Thanks again! I'm talking about pottery clay, I was thinking That once I had it to shape I could fire it. For the time being, I will only need to cast one of these for the project, but I'd like to do them in multiples some time in the future, but the real priority is getting a single good casting done. I'm not going to widen the base because I want to keep it simple for the project, I've learned that's the best way when it comes to these projects as you get little time and you won't loose marks for doing simple designs, as long as they are well executed. It's frustrating because the technicians tend to faff around and take it incredibly slow as if we have ages on the project, when in fact we only have a few weeks. The issue is that my teacher believes the method we mentioned will not work and probably won't let me do it which is incredibly frustrating! That and the fact he's convinced it's best to leave the wax in means I should really hurry up and get my own foundry set up! Quote Link to comment Share on other sites More sharing options...
njanvilman Posted March 16, 2013 Share Posted March 16, 2013 Gundog48 You are heading to a disaster if you do what you want with the method you describe. I am a 36 year veteran of teaching Metal Shop, which includes a foundry unit. What you need to do is go back and create a two part split pattern. These parts are alligned with pins in the split. Then do a petrobond mold, with each half in the cope and drag. A very large sprue and riser is needed to handle the shrinkage of the aluminum, and slow cooling of the molten metal. I usually applied heat with an O/A torch to the riser as it cools, then covered the mold with more clay. Do not ever pour molten metal into a mold with wax. I cannot figure out how your instructor thinks this will work. You will have an explosion and fire! The only direct casting techniques is to pour into a mold that has a foam pattern packed into a petrobond clay flask. I do not know what type of foam material is used, but I know that as it burns away, it gives off TOXIC fumes. Proper PPE equipment is needed. The finish is the texture of the foam. You need to do more research on patternmaking and foundry practices. Molten metal is nothing to mess with. It can lead to a disaster very quickly. Quote Link to comment Share on other sites More sharing options...
Gundog48 Posted March 16, 2013 Author Share Posted March 16, 2013 Thanks, I'm going to have to put my foot down on this one, it's clearly very dangerous and the worst thing is he doesn't realise it and could try it with another student. I've done a fair bit of research but I'm still learning. Basically, I need to get him to trust me enough to let me do a two part mold against his advice. If I am forced to go down the lost wax route, is there an effective way of burning wax out of petrobond? Quote Link to comment Share on other sites More sharing options...
njanvilman Posted March 16, 2013 Share Posted March 16, 2013 If I am forced to go down the lost wax route, is there an effective way of burning wax out of petrobond? Why would you make a mold with a wax pattern? The lost wax process is usually for intricate patterns, usually art sculpture pieces. Look it up, there is lots of information out there. When you make a mold using a clay such as Petrobond, you pack the clay around the pattern, then remove the pattern, cut the gating system, close the mold, and pour. If you are using wax for a pattern, it must be a hard wax, or perhaps freezing the wax, solid enough to pack the clay around. You do NOT burn out wax from a petrobond mold! I hate to sound like a teacher, although I am one, but you have got to do a lot more research before you kill yourself. Molten metal of any type is nothing to experiment with. MANY people have been killed and maimed by hot metal and explosions doing foundry work. Do your homework. Read about it. And keep asking questions BEFORE you experiment. Quote Link to comment Share on other sites More sharing options...
Gundog48 Posted March 16, 2013 Author Share Posted March 16, 2013 Thanks for that info, so am I to assume that lost wax is almost always done in a plaster mold as opposed to setting it in petrobond or sand? I always do my research, but I was under the assumption that I'd be doing this project under the supervision of someone who knows what they are doing. From what I've read here, my teacher has gotten a lot wrong and I can only conclude that he is experimenting as well, but he is sure in his methods and doesn't want to learn himself. I'm going to have to look carefully at how I approach this. The issue here is that I can do it at school where we have full extraction, a specialised casting area under the guidance of someone who clearly isn't an expert but probably knows more than I do. However, to do this, I need to convince my teacher that the method he has in mind won't work and is dangerous. My original suggestion was to do a two-part mold in petrobond, however he was dead against that as the shape is supposedly too complex and I'm pretty sure he won't let me try. The alternative is to get my foundry at home set up and working, in which case I have a steep learning curve in order to get myself knowledgeable enough to do this safely in a short space of time. I'm always very careful, but I'm a newcomer to foundry work so there is a potential to do something wrong. Neither is ideal, and it's a frustrating situation considering my school has such excellent equipment and everything I need, but I'm not going to be allowed to do it the way that many here are recommending and I'm being encouraged to do something which everyone here has said is dangerous. Quote Link to comment Share on other sites More sharing options...
Fe-Wood Posted March 17, 2013 Share Posted March 17, 2013 I'm going to agree with njanvilman's advice on this one about using a pattern board. You can split you original anvil pattern and add material to make up the loss from blade curf. Using pins that align with the flask will help with the two sided alignment. Find some books you can set in front of your instructor describing what you have in mind. Your Anvil is PERFECT for a petrobond mold, just make sure you don't have any undercuts in the pattern. There is no way to melt wax out of petrobond. Petrobond is oil bonded sand. Maybe you can take enough materials home and set the mold up there and bring the finished mold back to school for casting.... Quote Link to comment Share on other sites More sharing options...
LeeMcKee Posted March 31, 2013 Share Posted March 31, 2013 The first issue is the petro bond.... This is not 1942, we have new products that will do a much better job. My advise to you is to make your plaster mother mould to produce the waxes. Take the waxes and arrange them into a configuration that you can cast a few at one time and make a match plate for the job. If you are making multiples this would be the way to go, melt outs take a long time to make any sort of quantity. Once you have a good matchplate (in Aluminum) you need to use a good resin type bonded sand like Alpha Set or Chemcast "O". This will allow you to make many moulds and pour them all at one time. Petrobond will not allow you to spend weeks making moulds in preparation for the pour. You need to use appropriate risers and spruing to ensure casting shrinkage will not be an issue...nothing is worse that a hollow anvil, or half an anvil... I'm actually making some Little Anvils now myself and would be happy to document my techniques... Lee McKee Resident Artist / Tannehill Historic Ironworks State Park *If you have time check out our links!* Tannehill Historic Ironwork State Park www.tannehill.org Tannehill forge school of Blacksmithing www.facebook.com/pages/Tannehill-Forge-School-of-Blacksmithing/223833204346445 Alabama Art Casting www.alabamaartcasting.org Quote Link to comment Share on other sites More sharing options...
Bentiron1946 Posted March 31, 2013 Share Posted March 31, 2013 I just got back from an iron pour where we use a resin bonded sand with a low temperature burn out. Having come from a traditional "lost wax" background the first time I heard of this I expected total disaster but not so. The wax is somehow taken into the resin bonded sand and NO explosion ensues and the castings are wonderful. If a fine enough sand is used you can pull fingerprints, yes, fingerprints of the artist is on the finished castings. I was really stunned to see the high quality of the castings. We also use ceramic shell for the iron pour and it also allows you to pull the artist's fingerprints but you expect that from shell or traditional investment practices but not from sand. Last year at the pour we had a fellow cast around twenty small anvils and he put ten on a one inch sprue with a pour cup, in sand and another ten on a similar set up, in shell. He used a flexible mould to make his waxes, you can try a plaster mould but it can be risky if the wax decides to stick, after it does that you are lost and need to make a new mould so just save yourself some grief and make one to start with, you'll be glad you did. Quote Link to comment Share on other sites More sharing options...
LeeMcKee Posted April 1, 2013 Share Posted April 1, 2013 Did you go to David Lobdel's Iron Tribe event in AZ? That is how we do ours over here in Bama. The Bonded sand works very well and is cheap. In college we used Portland Cement and river sand.... You can get any cheaper than that and the wax is reclaimable. Quote Link to comment Share on other sites More sharing options...
Bentiron1946 Posted April 1, 2013 Share Posted April 1, 2013 No, I was at the iron pour at Mesalands in Tucumcari,NM. It is an intense week of making art, breaking iron and getting ready for the Friday pour, great fun. The week before there was a pour over in Las Vegas, NM at NM Highlands, I hear that it a fine pour too. Quote Link to comment Share on other sites More sharing options...
Recommended Posts
Join the conversation
You can post now and register later. If you have an account, sign in now to post with your account.