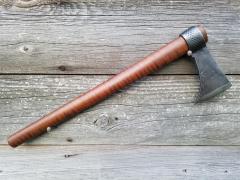
May 9, 201016 yr Made my first roller chain knife, garage door chain. Will work good as a patch knife. still question the correct temper process.
May 9, 201016 yr Hey DUNSTAN, That pretty nice, what type of etchant did you use? And what is your temper question? I'm not the smartest but i might be able to steer you in the right direction. Chad
May 10, 201016 yr Author Thanks Chad, Used muratic acid after finished polish. The question was the correct heat and cooling method used for roller chain blades. Some say to cool the blade after it loses magnetism in oil up to the tang, and others have said only the edge of the blade, leaving the back strap to cool slowly. THIS HOOSIER IS CORNFUSED!
May 10, 201016 yr I cant see it making much difference on a small knife if you 'edge quench' or fully quench it. If you just edge quench a blade the spine stays soft, which is handy on bigger blades. After you have quenched from above non-magnetic (either method) you must temper the blade. That is heat it up again (once its cooled from the oil) to about 200C (temp depends on the steel, and the hardness your after.) The blade should be 'pot hard' after the oil quench, so a file skates accross it. The 'tempering' softens it back up to a useable hardness, ie so it doesnt chip in use. Great welding by the way, it looks good :D
May 10, 201016 yr Author So if some say tempering and other say annealing, is it the same thing? And which way is the beat to do it, sand?
May 10, 201016 yr in a nutshell (and there are variations to each method..), annealing (heat above non magnetic, cool as slow as you can in ashes, or the forge etc) is done to soften the steel, and reduce internal stresses before you start grinding it. Normalising (heat above non magnetic, and let cool to room temp in still air) can also soften the steel & reduce stresses, but is usually done to make the 'grains' in the steel reform smaller. Often done 2 or 3 times. (small grain usually = stronger blade, that takes a better edge) Quenching (heat above non magnetic, and very quickly quench) hardens the steel. Very hard, so it is brittle, and will snap / chip easily. Once quenched, coz the steel is pot hard, you have to 'temper it' this involves heating it up to 200C (ish). tempering effectivly relaxes the pot hard steel to a useable hardness, where it wont chip or snap. The higher the tempering temperature the softer the steel will get. The art of bladesmithing, at least to me is optimising all these processes to make a strong knife, that cuts well, and maintains its edge for a long time. Hope this helps a little!
May 10, 201016 yr So if some say tempering and other say annealing, is it the same thing? And which way is the beat to do it, sand? NO.. not the same, please read the stickys and stop by my place in Ft Wayne when ya have the time.
May 11, 201016 yr Hey DUNSTAN, all of these are viable answers and these stickys do have good info in them, for some they can be difficult to interpret but everybody here is more than willing to help and share there knowledge and experience. If Steve is offering his shop and wisdom I'd take it in heart beat! sometimes its better and easier to learn watching people than it is working by your self from trial and error! Just remember: A smart man learns from his mistakes, a wise man learns from other people's mistakes. Anyway good forge weld, that's not the easiest thing to learn! Chad
May 11, 201016 yr Author Thanks to all ,Chad,John AND Steve, this has been very helpful. I have been blacksmithing for about 6 years, but just started making blades for fun and gifts. Steve, thank you, I would love to watch you work on a blade. One more question, after bringing it up to 200C / 400F APROX. is then air cooled to normally?
May 11, 201016 yr yup Heat treat is a subject that once you start reading up on is really very intersting.
May 11, 201016 yr Thanks to all ,Chad,John AND Steve, this has been very helpful. I have been blacksmithing for about 6 years, but just started making blades for fun and gifts. Steve, thank you, I would love to watch you work on a blade. One more question, after bringing it up to 200C / 400F APROX. is then air cooled to normally? Watch? LOL wear work clothes, smithing in my shop aint a spectator sport, YOU are gonna forge here... I may help a bit, but you are gonna get hands on....
May 16, 201016 yr Nice blade Dunstan! We just replaced our garage door a couple months back, and everything went to the curb but the chain. I held onto it thinking it might come in handy for something. Now I think I just want to copy you! Would you be willing to share how you did it? Thanks and nice work! John
May 16, 201016 yr Author Thanks Bluefeather, it was a new challenge for me as well. I started by cleaning and welding it together in a 4" overlap pattern. Heat and slowly forge weld it together with Borax. Kind of like this video, but with a coal forge and no press or power hammer.
Join the conversation
You can post now and register later. If you have an account, sign in now to post with your account.