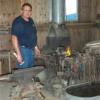
HWooldridge Posted April 18, 2009 Share Posted April 18, 2009 (edited) Someone in a related thread asked me to post a separate note on how I have repaired anvils, including the heat treatment - so here is an expanded text of a post I put up in May 2008. When I started blacksmithing in the early 1980's, good anvils were very hard to obtain and usually pretty expensive. I traded a couple of rifles for this 250 lb Peter Wright (at that time, I was gun-rich and anvil-poor) and it has been my regular shop anvil since it was repaired almost 30 years ago. Initially, a large piece of the face was gone plus the heel was cracked and trying to come off at the hardy. It was replated with a piece of spring steel off a scrapped bucket crawler and I was lucky that two of the helper springs on the rig were a uniform thickness, the right width and about 3 feet long. I'm not a "steel detective" so I tested a small piece of the spring by heating and hardening it before going to all that work. After I cut the piece to length, it was heated in a normal sized coal forge and flattened out of its curved position. I let it normalize then drilled and chiseled the pritchel and hardy. When it was time to attach the plate, I spaced it off the anvil with 3/8 round stock (including tight rings around the pritchel and hardy) and welded it from the inside out to the edge with E6011 rod. I did not clean between passes and simply piled on bead after bead until the gap was filled completely. Necessity is the mother of invention... At this point, I ground everything to final size then called a friend of mine over to the shop to help. We planned to hang the anvil upside down on a chain from a jib crane and heat in a coal forge. The forge box was specially made for this task by cutting an 18" slot (the length of the face), in a piece of 1/4 plate attached to 4 pipe legs, then I capped a piece of 3" pipe before splitting it down the center and welding it under the plate to act as an airbox. I stuck a short 3" nipple on the box and used a Champion 400 blower for an air source. The jib crane held the anvil about 4 inches above the plate so it would not settle into the fire. We used damp slack coal for the fire and initially built a long fire from wood tinder before piling up the coal. This was so the fire would burn consistently as I did not want one end to be hotter than the other. After about an hour of slow and steady heat, we could see color about 3 inches from the face into the body. We hoisted the anvil out of the fire, flipped it back over and set it on the ground then poured water from two wheelbarrows and a big galvanized tank on top of the anvil. It also took a garden hose to cool it enough not to draw the temper from the residual heat. This produced a good hard face but it really wasn't enough water as the heel around the hardy didn't get very hard. Whatever you do, DO NOT - under any circumstances, submerge a hot anvil in water as the steam pockets will make the face crack. I saw this first hand on a repair while helping another smith and had to hold my tongue after counseling him beforehand not to immerse the anvil. The only way to correctly cool an anvil face is with a cascading column - the bigger the better. I've successfully heat treated three anvils this way but if I did it regularly, I'd put a 1000 gal tank on legs with a 6" valve and elbow so the water could be dumped quickly. As you can see from the photo, the replated Peter Wright is taller than normal but is a great tool and it has served me faithfully for many years of hard and frequent use. The dark spot on top is an oil stain and there are no cracks or spalled spots anywhere on the face. It has great rebound and will last long after I'm off to the great Shop in the Sky... Edited April 18, 2009 by HWooldridge Quote Link to comment Share on other sites More sharing options...
Iron Falcon 72 Posted April 18, 2009 Share Posted April 18, 2009 Thank you. I was the one who asked. It looks like you did a great job. I'll keep this thread bookmarked. Quote Link to comment Share on other sites More sharing options...
HWooldridge Posted April 18, 2009 Author Share Posted April 18, 2009 You are welcome - but part of me hopes you'll never have to do this as it is a lot of work...:-) Quote Link to comment Share on other sites More sharing options...
Oak Hill Forge Posted April 18, 2009 Share Posted April 18, 2009 When you did the welding, did you pre-heat the anvil ? Have you made edge repairs with 6011 or7018 ? Quote Link to comment Share on other sites More sharing options...
Oak Hill Forge Posted April 18, 2009 Share Posted April 18, 2009 I have a 100 pound Vulcan I bought cheap, just to see if I could repair it. The edges are terribly chipped ... well beyond radiusing Quote Link to comment Share on other sites More sharing options...
element Posted April 18, 2009 Share Posted April 18, 2009 Thank you Hwooldridge!! Great post, Ive been waiting for a post like this for 3 months. Thats some real smiths talk right there:D Quote Link to comment Share on other sites More sharing options...
HWooldridge Posted April 18, 2009 Author Share Posted April 18, 2009 When you did the welding, did you pre-heat the anvil ? Have you made edge repairs with 6011 or7018 ? I have done edge repairs with a MIG on several anvils but about the best you can hope for is some carbon embrittlement of the welded areas so they aren't dead soft. 7018 would also probably work. Preheat slightly just around the fill with a propane torch; 300-400 degrees is plenty. The wide variety of exotic buildup rods yield varying amounts of success depending on the type and application - so I'm not going to comment on them here other than to say you will likely see a color mismatch after the anvil either begins to rust or develops a work patina. On the other hand, common steel rods or filler wire will blend into the surface pretty well and the patches will often completely disappear with time. There are several answers to the broken edge problem - all with varying degrees of difficulty. If the chips are minor, you can leave them alone and make a block with crisp edges to fit the hardy hole (Mark Aspery has shown this here). Another option is to take a right angle grinder with a flap wheel and clean them up a bit. I have a 100 lb anvil that was treated that way because it had one spalled place near the hardy and a single chip gone from one edge. I ground out about an inch so there is a large radius in that one place, which is useful for some work. You can also buildup the edges with welding as I alluded above. Finally, you can reheat an anvil using the technique I described in the first post (but to a yellow color) and use sledges and a flatter to clean up the top and edges. If the original forge weld is sound, this will make the anvil look almost new - and if you plan the work correctly, the heat treating can be done in the same heat right after the forging. I have not personally done this but I saw the process done in Mexico on a small 75lb anvil and it worked perfectly. However, it is not a one person job and you'll need at least two or three other brave souls to help out. Quote Link to comment Share on other sites More sharing options...
ThomasPowers Posted April 19, 2009 Share Posted April 19, 2009 "Country Blacksmithing", Charles McRaven, talks about anvil repair and IIRC he used a local volunteer fire department's high pressure hose to quench the anvil he re-heat treated... I like the book as it has a very different style than most blacksmithing books. Quote Link to comment Share on other sites More sharing options...
HWooldridge Posted April 19, 2009 Author Share Posted April 19, 2009 "Country Blacksmithing", Charles McRaven, talks about anvil repair and IIRC he used a local volunteer fire department's high pressure hose to quench the anvil he re-heat treated... I like the book as it has a very different style than most blacksmithing books. A big firehose would probably work quite well - anything to break up the steam pockets and remove the heat quickly. Quote Link to comment Share on other sites More sharing options...
Recommended Posts
Join the conversation
You can post now and register later. If you have an account, sign in now to post with your account.