

timgunn1962
-
Posts
393 -
Joined
-
Last visited
Content Type
Profiles
Forums
Articles
Gallery
Downloads
Events
Posts posted by timgunn1962
-
-
How does it perform in the forge?
-
As close as I can measure using drills as Go-NoGo gauges, my cheap noname MIG tips are between .006" and .007" bigger in diameter than the nominal wire size.
-
Vaughn, please pardon my ignorance, but what is felt to be the advantage of hitting welding temperature at low pressure?
I can understand it for those in the higher latitudes, where low ambient temperatures might keep cylinder pressures low, but it's not obvious to me how it is advantageous for those nearer the equator.
-
Too big on the gas jet and the temperature will be low with lots of Dragons Breath; too rich (reducing)
Too small and there will be no Dragons Breath and a massive scaling problem; too lean (Oxidizing)
Broadly speaking, the jet size will set the air:fuel ratio, which will vary the temperature of the flame.
Varying the gas pressure effectively varies how big the flame is.
There are several designs for chokes that will work with your burner. It's worth building one. The choke gives scope to adjust the air:fuel ratio.
Ideally, you want to have an air:fuel ratio that gives a flame temperature at, or just above, the maximum you will ever need with the choke fully open. You can then choke it down to get a lower temperature, and a reducing atmosphere, when you do not need it that hot.
-
Update on my own 2 burner Majestic: I recently relined it with supplies from Wayne Coe and now I can forge at 8 PSI (instead of 15) and get up to heat much faster. I have not done any welding since I re-lined it but I would guess around 16 PSI (instead of 25-30) should be a welding heat. Basically I was able to cut gas consumption in half by re-lining it. I am very pleased with how it works now because I never really had a problem with the burners (I'm at sea level). Just a update for all you folks with Majestic forges with the same frustrations I was having with gas hogging.
-Crazy Ivan
Not wishing to knock the improvement you've made, it's worth pointing out that pressure and flow are not the same thing.
For a given jet, gas consumption varies with the square root of the pressure; To halve the gas flow, you would need to get the pressure down to one quarter.
By halving the gas pressure (assuming the jet was not altered), you will have reduced the gas consumption to 70.7 % of the original value; still pretty impressive in my book.
-
The emissivity issue is pretty restrictive. It's fundamental physics, so the newer units are no better. The usual way of dealing with it is to shoot a workpiece at a known temperature, then adjust the emissivity setting until it reads correctly. As long as the emissivity of the workpiece doesn't change after that, the instrument will give accurate readings.
Because the thickness of the oxide layer changes the emissivity, it has limited value in "our" applications; soak at temperature and the Oxide layer gets thicker, hammer it and the oxide layer (scale) comes off.
I had a 1650 degC (2912 degF) IR unit and found it pretty close to useless. I passed it on to a smith who makes a lot of SanMai and Damascus. He seems to find it useful, though I think he uses it mainly to check that his billets are withinin the working temperature range, rather than for any sort of accurate measurement. I think he finds it "better" than judging by eye due to changing light levels in his shop.
My feeling is that buying/building a burner with good control of atmosphere/temperature and using a thermocouple/pyrometer to set it up, will give more repeatable results for less money. However, judging on the basis of the the work he produces, his method certainly seems to have something going for it.
-
The Amal units are now made by Burlen. At work we got them via at least one middleman and got hit with their markup. When I bought direct, I was pleasantly surprised at the prices.
Burlen seem to specialize in carburettors and parts for classic British sports cars and I'm sure they will ship anywhere. One thing to be aware of is that the threads are BSP, rather than NP. Usually, the 60-degree 1/2" and 3/4" male US pipe threads will screw into the 55-degree BSP female threads reasonably well, as the pitch and OD are the same. I'd be a bit wary of doing this with the Amal injectors because the adjustment uses the female thread and any damage is likely to make the adjustment harder.
The larger and smaller BSP threads also have different pitches to the NP equivalents. It's not a big issue, but it's something to be aware of.
There are a number of other manufacturers/suppliers of commercial Venturi mixers. I only have experience of the Amal units, but I also know of the following:
http://www.montselas.co.uk/atmospheric-injector.aspx
http://v2.wetdogglass.com/products/detail/286/Mixers
http://amalcarb.co.uk/downloadfiles/amal/amal_gas_injectors.pdf
http://www.selas.com/product?id=116
http://www.selas.com/files/docs/B2201-Hijectors.pdf
http://www.selas.com/files/docs/B2101-Lojectors.pdf
http://www.axner.com/venturi-burners.aspx
http://www.axner.com/mr-750venturiburner.aspx
http://shop.clay-planet.com/mr-750-venturi-burner.aspx
http://www.combustiondepot.com/store/cart.php?m=product_list&c=576
https://www.combustiondepot.com/store/pdf/p_10679.pd
http://www.seattlepotterysupply.com/Merchant2/merchant.mvc?Screen=CTGY&Category_Code=VB
http://charlesahones.com/venturi-air-mixers/
http://www.ordanthermal.com/products/mixers/mixers.html
If any are reasonably close to you, they are probably worth a call.
-
This was on Propane.
-
A good while back, I was playing around with some burners and built a quick-and-dirty test forge from IFBs. It was used to test a 1" burner based on an Amal atmospheric injector (a British commercially-made Venturi mixer. Amal were once a big name in motorcycle carburettors). The intention was to get it to run over a range of temperatures all the way from heat-treating to welding. I showed it to some of the guys from the BritishBlades forum at a hammerin and one asked if they made smaller injectors. The 1" had seemed quite small to me, as I'm used to using the 2" ones at work, but he knows what he's talking about and I thought it might be worth trying an even smaller one.
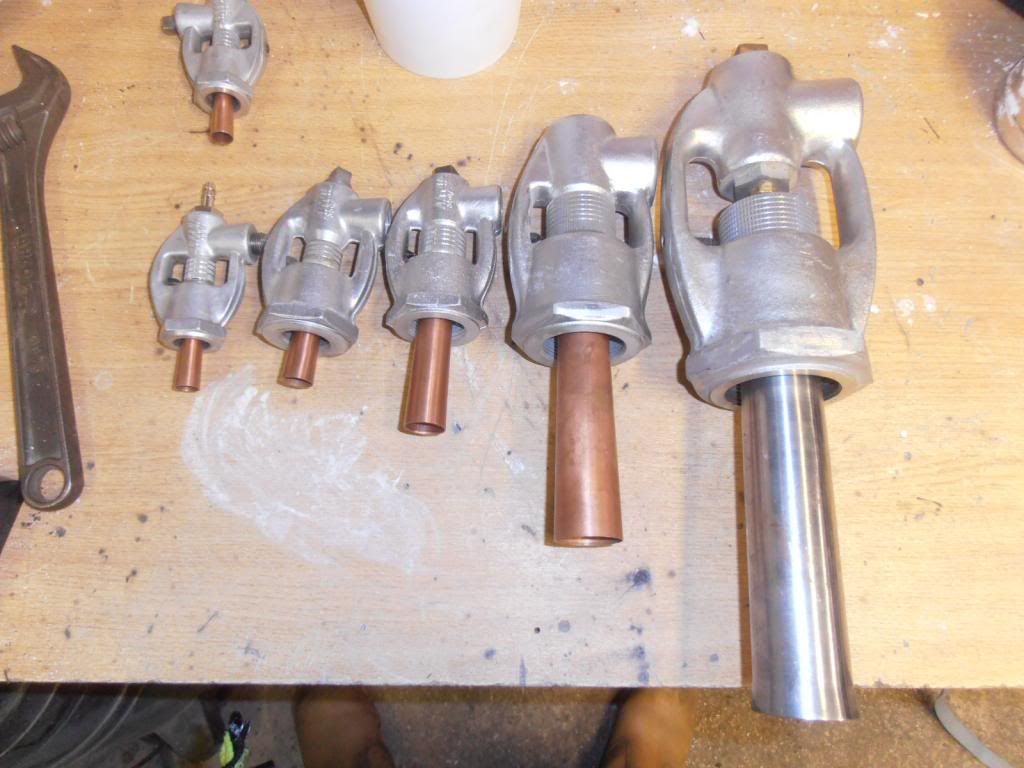
These are 1/2", 3/4", 1", 1 1/2" and 2" atmospheric injectors
A quick word on burner sizing here; the Amal injectors are threaded to fit standard pipe, but have the flare as part of the injector assembly and a throat diameter that is considerably smaller than the nominal pipe size. Most of the online Naturally Aspirated burner write-ups I have seen, that incorporate the Venturi principle, effectively use the nominal pipe size as the throat and add a larger-diameter flare onto the end. The 1” Amal has a throat measuring 0.67”. The throat on the 1/2” is 0.350”. My initial assumption was that a 1” Amal mixer with its 0.67” throat would probably be similar to a 3/4” burner built to one of the better-known designs.
I was not entirely convinced it would be big enough to do any real hot work, so my first try with a 1/2" burner was a quick-and-dirty Heat-Treat forge. Broadly speaking, the plan was to scale down a Don Fogg-style HT forge (normally made from a full-sized 45-/55-gallon oil drum) to something that would fit the space a hobby knifemaker might have available. After a fair bit of messing about, I thought I had something 10” diameter and under 2' long that might just about do the job. As a bonus, it should also be usable for forging.
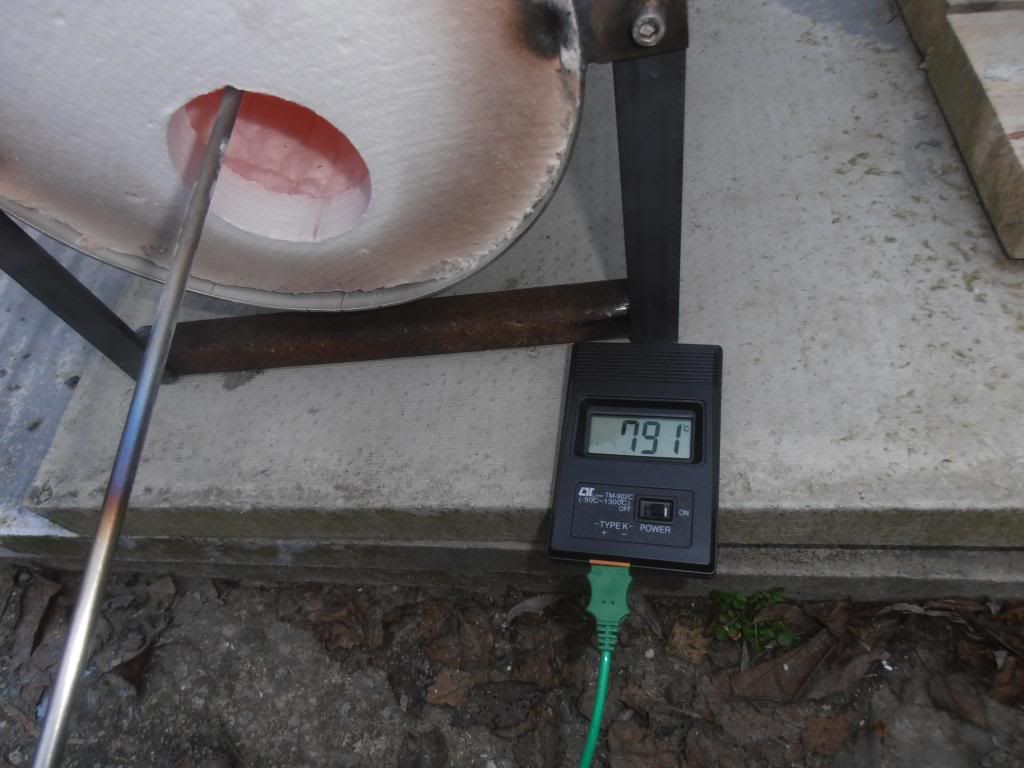
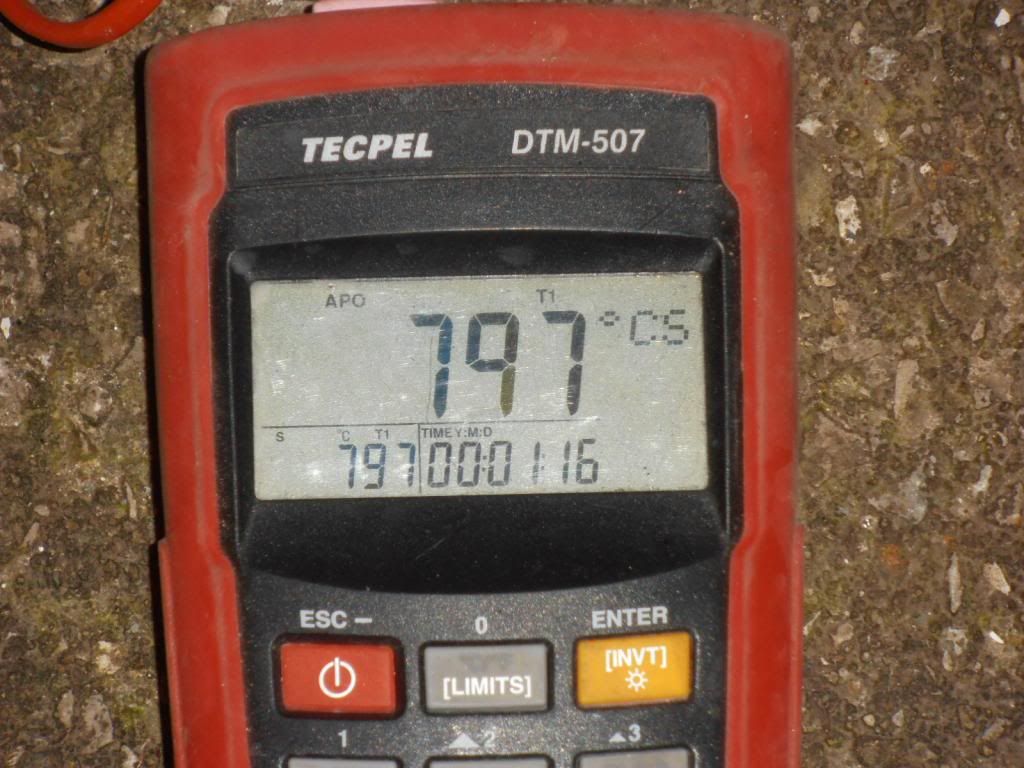
791 degC is 1455 degF, the lower end of the Austenitizing temperature range for O1.

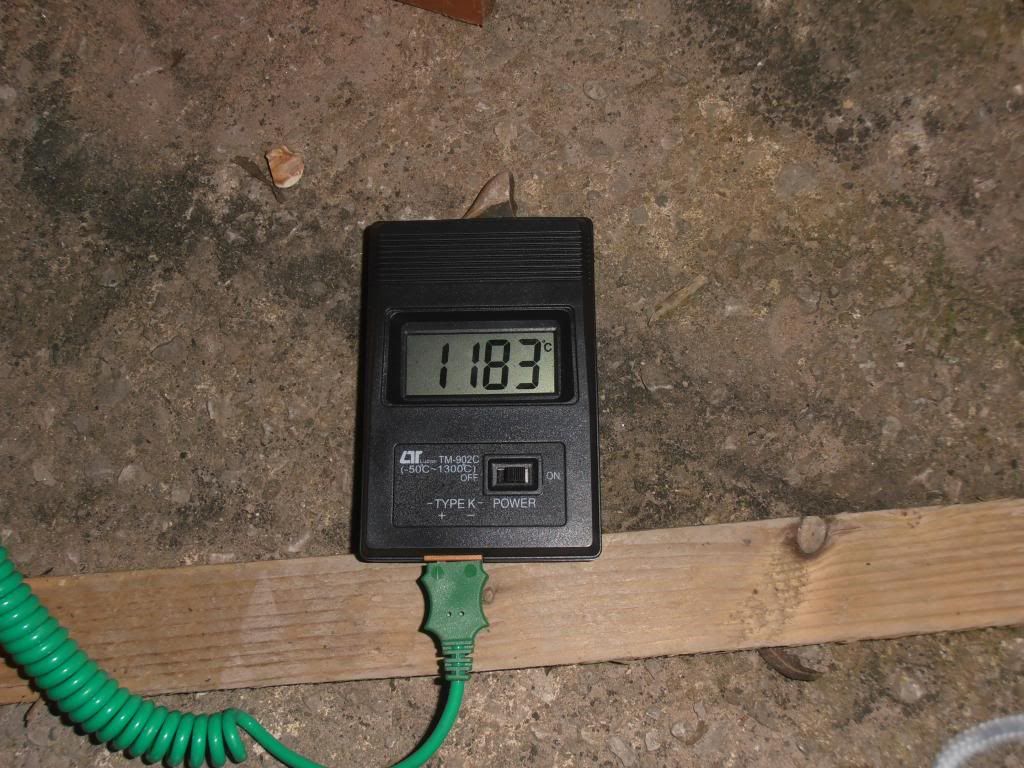
1183 degC is 2161 degF, more than hot enough for forging Carbon steels.
I then built another forge, about the size of a 2BF, with a 1/2” burner. This would just about manage the low temperatures for HT and would easily reach welding temperature, but at about 2 1/2” x 10” the chamber seemed too small to actually weld anything useful in.
A few weeks ago at work, we had a couple of small compressors to scrap, fitted with 25 litre (about 7 gallon) receivers. These looked a good size for forge shells at around 9” diameter and 20” long. I thought they'd work ok with 1” burners.
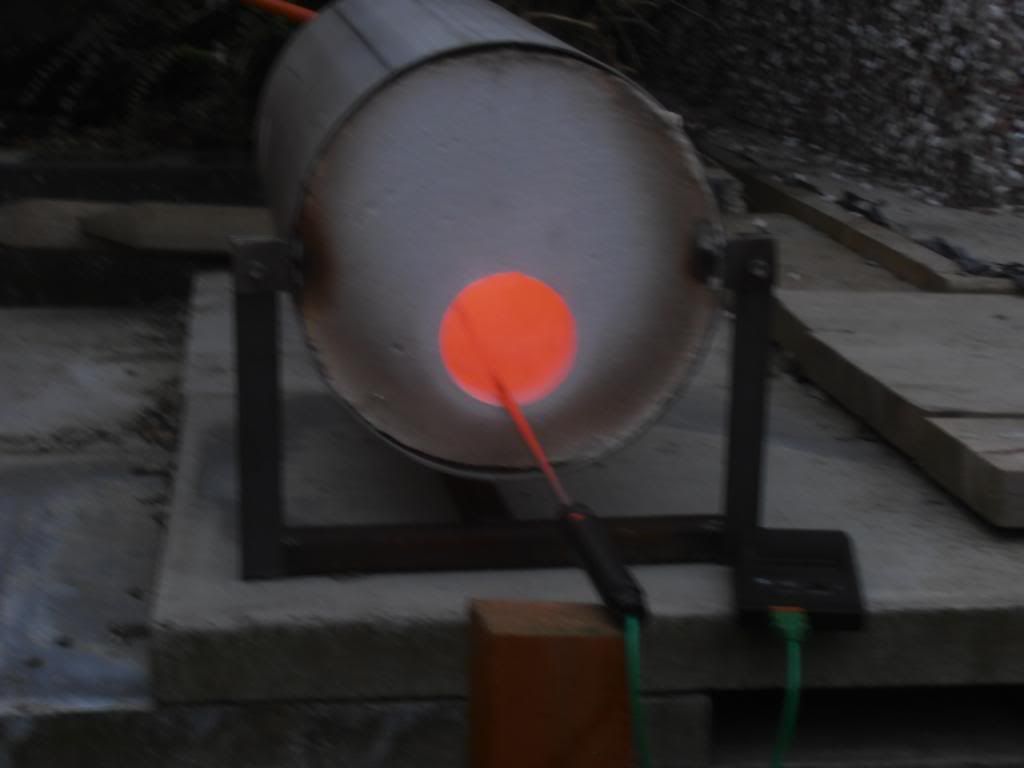
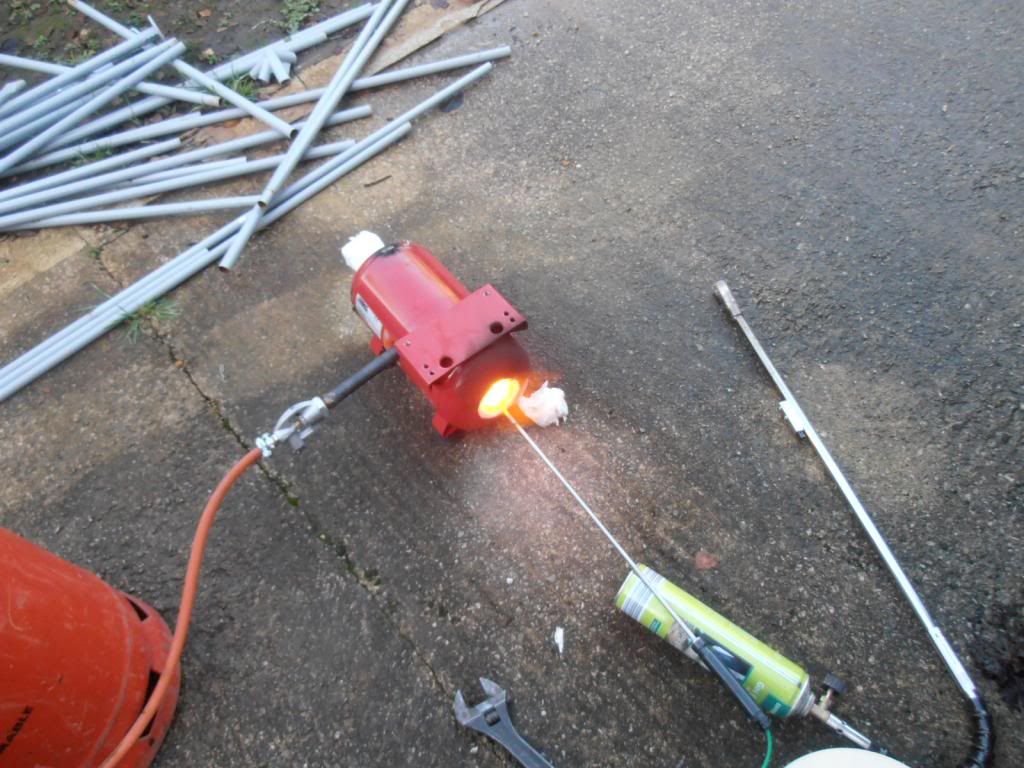
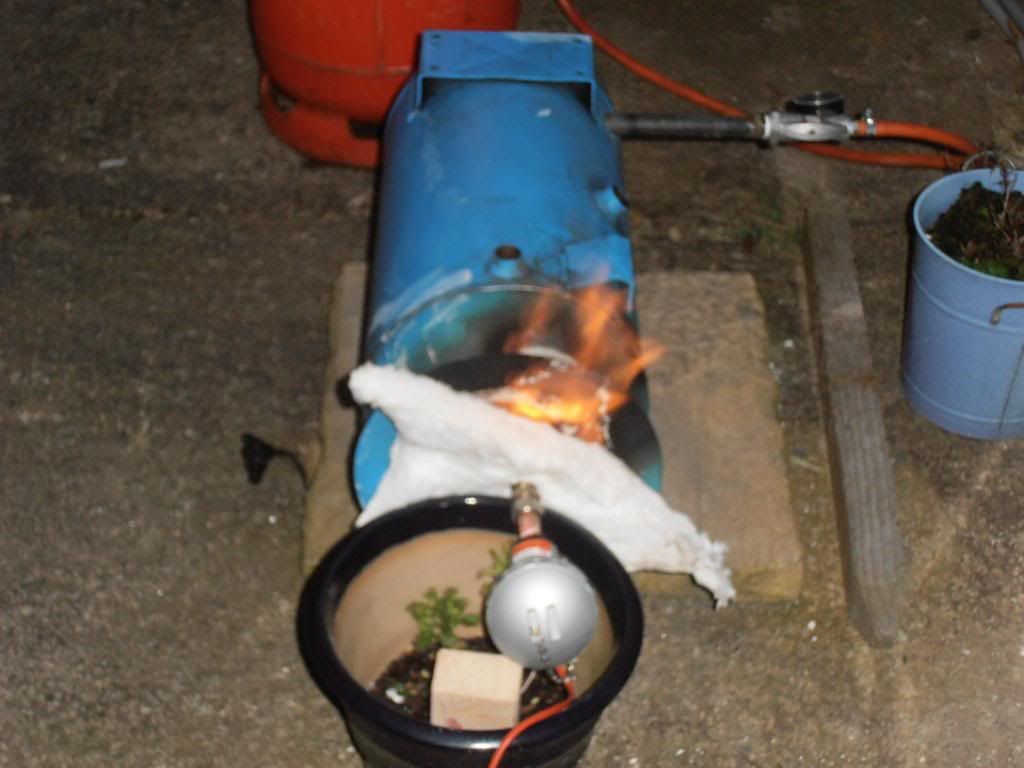
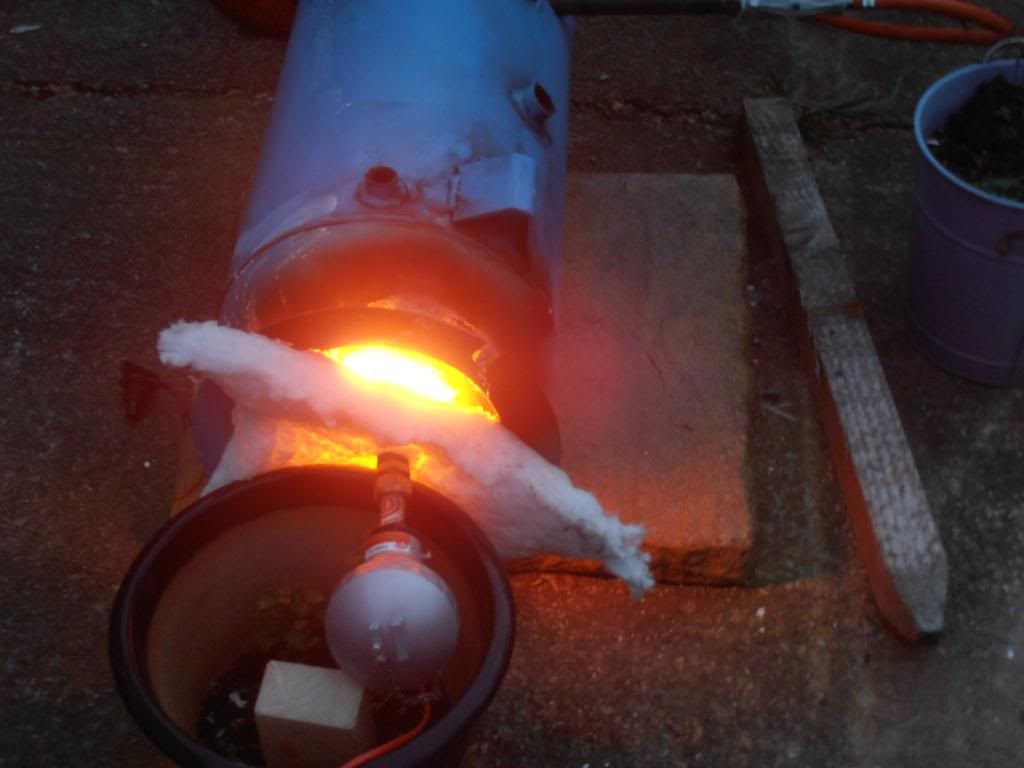
I built one; cut off an end and holesawed an opening in it, lined it with Ceramic Fibre Blanket, coated the hot face with a mixture of Rigidizer, Zirconium Silicate and porcelain clay powder, then welded the end back on. The burner port was cut to take the 1” burner. After a couple of days, the inside was still wet and I was getting impatient. I stuck in the 1/2” burner and fired it up at low pressure to dry out the porcelain mix. I also stuck in a thermocouple to see how the temperature went, expecting it to start low, rising as things dried out and stabilizing once dry.
After an hour or so, I looked at the temperature display and it was saying 1146 degC/2095 degF; a pretty decent forging temperature. There was still plenty of adjustment on the burner, so it got fiddled about with. HT temperatures seemed no problem. Nor did welding temperatures; I've seen online sources giving values of 2300 degF/1260 DegC, but 1300 degC/ 2372 degF seems to be a nice welding temperature taken from my actual measurements at hammerins. At 50 PSI and with a fully open airgap, the 1/2” burner maxed out a type K thermocouple, which is “only” good to 1370 degC/2500 degF.
Being primarily interested in the burner, rather than the forge, I wanted to see whether the temperature was being limited by the gasflow or the airflow. I stuck in a type S thermocouple (Platinum-based and expensive) instead of the type K and measured the temperature at around 1410 degC/2538 degF.
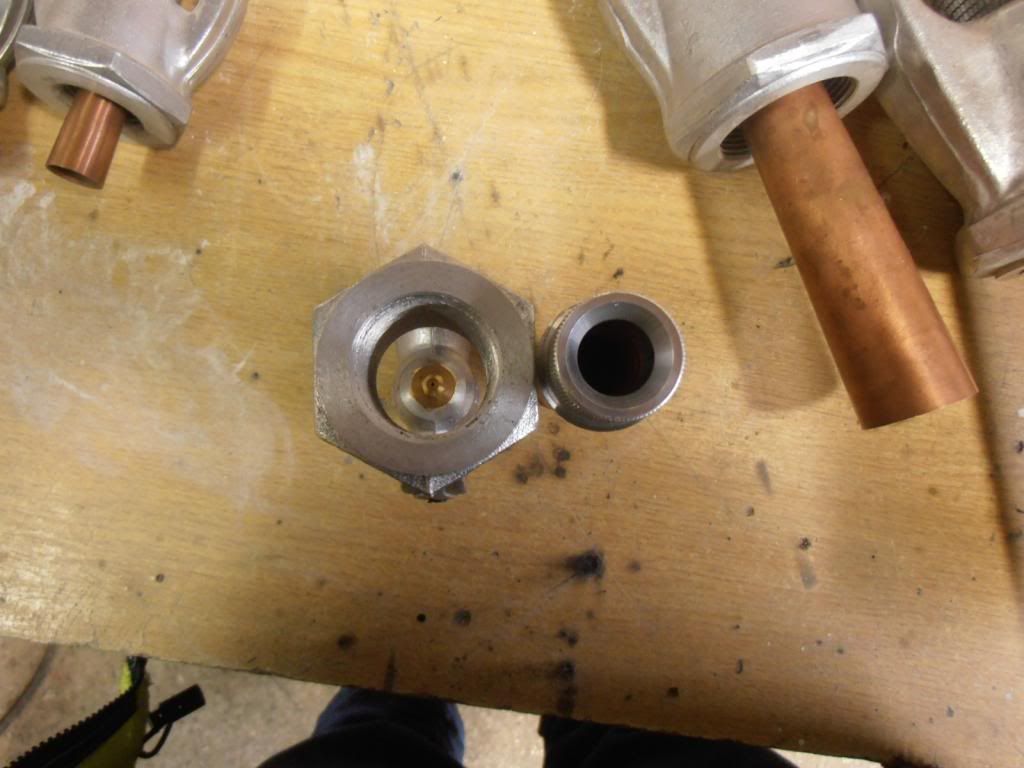
The size 30 gas jet was then transferred to a 3/4” burner and tried again for maximum temperature in the forge, reaching about 1420 degC/2588 degF, so pretty much the same. The Amal jets are calibrated for petrol/gasoline but the 30 jet is, as close as I can measure, about 0.5 mm/.020” (a 0.500 mm drill fits, a 0.508 mm drill does not).
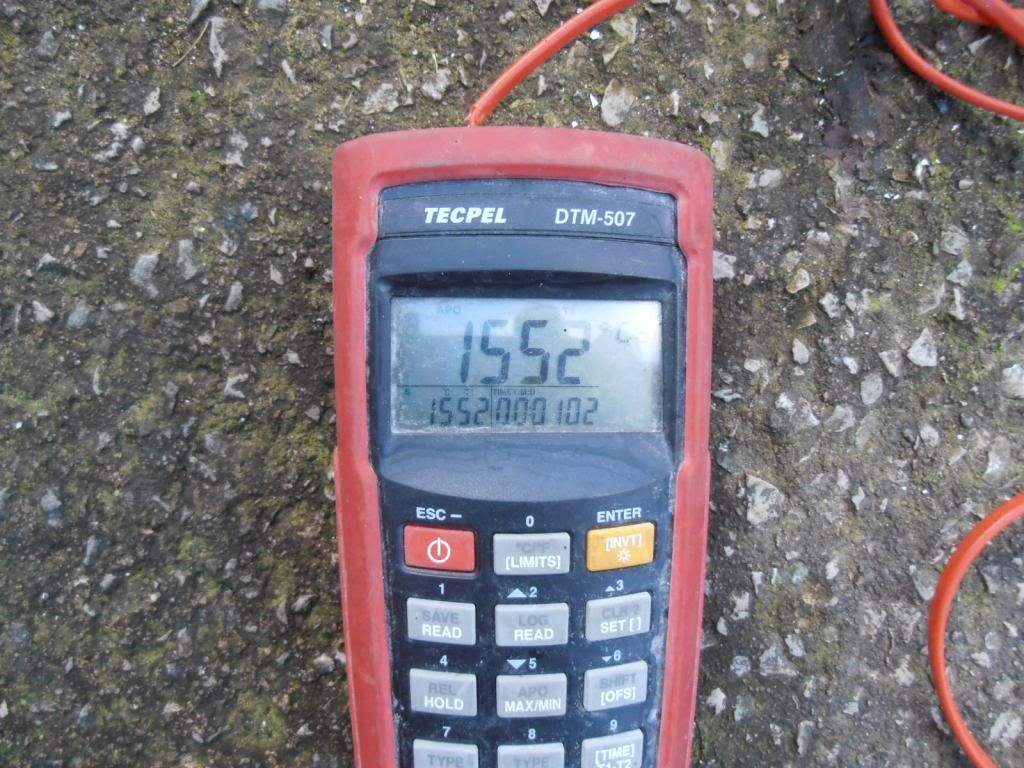
Next, the 1” burner was tried, fitted with a MIG tip sized for 0.6mm (.023”) wire and around 0.725 mm/.029” diameter (0.7mm drill fits, 0.75mm does not). This gave a maximum temperature of 1552 degC (2825 degF) and pretty much kakked the forge lining. I grudgingly decided this was rather more burner than necessary.
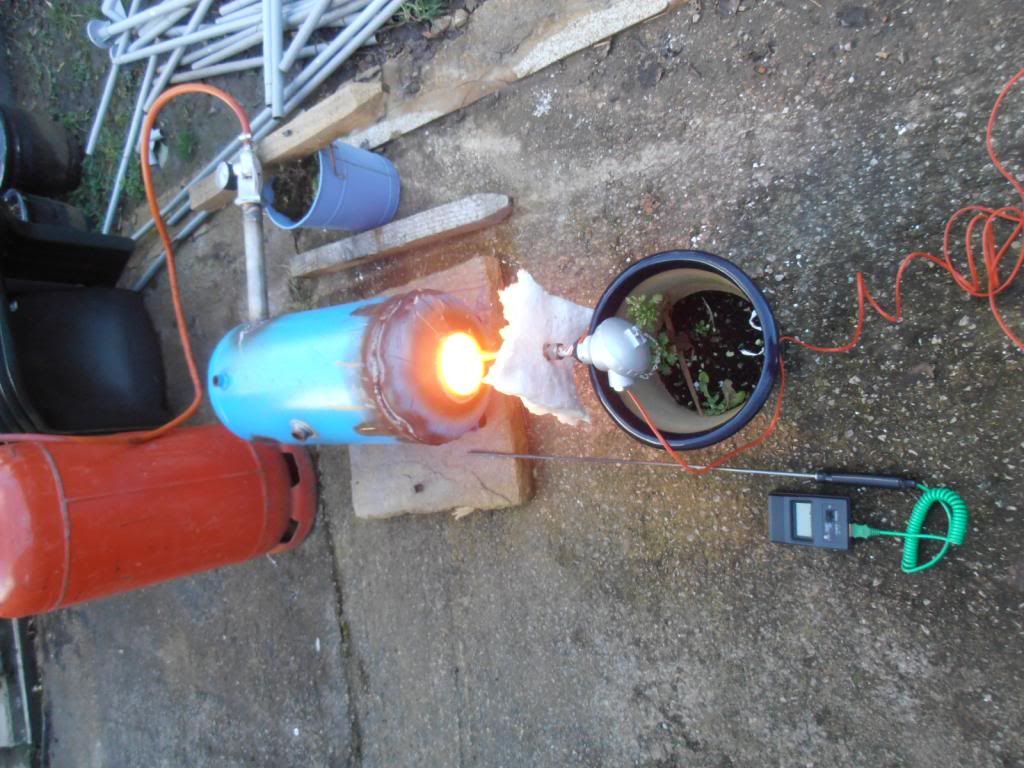
The other receiver was lined, this time with only a 1/2” burner port, and fired up to test.
The gas pressure was set at 20 PSI and the only thing that was adjusted initially was the air gap. First impressions were that it would probably make for an adequate beginners forge. Forging and Heat-Treat temperatures seemed OK and maximum steady temperature was 1345 degC, still at 20 PSI. Winding up the pressure to 40 PSI, 1445 degC was the maximum temperature reached. There was still a bit of a steam plume visible from the various unplugged ports in the shell, so there may be a little more to come once the lining is fully dry.
The flame at HT temperatures is quite yellow and very rich.
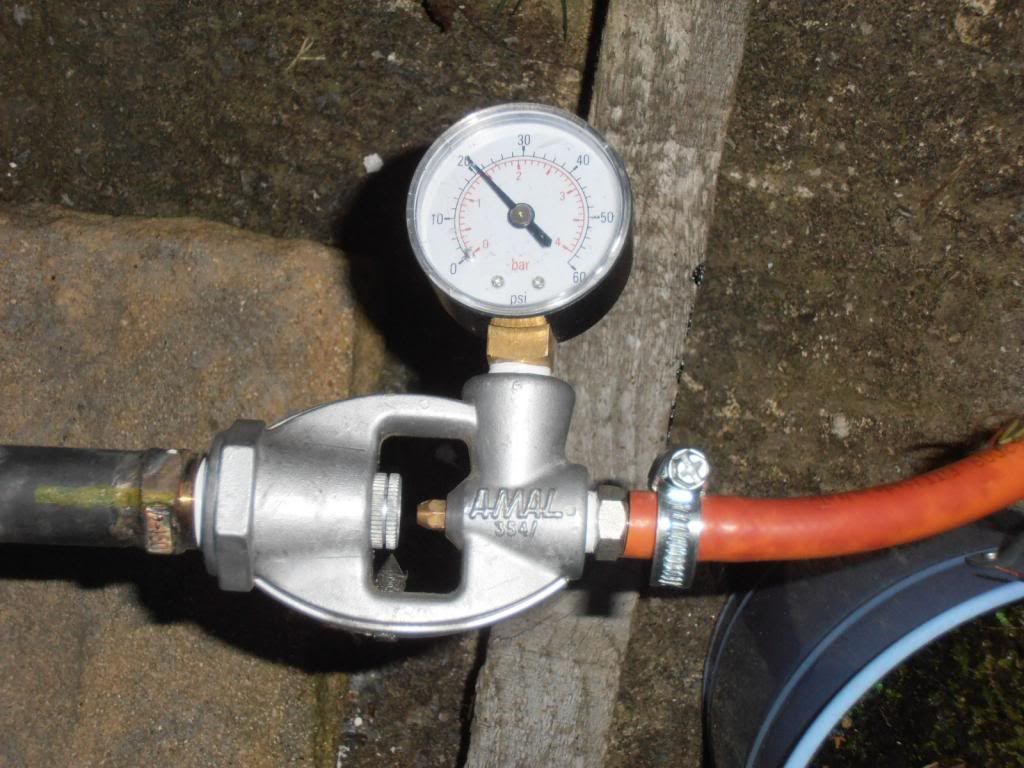
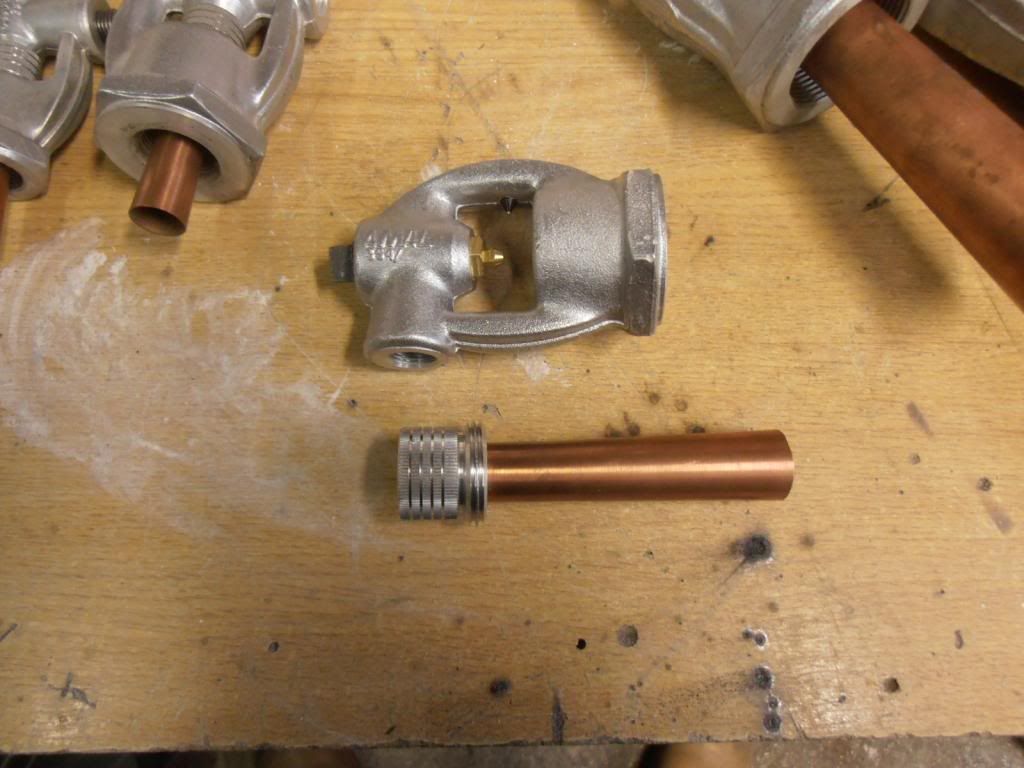
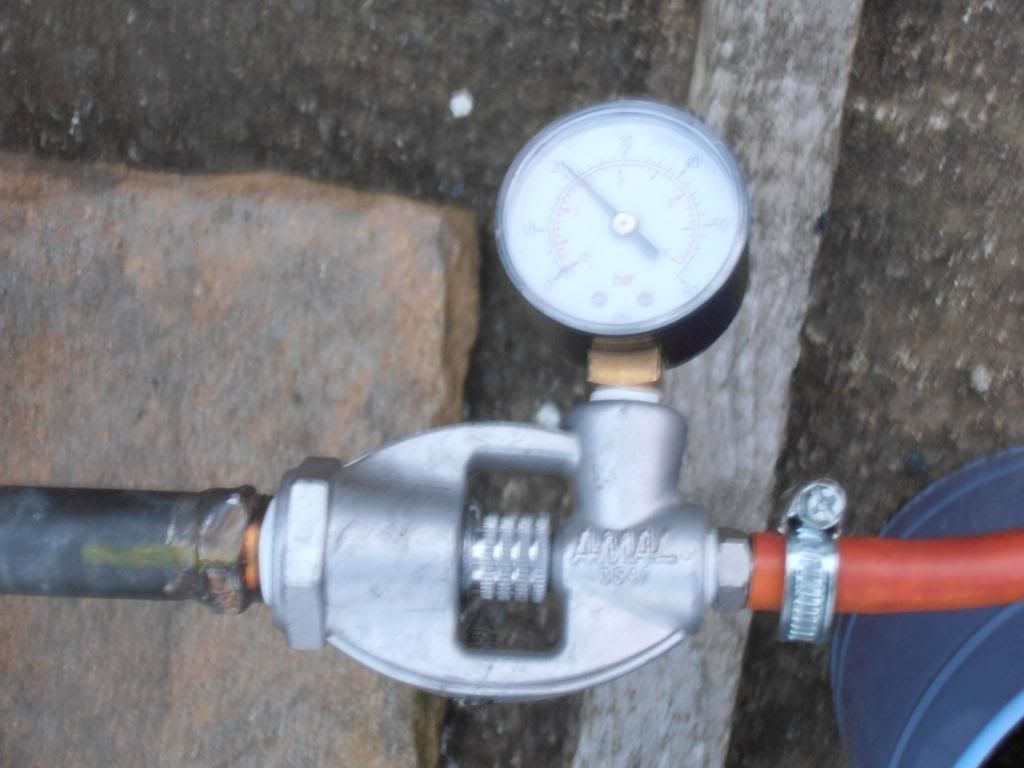
The air gap (choke) is adjusted by rotating the knurled section, which screws the whole Venturi into or out of the cast body of the injector.
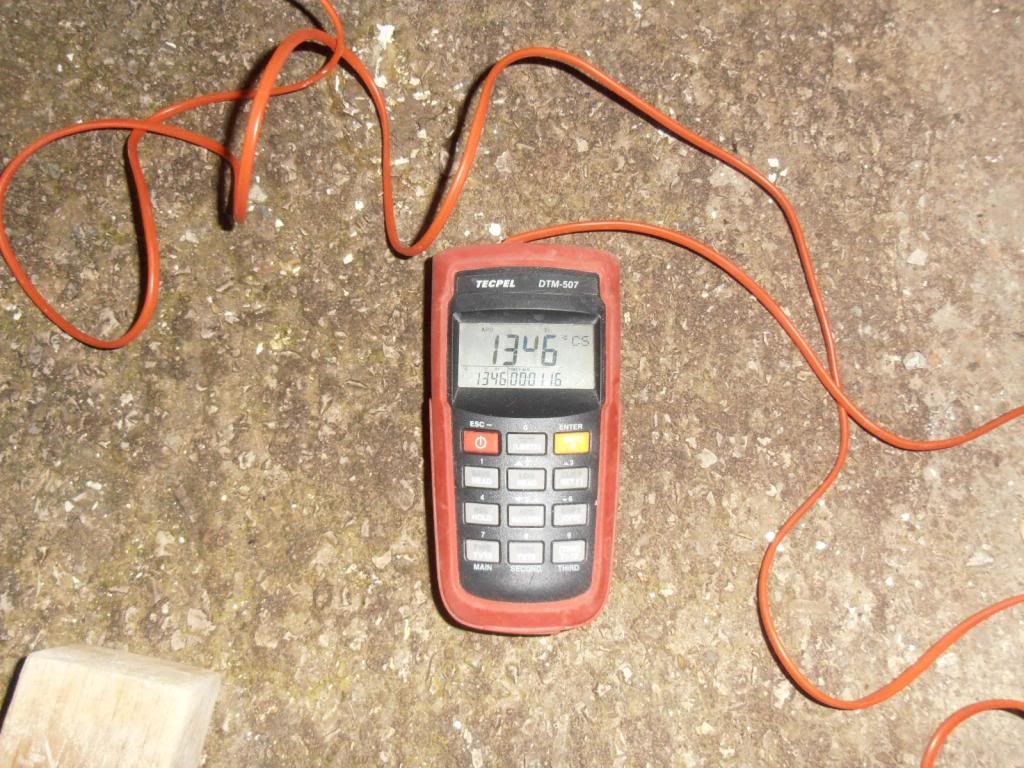
1346 degC is 2455 degF.
Although welding temperatures are attainable, the CF lining is definitely not suitable for welding with flux. Even just once. Any welding would need to be dry and I'm not convinced this is a realistic proposition for a beginner. Some more testing is definitely required.
The atmosphere seemed to be reducing at all useful temperatures, which should help to minimize scale and decarb. I am not sure whether it remains reducing with the air gap fully open though. It was my original intention to jet the burner so that it would be reducing at every possible setting and I originally thought I'd managed it with both the 1” and 1/2” burners, but now I'm not so sure.
The relatively low heat input resulting from the small gas jet probably makes it slower to heat biggish bits of steel than the pros would want to live with, but as said above, I think it would give someone a reasonably decent start at hobby knifemaking.
Realistic costs are awkward to work out, mainly because I used stuff either scrounged or that I already had.
The 1/2” Amal gas injector cost a little under £40 (about $60) from Burlen Fuel Systems in Salisbury as a walk-in customer. The rest of the burner assembly is just a piece of 1/2” stainless pipe with a threaded end. Threading stainless is no fun, so I used a weld nipple to provide the thread. I had these already, along with a regulator, pressure gauge and hose.
I used somewhere in the region of 2 metres of 25mm/1” thick, 1400 degC-rated CF blanket (1400 degC is 2552 degF), maybe a litre of Rigidizer, some Harry Frazer porcelain powder and some Zirconium Silicate powder. I already had these.
The receiver that became the forge casing was free. I used one thin disc cutting the end off, part of a flapdisc tidying up the cut edge and a minimal amount of MIG wire and gas welding it back on.
I think it really needs some means of measuring the temperature to realise the benefit of the fine control provided by the Amal injector, so that is factored in. Although most of the pics show a type S thermocouple and pyrometer, a type K is good to 1370 degC/2500 degF and is a fraction of the cost of a type S. The type K thermocouple I use cost £32 (maybe $50 at current exchange rates) a year or so back and the TM902C display lists on ebay at £3.39 (about $5) delivered.
I've probably got under £120 in the whole setup (under $200), including the thermocouple and pyrometer, but it would probably be more realistic to think in terms of a couple of hundred quid for a UK-based hobby maker to duplicate it (around $300-ish).
-
I think the 51670 is probably A516 grade 70; 0.1 to 0.22% Carbon, so not likely to be of much use for knifemaking.
304 and 3i6 are used in table "cutlery" (flatware?), where their stainless properties are important, but their hardness is not. Edge-holding is not a major consideration when talking about knives to be used on ceramic plates. It is not even a minor consideration for spoons and forks.
-
Those are cool looking burners. Who is the manufacturer, and what is the standard application of those burners?
They are Amal Atmospheric Injectors. As far as I can tell, they are intended for use with low-pressure gases (Inches of water column) and would originally have been supplied to OEMs. Amal were best known for making carburettors back when the world was young and Britain made motorcycles. They also made various other bits of industrial gas-train equipment.
I have used the 2" and 1 1/2" units for at least 20 years at work. The smaller ones were the obvious choice once I became interested in forging and heat-treating stuff.
Amal products are now available from Burlen Fuel Systems. I think they really wanted the carburettor side of the business and the other stuff just came along with it. They do not have the injectors in their online shop, but I've had no problem talking to them on the phone. When I have bought from them, it has been as a walk-in customer, so I cannot comment on their internet sales.
Brochure for the atmospheric injectors
http://amalcarb.co.uk/downloadfiles/amal/amal_gas_injectors.pdf
Burlen homepage
http://burlen.co.uk/
Usual disclaimer; my only association with Amal or Burlen is as a customer. -
The smallest I have is a nominal 1/2" unit, but it is a commercial gas mixer and the Venturi throat is 0.350". I don't see any reason why they could not be made considerably smaller.
These are 1/2", 3/4", 1", 1 1/2" and 2" and seem to scale very well.
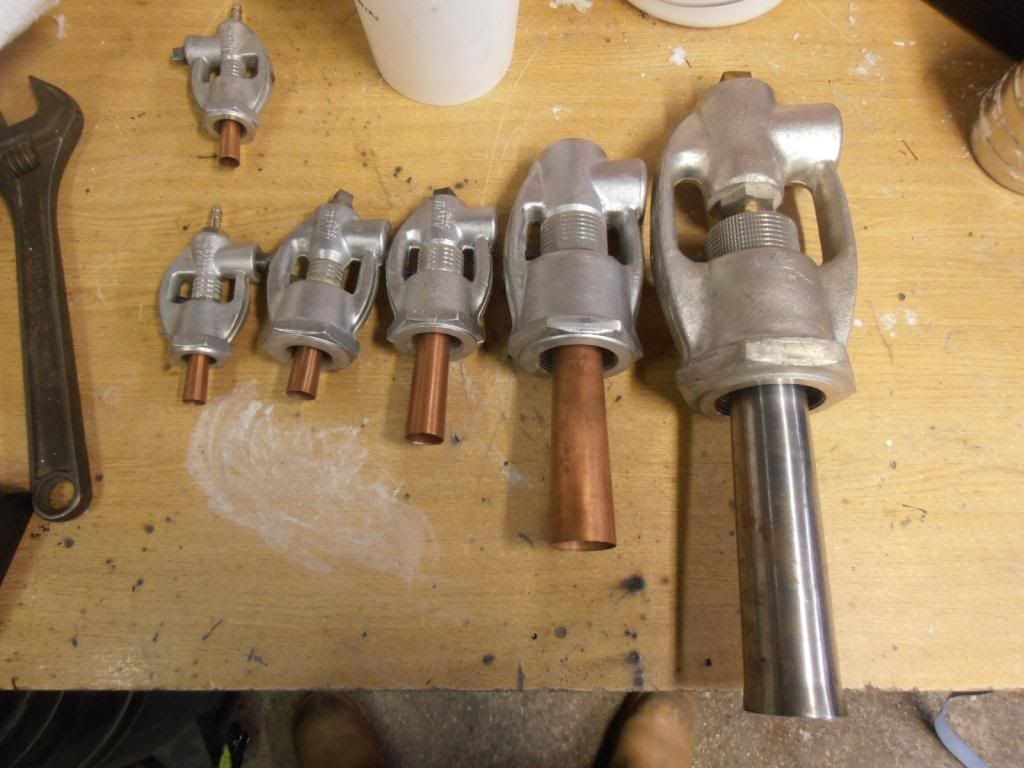
The nominal size is the pipe thread which fits the gas mixer body. The Venturi part at the bottom of the picture is threaded the same as the pipe and adjustment of the air gap is by turning the knurled section to screw the Venturi closer to the jet for richer and further away for leaner.
This gives extremely sensitive control of the air:fuel ratio. In a 5" diameter chamber, 16" long, this 1/2" burner will allow setting at any temperature between Heat-Treating and Welding (just under 1400 degF to just over 2500 degF) using a size 30 Amal jet. As close as I can measure using drills as go/nogo gauges, the jet is between .020" and.021". I use a 0-60 PSI regulator.
If they made a 1/4" mixer in this series, I would certainly have a use for it.
Going small in the "real" world, I would expect the difficulty of manufacture to become a limitation long before the physics, though it would be much easier without the adjustable air gap.
-
Definitely new belts. If you don't need to open the belt to fit it, raw edge wedge belts with a cogged form on the inside are better than either wrapped wedge belts or the older vee belts when you have to contend with small pulleys and minimal wrap. Gates seem about the best I've tried and the lengths really are that consistent.
Do a really good job of degreasing the pulleys (both of them) and it might well help to take any polished surface off the small pulley. Blasting works well, but a quick once over with a fairly coarse abrasive cloth is better than nothing.
If they have been slipping, check the small pulley still has V-shaped grooves. If they are starting to wear U-shaped, even slightly, replace the pulley.
Link belts are only really a good idea for stuff where the belt has to be split to install it. I think the link belts claim to be stronger and more vibration-resistant than conventional belts is based on the old 1950s-spec Vee belts. The latest generation wedge belts are, as you'd expect, also way ahead of the 1950s stuff. Gates had their "Quad-Power" belts maybe 20 years ago that would transmit 4 times more power-per-belt than the old ones would and things have moved on since then.
-
There are one or two different recipes for a poorman's version of ITC100 knocking around. Essentially they tend to be around 2 parts Zirconium Silicate to 1 part china clay powder, mixed to a paint-on consistency with either water or blanket rigidizer (Sodium Silicate) for more absorbent surfaces. I think many of the batt wash formulations may have a high enough Zirconium Silicate content to work well.
You should be able to find the stuff at any decent pottery suppliers. RPM might be worth a try. Failing that, Ulster or Scarva in the North.
-
That helps. Thanks Thingmaker.
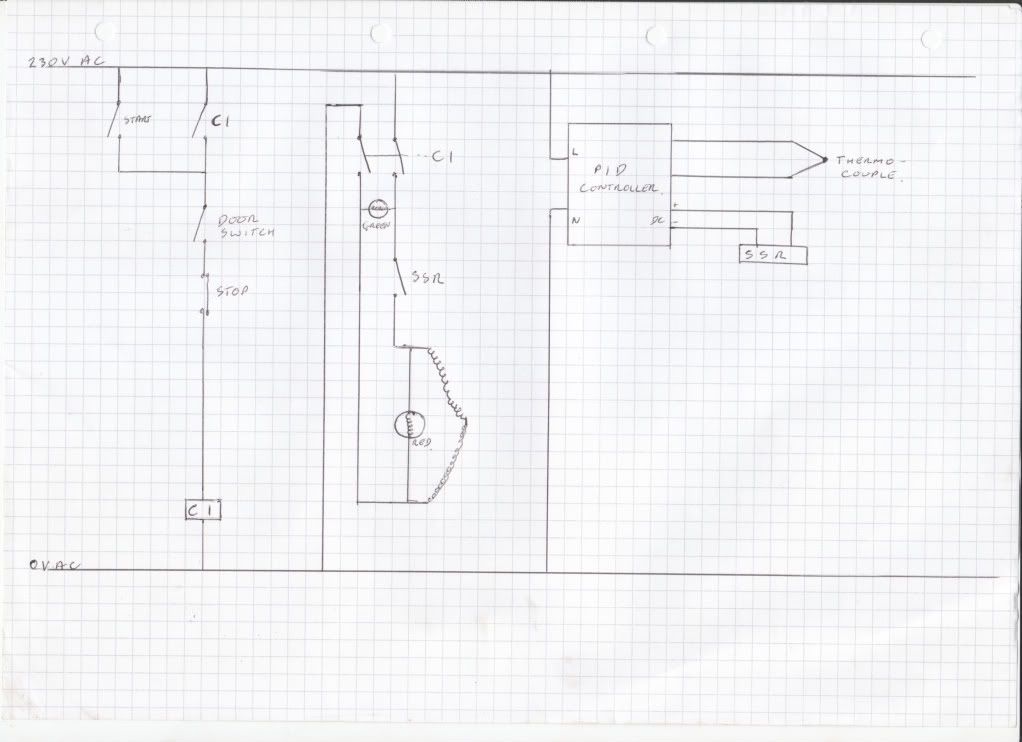
Mike, I am not a qualified electrician, even over here, so please get an opinion from someone competent and familiar with your system.
It looks like my wiring would probably work OK with the addition of a second SSR in the other hot leg. The AutomationDirect Solo/Omega CN7823 controller I use has a pulsed DC output rated at 40 mA, so will happily run 2 SSRs. I use a contactor to break both the live and Neutral of our supply. It would break both hots on yours.
Protective grounding and a GFCI should take care of the safety concerns whilst it is running.
-
The Hydrovanes are rotary vane, not screw compressors. If you have a continuous air demand, they are very good. My experience with them is fairly limited, but how well they work in a given application seems to depend on the demand profile. They like to work steadily.
The ones I have used are either on or off, much like a piston compressor. They don't tend to run on Variable-Speed Drives, so if your air demand is half their capacity, they run half the time, whereas a modern screw compressor on a VSD would run continuously at half speed.
It seems to be the number of starts/stops, at least as much as the actual running hours, that determines life expectancy. 14700 hours in 2 years would mean almost continuous running and be much better than 14700 hours in 10 years.
I've seen them with 80000-90000 hours and still running sweetly with no more than routine maintenance in water treatment applications (continuous run at 6 bar for aeration systems; no receiver).
-
I'm fairly sure it's Sodium Silicate (Water Glass). It has a number of uses and sources. I think Rutlands produce a floor sealer that is liquid Sodium Silicate, for example.
Thin refractory might work, but I tend to find the solids stay aon the surface and the liquid soaks in, giving a very thin rigid layer.
I took to mixing China clay powder and Zircopax with rigidizer to give a thin suspension and sloshing that on as a sort of poor mans ITC100. Seems to work reasonably well.
-
If you need it to be mobile for use anywhere there's power, the 110V may be worth considering.
Otherwise, 220V knocks it into a cocked hat. It's definitely the better way to go if you have the supply. Being able to use an off-the-shelf 110V element on each side and connect them in series for 220V makes sourcing the elements easier.
The oven power requirement for multiple workpieces tends not to be significanly different to that for a single slipjoint blade; the thermal mass of the oven itself is much greater than any collection of blades most of us would want to load in one hit. Even if you are making small anvils, it will just slow things down slightly.
More significant to my mind is the length of workpiece you want to accommodate. An extra 4 1/2" (the width of a brick) adds about 20-30 bucks to the build cost.
Assuming the same materials, the surface area is the main thing that determines how much power is needed. I built my first 4 ovens 18" long with 3 kW of elements. My latest is 22 1/2" long, also with 3 kW of elements. All will comfortably run to 1205 degC (2201 degF) with power to spare and I'm reasonably sure 27" would work fine on 3 kW.
I also built a 42" sword oven with 6 kW of elements, just for fun. I am told it works reasonably well.
We have 13A, 230V domestic sockets in the UK, which is why I use 3 kW. The sword oven uses a separate supply for each side's element.
There are some quite significant differences between your power systems and ours. We only have one hot wire to contend with, but it is at 230V to ground. I am happy I build my ovens so they are as safe as they can reasonably be, but I don't think they would necessarily work, or meet code, over there.
There are homebuild HT oven wiring diagrams from the US and Canada out there on the web and you are better off using one of them as a starting point, rather than a European one.
-
For Carbon steels, you should be fine with a basic PID controller. For anything that calls for a hold on the way up, you can just change the setpoint at the appropriate time.
Once you get to some of the stainless steels, ramp and soak is very nice to have, especially for slow ramp down when annealing.
Stick with a 48mm x 48mm (1/16th DIN) controller and leave a little slack in the wires (the terminal positions change on different controllers) to leave an upgrade path for the future.
Ramp is also nice for tempering as a small overshoot can lose a Rockwell point or more and radiated heat from the elements can make it much more. Temper in a tray of dry sand and you'll have no problem.
-
I am rather struggling to see what the test in the post #13 video is supposed to demonstrate, unless I am missing something important.
It looks to me as if both burners have chokes. The one on the left seems to have a plate choke which appears to be closed down quite considerably. The burner on the right shows a sliding-sleeve choke which appears to be fully open.
At the beginning of the test, the forge on the left seems to be running noticeably richer and cooler than the one on the right. The difference in dragons breath seems less marked later in the video, but the forge on the right looks significantly hotter immediately after the gas supply is turned off.
The test therefore seems to me to be comparing an appropriately-adjusted burner (on the right) with an inappropriately-adjusted one (on the left).
Obviously, the appropriate adjustment will vary according to what the user is trying to achieve.
Am I being unreasonably cynical about this?
-
I've not built a Frosty burner myself.
I have been using 0.6mm MIG tips (.024") in burners based on a 1" commercial Venturi injector with a throat around 3/4" in diameter. It looks to be very efficient at inducing air, so I'd expect a home-built burner to need a smaller jet to get a similar air:fuel ratio. The commercial unit has a very progressive choke adjustment as well, so the combination of pressure adjustment and choke adjustment gives very good temperature control; I can get everything from HT soak temperatures up to welding.
If it's easy to do, I'd try smaller MIG tips first. Certainly .030" and maybe even .023"
If you go for the .023", I'm pretty sure you'll need to rig up a choke arrangement, but it should give you greatly improved temperature control if you go that route.
Photos of flames seem to be pretty difficult. I can't get decent ones, but I am a lousy photographer. Video seems to do a better job for me.
-
Has anybody heard of Matrikote or used it? If Kaolin clay turns into ceramic after firing, can I use ceramic tiles to line the forge walls inside the chamber?
Ceramics are a whole class of materials. Rather like metals.
Most ceramic tiles are not up to handling the temperatures we need.
Unglazed porcelain floor tiles are a relatively new development, in part made possible by the development of the technology to fire big flat tiles to the sort of temperatures needed for porcelain.
I cut a porcelain floor tile to fit in my HT oven and it's much more resilient than the soft brick. It cracked, with a single crack about 16" long, after the third time up to 2200 degF, but is still in one piece.
I don't think it would be good for forge walls because I don't think it could handle the temperature gradients in a typical forge (a heat-treat oven is intended to give even heating, it is a large part of the design brief. Most forges can happily function with a relatively small hotspot) or the much higher rate at which the temperature rises on startup.
If I build a flat-bottomed all-fiber forge anytime soon for forging temperatures only (i.e. not welding), I'll try a removable porcelain tile floor.
-
Try ebay for something in the 1/2 Kg/ 15 Troy Oz range to suit electric furnaces.
The price will make you wince, but I priced up 2kg crucibles over here in the UK and they worked out cheaper than I could buy the graphite rod to make them.
The only time I ever tried machining graphite, albeit in a home workshop, the mess it made was enough to put me off doing it again.
-
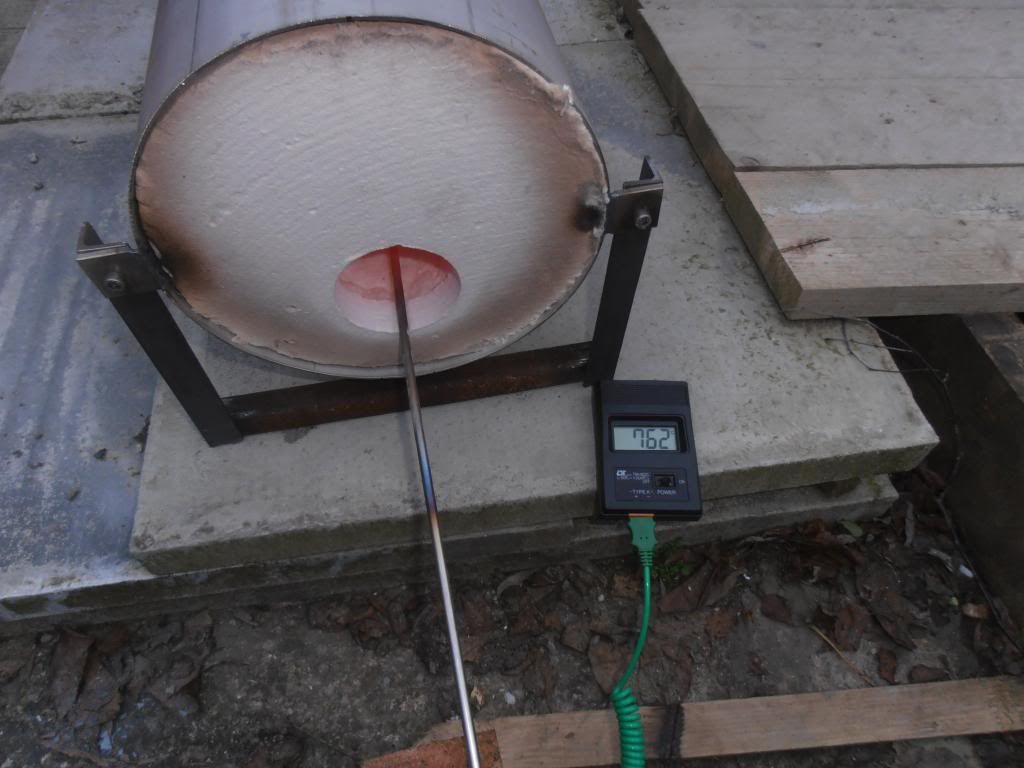
I've just weighed my cylinder before and after a day of playing with a new burner in my mini-forge.
The forge chamber is just over 2 1/2" diameter and about 12" long, so around coffee-can forge sized. I weighed the cylinder at 80lb before and 74 lb after, for 6 lb Propane used (possibly 7, as I was using a cheap luggage scale) over 9 hours of continuous running at 10 PSI (measured on a cheap gauge).
I can get temperatures from 830 degC/ 1526 degF to 1245 degC/2273 degF at 10 PSI just by adjusting the choke. The burner uses a 1/2" industrial Venturi Gas mixer made by Amal.
I was trying to get the full range of useful temperatures from Heat-Treat soak temperature at just under 800 degC/1472 degF to welding at around 1300 degC/2372 degF, or maybe a little higher, without having to adjust the regulator. I couldn't do it.
Welding temperature needs more pressure; 60 PSI will get over-range on my type K thermocouple, which tops out at 1370 degC/ 2498 degF, though I've not tried welding in this forge because it is lined with 2" of Ceramic Fiber and flux will kill it.
A 20 lb cylinder could be expected to last over 24 hours forging on a similar setup.
Gas consumption varies with the square root of the pressure, so 6 times the pressure would use almost 2 1/2 times as much gas, which means 20 lb should last 10 hours plus at welding temperature.
I've used a similar burner in a scaled-down version of a Don Fogg drum HT forge, made from an 18" length of 10" pipe and that will hold HT soak temperatures and go to forging temperatures by adjusting both the choke and the pressure, but it will not reach welding temperatures, even at 60 PSI.


Big Forge
in Gas Forges
Posted
That's a pretty serious setup.
If you are running on Propane and my sums are anything like right, that's 40-50 lb/hr of gas through it. What is the gas supply system?