

timgunn1962
-
Posts
393 -
Joined
-
Last visited
Content Type
Profiles
Forums
Articles
Gallery
Downloads
Events
Posts posted by timgunn1962
-
-
On 11/10/2015, 15:31:48, dps9999 said:
Now i was thinking is it possible to turn this into a forced air burner by simple making a attachment that could fit into the hole you see on the side (where normally the air would get sucked in from the venturi effect) and basically have a tube run from the side there into a blower with a gate valve in between. Would that work? or better keeping as is and building a separate blown burner?.
Tentatively yes and definitely yes: It certainly could work (note this is not the same as will work). It would be better to build a separate blown burner.
The Naturally Aspirated burner uses the gas velocity to draw in air. If you need more air, you can simply go to a smaller gas jet and run at higher pressure to keep the same gas flow. In most cases, this will give a higher flame temperature because most burners run rich. You can then fit a choke to restrict the airflow when you want to run richer and at a lower flame temperature.
If you want a blown burner as well, build one to a known good design. Avail yourself of the time and effort someone else has put into the design process and spend your own time and effort forging stuff. Unless of course you want a new hobby and feel burner development would be a good one.
-
I've not found the length to be critical. I tend to use somewhere between about 8 and about 12 diameters of pipe, but only because it looks about right: I've not done any testing to find an optimum length.
I think the idea is that the flow is laminar for most, if not all, of the copper expansion section and becomes turbulent pretty much where it hits the full pipe diameter. The turbulent flow in the pipe will be where the gas and air do most of the mixing.
I assume by offset angle you mean the 45-degree bend? If so, I don't think it will cause any problems.
I usually spend a bit of time fettling the Amal injectors before using them:
I file off the casting flash on the tapered boss the jet screws into, so that it can be choked down to almost zero air gap.
I unscrew the choke and lubricate the threads liberally with graphite or Molybdenum Disulfide dry lube. Industrially they are usually set-and-forget, but for smithing (and particularly bladesmithing), they are likely to need more frequent adjustment. I've found grease tends to pick up dust and grit and is as bad as no lube.
I use lots of PTFE tape on the burner pipe thread. Much more than is normal. This is to protect the soft aluminium threads from being damaged by the steel pipe. The mixture adjustment relies on these threads, so they are worth protecting. The gas-carrying threads get an anaerobic pipe seal, usually the Screwfix one. This includes the jet threads.
The 1/2" burners are very small. The heat output varies with area, so a 1/2" has about half the output of a 3/4", which in turn has about half the output of a 1".
I know from experience that a 1" will happily handle a 6" x 6" x 13 1/2" chamber in an Insulating Fire Brick forge with about a 3" x 4" opening (built with bladesmithing in mind). The size of the open area can make a big difference.
There's nothing really in your forge pics to give me a sense of scale, so it's hard to know what size burners would be appropriate. I have found the following jet sizes to work well in forges (Propane and only primary air) 1/2" injector: 30 jet, 3/4" injector: 60 jet, 1" injector: 120 jet.
Amal are/were a carburettor company and size their jets in cc/min of petrol, so tuning jet sizes can be something of a trial-and-error process.
-
Some designs are probably finicky enough that the tapered tip makes a difference, albeit a fairly small one (and if it's a "build it exactly like this and it will not need any tuning" design, it is very likely it will be that finicky).
Since with Frosty's design, the tuning is done by cutting back the tip, it probably doesn't matter at all: it's just one of several variables the tuning process will deal with.
-
It sounds like you were originally running a fairly low pressure because of your near-empty cylinder and I'm guessing you had a relatively lean mixture (not much dragons breath) with the choke fairly wide open. This combination may actually get the burner tip hotter than most other settings: a hot flame with a fairly low mixture speed.
There are a number of different things going on at the same time and you'll get a feel for what they are and how they interact as you use the forge.
Basically, you have two variables that are under your control: the gas pressure and the choke adjustment.
Adjusting the pressure adjust the amount of flame you have. Adjusting the choke varies the air:fuel ratio and with it the flame temperature. Increasing air makes the mixture leaner (more Oxidizing), reducing air makes the mixture richer (more reducing).
The highest flame temperature occurs when the mixture composition is such that all of the Oxygen in the air reacts with all of the fuel gas, leaving neither unburnt Oxygen nor unburnt gas. This is known as the stoichiometric ratio by combustion engineers and (supposedly) as a neutral flame by smiths.
As far as I can tell, "we" tend not to want reducing atmospheres because they cause very rapid scaling. Scaling (oxidation) still occurs at the stiochiometric mixture and even some way rich of it, which I suspect makes a smiths idea of a neutral flame different to a combustion engineers idea of a stoichiometric flame.
When I put together a forge burner, I aim to size the gas jet so that I get a mixture that is around stoichiometric with the choke fully open. This means that I can adjust the flame temperature by choking down the airflow.
Generally speaking, for a given choke setting, there is not a lot of change in the air:fuel ratio when the gas pressure changes in a Venturi burner: as the gas pressure increases, the gas speed through the jet increases, so the suction generated at the Venturi throat increases and the airflow therefore increases, keeping the air:fuel ratio constant.
In the burner tube, the fuel/air mixture needs to be travelling towards the forge faster than the flame-front moves through the mixture in the opposite direction.
The mixture speed depends on the gas pressure and the choke setting.
The flamefront speed is not a constant: it depends on the air:fuel ratio and the temperature. Flame speed is higher in hotter mixtures. It is also higher in mixtures closer to the stoichiometric ratio.
If the flamefront speed exceeds the mixture speed, at first the flame travels back down the burner tube until it runs out of mixture to burn. With nothing to burn, it goes out. The gas keeps flowing and it draws air in, so fresh mixture reaches the chamber after a short delay, ignites in the hot chamber and the flamefront again travels back down the burner tube. This cycle repeats, with each occurence heating up the burner tube slightly and increasing the flamefront speed of subsequent events, until the flamefront establishes at the point of mixing in the Venturi throat. The noise made during this is distinctive and you can usually just turn up the gas pressure and stop it if you catch it in time. If you leave it until there is an established flame in the throat, the burner tube gets properly hot and it's often not possible to just turn up the pressure and get the flame back where it should be.
Using a straight burner tube, the mixture speed is higher than the flamefront speed all the way to the end of the tube and all of the flame is in the forge chamber. Burners like this tend not to run outside a forge, which doesn't help the marketing guys. A flare or flame retention cup often gets added to allow the burner to run in the open.
The mixture speed is slower in the flare or cup, due to the increased cross-sectional area, and a stable flame can be established. The bit of the flare or cup downstream of the flamefront will get hot and should be considered a consumable part. In a running forge, it is not actually necessary, though it does make it a bit easier to get it started.
The flares/cups are usually made from stainless steel and tend to have a fairly good lifespan. By the time a novice smith has burnt the cup away, he/she will probably have sufficient skill/experience not to need it anyway.
Have a bit of a play with your burner out of the forge. Try setting the pressure at a value and then just open/close the choke to adjust the mixture. It looks like a pretty good choke design with that screwed adjustment and should be nice and progressive. Once you have a feel for the controls, put it in the forge and have another play.
How much time you need to spend tweaking will depend on the work you do. For many, it will be a case of finding the sweet-spot for the work they do, then leaving it alone. For others, particularly bladesmiths who Heat-Treat in their forge, it might be a case of marking graduations on the choke and fitting a pressure gauge so that its easy to return to any one of several settings.
-
Ferguson gives 600-700 degC, 60 minutes and a Nitrogen atmosphere for Fine Silver/Copper. There's no figures for Sterling Silver/Copper.
-
I think Dykem is a layout fluid. I am guessing that what you want is Engineers Marking Blue, also known as Prussian Blue, possibly also as spotting blue.
The brand I use (although very rarely) is "Stuarts Micrometer"
It's used when hand scraping. It's non-drying and gets applied as a very thin layer to a surface which is then brought into contact with another (clean) surface. It transfers where it touches and you then file or hand-scrape off the blue spots and try it again, alternating the blued surfaces every so often.
-
Let me see if I have this straight. Double the area of the hole halves the flow velocity and quarters the pressure. Yes?
Does the volume of gas delivered not double? OR is that a constant?
Frosty The Lucky.
That's it, yes.
They are all related, so adjusting any one will have an effect on one of the others.
If you keep the flow (volume) the same and double the hole area (as suggested in post #3) the pressure will drop to one quarter.
If you keep the pressure the same and double the hole area, you'll double the flow.
I'm more familiar with Naturally Aspirated burners than blown burners, but the basic Physics applies to both.
Most of the Naturally Aspirated burners out there have fixed gas jets, so simply follow the square law for flow (and therefore BTU/hr) vs pressure.
If you double the pressure, the flow will increase by around 41% (the square root of 2 is about 1.41).
If you halve the pressure, the flow will reduce by about 29% (the square root of 1/2 is about 0.707).
-
I'm not a gun burner guy but with my experience a high static pressure tells me the burner nozzles are too small or restrictive. Maybe put more nozzles in the ribbon? 2x as many = 1/2 the pressure.
Just be aware that's an educated guess from a long time tinkerer who's been kicking around a naturally aspirated ribbon burner concepts but has NOT made one. So it's a FWIW idea.
Frosty The Lucky.
Flow and pressure are actually related by a square law: Flow through an orifice will vary in proportion to the square root of the pressure.
Double the hole area and you'll have halve the flow per hole and only need one quarter of the pressure.
Frosty's suggestion of doubling the number of holes is preferable to making the holes bigger because there is a greater likelihood of the flame travelling back down a bigger hole. It's largely down to the relationship between the wall of the hole and its volume.
Higher pressures tend to mean higher velocities through whatever is doing the job of a burner nozzle, reducing the risk of flashback. In a ribbon burner, the holes through the refractory are doing the job of burner nozzles.
If you modify a known good burner design to run at lower pressure (or even run one below the pressure it is known to work at), you increase the risk of flashback. Flashback happens when the speed of the flame-front through the mixture exceeds the speed the mixture is moving in the opposite direction through the nozzle. In most burners, it's not a big deal because there is not very much mixture upstream of the nozzle. Ribbon burners tend to have a plenum, often with a significant volume of gas/air mixture in, so there's more potential for a bigger bang.
There's quite a lot more to burner design than it initially appears.
-
Cut off the hose fitting and fit a new one. The barbed tail bit will need sizing to suit the hose bore and the nut to suit your regulator fitting. You'll also need the appropriate hose clips. This is the sort of thing:
http://www.gasproducts.co.uk/acatalog/4.8mm_Blow_Torch_Gas_Hose_Nozzle_x_3_8__Left_Hand_Thread.html
I think you've got a 1/4" US thread on the old reg and a 3/8" BSP thread on the new one, judging by the photo.
I always use an anaerobic pipe seal with gas. Test for leaks with a washing-up liquid solution.
The flame arrester is a very good idea with Acetylene, which can dissociate exothermically in the absence of Oxygen. I'm pretty sure it is not a legal requirement even on Acetylene and it doesn't seem likely to provide any benefit at all in this application with Propane.
-
The flow rates are given at a range of discharge pressures and I'm fairly sure the value of 148 CFM is against 0.500" water column of Static Pressure.
Basically, it will develop something over 1/10th of the pressure you have read would be sufficient. Probably not a lot over.
-
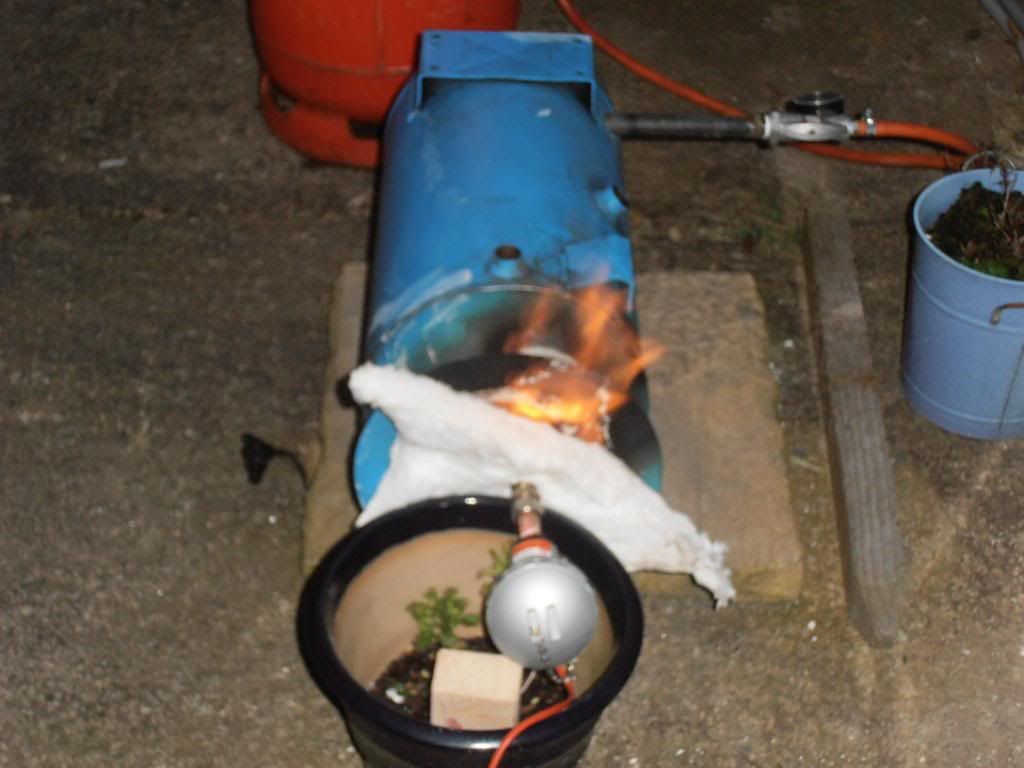
I reckon its taken a good 6-8 hours each time to get mine fired and the blanket properly dried out. That's after giving it a good couple of weeks air drying.
With a steel shell and the relatively low-permeability clayed lining, there's no short route out for the water vapour and it mostly needs to be driven out of the ends, rather slowly. Once it's properly dry, it gets the last couple of hours at 1300 degC or thereabouts (2370 degF or a good welding heat for most folk).
I'd like to try building a forge in a mesh shell because I think it would help a lot with the drying and firing time, but I've not found anything suitable at the right price yet. Galvanized would probably be ok because the outer surface temperature is low and the Carbon Monoxide risk means it'll only ever get used outside anyway, but I'm still reluctant to risk it.
-
It depends a bit on your setup, but theoretically it increases the thermal conductivity and reduces the insulation value. However, I don't see any real downside in practice. The added thermal mass is minimal, so it's effect on heating time is also minimal.
Making a thin mix of china clay in rigidizer and sloshing it on gets a fairly deep rigidized layer with a thin shell of porcelain once fired. It is much more resilient than untreated fibre and doesn't shed the fibres. This advantage more than offsets any theoretical reduction in efficiency.
If you do it, you only really get one shot at it. The rigidizer solution/suspension soaks in, but the clay particles are filtered out by the blanket and get trapped in the top layer. If you try to add more after this, the clay layer on the surface tends to form a barrier to the liquid and you just make a mess.
I do it and then paint on my poor-mans IR-reflective coating.
-
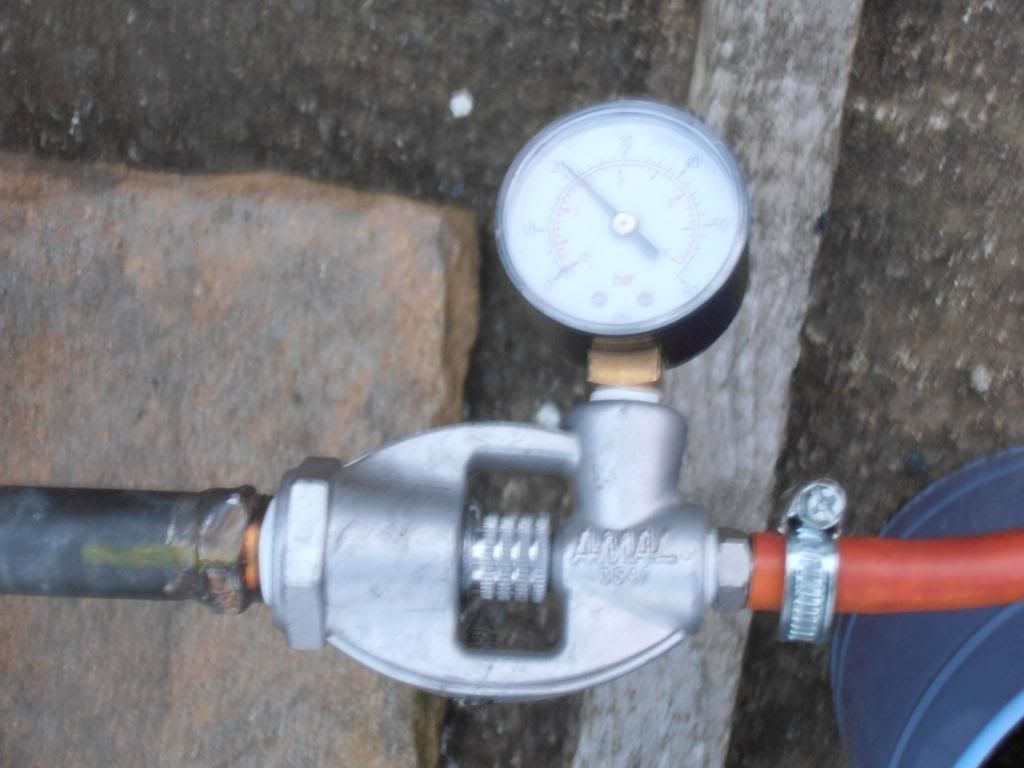
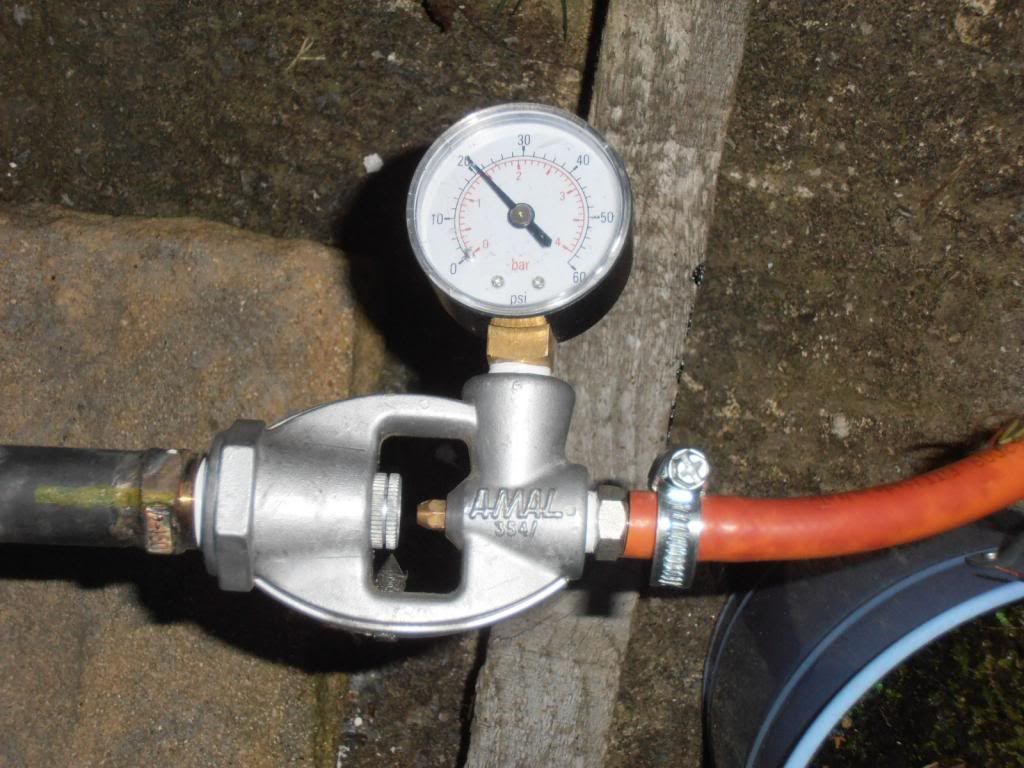
The higher value of 25 Bar is about 370 PSI and is the safe working pressure on the inlet side. Propane liquifies under pressure and the vapor pressure above the liquid depends on the temperature of the cylinder. Hotter cylinder, higher pressure. 25 bar/370 PSI is reached at about 145 degF.
The lower value (4 Bar in this case, about 60 PSI) is the maximum range the outlet pressure can be set to on an adjustable regulator, or the fixed outlet pressure on a non-adjustable regulator.
-
I have no great difficulty sourcing Rigidizer in the UK. Price is not actually too bad; under 20 GBP for 5 litres over-the-counter.
Both Unifrax and Morgan Thermal Ceramics certainly have distributors in Europe, though my Google-fu is weak and I can't find any actually in Slovenia.
-
If you've got an easy way of changing gas jets, you've won the first battle.
When I have built burners from scratch using MIG tips, I've started with a size that's too small (gives a lean, Oxidizing flame with the choke fully open) and opened it up with a microdrill set in a pinvice, one drill size at a time, testing at each size. Initially, it will get hotter as you open up the jet. At some point, it will start to get cooler. When it does, drill out a new mig tip to the hottest size and fit it. You can then go progressively cooler and more reducing by closing down the choke. Use a fixed value for gas pressure throughout the jet tuning. Once the jet is right, you can play with pressure and choke settings.
I use a type S thermocouple to measure the temperature, which might be considered cheating. If you tune at a constant but fairly low pressure and used a fixed thermocouple location in a cooler part of the forge, you can get away with a much cheaper type K, and if you can judge temperature reasonably well by eye, you don't need a thermocouple at all.
-
As I understand it, the Zirconium Silicate is intended to work as an IR reflective component in the coating. The idea is that IR radiation is reflected back from the walls to the workpiece where it can do the most good.
ITC100 is the best known IR reflective coating, but is somewhat spendy. I am not sure if it uses Zirconium Silicate or Zirconium Oxide as the IR reflective component.
I have used both commercial rigidizer and a 10%-by-weight solution of 140 tw Sodium Silicate in water to mix with the 2 parts Zirconium Silicate/One part China clay. Both seem to work reasonably well. Just using plain water seems to work much less well (poor adhesion).
Using higher concentrations of Sodium Silicate seems to be a bad idea, though it may just have been that I didn't let it dry enough before firing. Whichever it was, I got something like stalagtites last time I was careless over quantities. I think I prefer the commercial rigidizer.
-
First thing to say is that I have not built a sword-length HT forge myself, so bear this in mind if (when) you get conflicting advice.
Don't Fogg came op with a design for an affordable horizontal drum forge built from a standard drum (55 US gall/45 imp gall/200 litres), lined with 1" of kaowool blanket and heated with a small and simple burner.
I am pretty sure the large volume is a significant factor in the even heating it provides.
I have tried to build a scaled-down version with some success. Mine have been built with a 10" pipe shell and a 1/2" burner.
I don't think I'd want to go smaller than an 8" ID, especially if increasing the length to 6'. I'd be looking to put 2" of kaowool lining in a 12-14" shell and use a 3/4" or 1" burner for something that long.
I'd avoid multiple burners like the plague: balancing multiple burners to give exactly the same flame temperature is a hassle I could happily do without. At HT temperatures, the heat input needed is not all that high.
The clever bit is the burner. I use a commercial Venturi mixer made in the UK, but expect something very similar is available over the pond. Otherwise a blown burner would probably give fine enough mixture control. The important thing is that the air:fuel mixture must be very finely and progressively adjustable. My limited experience of homebuilthomebuilt Naturally Aspirated burners has been that the mixture control is pretty much an afterthought and that controlling temperature to within a degree or two of target is frustratingly difficult.
-
Looks to me like a rather large billet for that size door opening. Does it have to go in on a diagonal?
If tried by now, how did it work? I have built a similar sized gas furnace, but with only one burner and fired on natural gas. Feel like I struggle to get to welding temperature. Haven't tried a bullet in mine yet, but hope to in the future.
Natural gas is usually at low pressure (a few inches of water column), making it difficult to get high temperatures in Naturally-aspirated forges. Propane is easier because it is stored at high pressure and just needs regulating down to the pressure we want.
For NG, a blown burner may be a better option.
-
You should be able to adjust how much air mixes with the gas by loosening the thumbscrew, moving the stainless steel sleeve up or down and locking it in position again with the thumbscrew.
In the photo, you have no air mixing with the gas, so the gas cannot burn until it encounters air.
Adjusting the air gap will adjust the temperature of the flame. More air usually means a hotter flame.
Adjusting the pressure with the blue regulator will give you control of how much of that flame there is (screw it down to increase pressure/gas flow).
The operation of your burner is essentially the same as a Bunsen burner. If you don't remember it from school, I'd suggest watching one or two youtube videos about Bunsen burners.
-
I'm sure both Metric- and inch-threaded MIG contact tips are available. I think Tweco list both 1/4"-28 and M6 x 1.0 in the 14T-series.
-
My apologies Frosty. I don't know how many forges you have, or need.
Markknx, you seem to be referring to heat and temperature as if they are the same thing. I'm afraid I do not find it easy to explain the difference, but there definitely is one. I think it's probably worth reading up on if you find it at all unclear.
Choking the burner does indeed cause the flame to go rich. It also causes the flame temperature to drop.
The flame temperature depends on 2 things: the amount of heat energy being released and the amount of "stuff" being heated by that heat energy.
It seems fairly easy to understand that there will be a fuel:air mixture at which all of the gas burns with all of the oxygen in the air, leaving no unburnt gas and no unburnt Oxygen. This ratio is called the stoichiometric ratio and is different for different fuel gases. Simplifying slightly, the stoichiometric ratio will also give the highest flame temperature. This is because all the heat energy goes into the smallest possible amount of "stuff".
If we lean off the mixture from Stoichiometric, the energy release is still the same: all the gas has been burnt with the same amount of Oxygen as before, but there has been extra air drawn in and run through the burner. This extra air is intimately mixed with the gas and combustion air, so absorbs some of the heat energy released during combustion. With the same heat energy and more "stuff" to heat (the original "stuff" plus the extra air), the temperature rise will be lower and the flame will burn cooler.
Conversely, if we start at stoichiometric and add extra gas, the gas cannot contribute anything to the combustion process in the forge because there is no extra Oxygen for it to burn with. The extra gas therefore acts simply as extra "stuff", absorbing some of the heat energy and reducing the flame temperature.
Of course, once the hot gas gets out of the forge and finds the extra Oxygen, it burns with it. This is the "dragons breath". Because this second burn happens outside the forge, it is not helpful to us in terms of heat input to the workpiece.
There is another term that is useful when describing combustion, and it is "adiabatic". It describes a system where there is no energy exchange between the system and its surroundings. This is one of those concepts, like perfect insulation, that is unachievable in real-world situations, but helps in understanding what is going on.
There is a website, http://elearning.cerfacs.fr/combustion/tools/adiabaticflametemperature/index.php, that has a tool for calculating the adiabatic flame temperatures of gases burning with air at different air:fuel ratios. Propane has the formula C3H8. The Equivalence Ratio is relative to the stoichiometric ratio for the particular gas being used; 1 is stoichiometric. .5 would be with only half the stoichiometric air supply. 2 would be with twice the stoichiometric air supply. I ran the numbers for Propane at a range of Air:Fuel ratios and charted the results. The graph was broadly in line with what I expected from having spent time working with gas burners, but had never seen numbers for. The top curve is temperature in Fahrenheit, the bottom one is in Centigrade.
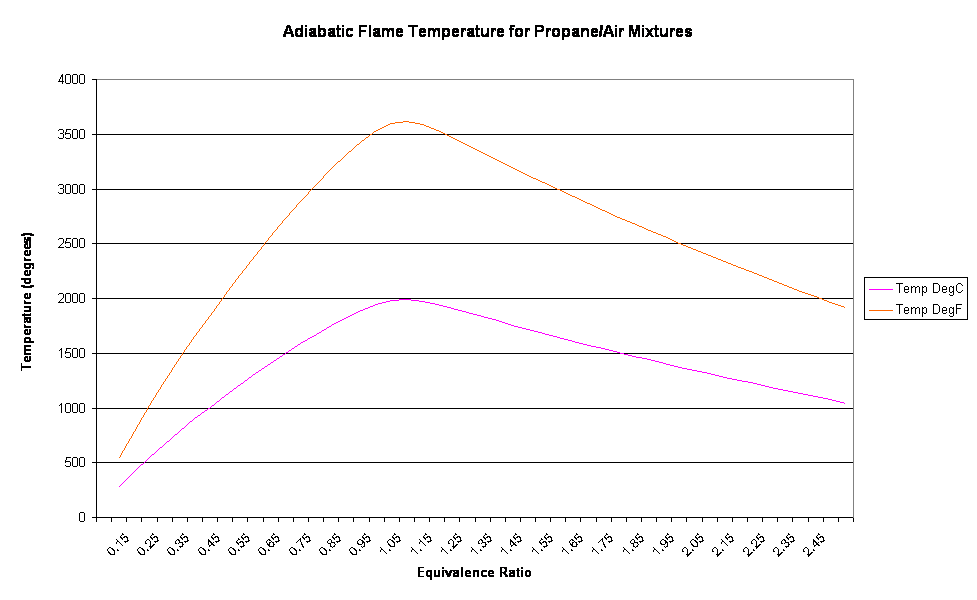
I try to tune my burners to give about their highest flame temperature with the choke fully open. The actual temperature achieved in the real world will be something less than the graph: "my" curve will be lower, but its shape will be similar. By reducing the choke opening, it is then possible to follow the curve down to the left until the desired temperature is reached.
There's a guy on youtube who is much less of a geek than I am and his video probably explains things better than I can:
Another youtube video showing a quick-and-dirty HT forge in use heat-treating O1 steel. The blade was put in with the forge at 700 degC (1292 degF) and ramped up to 816 degC (1500.8 degF) solely on the air adjustment. Because of the ramp-up, the temperature was not as accurately set as would have been the case if it had been set at Austenitizing temperature before putting in the workpiece.
Gas pressure was at 20 PSI throughout. I'm sure many will be thinking "woah, that's crap: my forge welds at 5 PSI", but the gas jet in the video is only .020" (I have measured mig tips for .023" wire at .029"; over twice the area of the jet used in the video), the chamber volume is around 900 cu in, there is only 1" of insulation and the desire for even heating trumped the desire for economy.
The very fine control shown in the videos is only really needed for heat treatment. If you don't need it, great.
However, if having the ability to set a welding temperature when you want to weld, or a forging temperature (with the scaling-reduction that comes with the rich flame) when you want to forge seems like it might be useful to you, a simpler sliding choke will get the job done for very little extra effort over a chokeless burner build.
I've concentrated on Heat-treat because it's where the control comes into its own, but the basic principles apply to more conventional forging applications as well.
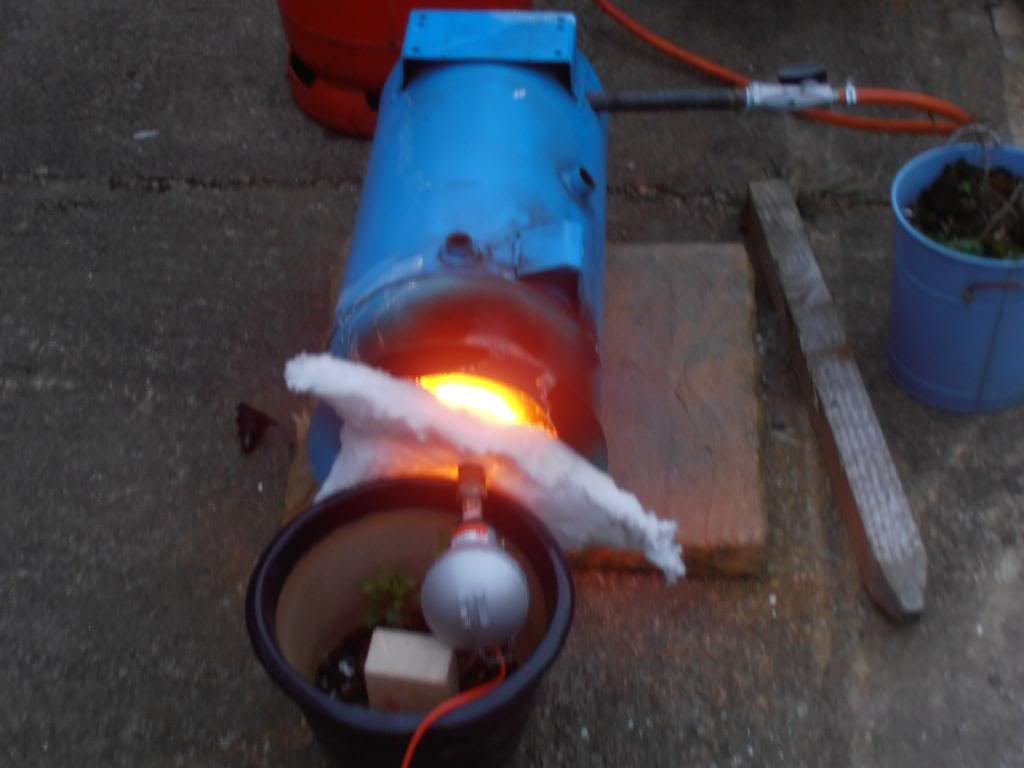
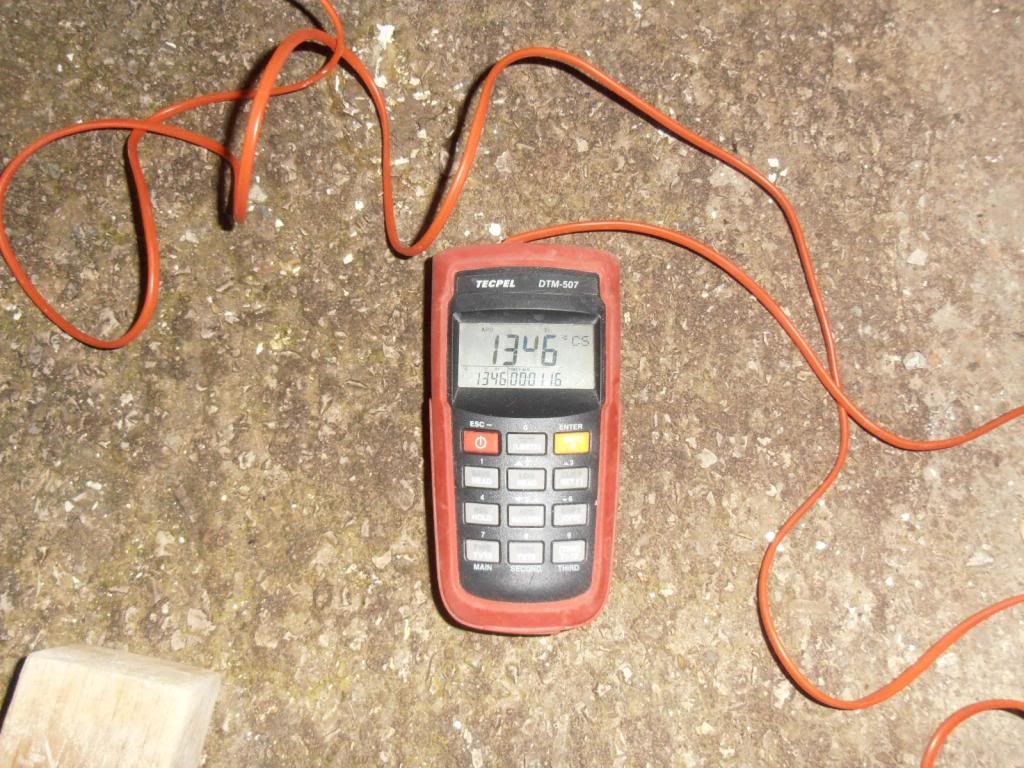
Using the same 1/2" burner as shown in the second video in another quick-and dirty forge, this one about 150 cu in and with 2" of insulation, the temperature range available at 20 PSI was from below 800 degC (1472 decF) to 1346 degC (2455 degF). Increasing the gas pressure above 20 PSI took the temperature over the 1400 degC (2550 degF) rating of the kaowool lining and I chickened out.
http://i667.photobucket.com/albums/vv31/timmgunn1962/25L Receiver Forge and Amal Burner/P3150910_zps6ff4abbc.jpg
-
A nut or tapped lug on the slide-choke sleeve and a clearance-drilled lug on the burner tube with a long setscrew retained by a nyloc nut would probably be the way I'd go for a progressive choke. I do have to confess to cheating by using a commercial gas mixer (and consider it about the best 35 pounds, around 55 bucks, I've spent in years) I did spend quite a lot of time experimenting with the jet sizes, but the clever bits were all worked out by someone much cleverer than me a long time ago.
I disagree with Frosty somewhat about the need for a choke. Nothing fundamental: more a result of different circumstances, I imagine.
He's right in that no choke should be needed to run. The A/F curve is also pretty close to linear.
For blacksmithing, which I assume is Frosty's thing, there should probably be no real need for a choke. Within quite wide limits, you can control forge temperature just on gas pressure. If you want to do different things at different flame temperatures, you can build forges optimized for each thing and fit burners optimized for the job in hand. The T-burners are cheap enough to make.
I suspect Frosty in Alaska has less of a space consideration than I do, living here on a small, densely-populated island, making the multiple-forge option viable for him.
From a bladesmithing stance, having a choke gives precise control over temperature/mixture for Heat Treating. You certainly can get the temperature control with a simpler burner, but this usually means controlling flame temperature on excess air (usually secondary air) and limits the atmosphere to the Oxidizing range. With a good Venturi burner, I can set a temperature and hold it indefinitely within a couple of degrees C (3 degF). The range I can run at is around 750 to 1500 degC, 1382 to 2732 degF, or perhaps a little wider.
As very much a beginner to smithing, I do not have the ability to judge temperature to any degree of accuracy by eye. Given that I am colorblind, it seems wise to assume I never will and not waste time trying to learn, so I use a thermocouple. When forging, being able to set the forge temperature to something that will not ruin the steel if I let my attention wander for a minute or two is very useful to me, but being able to go screaming hot if needed is also useful. I don't have the space for multiple forges, so need to ensure that the one I have will do everything I want. The choke makes it easy.
Basically, the jet size is tuned to give maximum temperature with the choke fully open. Closing down the choke then reduces temperature. Importantly, it is a progressive effect.
-
If you want to run at variable temperature, adding a choke is the way to go. As Frosty says, it's much easier to control the mixture at the intake end.
If you want really fine control over the temperature/mixture, Heat-Treating blades for example, it's worth making the choke as progressively adjustable as you can. The commercial Venturi mixers usually have a screwed adjustment
-
The MIG tip is good, primarily because it's easy to change when tuning.
When you are tuning, if the burner is running rich then a smaller gas jet will increase the temperature. It's counter-intuitive and I've had a couple of smiths look at me like I'm an idiot when I've suggested it, but it's true.
If you are running lean, a bigger jet will get you hotter.
I did my fine-tuning with a couple of MIG tips, a thermocouple, a set of micro-drils and a pinvise. Start with a tip that's too small, choke fully open, set a pressure; I used 20 PSI. Measure the temperature. Open out the mig tip with a drill in the pinvise. Do it again. When the temperature reading is lower than the last one, open out the other mig tip to the hottest size and fit it instead. This will give you the widest adjustment range by using the gas pressure and choke.
NA burners use the speed that the gas exits the gas jet to generate the suction to draw in the air needed for combustion. Getting high gas speeds needs high pressures. There is no disadvantage I can see to running at high pressure and I've never understood the "I can weld at 3 PSI" mindset: I much prefer the "I can weld at 40 PSI and Heat-Treat at 3 PSI" idea.
Amal gas burner upgrade?
in Gas Forges
Posted
I think the Amal factory recommended jet sizing is based on normal industrial combustion processes.
"We" are not normal, at least insofar as combustion processes go.
We tend to run with only primary air (air that mixes before the burner nozzle), so we need more of it than systems that also have secondary air (air that mixes after the burner nozzle). The amount of air depends primarily on the gas speed out of the jet. To get more primary air, we make the gas jet smaller and run at a higher gas pressure to give a higher gas velocity.
There is a relationship between flame temperature and air:fuel ratio, with maximum temperature at an equivalence ratio of about 1, falling away on both sides as the equivalence ratio goes higher or lower.
The graph is theoretical only and is calculated for ideal conditions. We'll see lower temperatures in the real world, but the graph shows the shape of the curve.
Most industrial processes run out to the right-hand side of the graph. We tend to want to run on the left-hand side where we get a reducing atmosphere to limit scaling.
I have tried to size the jets to get about the peak temperature with the choke fully open and make the full range of temperature adjustment available by closing down the choke and running down the curve on the left-hand side. The ones I have suggested are the jet sizes I have found worked best in my testing.