BFancy
Members
-
Joined
-
Last visited
Everything posted by BFancy
-
Ooh! I quite like the joinery on the stand! Held together by wedges for quick assembly and disassembly?
-
Those are absolutely beautiful! Nice work!
-
I didn't expect the kind of grief I'd feel for a man I hardly knew. I wish I could have known him better. Mikey, my burners are a pair of 3/8 Frosty burners running with 0.6 mm 3d printer jet. I honestly expected to be able to turn them down much further than I can without them huffing. I have an idea about the normal Frosty T ratios that I might like to test once I have some time to tinker. I'll go into a bit more detail in a minute. Hefty, what size burners are you running on your forge? If they are the same size as mine I've got an idea about that lean mixture. As for the counterweight on the doors, I believe I know exactly what you are talking about. I might mess about with that in the future, but for now, the doors are not very heavy, so lifting them is pretty easy with my poker. Alright, the idea I've had is that the Frosty T burner plans use the 3/4" burner as an example and call for a 1" T with a 3/4" branch. The 1/2" inch burner uses 3/4" intakes. The smaller we go in size, the bigger the inducer intakes are in relation to the burner tube. My burners use a 1/2 x 3/8 x 1/2 T inducer. They run pretty lean in the forge and I'd like to try using a 3/8 x 3/8 x 3/8 T and see how that affects the mixture in the forge, and if that let's me adjust mixture with the jet distance. I travel for work and won't be able to tinker for probably the next month or so, but I would like to know everyone's thoughts on this.
-
I only joined this forum two weeks ago, but in that time Jerry was the first to meet me here with a warm welcome, and help me a great deal with my most recent build. I noticed that he hadn't responded in a while and I had just attributed it to bad weather, but... Even in our recent conversations he mentioned missing absent friends. I'm sure he's met up with them again, but I'll miss him. Jerry, today I'll ring the anvil in your honor. Rest in peace.
-
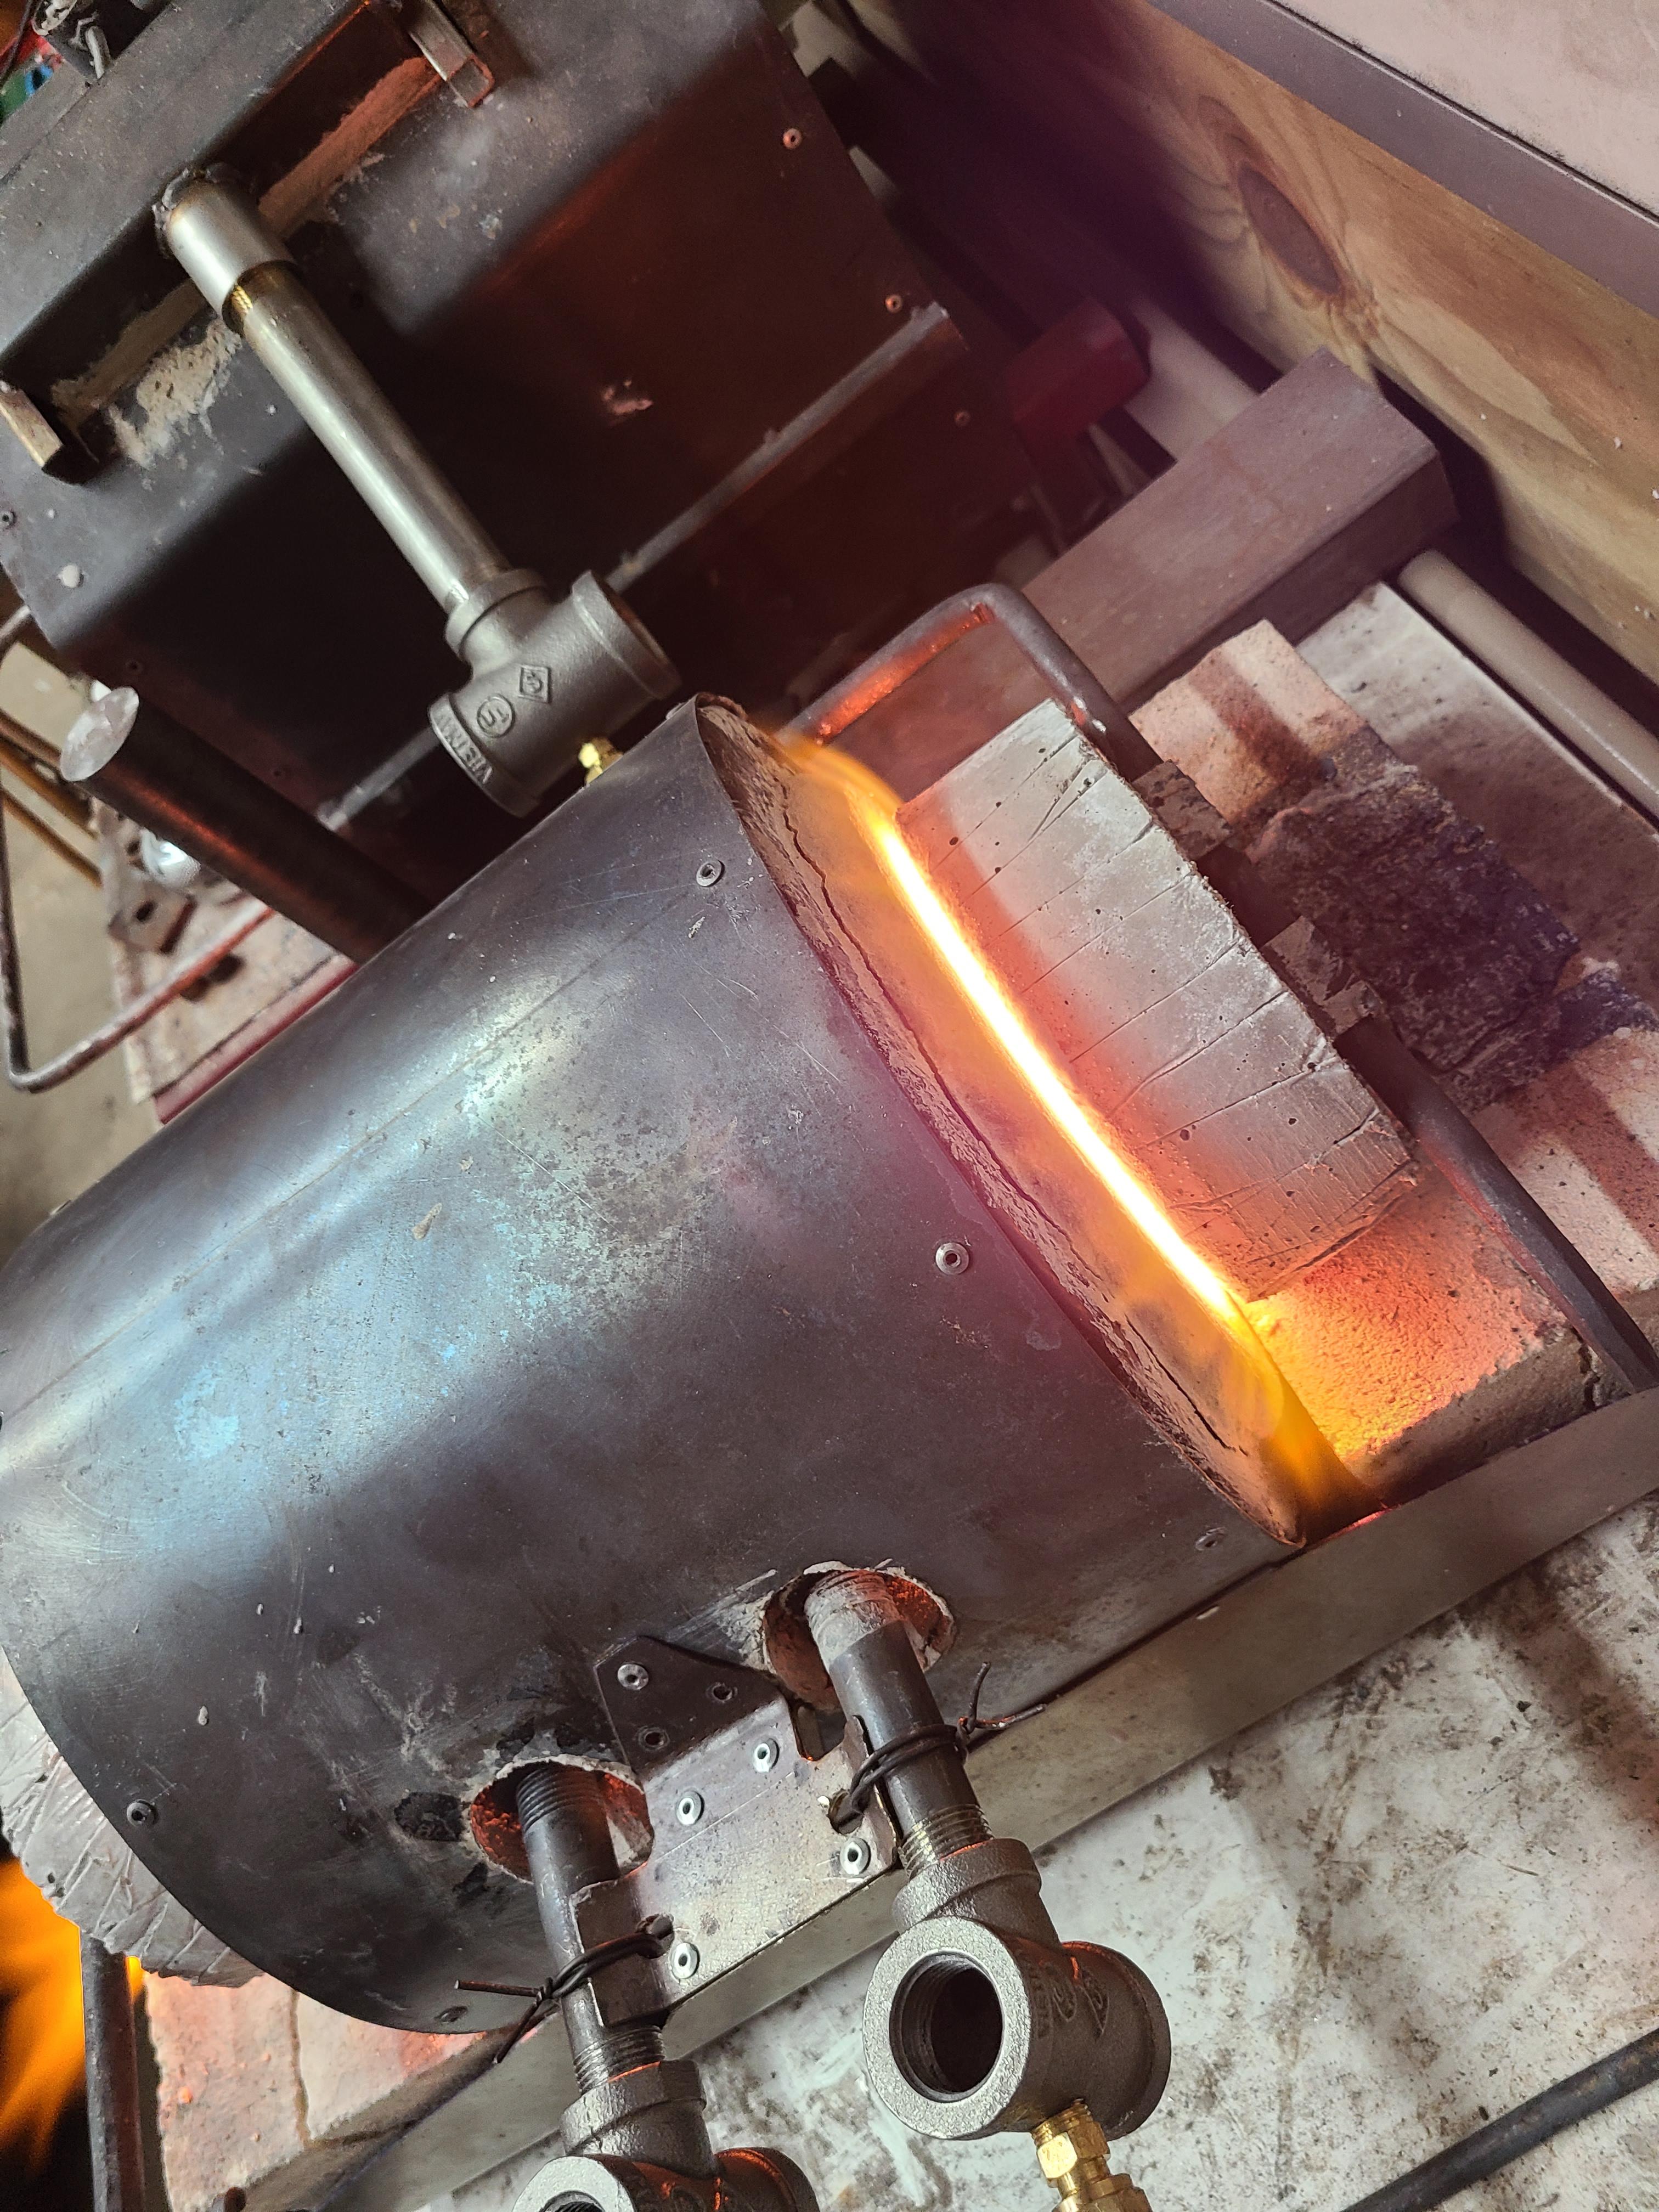
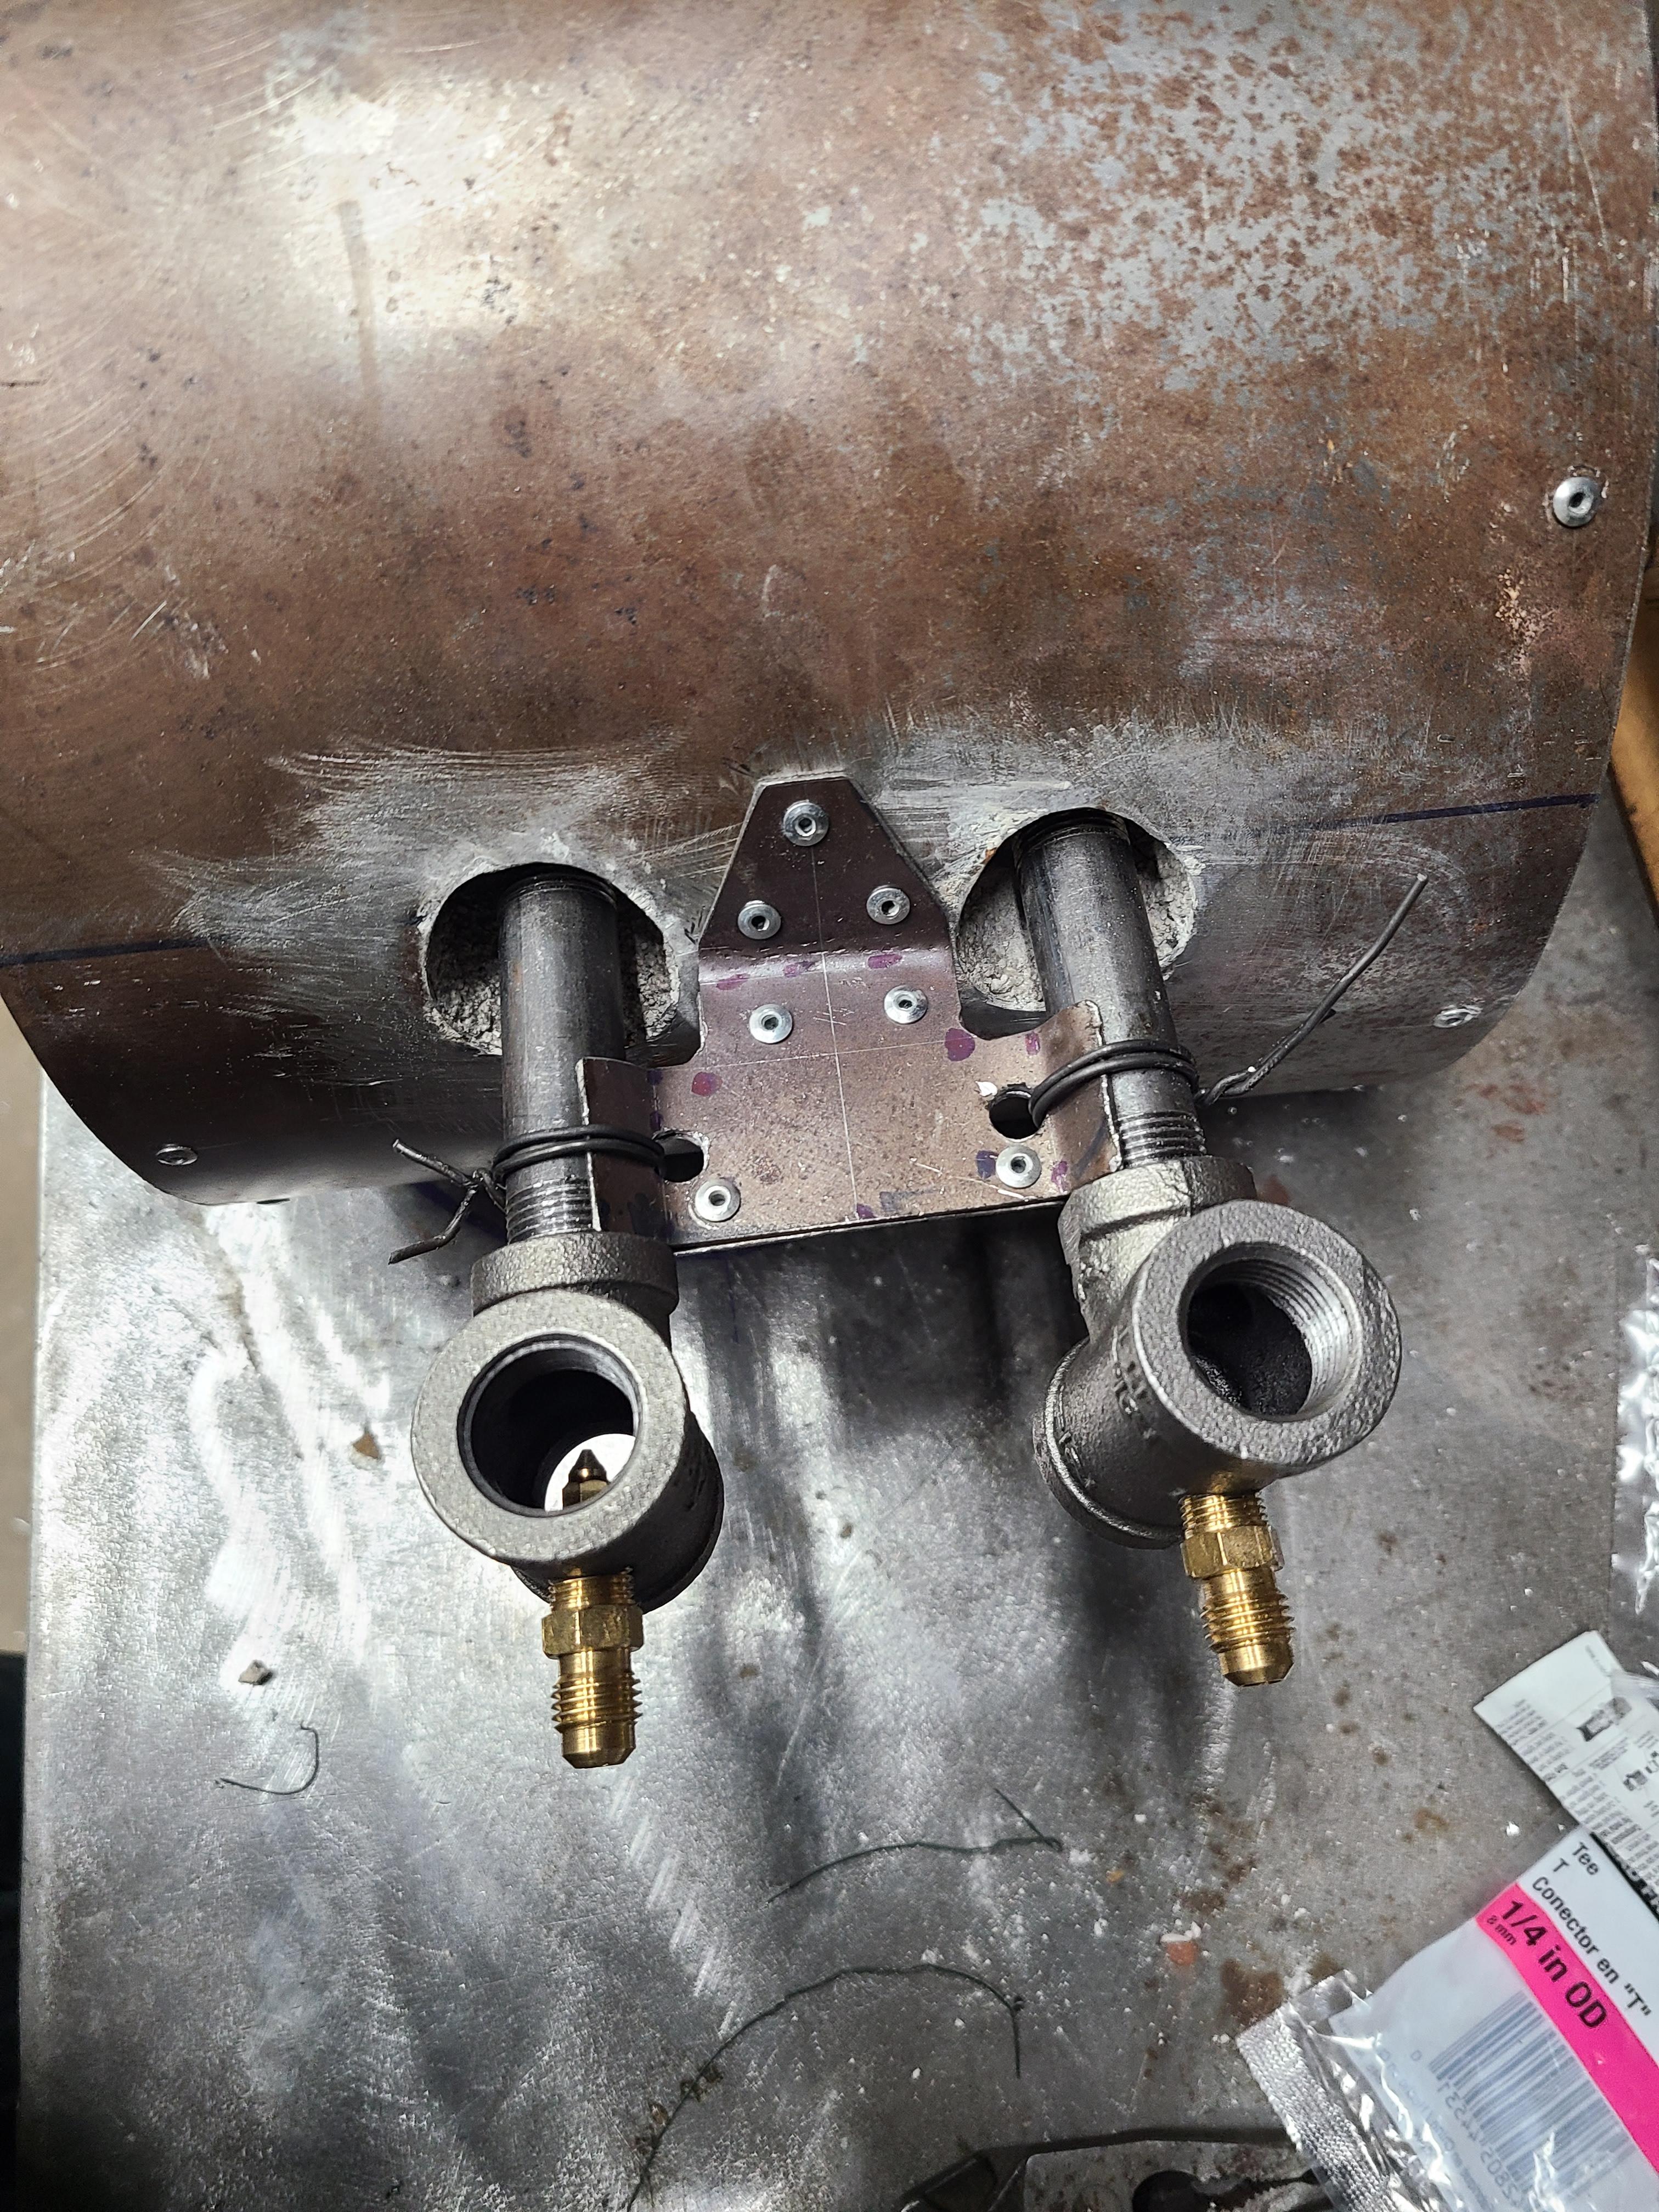
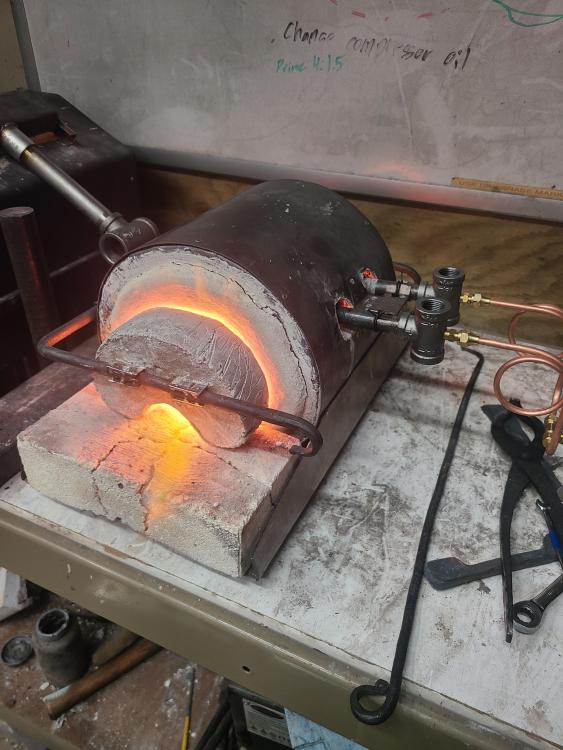
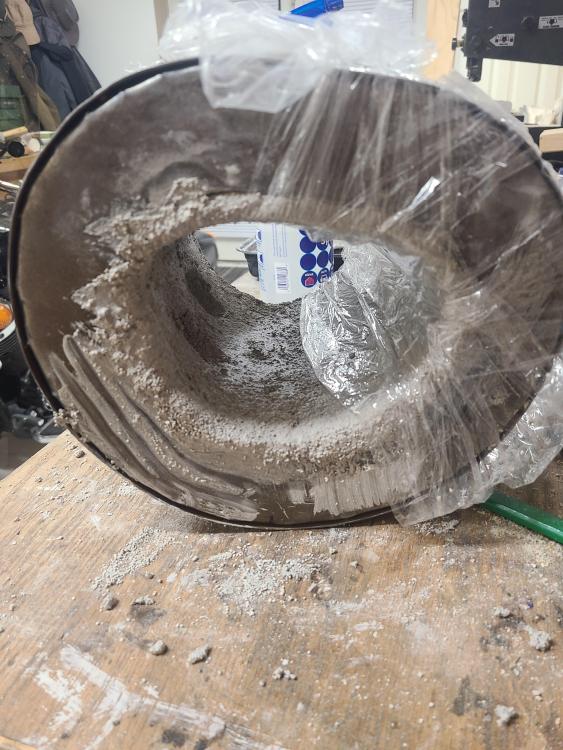
It has been about a week and I have finished my doors and some additional experiments. I noticed that a lot of the doors on internet forge builds follow either one of two routes: the first being a mobile baffle of some sort. The simplest of this style is a simple fire brick that can be move out of the way, while the most complicated involves some sort of captured refractory and a lift mechanism involving cables and counterweight. The second is a hinged door of some sort. There are several paths down this fork as well, those being the different ways of hinging a door along a different axis: The x-axis being more like an oven door or a tailgate on a car, the y-axis like a cabinet or house door, and the final z-axis, like a lift gate for a train crossing. I like the simplicity of a mobile baffle like a fire brick, but I'm clumsy and have dropped multiple HOT fire bricks to shatter on the floor. So how do I make a mobile baffle that cannot be dropped on the floor? Simple: attach it to the forge shell as a door. I decided on the final option, the z-axis door, as that allows me to close the door on items in place on top of the hearth. Not to put too fine a point on it, here is a picture of the finished doors: I didn't want any metal exposed directly to forge atmosphere except for what I am heating for a beating. So this is what I ended with, anchors cast into refractory, tacked to a hinge/handle arrangement. These doors are not solid kastolite. I mentioned in a previous post being intrigued by the idea of making "fire bricks" with a core of ceramic wool, so that is what I did. I encapsulated a rigidized wool core with kastolite poured around it, leaving a hole poked through to the core for moisture to escape from. I have no interest in destroying my work by superheating steam in a closed structure. Picture of my "mold": I cut and taped a cereal box into shape and lined it with some plastic wrap to keep the kasolite contained. Not shown in this picture is the hole I poked in between the anchors for steam to escape, kept open with a coffe stir straw into the wool. I put these in a bag and left them to cure for most of a week warm and wet for the best strength. And here is the hole in action venting steam: Over all, I'm very happy with these doors. I didn't take any pictures of the "working" side of the hinge because it's dead simple, just a strip of steel bent into a barrel for the 7/16 rod to rotate in. They are adjustable for depth too, so I can make the opening between the doors and the forge bigger if I need to for the forge gasses to escape. Now for the additional experiments mentioned at the top of the post. With my infrared thermometer I recorded a peak temperature of 2706⁰F. This not likely entirely accurate because the refractory index for ceramic is slightly different than what the thermometer is set for, but it should be close enough for this. It turned one of my modified nozzles that Frosty disliked so much into a nice puddle on the floor in probably less than 5 minutes. It's cast iron, so the melting point is lower than pure iron because of the high carbon content, but I noticed the color of the forge turn towards white once it started melting. I think the reason for the temperature increase is because the forge was burning off the dissolved carbon in the part. If anyone has ideas about this I'd like to hear them, for curiosity sake if nothing else. I've done a few successful forge welds but none without flux. The forge does have an oxidizing atmosphere that adjusting the burner jet does not seem to affect. The only change I noticed was a shortening of the flame compared to my control burner. Substituting a 0.8mm 3d printer nozzle made the flame rich to the point of safety concerns. So in this case, I'll keep with the 0.6mm jet adjusted how it was before I messed with it. Mikey, the burners seem to behave best with the back of my coupling just inside the forge shell. With the burners further out from the forge interior, the flames seemed almost trapped in the ports, but too close and the burners would just blow the flames off the couplings. I sanded the ports a bit, but I didn't notice any improvement in burner characteristics. The space around the burners does not seem to be inducing any air. I used some HVAC foil tape to temporarily block off any air bypassing the nozzle into the burner port and noticed no change in flame color or behavior. Voltaire said, "perfect is the enemy of good" I have actually achieved everything I initially set out to do when I started, so anything more gained is just icing on the cake. That's not to say I won't keep tinkering, just that even if nothing I do makes it better, it's still pretty darn good. So thanks to everyone that helped me get here, specifically a big thanks to Frosty for dealing with my silly burner mistakes, and Mikey for his freely shared knowledge on forge design.


-
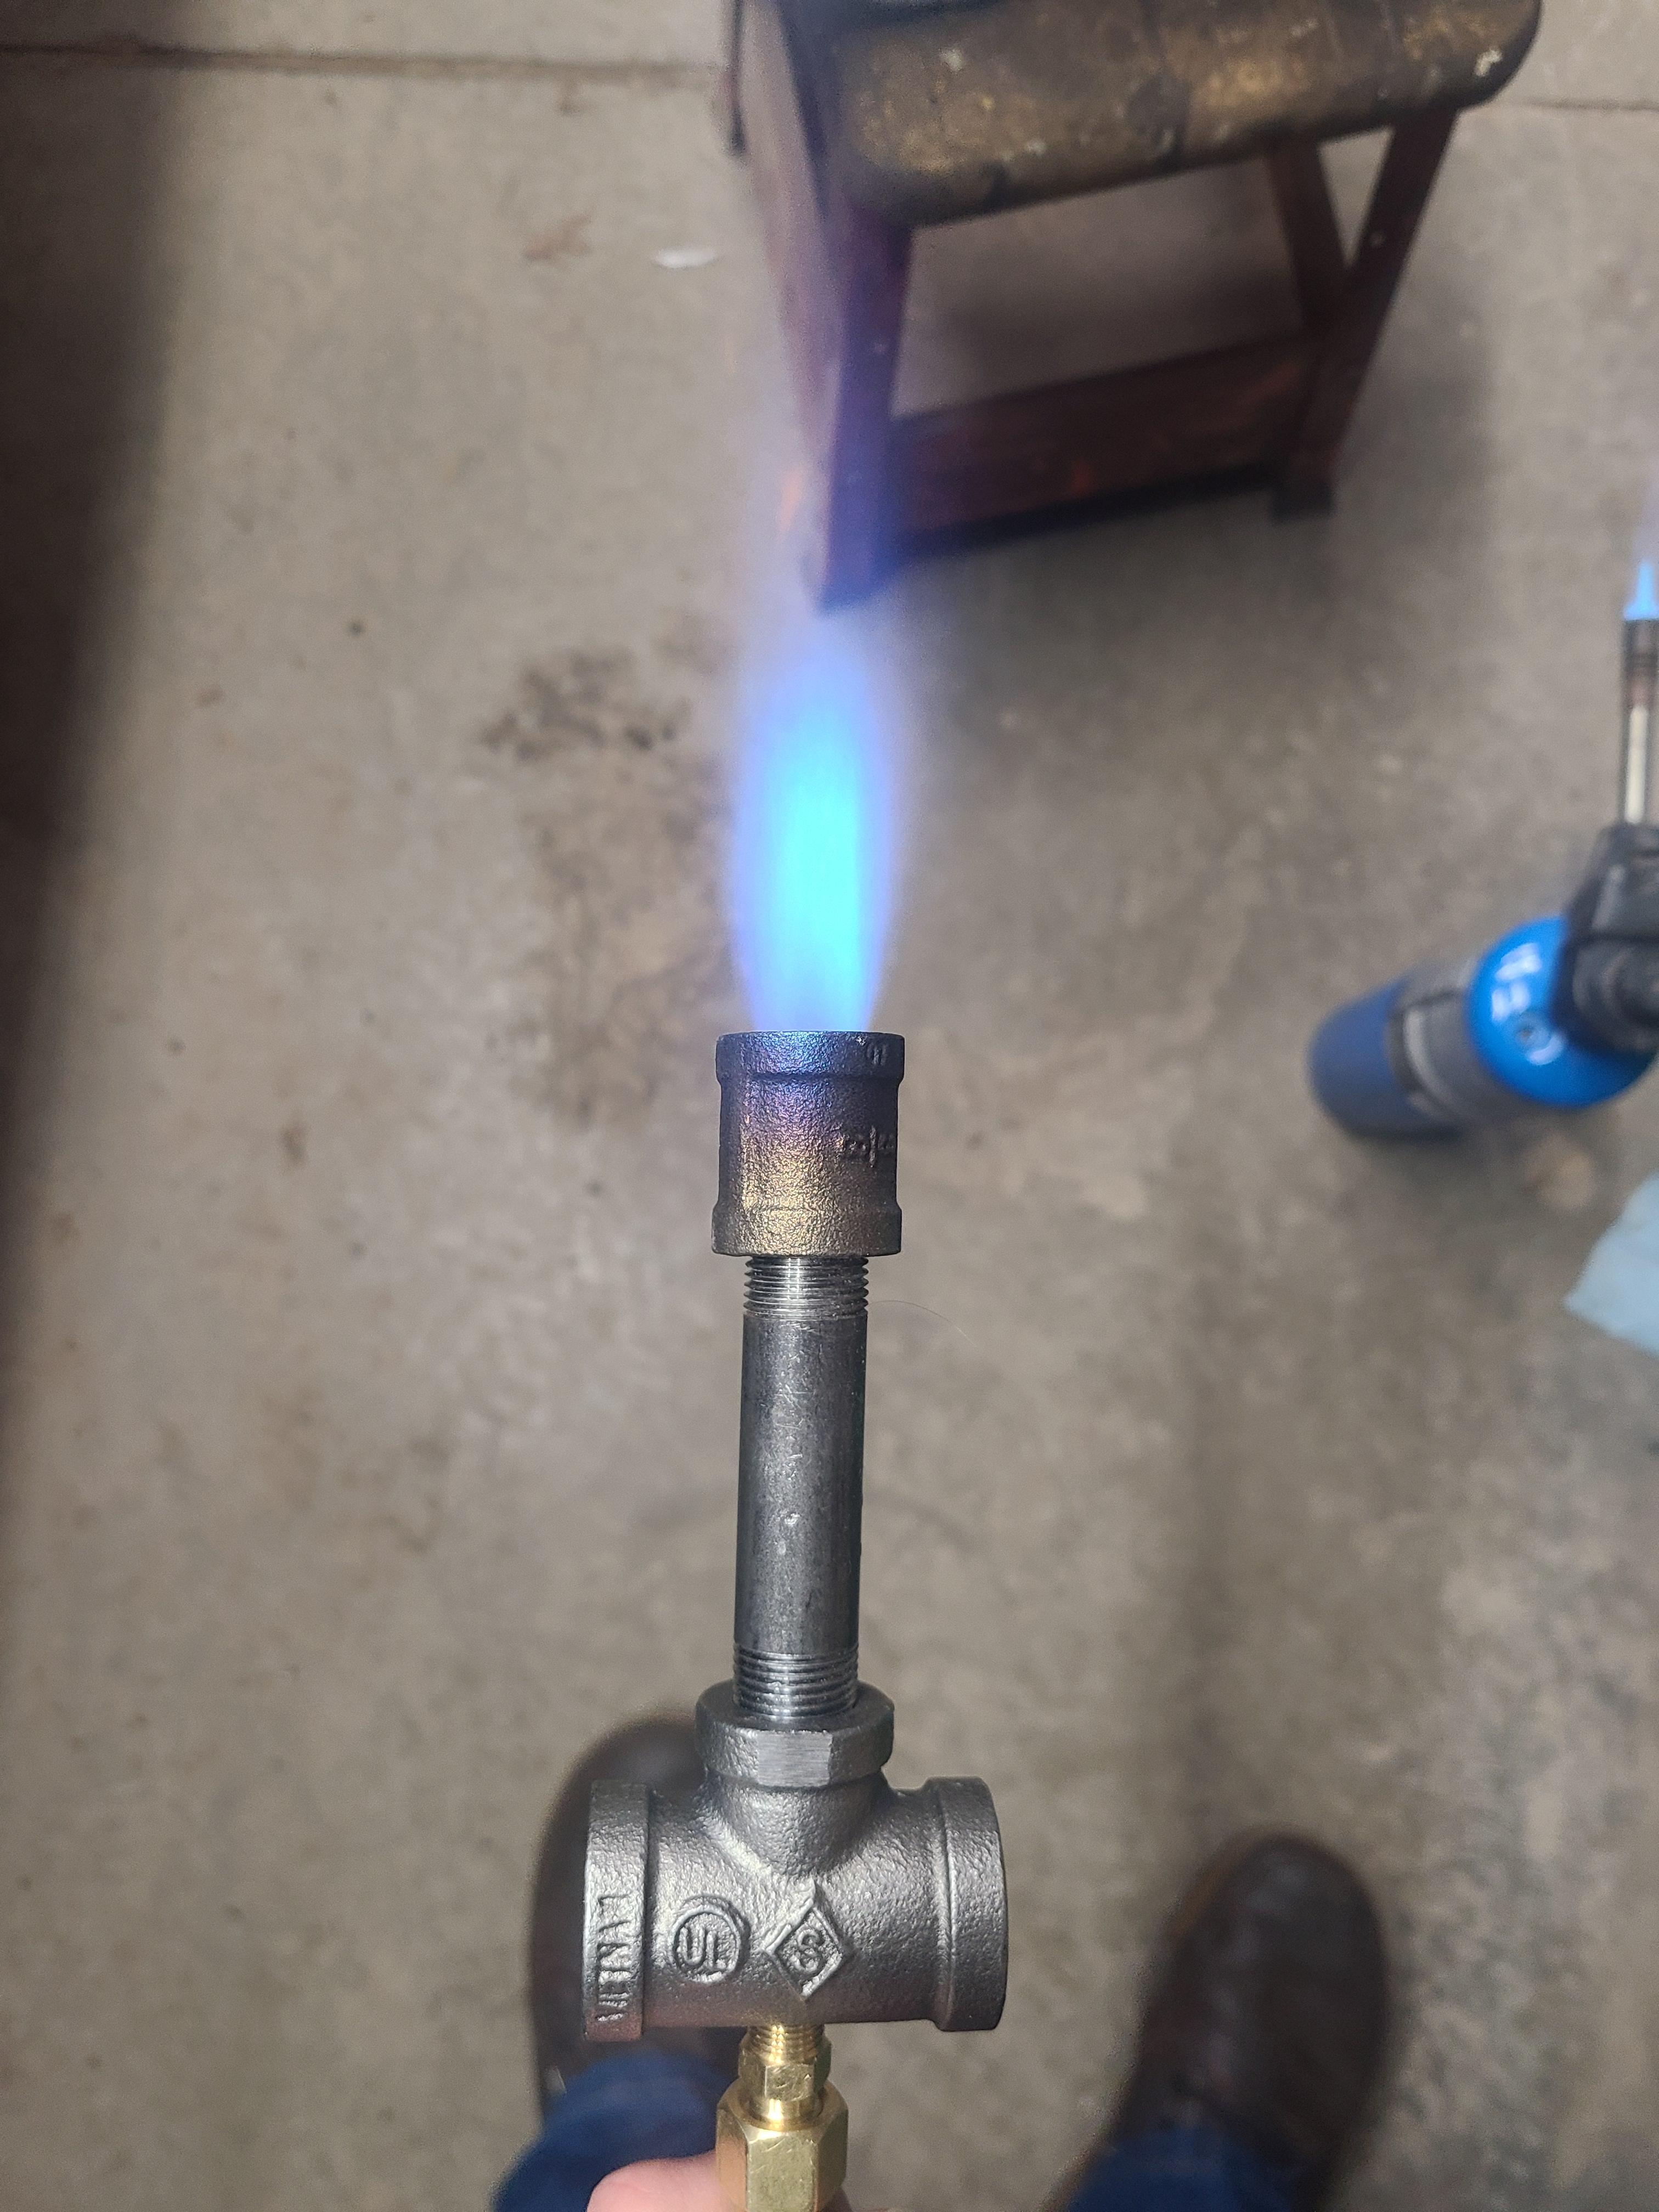
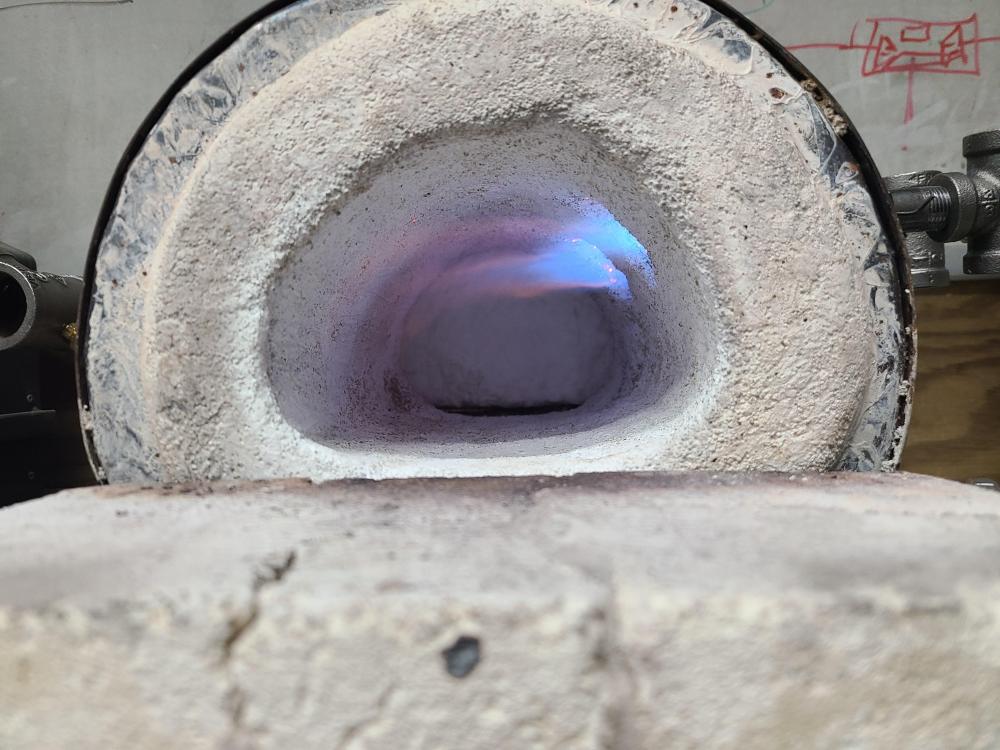
Mikey, thanks for the reassurance on the secondary air, I definitely agree with your assessment on that, now that I've run it some more. The burners have about 1/16 most of the way around maybe up to 1/8 in spots. I actually might stuff a small amount of wool around them because I was seeing some small flames shooting back towards the inducers and I can't imagine that's good. I did some tuning and answered the uneven burner question, they burn much closer now. Still different, but I doubt I'll ever get them identical, seeing as they are hand made, and the ports are slightly different. This is after my preliminary tuning: This is after the kiln wash was applied and the forge warmed up just a bit: Just for fun, I held some bailing wire in the burner flame and melted it off, so that's cool... or Hot rather.

-
It's been a few days, the kastolite has cured nicely and it's time to move this project along. I'm going to do more showing than telling here because who wants to listen to me ramble when there are pictures to look at? What is a forge without a heat source? Just a weird box. The first thing was to build a mount for the burners. Next I had to give it some support so it would quit rocking around on my bench. These rails have a little tab that was bent round on the bottom side to form feet. No pictures of that done, sorry. These rails are both feet and a support for the hearth front and rear. The hearth is some of what is left of my old brick pile forge. And here she is after driving out all the moisture. No pictures of the flames in a cold forge yet. This was the first firing, so there was a lot of orange from the refractory until it warmed up. A couple things I noticed: The burners do not burn evenly. That is to say, the far one in the pictures far out performs the near one, like its getting more gas. Any advise for evening them out? Maybe just getting them both tuned right will do it? Speaking of, I know it's darn near impossible to see in a hot forge, but I'm pretty sure they're either running lean or inducing a lot of air around the ports. Those flames looked pretty purple to me. I'll take some pics tomorrow in a cold forge. A second note, never mind my 'doors' I've got real ones planned. I'm pretty excited, I tell you what! My fancy Infra-red thermometer said 2440⁰F and it's not even properly tuned yet!


-
Ah, I'm not changing much of anything at the moment. The bricks I got were from the Jungle River site years ago. They still sell them but since then I've found a spot in Minneapolis that has had everything I needed on hand. I don't think they carry Morgan Thermal Ceramics, but they might have something comparable, or know someone who does. I'm going to finish up this current forge build before hunting for new projects. My NARB forge isn't getting a new floor until this new forge is burning nice and HOT with the kinks worked out. You might even say the NARB forge is on the back burner for now. Ha!
-
The bricks I bought claimed to be rated for 2500f with alumina in the refractory, and they seemed to hold up okay against Flux- not that I used much because the forge didn't get quite hot enough to do anything that needed the stuff. The real problem I've had with these bricks is they just fall apart after a while. I have been planning on replacing the floor in that forge since I read through Forges 101, just didn't have the wool. I bought extra when I started this build with that in mind. And yeah. It takes a LONG time to heat up. Thanks for the offer of the bricks, but ever since I saw somone (Another FrankenBurner?) mention making their own with some wool and kastolite I've been itching to try it. But if that doesn't work out I'll take you up on that offer if it's still open.
-
For all I complain about it now, that brick box probably wasn't at fault, I think I built it around 2019? So I didn't have any of the fancy new k26 bricks, just the old fashioned high alumina soft bricks. Knowing what I know now, a well built 3/4 burner should have absolutely been able to bring it to heat. I'm going to blame poor burner design. It looked broadly similar to one of yours, Frosty, but instead of using a... well. I could go on but I figure I'll spare us both the time. As for the NARB forge, I think if I replaced the firebrick floor, I might be able to squeeze some more performance out of it. But for what it is, it works fine for the moment. The bailing wire... I feel like perhaps I could have worded my idea better. The bailing wire could be replaced with a small hose clamp if I cut a slot instead of a hole. The bracket will be held to the forge with 6 pop rivets. I've drawn a picture for the general idea, hope it makes sense. Like I said, if it doesn't feel sturdy enough, I'll do something else.

-
Billy, I started with coal but had to switch when I moved into my current shop space. My first propane forge followed the Essential Craftsman design, and the burner I was running it with was cobbled out of plumbing parts following some random YouTube video. I did not do a good job building the burner. The jet was way out of alignment, the flare was just a plumbing reducer and the brick box it went into was just as bad. The entire setup was so inefficient that even with this 3/4 burner pegged on the regulator I was only just creeping into welding heats by the time my tank frosted over. But it heated steel, and that was good enough until it wasn't. On my next forge I used 2" kaowool, some refractory cement as a flame face and a new differently bad burner pointed right at the floor straight up and down. I wish I had found this forum before I built that one. After I found the forum, I blitzed through the NARB thread and Forges 101, and re-did the flame face in Kastolite, built a 3/4 Frosty T powered NARB and that is my current setup. But as I posted at the beginning, it just doesn't quite get hot enough for me to be happy with it. So far, I've built the new forge with just sheet metal and pop rivets, so I think I'll try to continue the theme. I've got an Idea kicking around in my head of using 2 pieces of bent sheet metal riveted together and some bailing wire to affix the burners to the shell. Once the forge has another day to cure, I'll mock it up to see if it'll work.
-
Alright, I've got an update on the actual forge this time instead of just the burners. Mikey, I did the work and went to bed before I saw your post, but I (almost) followed your hole saw instructions before you gave them! I ended up taking Frosty's suggestion (I hope) of mounting the Burner up top at a tangent to the inside of the forge, which makes sense to me. So these pictures are not fantastic (nevermind the cluttered bench), but I hope they show what's going on well enough. This first one is after the rigidizer with the burner laid on top to show angle of the ports. This one is in process of applying the Kastolite. If you look close, you might be able to see the burner holes. And here she is wrapped up wet and about to be covered in a blanket to stay warm. Mikey, you hit the nail on the head I think. I do love an elegant solution. So I have to ask, when you say an angle bracket on either side, do you mean 2 brackets per burner or something like one bracket holding a burner with the burner affixed to the bracket with a hose clamp? I've got to stop or I'm going to keep saying bracket.


-
The 3D printer nozzles are a winner for sure! The 0.4 mm nozzle was too small - not surprising, the math said I might need to open it up a bit, but I bought an assortment, so I figured I'd try the 0.6 mm and it worked fantastic! For those following at home that's 0.0236 inches, which I expected to be too large, but if it works, it works. Another note about these nozzles is that they screw in with an M6 shank, so they matched my existing holes for the mig tips. The m6 x 1.0 thread means I can tune very easily by just screwing the jet in or out. I added a bit of blue threadlocker to keep it from moving and to give it a minor seal, though I might need to change that in the future if the propane starts eating it. The nozzle had to heat up a bit for the flame to stick, but that won't be an issue in the forge. Now I just need to figure out how to mount it before I start adding the kastolite 30. Frosty, when you suggested I move the Burner further up so less junk falls in it, did you mean something like this?


-
You know Frosty, I was good at math once... looks like those days are past now though. I redid my calculations and it looks like I need a jet of about 0.0175 inches for my 3/8 burner to keep in line with your ratio. Unfortunately that brings me square outside of using MIG tips, as 0.023 is the smallest they go. I think I saw somewhere on here people using 3d printer nozzles for gas jets. Some more math, (wrote it out this time!) Tells me that a 0.4 mm printer nozzle is close to what I need, though I might need to open it up a couple thou. We'll see.
-
Thanks for the input Neil. I am aware that burners have different characteristics when inside a forge, but seeing as the forge currently looks like this: That might be a bit difficult. My goal here is to get a pair of 3/8 T burners in tuning range, so when I get the forge finished I can do just that. However! At the moment, I'm having some trouble inducing enough air, without the added back pressure a forge would provide. And Mr. Fancy is fine. Happy New Year, Ben

-
Here is a picture with the new coupler and a new mig tip: In order to keep the flame on the nozzle, i had to turn my regulator WAY down. Still running very rich to my eye, but much more stable. A note about the jet being centered. I did notice that after changing jets, it was no longer quite right, so I took your advise and gently moved the mig tip a bit at a time. More than anything else, I think that stabilized the flame... which means I'll have to drill and tap another T. Oh well, I'm learning and I enjoy tinkering just as much as swinging hammers. I'll come at it tomorrow with fresh eyes.

-
No worries on the long explanation! I'd rather have more to go on than just guessing what you might have meant. In order: I drilled the T on my drill press, but the threads for the branch off of the T are not very straight to the part. I did my best. I Trimmed the mig tip (.023) because it was running so rich. Having trimmed it back this far, I suspect I'll need a thinner jet, or I'll need to come up with a better nozzle. And I do have extras tips, no worries about that. Although the picture shows the flame running along one side, it actually jumps all around the nozzle. When I sight down the mix tube on this one the jet appears to be in the center. The coupling I used as a nozzle was 99 cents at the local big box store, so I'm not too upset. The nearest dedicated plumbing supply I've found on the internet is about a 30 minute drive, and they're only open bank hours, so I'd have to take off work early to get there next week. The reason I cleaned out the threads on one end of the coupling is because I couldn't get the coupling to hold a flame any easier than just the mix tube. (Maybe I was just trying to give it too much gas?) Having typed all this out, I suspect the vozzle is the main contributor to my problems. I'll pick up a couple more couplers. (ha! A pun!)
-
The Burner dimensions are: T: 3/8 X 1/2 x 1/2 Mix tube: 3/8 x 3 And the coupler is standard size, but I used a carbide to remove the threads on one end. The flame is pretty... fluttery. It might be that I wasn't precise enough when drilling the T, or any number of things.


-
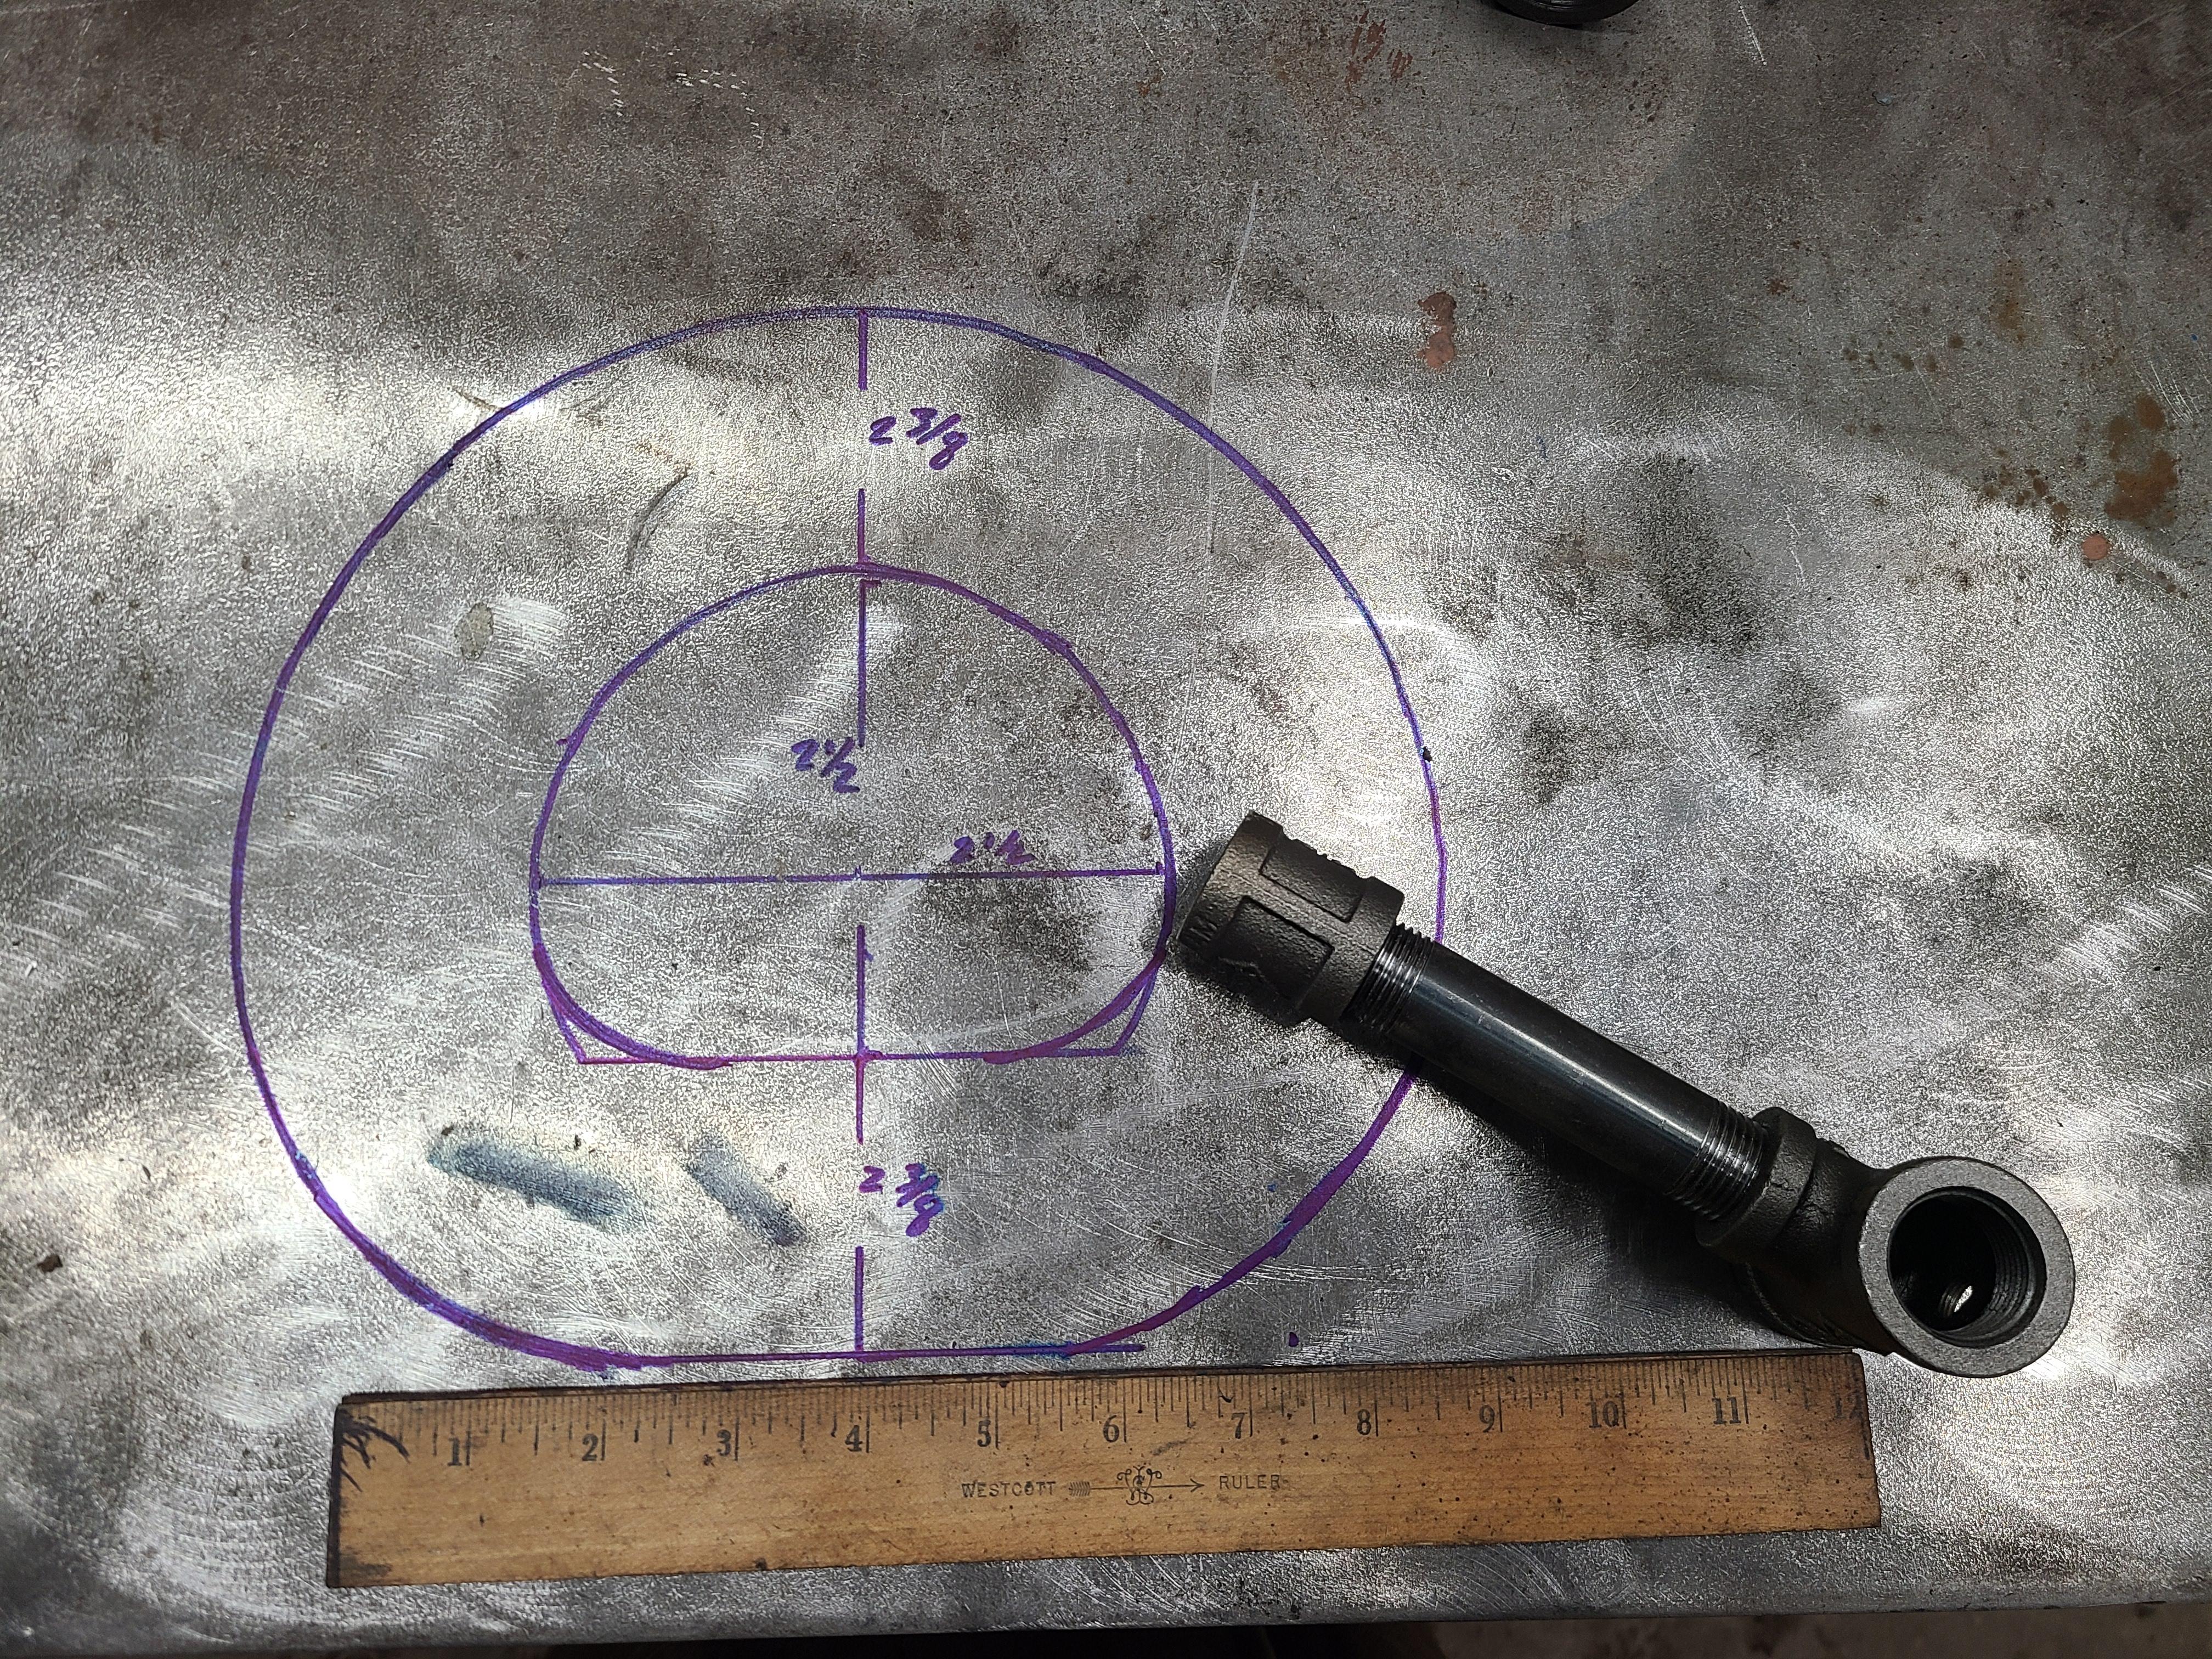
Alright, I've made a 3/8 T-burner and mocked it up against my drawing: The smaller burner sure does look more proportional. =)

-
Actually, I did lay out my burner with my planned positioning, and I'll explain why I put it there and not the conventional top down sort of angle. From my understanding reading forges 101, the reason we are encouraged to point the burner at the floor is because of the chemically active propane flame. Pointed at the floor like that, the part it is impinging on is the thickest, most durable refractory. My planned forge will have the same thickness of refractory on the 'walls' as the floor. The second reason is so I can avoid pointing it at a corner. The tunnel being what it is, the only 'corners' I have are on the floor. So if I point at the floor short of the corner, the only place for the flame to hit is directly on my work. The final reason is that with my burner in the 4 o'clock position I have the longest unimpeded flame path before hitting something. That something being a nice sloped wall. If I have misunderstood something, please educate me. I want to know the whys and wherefores of this design before I start.
-
Thanks for bearing with me Frosty. My previous interactions with forums being what they were, I figured It would be best to keep the forge stuff in the forge thread, what for searchability reasons and easy moderation, but going forward I'll keep that in mind.
-
Greetings! I'm planning out a new forge, smaller (and hopefully hotter) than my current 3/4 NARB powered forge. I'd like to be able to forge weld with this one, as my current one just doesn't get hot enough. What I've got planned so far is a 2 1/2 inch radius tunnel forge with a flattened bottom about 9 inches long. Insulation will be 2 layers of 1 inch 8# ceramic wool and 3/8 inch of kastolite 30. For a shell, I'll be using some steel sheet I've got kicking around pop riveted together. Some back of the napkin math tells me the inside will be around 175 cubic inches, so I'm planning on a 1/2 inch Frosty T burner. First question for the people who know, I've seen Mikey post in Forges 101 that two smaller burners is more efficient in this kind of forge than one larger one. Is there a tried and true 3/8 T burner orifice design I can copy without needing to order specialty parts? My second question is about kiln washes/ IR radiators/ IR reflectors. I was able to find some kiln wash at my local refractory supplier for $5.80 per pound consisting of: ZrO2 55.0% SiO2 35.4% P2O5 4.5% Al203 1.2% Does anyone see any benefit to this, or will I need to source some Plistex? Here is a quick sketch on my table of what I'm planning, including approximate burner angle:

-
Thanks Larry, I had no idea there was something so close! I had looked at the ABANA website before, and hadn't had much luck finding anything like that. I'll be looking into this further, for sure.
-
Thanks Frosty, I appreciate the welcome. The questions these days mostly pertain to building a new gas forge, so I'll be posting in that section with some pictures and hopefully nothing that hasn't been covered a thousand times already.
-
Howdy All! Greetings from Stillwater, Minnesota! My name is Ben, although online I am usually found under the handle BFancy. I've been doing this blacksmithing thing off and on as a hobby for probably around 15 years now, mostly making tools and home fixtures. I figured it was time to make an account so I can start asking for help instead of just reading and hoping I got it right.