Nomad
Members
-
Joined
-
Last visited
-
Frosty, Thanks for the info. I 100% understand the need to base burner on chamber volume but I am kinda stuck for data. Not being where I can measure the cylinder I am going to use for the chamber has left me resorting to Google which has been tremendously unhelpful when it comes to dimensions. I can extrapolate some on a guess but so… If the cylinder is, (rough guestimate as the only functional dimension I can find online is diameter) R=6 ¼ ” H=rounded to 12” for simple math (list as about 18 overall so guessing 6 inches for rings) Gives me about 1470 cubic inches. Now, I am guessing I can subtract the diameter down….3 or so inches for lining, that gives me a volume of a bit over 360 cubic inches. Wayne says his propane bottle forges have a volume of 583 cubic so my guess on how much space I am loosing to the lining is off My number puts it at the top end of your recommendation for a single ¾” burner (300-350) and Wayne’s well above it. For the life of me I cannot find the volume you say for 1” burners but it sounds like I should scale up, especially since my intention is to use one burner only the majority of the time. Yeah, circumference is only useful when trying to plan how much ‘wool to wrap the body in…not so much for burner sizing. Thank you for the plumbing info. I will draw that out so it makes more sense (I’m visual) and make sure to put a shut off valve to isolate that burner. Sorry to press for more but I would like a little clarification if you don’t mind. You are saying I should place the regulator near the tank before the manifold. Does that mean you then tune each burner with the downstream ¼ turn ball valves? Again, thanks for the assistance and I am happy to do whatever I can from the information I have.
-
Well, I think I’ll try something new and try doing something the right way the first time and NOT waste a bunch of time and cash… To that end I am going to try to line out a materials list and put forth a couple questions I have been unable to answer scouring the forum here and the plans I have downloaded. A little background on me, I’ve built a couple gassers that worked fairly well over the last few years but currently (multiple moves recently where some stuff just didn’t make it) don’t have a forge. I have a fair few tools of various qualities and a little experience in a lot of different stuff. Specific to this project I have a buzz box welder that my very limited skill set can make work. My goal in this is to build a propane forge that will allow me to work basic techniques until…well I outgrow it. I’m a cheap/broke hobbyist so I don’t need anything commercial quality and I enjoy the building side almost as much as the using so I don’t want to buy a manufactured one. I use a fair bit of reclaimed steel so I want something large enough to get odd shaped pieces reformed to bars that I can use (think opening eyes in leaf springs). In a perfect world (and this seems reasonable) someday I will start doing some forge welding practice and this forge should allow me to start. I figure that about the time I need to reline the forge, I may consider a new design. My intent is to use a 20# propane cylinder as the body and follow Wayne Coe’s design. I am currently planning on firing it with a pair of Frosty’s T burners run off a 100#er I have. I already have a regulator that I’ve used in the past with good results. As I said, this post is to try to consolidate thoughts and pose a couple questions. I apologize beforehand if these have been answered elsewhere on the forums; I have literally reviewed them for hours. (I work a job where I have a lot of time on my hands to do so). Some of my questions are more… academic as I am stuck planning at the moment and am curious more than anything. Let’s start with the burners (parts to make 2) 1"x 3/4" black iron plumbing T (2) ¾" x 6" black iron nipple (2) 1/8" mpt x ¼" flare fitting (2) 0.035" Tweco mig contact tip (2) 1” x 3” black iron nipple/pipe (2)- I intend to use these to mount my burners to the forge body. I have had good luck in the past thinning the outside of my nipple and reaming out the inside of these to make a tight slip fitting. I will weld these to the body and tap them to take the ¼” x 2” bolts to lock the burner in place ¼” x 2” Bolt (6) Only question I have on the burner is this: I have seen references to cutting down the Tweco. Is that to ensure the tip sits 0.5XD from the end of the burner tube? I assume I’ll need to decide if that is needed during tuning, correct? I have a working idea for my gas supply plumbing that goes from each burner to a length of copper pipe, then the regulator or needle valve (my plan is to use one of each though I might have a second regulator in my stuff) then to a T, a shut off valve, then to my rubber supply line coming from the tank. With regards to plumbing, is the needle valve adequate to isolate my second burner or do I need another valve? My thought was when running just one burner to use the one at the rear but should it be the one closer to the door? I had also planned on welding a support arm to the forge body to secure the plumbing to, well away from the body itself. Is this a terrible idea? For the forge itself, I need: 20# propane cylinder for the body (1) Hinges (4) Ceramic blanket (planning to buy Inswool from Wayne)- If my math is correct, the inside circumference of this cylinder is 39” and should be around 20” long if you include the ends. Figuring extra for the bottom, (5 linear feet) Castable refractory (Kast-o-lite 3000 or what I can get locally) (15 pounds) IR reflective (Plistix or what I can get locally) (1 pint) Fire brick for floor and end closing (have several on hand) Regarding the forge, should I expect 1 pint of IR coating to do this or do I need to plan for more? Once the lining is in place, how thick will the walls of this be? I am trying to get an idea of what my finished volume will be (Wayne mentions 583 for a forge this size but is that shell only or shell with liner in place?) Also, I don’t have an oven to ‘kiln dry’ the castable as Wayne suggest. I’m in the Portland, OR area so humidity is going to be high no matter what. My thought was a few days with a candle or two inside it well buttoned up then a long low run with one burner turned as low as I can get it for several hours. AM I setting myself up to fail or is this a reasonable solution? With this setup, should I plan to be able to do basic forge work (not welding) with a single ¾” burner and just kick on the second for bigger stuff/welding or would I be better off installing a pair of 1” burners? I know this forge is probably on the larger side (isn’t that a requirement for us new guys, overbuild the forge?) but I figure I will add bricks if needs be to decrease the working volume. I hope I am not being too redundant with this line of questioning but your seasoned input is appreciated. And I also very much want to thank the guys around here that put so much time and effort into sharing their experience and knowledge with the rest of us.
-
Hi all, Well, I'm an amateur (which is a bit of a stretch upwards) smith/welder/caster/scrounger that has been on and off here over the last decade or so. I've gotten the bug back and so I'm back to spending hours on here. I'm a big fan of cheap and reusing old steel. My current setup isn't; no forge at the moment but a collection of gear and plans to build one when I get home (I work away from home). Gas is more my speed than solid fuel and I've built a few but this one is going to get a new-to-me T burner as designed by Frosty. (For the record, listen to Frosty. Several years ago he strongly encouraged me to shy away from the forced air burner I decided I wanted to start with. It ended poorly though my 10 year old got some first hand training with a fire extinguisher). Near future plans for an ABANA membership as well.
-
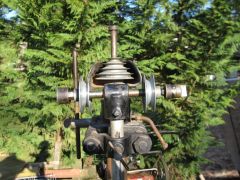
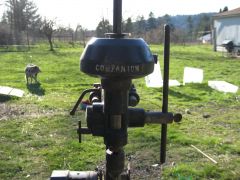
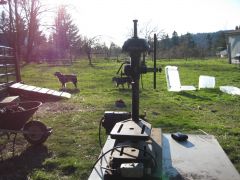
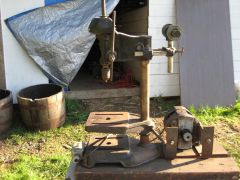
I picked up a $5 bench drill press at Goodwill. It's a Companion belt driven model that looks (guessing) 30+ years old.(I'm trying for picks but having issues uploading them) Needs a little (very little) work but everything turns, including the 1 hp motor. Eventually I plan to replace the motor and the chuck but that is down the road. I have also picked up an older tablesaw and a 'bench grinder' (1 hp motor and a set of pillow blocks) for $5 each. I am sure someone's Grandad is spinning in his grave that this stuff if being given away. Anyone know anything about these drill presses?
-
-
-
-
-
-
Funny you should ask as I spent about an hour staring at the Utilikilt web site yesterday. I have been to the retail store, have the belt and am trying to find a buyer for my kidney so I can pick up a Workman's. Last big festival I went to I was in the whole 9 yards of Great Kilt though I'll whack off a couple yards before I do that again...... N
-
-
Well, a couple quick points..... The bricks and joints don't have to hold anything but heat. As long as the insulate, they are doing their part. Build a frame (as was sugested) or put another layer of brick and real morter around the outside. Second...slow cure is way important. You ought to cover it with plastic and leave it alone for a couple days. Then couple more with no cover. Then reallly low heat. Water expands somewhere in the neigborhood of 1600 times it's size when it becomes steam. That's why concrete explodes in a fire, it's the moisture inside. Well, let us know how it goes.... BTW- my current furnace is made of garden clay, perilite, and sand inside a shell from a 40# propane tank. Not the best but something to play with..... Nomad
-
Work: Let me throw in my 2 penny’s worth. First, this is coming from someone on your side of the fence (beginner that doesn’t have the $$ to spend on toy) and not from an expert. For your forge, you have a great start. You can do a bunch with what you have. The BBQ is an ok, but not great foundation. I used the cart from one and bolted an old cast iron sink into it. That was lined with dirt, garden variety. Where I’m from doesn’t have much organic material though I did sift it through some scrap
-
I just bought Item number Item# 16-1336 from Surplus Center - Hydraulic Equipment Electric Motors and am installing it now.Seems to be just what I need. I did the blowdryer thing and though it worked ok, there are many better ideas. Nomad
-
To stay on the cheap, I use the $30 circular saw with 7" abrasive wheels. Works well for me because I need the saw to cut wood around the house as well and just change out the blades. By far no the best but not a lot of cash tied up in it.