TheWanderingLlama
-
Posts
51 -
Joined
-
Last visited
Content Type
Profiles
Forums
Articles
Gallery
Downloads
Events
Everything posted by TheWanderingLlama
-
I fished some C-Channel out of the scrap bin at work that had some spindles on it a few weeks back. Didn’t pay much attention at the time to the spindles. Turns out they were spindles for a simple wood lathe. I have wanted a small lathe to turn handles for files, wood chisels, etc. Cleaned it up a bit and scabbed it together today and it works well enough. Not OSHA approved at the moment - but seems to work well enough for small pieces. I also scored this arbor press from my in-laws over the weekend - which will be perfect for pressing on ferrules/collars for the tool handles - what luck! As I have started down this road I am attracting more and more stuff. I need advice on how to hide this stuff from my wife...


-
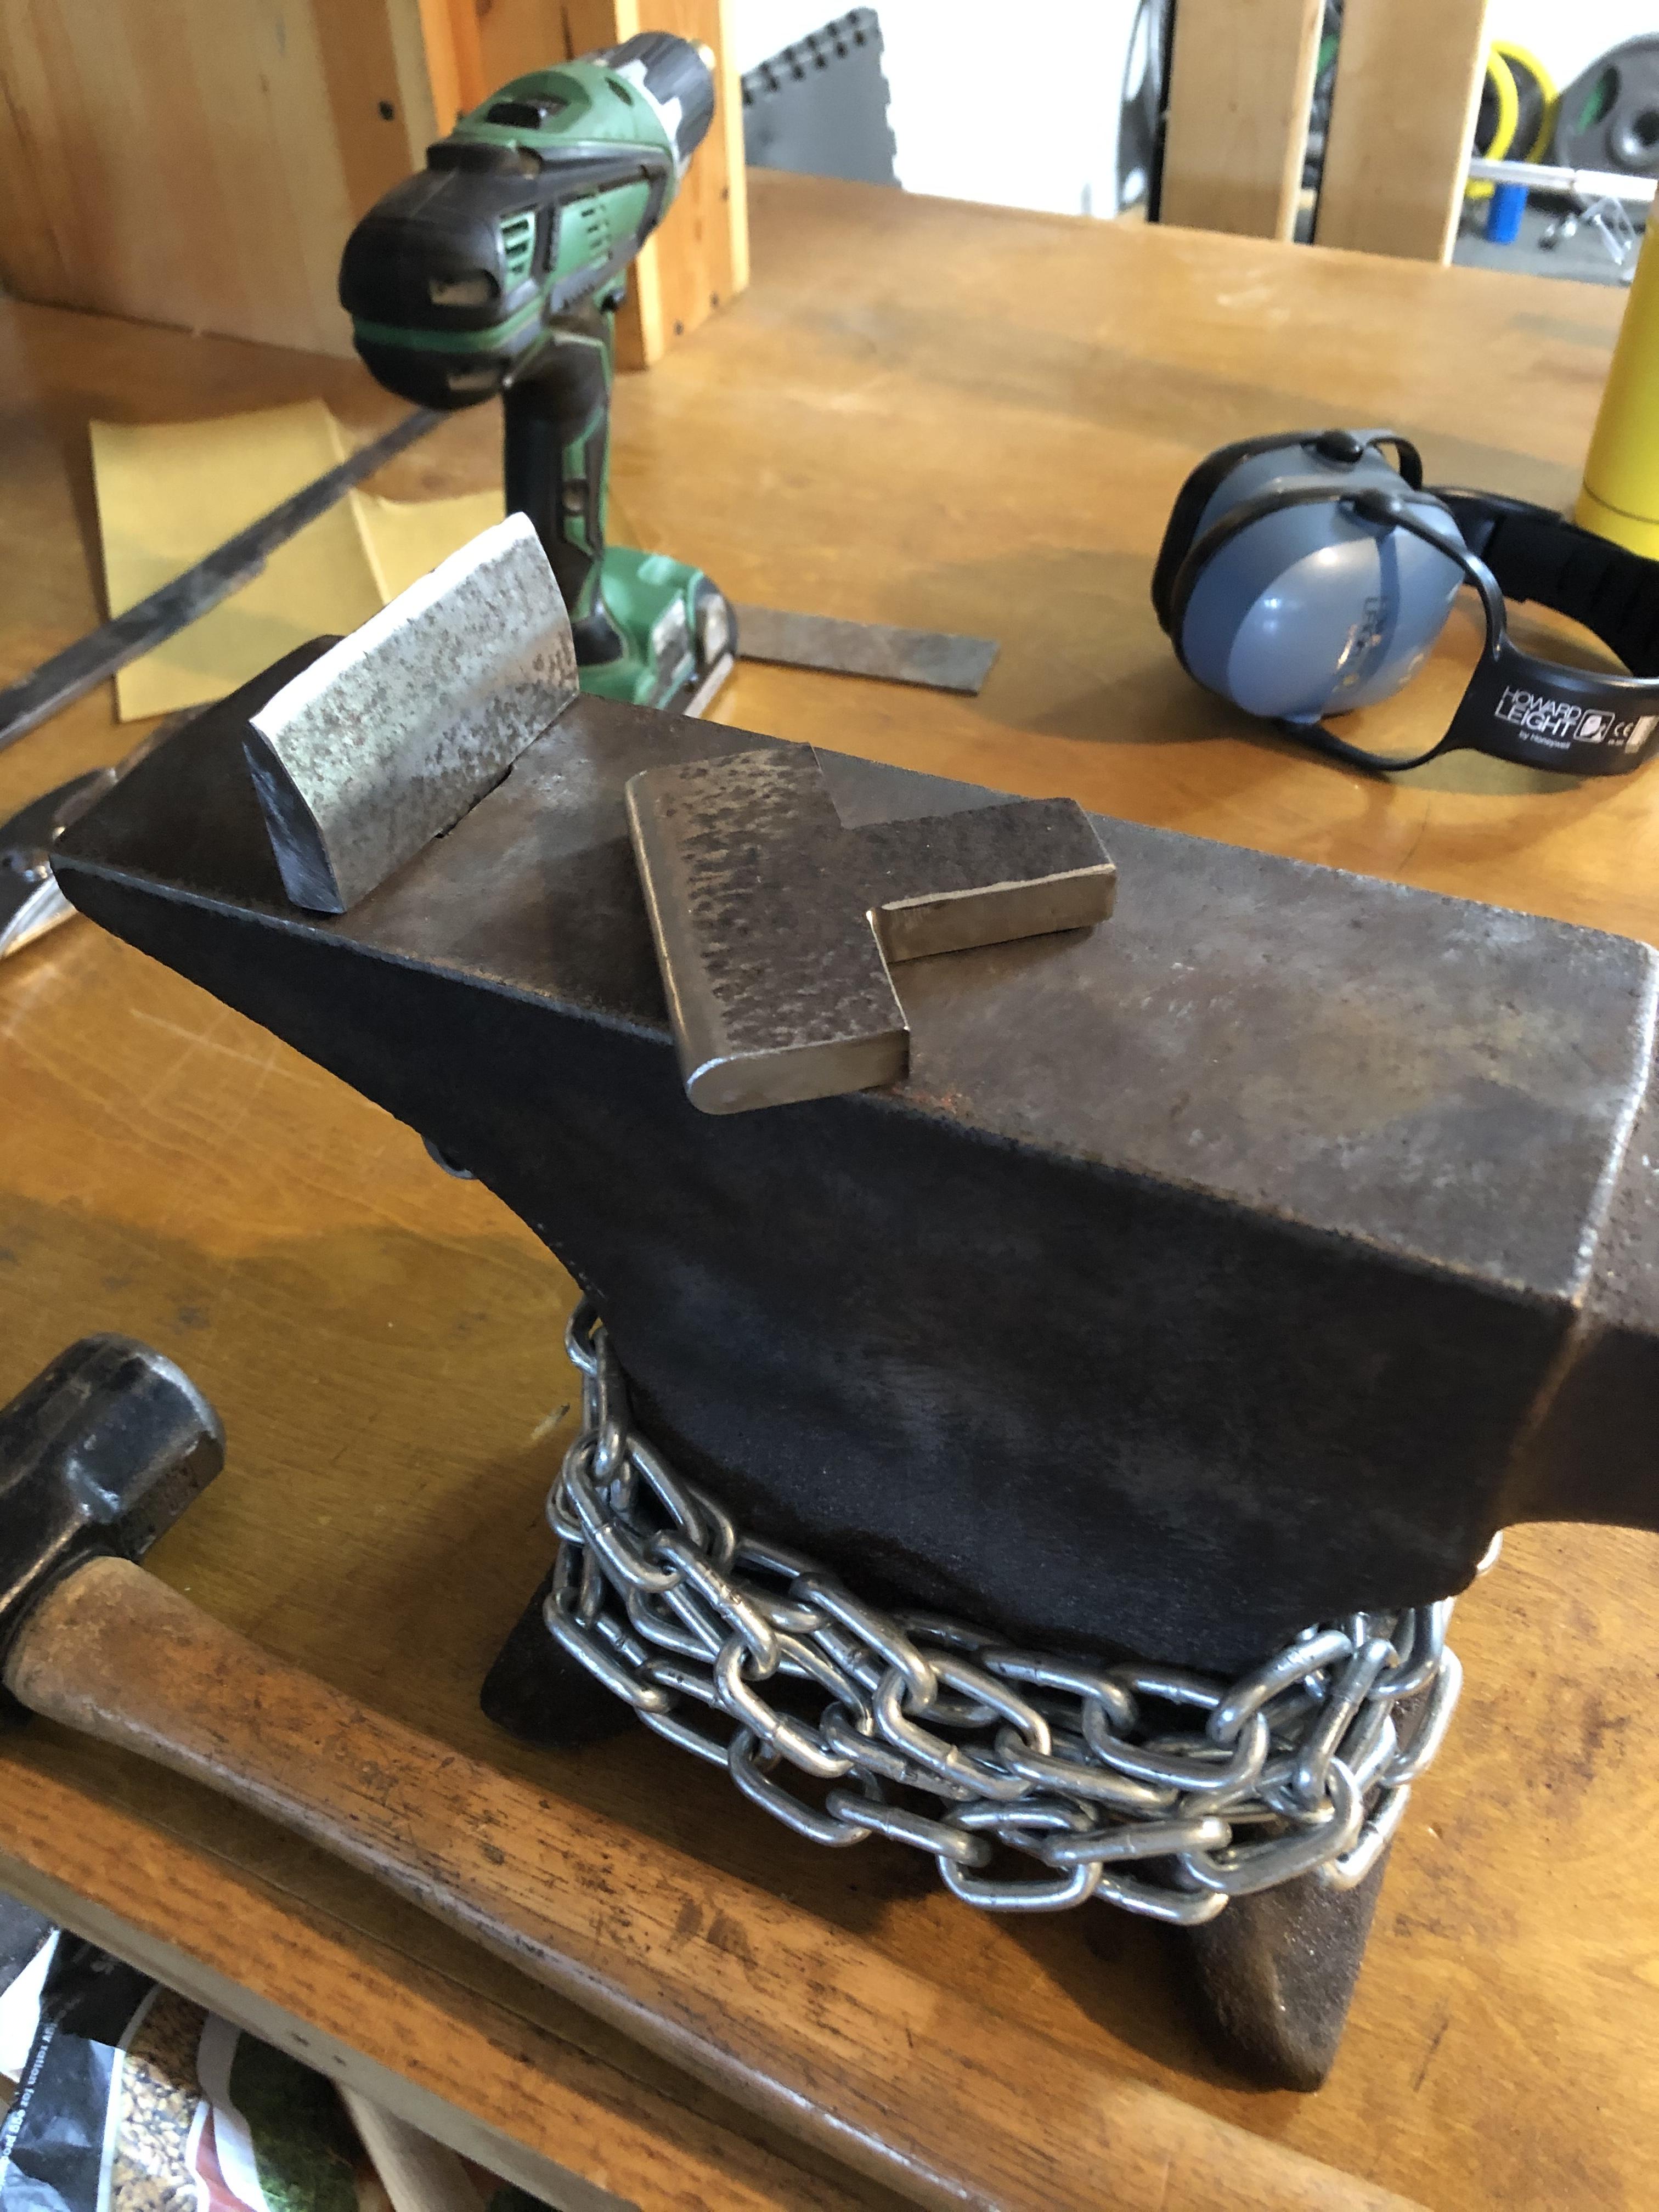
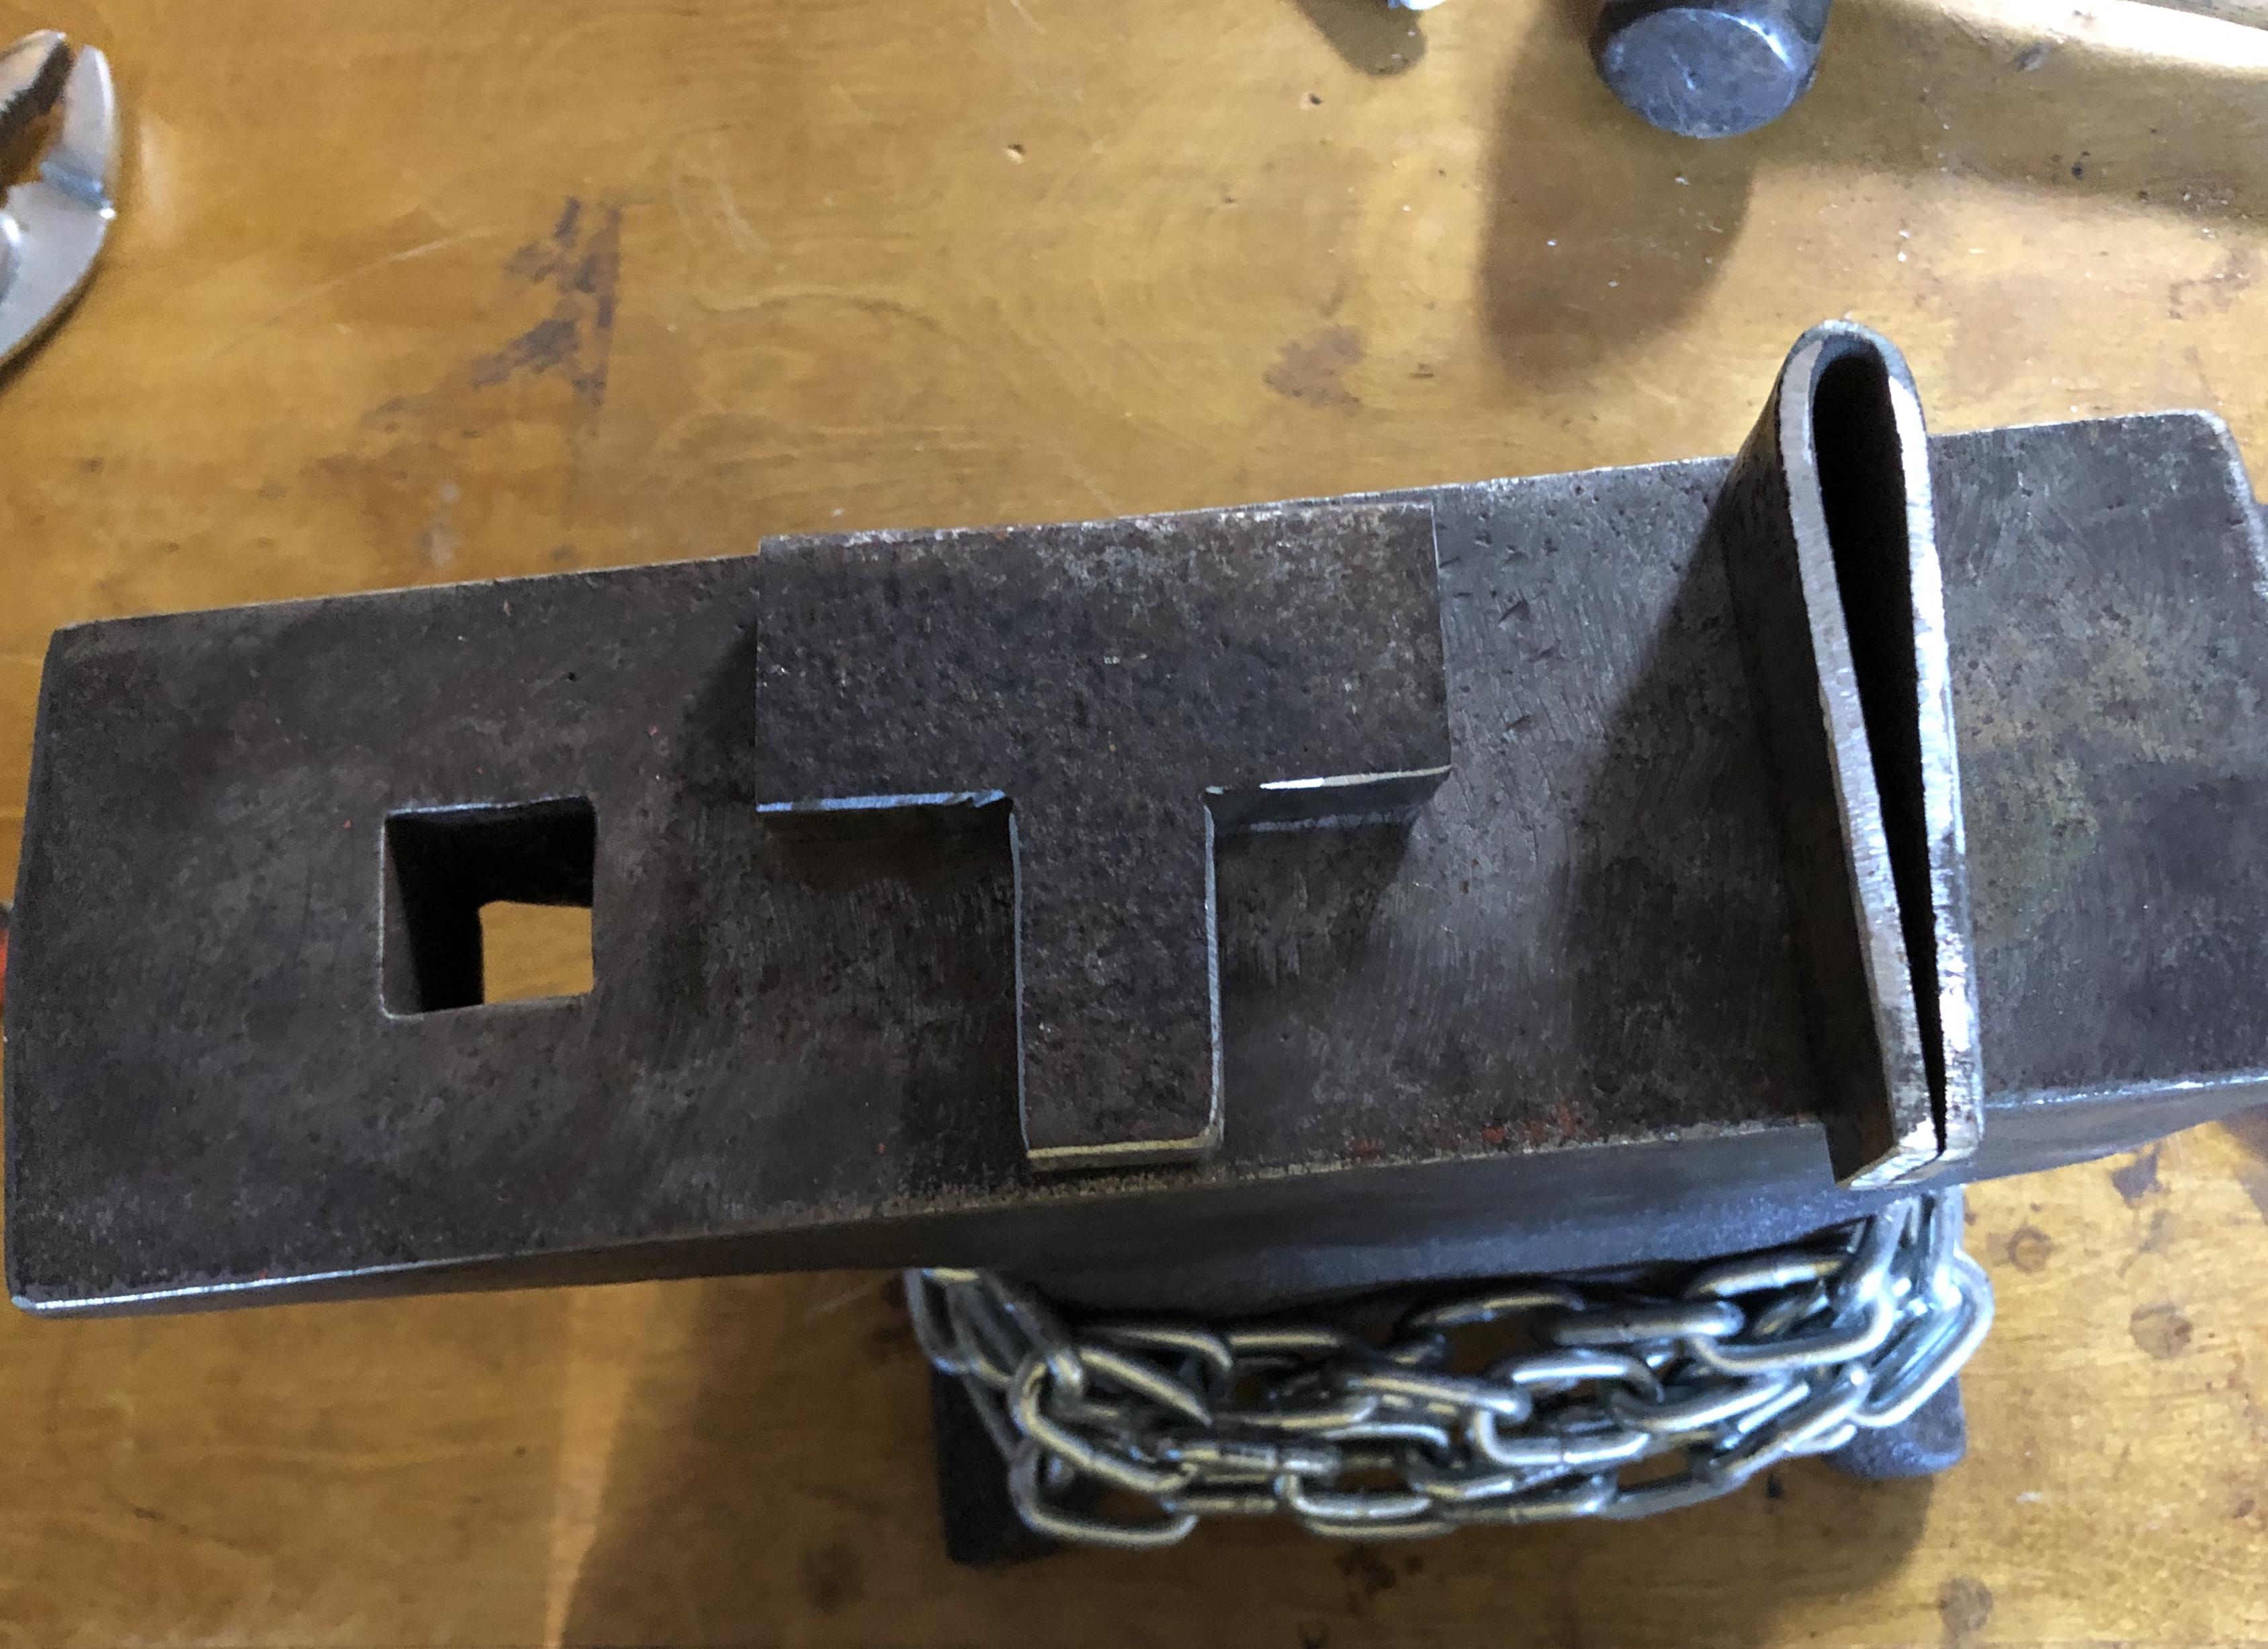
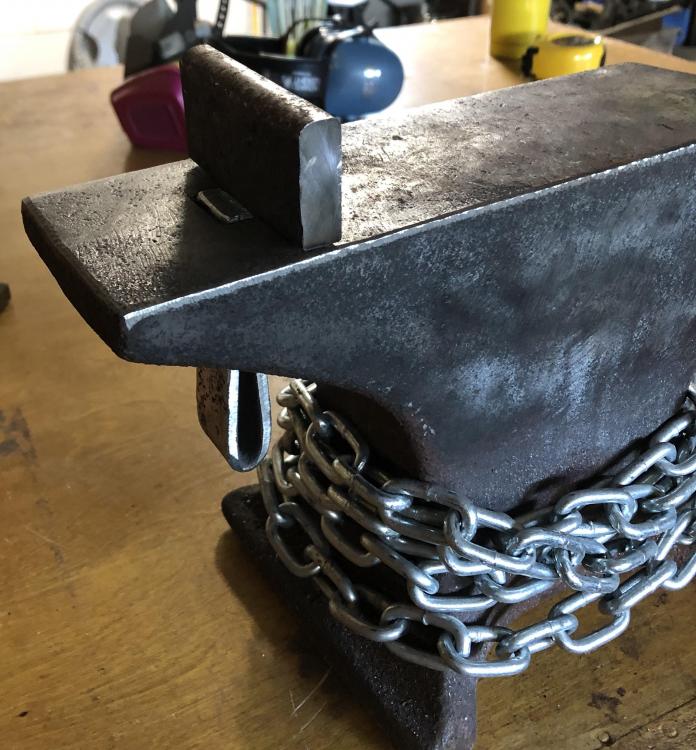
Near finished pictures - my very first hardy hot cut and fuller.

-
Glad it worked. I see you are in Florida - way outside my neck of the woods so to speak. In Ohio we are fortunate to be rich in good handle wood - osage orange, hickory, ash, locust, etc. We have black mulberry all over here and I have been told it is good for handles. I have not used it personally.
-
Chris W: Hmm, I am new here so not sure what is up with the link. It works for me - it actually shows the first page of the pdf as an image. Here it is in a different format: Good Reference for Wood Properties It is not in the document unless it is in as a different name - it has scientific names you so could search for it. I do know mulberry has been used for bow staves, so I am sure it would make a good handle.
-
Lots of good input here already. At some point, I came across this gem of a report. You can take a look at the table that starts on page 6 of the pdf. I think the impact test is probably the most relevant one for impact tool usage. There is a ton of data here - maybe too much... What I suggest is you look for woods that are known to be good for tools - Osage orange, hickory, and ash. That can establish the ballpark that one needs to be in for the impact test and you might be able to find some suitable sources for handles from some local woods. I am lucky to be in Ohio... I have some Osage orange fully dried in my shed (which when you look at the data is truly an incredible wood.) Also have a bunch of hickory and locust drying. All of it was blow downs I found on relatives property. I will second a comment above in that the exact species really matters. A native sugar maple compared to the silver maple in my back yard is a world apart. I can snap large branches of the silver maple with minimal effort that would be unbreakable from a sugar maple. Good Reference for Wood Properties
-
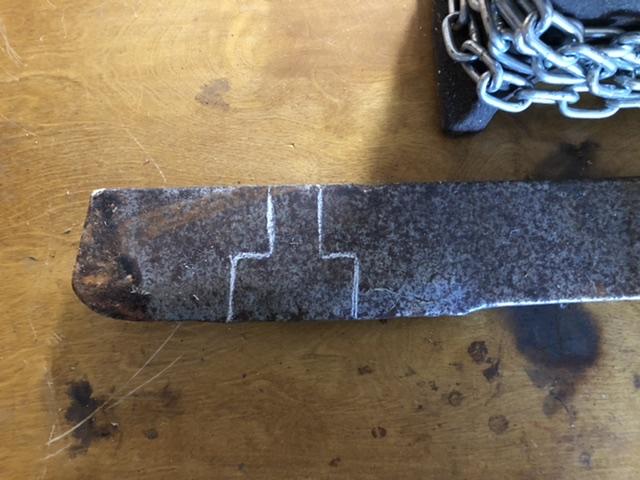
I ended up going with Thomas’ wedge approach. Below are picture of the work I progress for the fuller. The wedge is a piece of spring steel scrap that I had on hand. I can tap it up from the bottom with the side of my hammer. It needs driven out from the top with a punch. Seems to hold it pretty good - we will see! Still need to cut out the hot cut tool. Thanks to all for the suggestions.

-
Thomas: The blade is 20+ years old. Not sure if that would considered “modern” or not? It could be a fair bit older - the deck it was off of was well older than that but unsure of when this one was pulled off.
-
Thomas: Normally I have access to a TIG and MIG at work - but COVID has made that off-limits for now. I like the shim idea.
-
Arkie: Great - glad to know this is not out in left field. Thanks. Goods: That is a great idea. I supposed I should fuller it a bit at the bend point I fold it to help with the bend squishing out a bunch? Since I am just filling up space I wouldn’t even need to forge weld it or anything - but might be an opportunity to give it a shot.
-
Just starting out and I have a small 55 pound cast steel anvil and would like to make a hot cut hardy and some fullers. Because this anvil is relatively small and if I stick with blacksmithing will move to a larger one, I am looking at something relatively simple. I have a 1/2” thick bush hog blade that is medium carbon steel. I was wondering if making a “T” shape where the narrow part of the T could fit diagonally across the hardy socket would be workable. The “T” would form a shoulder across the anvil face with the top of the “T” being the working surface. Pictures below. Given how small this anvil is and the dimensions around the hardy hole, I am leery to doing any kind of serious hot fitting of the hardy. So I would thing I would get it really close to shape via forging/grinding/filing and then just do some light strikes to get it to square up and fit. I was not planning on upsetting the tool stem enough to fill the hardy hole - so it would be locked in across the diagonal. My hardy hole is 15/16” and the stock is 1/2” (minus some rust...) - so there is decent contact against the hardy walls. Hoping that if I am just doing downward blows on a small anvil that this would be enough to get some work done. Thoughts? Obviously not “best practice” - but usable? Another advantage is I can do most of this cold - since forge time is limited for me right now

-
What did you do in the shop today?
TheWanderingLlama replied to Mark Ling's topic in Blacksmithing, General Discussion
Shebumi: That grindstone is cool. I am jealous. I love routing through barns. -
What did you do in the shop today?
TheWanderingLlama replied to Mark Ling's topic in Blacksmithing, General Discussion
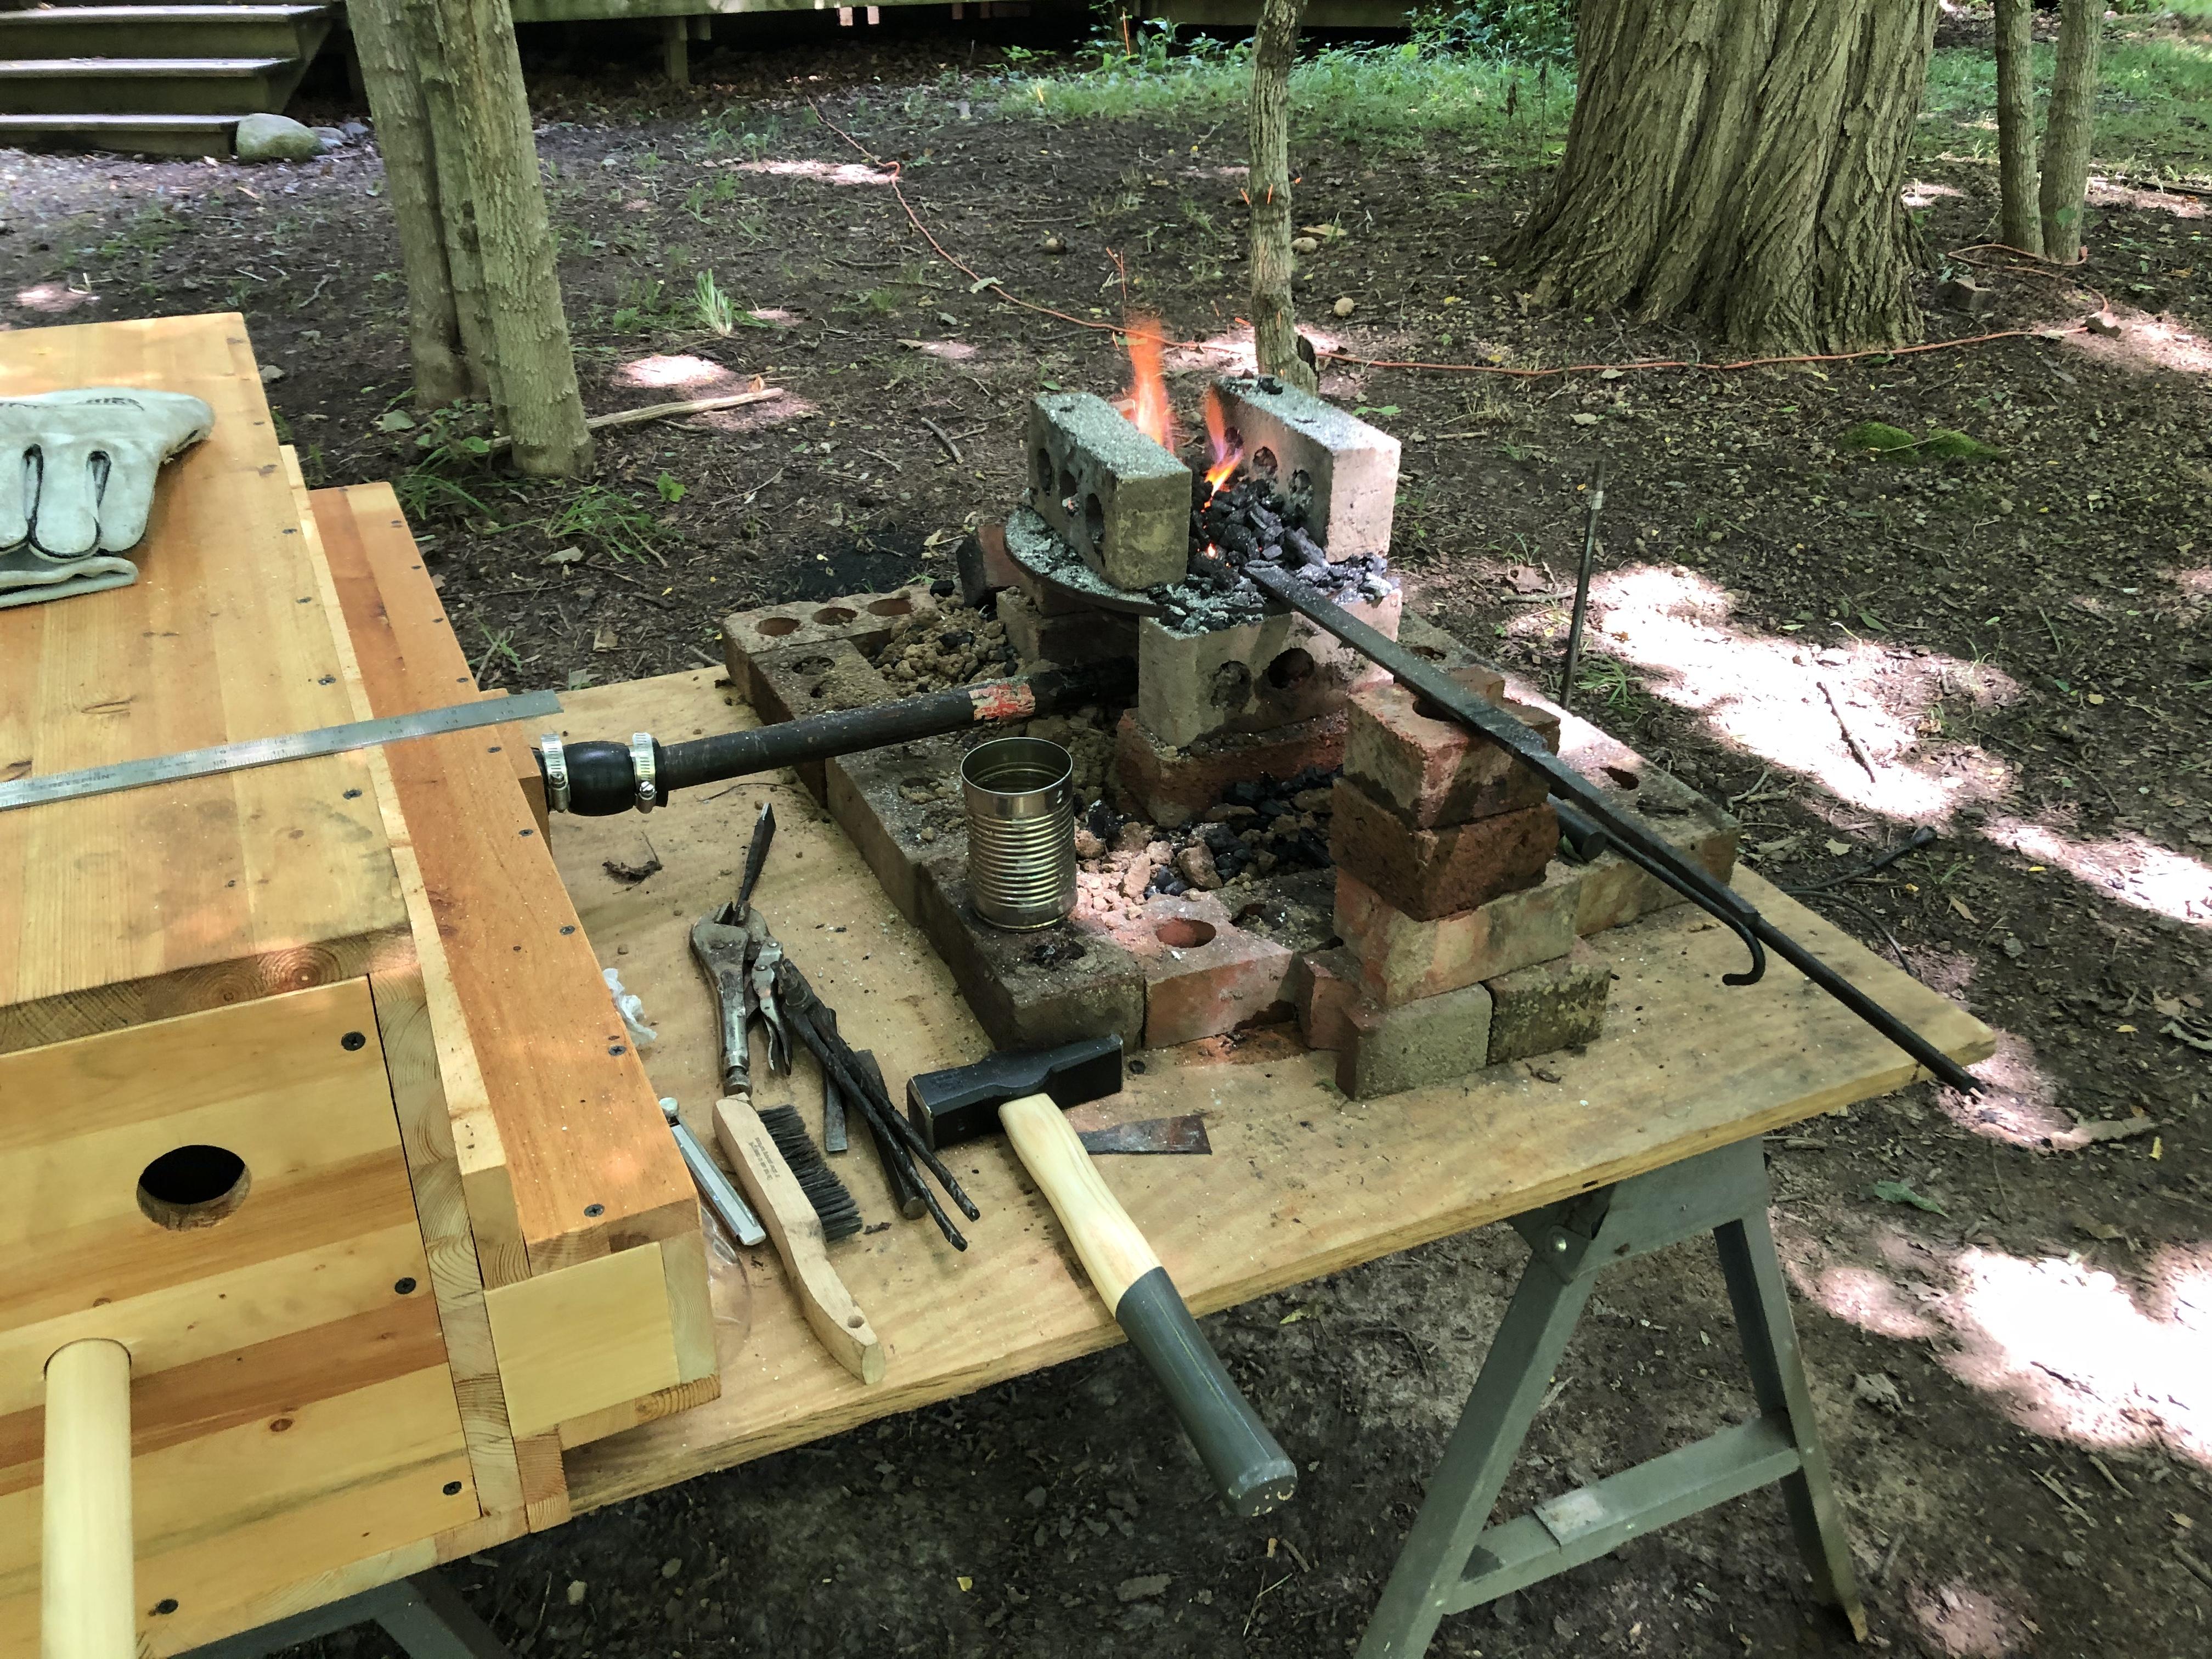
This is the first time using the box bellows and the brake rotor fire pot. Both worked well with my homemade charcoal. Previously I was not able to get the fireball to grow enough to not have to angle the stock down trying to find a hot spot. This is a traveling setup - so everything needs broken down easily. With the box bellows I can gently pump and get it going well enough. For kicks so put in a piece of a 7/8” half shaft and was able to get it up to temp easily. I think this size of bellows is more than adequate for what I need at the moment. Also first time making a knife. The knife is out of a plow disk and anchored in a file handle. I didn’t care to clean it up all the way - but it cuts things - so it is a knife! I also started making another set of tongs via drawing out reigns. That convinced me that I need to learn to forge weld ASAP. I enjoy making other things more than making tongs... Alternatively at work I have access to a CNC plasma cutter - thinking I should just make a small run of tong blanks.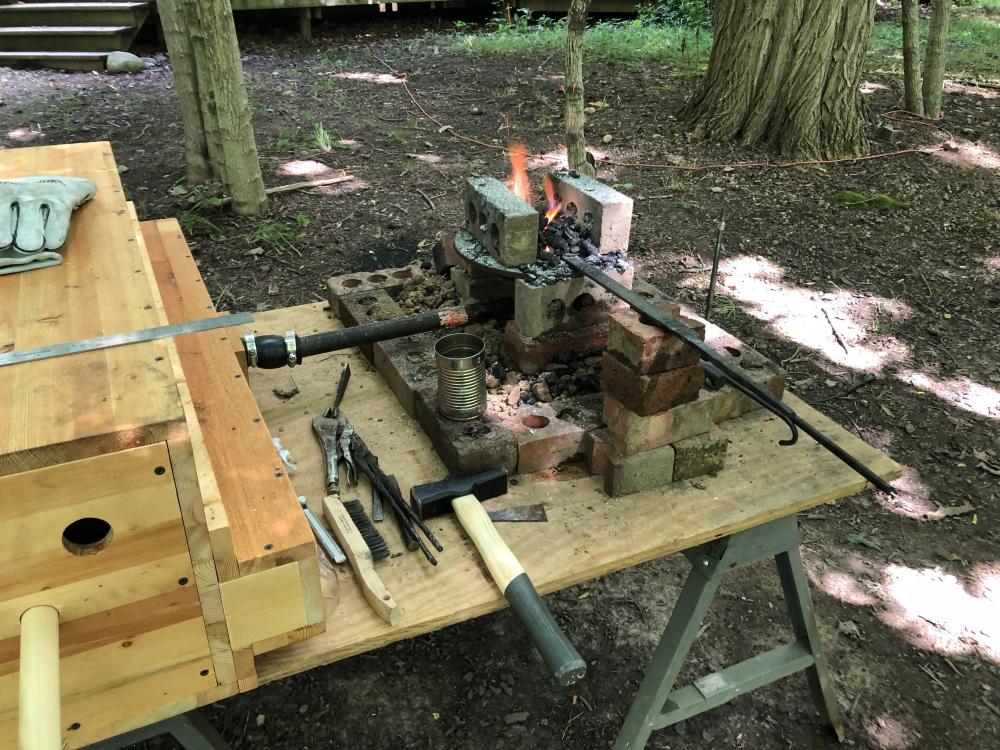

-
What did you do in the shop today?
TheWanderingLlama replied to Mark Ling's topic in Blacksmithing, General Discussion
Thomas: Thanks for the warning. I tried to reduce the friction and pressure drop as much as I could within reason. I planed down the plunger as so that it doesn’t bind at all. I then stapled in some slick plastic strips wrapped around the bottom and sides. The plunger gaskets are actually curtains - so they are not between the piston and the interior surface - they just ride along and the working pressure pushes them into the piston-wall area. Definitely need to make some fire and see how much effort it takes and how to best orient it. There are more things to tweak for sure. Don’t want to blow out a shoulder. -
What did you do in the shop today?
TheWanderingLlama replied to Mark Ling's topic in Blacksmithing, General Discussion
A D handle is a good suggestion. I will try it out first to see how I am going to orient it. Right now if it sits on a table it is easier to grab as is since I am reaching down. If it is higher my arm is more in line I think the D handle will be really nice . I have hanger bolt ready to go - so I come up with a handle of some sort. -
What did you do in the shop today?
TheWanderingLlama replied to Mark Ling's topic in Blacksmithing, General Discussion
LOL. Or surprised Pinocchio with a nose that grows then shortens repeatedly. Fingers crossed for a well fired forge. I am using charcoal and only need a small fireball - so I can’t imagine this not doing the job. If it doesn’t the problem I is something else. -
What did you do in the shop today?
TheWanderingLlama replied to Mark Ling's topic in Blacksmithing, General Discussion
I wrapped up work early today and had time to put some boiled linseed oil on my box bellows I just completed. This is to replace my very sub-optimal salvaged blower I had been using previously. It puts out far, far more air then the blower does. Have not tried it out yet in a forge - hopefully this weekend. Very excited to have proper air.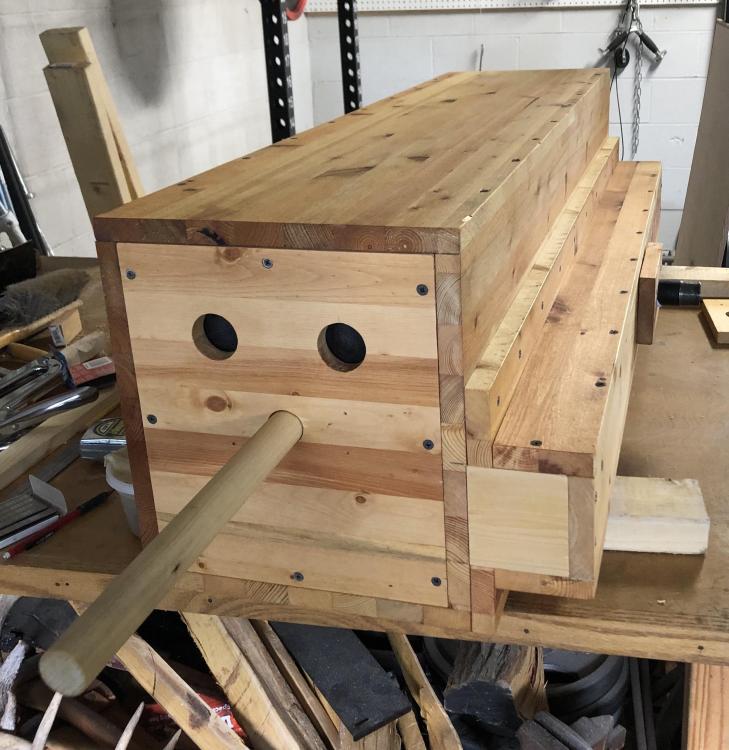
-
Intro Topic - New to Blacksmithing
TheWanderingLlama replied to TheWanderingLlama's topic in Introduce Yourself
That has been my conclusion as well. Someone may want the history behind a 100+ year old anvil and be willing to pay the same price per pound as a quality new anvil. I am not that guy. My dad worked as a machinist in a shop that had a blacksmith as a tool maker - he is going to reach out to him and see if he has any good leads (or something in his shed.). Just need to not be in a hurry... Jealdi: I will check that out. I am in central Ohio, so not that far away to check something out in NE Ohio. -
Intro Topic - New to Blacksmithing
TheWanderingLlama replied to TheWanderingLlama's topic in Introduce Yourself
As I have poked around I have found that Ohio has a pretty rich blacksmithing heritage/community. I will definitely be aiming to go to the Troy event - too bad it had to be called off this year. I am still hoping to turn up a bigger anvil then the 55 pounder I found. I have been TPAAAT’ing. Anything on Craigslist is so horribly overpriced that I could just buy new. I know there are hundreds of anvils hanging out in barns/sheds that need rescued - hopefully I can find one around ~175 pounds or so with a fair price. I have a light but workable “real anvil” and a functioning chunk of steel anvil - so I can play the long game on TPAAAT. I did have found at least two guys on Craigslist who must be anvil-finders/resellers. But again, prices are close to new anvils so doesn’t make sense to me. -
Intro Topic - New to Blacksmithing
TheWanderingLlama replied to TheWanderingLlama's topic in Introduce Yourself
I just checked his website out - very cool. Thanks for the info. -
Intro Topic - New to Blacksmithing
TheWanderingLlama replied to TheWanderingLlama's topic in Introduce Yourself
I just saw that... -
Intro Topic - New to Blacksmithing
TheWanderingLlama replied to TheWanderingLlama's topic in Introduce Yourself
Welshj: Central Ohio. Madness indeed... -
I face the same suburban (and wife...) issue as you do. I have taken to making things portable and finding ways to quiet whatever you are using for an anvil. When I forge at home, I set the forge up on the back patio and then just carry the steel three paces into the garage where I have anvil/vice/etc. I make the forge inaccessible via making a bit of a barrier of sawhorses. I have talked to my neighbors and they are cool with it - so that is good. I just am respectful about time of day. I also pack my stuff up when we visit my folks or my in-laws. They live in rural areas so much easier. I also use charcoal - I would not be able to do coal where I am at. Propane would work, but just starting out charcoal is cheaper. If the hobby sticks I will consider a propane or NG forge.
-
Intro Topic - New to Blacksmithing
TheWanderingLlama replied to TheWanderingLlama's topic in Introduce Yourself
Frosty and Arkie: I will keep an eye out for drill hammer head on the cheap - thanks. I have a piece of medium carbon 1.5” rod that could be turned into some hammer heads just with the basic machine tools I have to be honest. Probably not up to forging them now, but can certainly drill out and file an oval into the handle per Weygers book and shape the rest via hacksaw, cutoff wheel, and bench grinder. I usually make my own tool handles for stuff like this, so the eye does not need to be conform to a standard size. I have already played around with tempering a bit just on some spring stock so think that I would be able to get the hardness to where it was a serviceable hammer in my simple forge. I can see that blacksmith’s accumulate hammers quite quickly... -
Intro Topic - New to Blacksmithing
TheWanderingLlama replied to TheWanderingLlama's topic in Introduce Yourself
Thanks for the welcome. The firebrick was $12 for a pack of 6 a a big-box store - Menards. It is not particularly durable, but works good enough as long as I don’t knock it around. I tried to find a lighter hammer on the cheap but it was a stopping point so I went ahead and bought one. Swinging the four pound hammer was wearing me out as a newbie... I have a bunch of hickory staves about dry for handles and a more modest amount of Osage orange that is already dried, so if I come across some serviceable hammer heads I am ready to go. We have a Habitat for Humanity Restore close buy and they often have hammers and other tools for cheap - hammers are $3 regardless of the type. Just need to be on the lookout! Take care. -
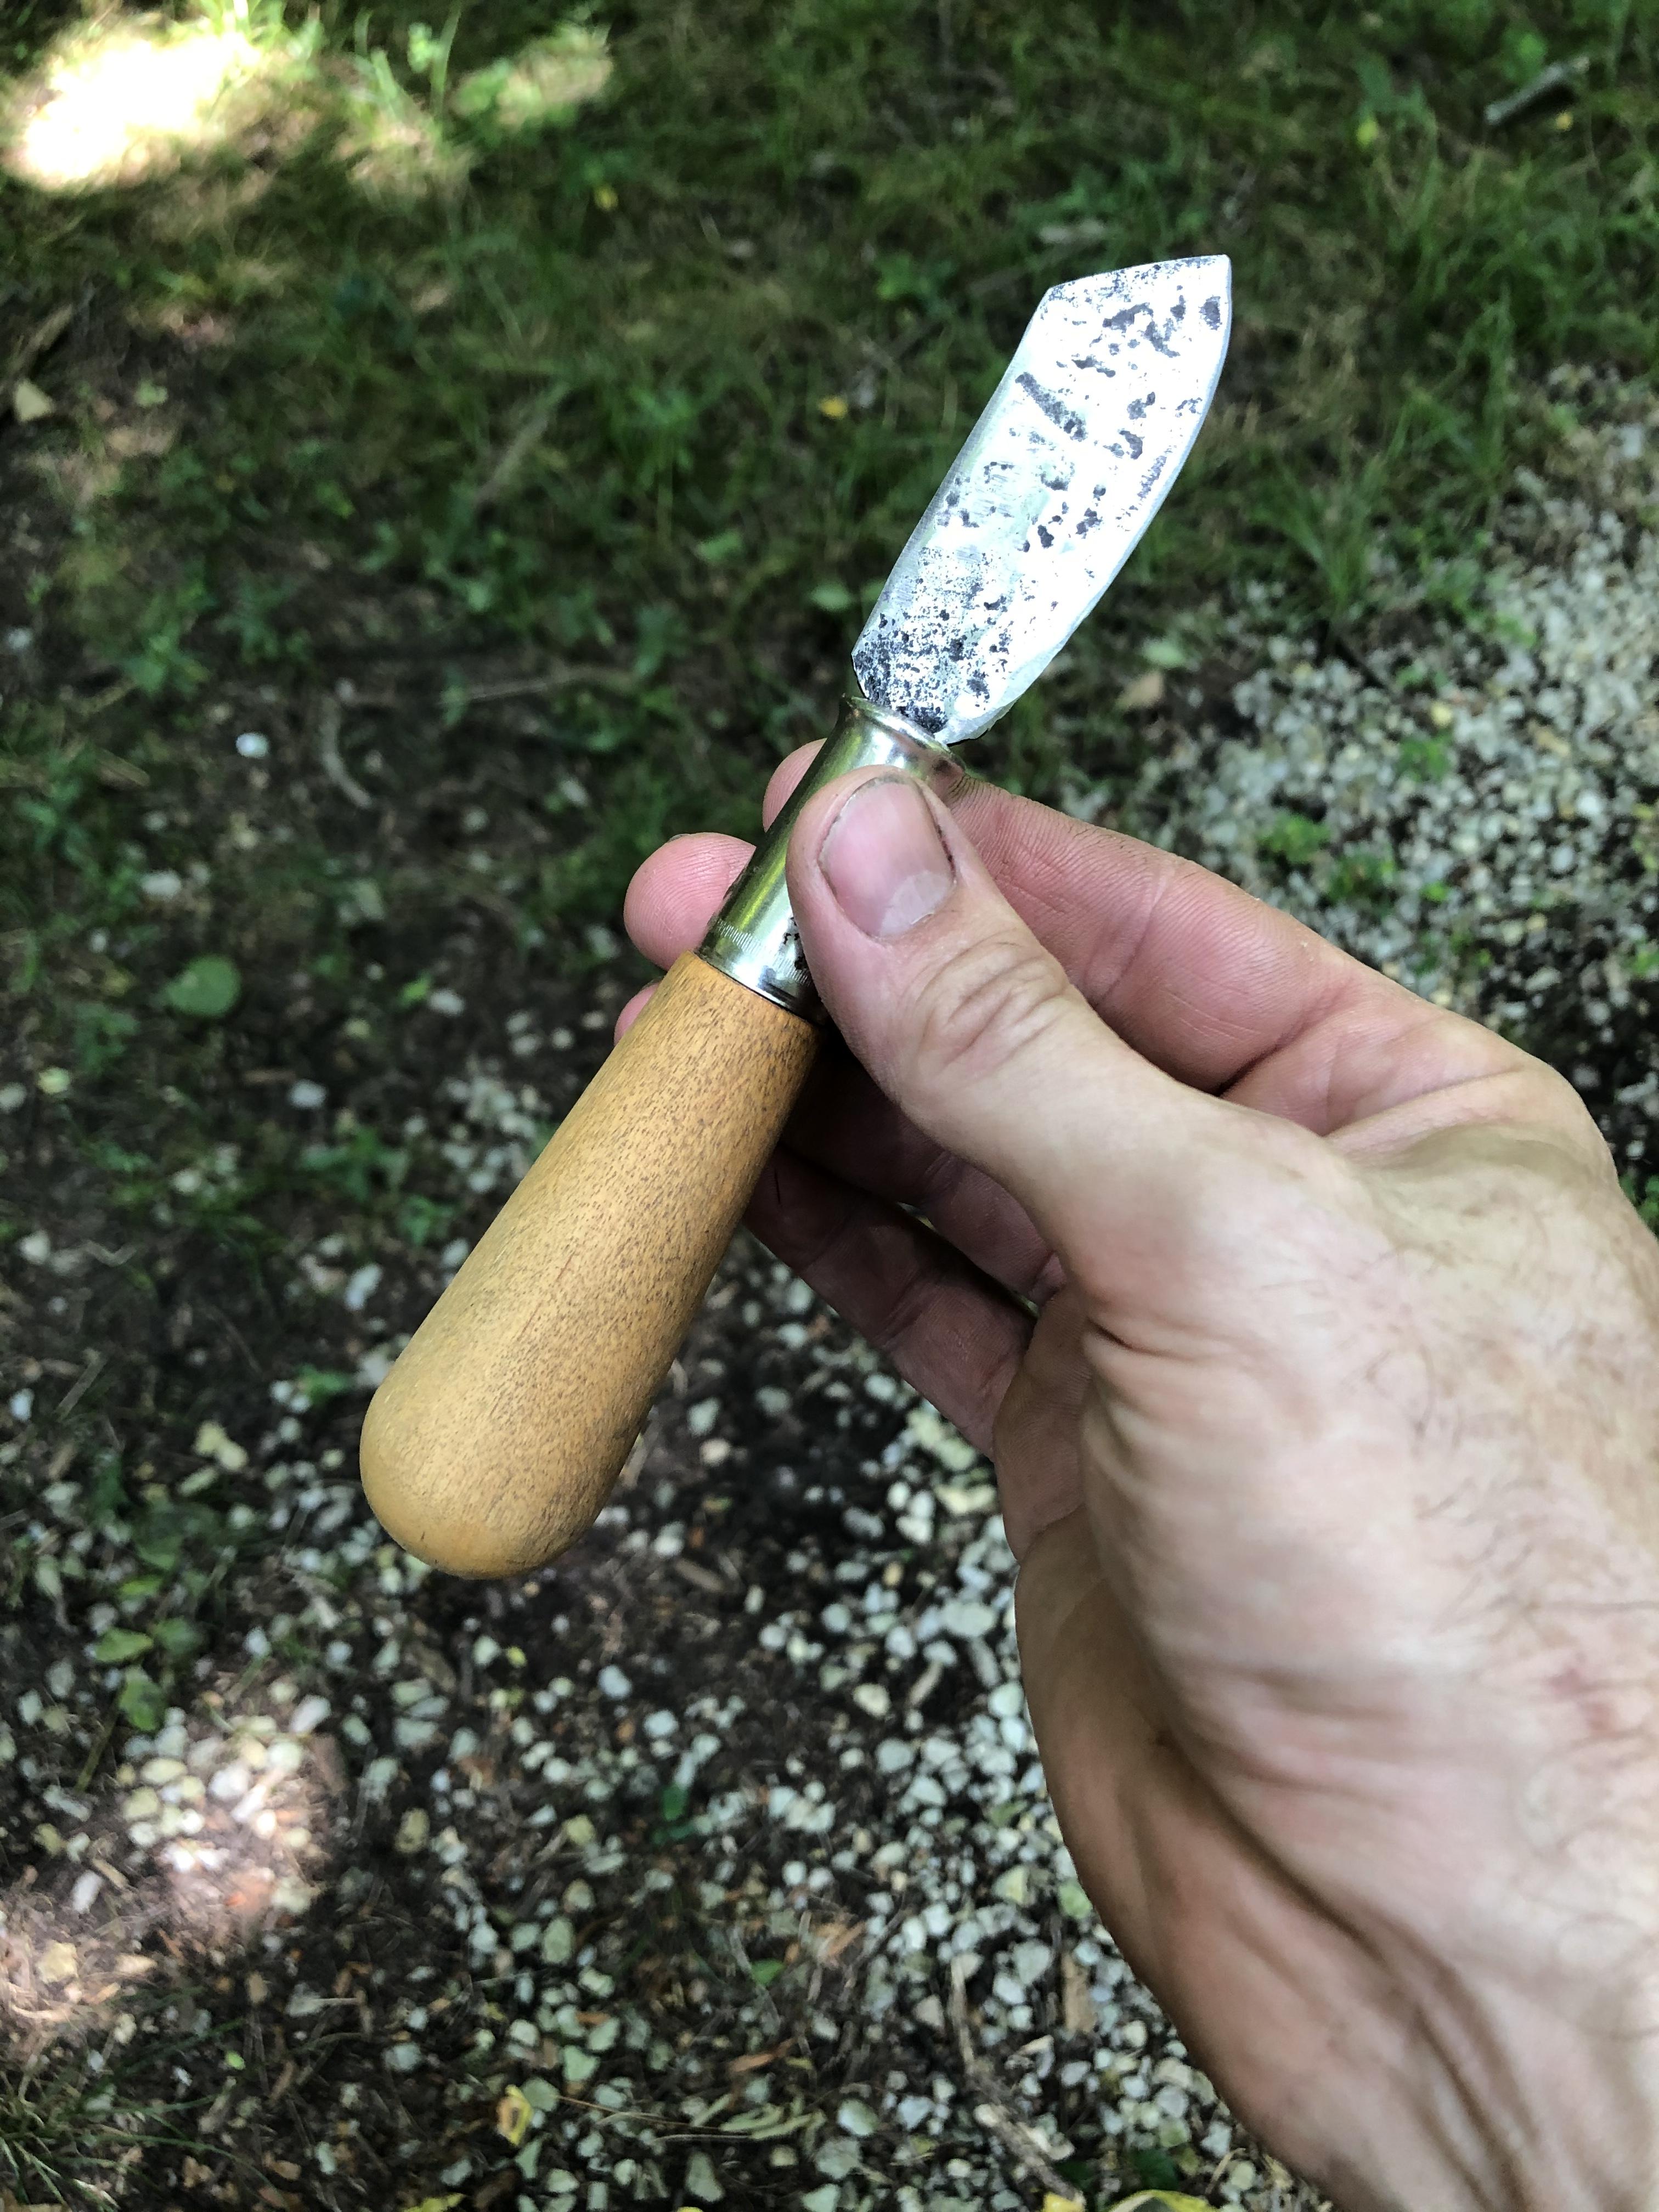
Greetings, I have been getting a lot of great information from this site so I figured I would join up in the off chance I can contribute something - but mostly for advice... I have been doing things on a very casual basis over the last month or so - a few hours here and there. Through the TPAAT I have acquired a rusty 55 pound cast steel anvil from an uncle-in-law’s shed as well as an (even rustier) monster bench vice that is about as heavy. Both cleaned up nicely. I already had tools for woodworking and some basic mechanics stuff (angle grinder, bench grinder, drill press) and have supplemented that with some from my dad who is a retired machinist and has a trove of stuff he got when they bought there current place. I also managed to get a 65 pound 6” cylinder of high speed steel that can serve as a “larger” anvil if I really want to hit something hard. My forge at present is a JABOD’ish design. I came across a scrap stainless steel sink that I trimmed out and then embedded a brake rotor in some natural clay. Started out with literally a hole in the ground. I have been doing side blast but currently configured for bottom blast. Using charcoal right now for fuel and made enough to fill a 40 gallon trash can just using an open pit method. My initial blower was a salvaged squirrel (5” rotor) cage out of a dehumidifier unit that failed. That was good for a small fire, but I was struggling getting a decent volume of a fireball. I messed around a great deal with this trying to remodel the JABOD’ish forge to work, but in the end I surmised that I just don’t have enough air. It was enough to get metal plenty hot up 1/2” diameter, but the fire was just not very deep. Even with just 3” from the top to the tuyere to the surface of the forge top, I was still having to push the work piece down into the charcoal bed to get to the fireball. My “Eureka” moment that my blower was not up to snuff was in a moment of desperation I grabbed the shop vac and blew a bit of air into tuyere and saw what the right amount of air can do. Suddenly there was fire everywhere - too much fire - but confirmed that I needed more air. Wanting to do things on the cheap, I decided to build a box bellows. I had a bunch of 1“x12”x96” pine shelving that I had grabbed for free from a neighbor did the job for the wood. I ended up with a ~11”x11” cross section with 45” of total length. I am using old fleece fabric for the bellows seal (folded and stapled) and faux leather for the valve flaps. I just wrapped it up last eventing and have not connected it to the forge yet, but based on approximating performance by filling up a trash bag I am getting easily 5 times the air I was with the blower operating a no back pressure. I am sure the blower is putting out much less that that when operating against the pressure head of moving the air through the tuyere and the charcoal bed. Have been hard at work salvaging some steel and have the usual assortment of agricultural/automotive stuff: low carbon 3/8” rod from a combine, coil springs, torsion bar, a couple of plow disks, a 1/2” thick bush hog blade, etc. My dad also had some high carbon steel 1/8” sheet scrap that he had used to make a knife out of already. Also some heavier medium carbon cylinders from some shafting. Projects thus far have been basic “tutorial” things learning how to move steel, basic fire tools, some handles for my forge tub, a pair of functional but ugly tongs, some drive hooks, etc. Next steps are to adjust my current forging table to accommodate the box bellows. This is just a piece of plywood that I set on metal sawhorses - I need to keep things portable since I live in the suburbs and can’t justify anything more permanent at this point. A lot of what I am doing is likely going to be “on-the-road” so to speak when we take the kids to visit grandparents (who both happen to live in the country.) There the kids are more occupied and nobody cares if I make loud ting-ting-ting sounds. Right now I can toss everything I need in the back of the minivan with enough room for other stuff. In terms of future projects, looking at some basic utility-driven things: tools to help with Dutch oven campfire cooking, camp tripod, small carving knives, etc. Would like to work up to making a hammer or small axe. Right now I feel that I have a good working setup and have spent next to nothing. I bought a pack of $12 fire bricks to help coral the charcoal and splurged on a $40 2-lb cross peen hammer because the 4 lb one that I got was overkill for what I was doing.