

bluerooster
-
Posts
568 -
Joined
-
Last visited
Content Type
Profiles
Forums
Articles
Gallery
Downloads
Events
Posts posted by bluerooster
-
-
Dang Jennifer, don't be lopping off things you might need later. I guess physical therapy (working at the forge) is in order. And you'll have it back in no time.
I spent the afternoon drawing and shaping the bar that I made yesterday. It rained pretty hard last night, and all the fuel (coke) left over from yesterday was soaking wet. Wet coke is hard to start, I didn't want to but I started it with a handfull of green. And of course it drifted straight away to the neighbors house. But anyway, got the bar started drawing and shaping, so far no cracks, and gained about 8" in length over 10" to start. I have a few inches Yet to work, then the tang. I may be able to work some metal from the edge into the length, by forging the bevel, I figure that by the time I get it all forged out, I'll gain another 2" overall, and get down to a reasonable thickness.
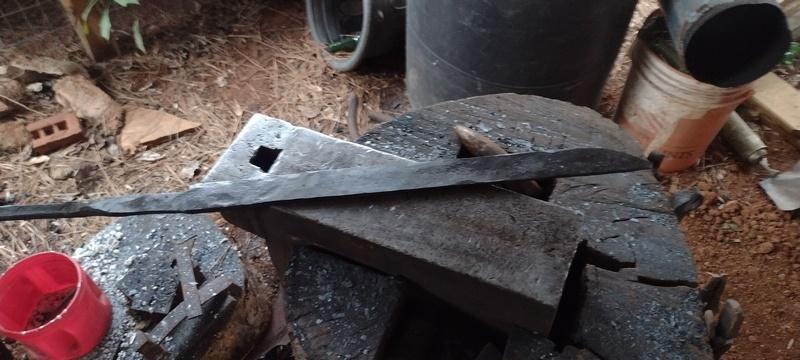
So far, it's reasonably straight, but a bit fatter in a place or two.
-
What did I miss that you nearly lost an extremity?
-
-
Nice work Ted, I like the wood handles.
I spent the past couple hours putting together another "hot dog". I made the insert thinner than the last one, so mabe I'll have better luck. Here it is fitted up, wired up, brushed up, and fluxed up. Tomorrow is welding day.
.jpg.8d2ee165f3faac9c0a75d8d6021c496b.jpg)
For some reason I didn't "submit reply" yesterday. (I blame it on SWMBO flappin' her gums about politics)
Anyway, it is now tomorrow afternoon. and welding day went pretty good. But first, Those roses look awesome, I wish I could do something like that.

So, today I started with a nice clean forge, and good clean fire, with coke from yesterday to start. I started the welding process at the handle, then worked my way out to the end. It took several heats, fluxing as I go. I kept the HC outside fluxed an that helped to keep the scale loss down. (thanx Frosty) It took several heats to welding temp over the length of the bar. Got it welded, and no cracks on the edge. Then I stopped to clean out the clinker. Why izzit that lately clinker has been fusing its self to the grate? I pull on the clinker, and the grate comes with it, dumping the fire to the ash bucket. So, I bust the clinker off the grate, put it back in, and restart the fire. I found that I can toss in a small piece of cardboard, then rake the coke back in, and slowly crank the blower. The pot, and coke are still hot enough to ignite the cardboard. I then started the drawing and shaping.
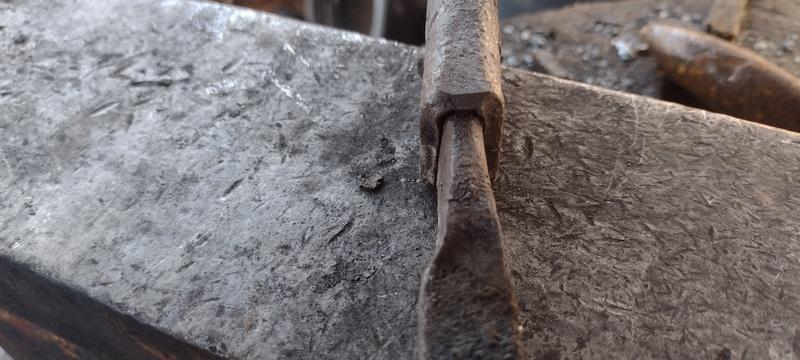
It was looking good, untill I brushed it off, and turned it on edge.
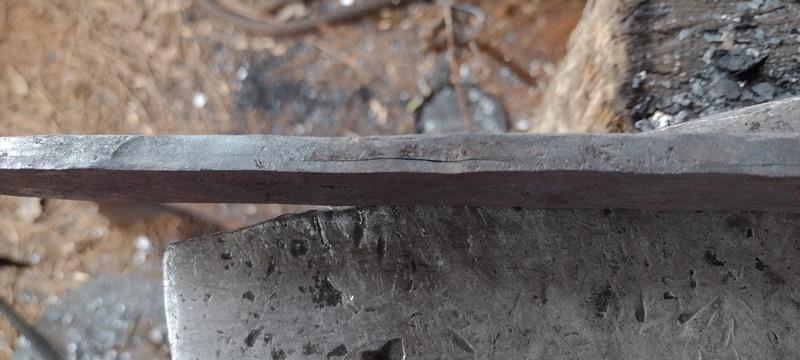
It appears to have some unwelded spots along the spine. I'm hoping that it's only on the edge, but I'll see what I can do with it in the drawing, and shaping process. I'm going to continue until I either finish, or the HC cracks.
-
My forge is pretty much outdoors, but has a roof over it. (pole barn no walls). I have a side draft flue which draws pretty good, but sometimes the wind will blow the smoke back at me, while the flame is going to the flue. I got a piece of sheet metal to sit on the table to act as a wind block, and the smoke follows the flame. (most of the time
") )
)
-
Most farriers here have a Camper shell type of affair on their pickup. These are shaped like no other, so you can usually tell at a glance that they are farriers. The forge is mounted just inside in such a manner as to not be able to move it. with a hood and vent through the roof to allow the heat to escape. And propane tank mounted just outside.
-
I went to grab a bag of coal last Friday. And got to thinking about it. I get my coal from a farrier supply. I don't know of any farriers that use a coal forge in their business of horse feet. All farriers that I know, or see on the road use propane forge on the job. But somebody is buying coal, or the supply place wouldn't stock it. So, just for the fun of it, I looked for "Blacksmith in GA" on social media. Low and behold, I found two groups. One with 7 members, and one with 746 members. Of the members in the latter group, 3 are within 5 miles of me. And several more are within a 30 min drive. Ain't that cool? I plan to meet up with a couple of them and see what I can learn.
So, I guess one can check out the social media of your choice, facebook, twitter, etc. to find smiths near you.
-
I like that hold down/stock support. Is that a base from a gum machine?
-
18 hours ago, JHCC said:
I am teaching a class on Sunday, so I need half a dozen pairs of 3/8” bolt tongs. Here’s the prototype; I’ll make the rest tomorrow.
Just out of curiosity, What is the class? I would think that making those tongs would be a good lesson.
-
Spent some time at the forge. And learned quite a bit. Thanx to Frosty, keeping the outside fluxed sure did help. What I learned is this: #1 making a "hot dog" with HC as the bun, and LC as the "dog" is difficult. two different welding temps, two different forging temps, but when finally figured out, can be awesome. (I don't have it figured out yet) #2 At the temp for easy moving of LC, HC wants to be too hot. (I developed cracks at the edge)
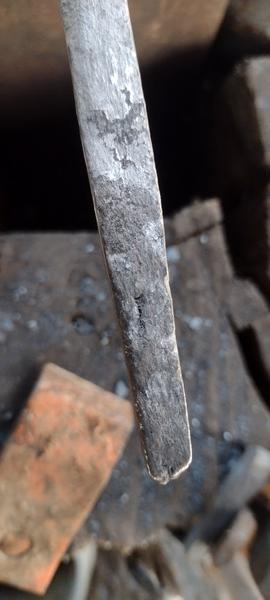
On this particular bar, When I noticed the crack, I decided to quench, and snap it off, to see the internals. I heated it up just over critical, and held it there for a few minutes, then into the slack tub. Yep, it got hard, but I found that I'd missed the crack by an inch or so. No worries. Back in the forge, and paid close attention to the placement. This time crack was center of the heat. Slack tub again. Then tried to snap it off. Ain't gonna happen. The LC spine is doing it's job. Finally, after several hard strikes with the 5 pounder, I managed to break out a piece of the edge.
The "heart of the blade" is clearly visible here. Here's the chunk that came out.
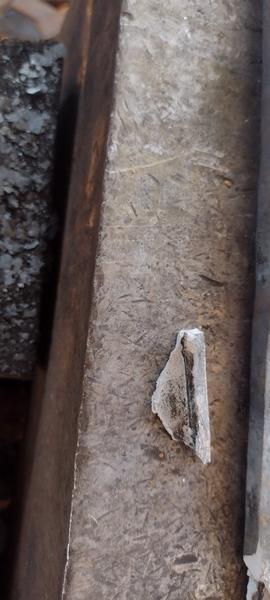
It appears that a good portion of the weld didn't set properly. But looking at the spine, It looks to be homogeneous.

And look at the grain structure where the chunk came out.
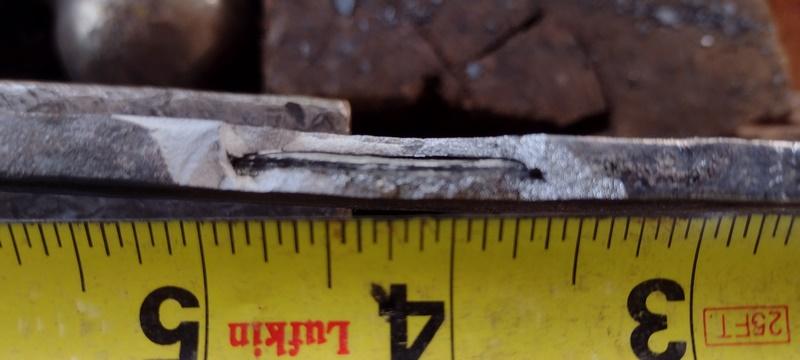
You can see, it goes from nice and tight, to loose and grainy. I suspect that it's from the double quench in two different areas. and the overlap is the looser grain.
Either way, it's a bad blade, but could be serviceable, in that, it would not break off. But could have chips come loose. Bear in mind, once I noticed the cracks, I decided to point harden, and point load it to destruction. It took several hits with the 5 pound sledge as hard as I could swing to get it to come apart, It never snapped off, It never bent, but would spring back.
Yes, I will try again. But with a different approach.
-
quick, and simple tongs. I love it!
-
Frosty, Thanx for the info. Now I know the "why" of what Asian smiths do. Flux the outside between every heat. To limit the loss due to scale. And also their "bun" is pretty doggone thick, compared to the 'hot dog", now I guess it's to make up for the inevitable loss due to scale, even when fluxed. Very good info, thanx again.
-
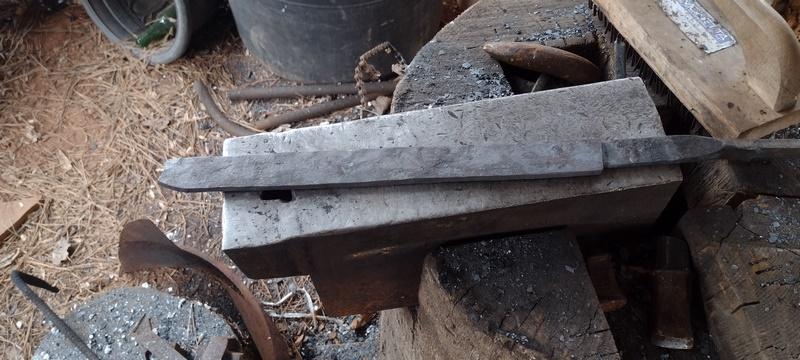
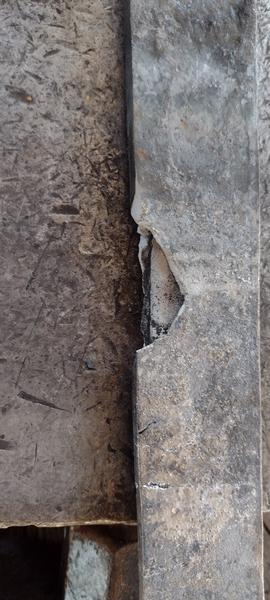
A couple pics of the project.
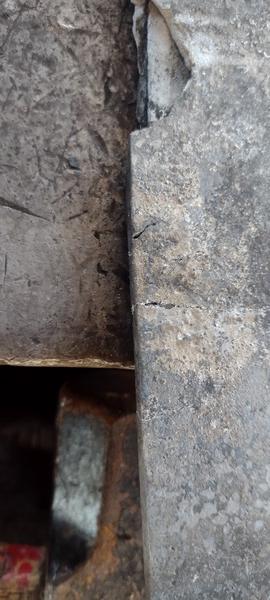
End yet to be welded
And what appears to be a cold shut at the end of the low carbon center.
Also looks like a small issue at the very end, but I think that will be gone when it's finished.
-
Got the "hot dog" welded to the "bun", all but one end. Took several heats, but it's stuck together. Was going to finish up that not welded end, but decided to clean up the fire first. pulled it apart, reached in with the hook and pulled. Fire fell out the ash dump, and grate turned up on end. Clinker had stuck it's self to the grate and when I pulled, grate, clinker, and all came out. Lost the fire, and need to re-install the grate. So, I'll do that tomorrow. Need another bag of coal anyway. Once I get the last bit welded, I'll work on drawing and shaping at, or very near welding heat, for the first couple of trips down the blade.
Question for ya'll: When working a long bar, is it best to work from heel to toe, or toe to heel? (heel being the part you're holding) Or doesn't matter as long as the outcome is the same. I can only work about 3 inches at a time at welding heat.
Something I didn't consider when I started this project is the loss due to scale on the outside. I'll continue to completion, but I'm afraid it may not work out as planned. The thought was that the outer layer is 1/4" high carbon steel, folded to make 1/2" (1/4 on each side) so the low carbon that I put in the middle, I made about 3/8" thick, at the spine, tapering to about 1/8" to fit the fold. As I was welding it together, I found that the outer layer seems to be getting thinner, while the inner is staying about the same. First time doing this, so I'll learn what not to do as I go.
Anyway, I managed to get some hammer time in, and pulled enough clinker to pave the driveway.
Borax makes lots of clinker.
-
Didn't get any forge time in yesterday. Had to work on cars, so I could get to work today. So it will be the weekend before I get back to the forge project.
-
I've repaired many hammer handles that way while on the job.
-
I've been working cold steel since 1982, in the autobody repair business. I'd gotten to the point that I can usually make sheet metal do what I want it to with hammer and dolly. After watching an episode or two of FIF, I figured that I can do that. After all, I've been moving cold steel for near 40 years, hot steel moves easier, right? That's when I started to learn. I fabricated a "forge". Bottom blast trench, to burn charcoal. My anvil was a couple of stacked plates of 1/2" steel. I was able to heat metal, and beat metal, but, not what I wanted. Burned a lot of charcoal, to get very little done. My first welding attempt turned into a splat of sparks, and nothing left. (hit too hard) I had a little metallurgical knowledge gleaned from one of the shops where I worked. We did a lot of restoration work on old cars. With a motto of "That which can't be had, can be made". Our machine shop came straight from the turn of the century, (late 1800's/early 1900's) We had a lath, bandsaw, and shaper. All run from flat belt on overhead shaft. We also had, upstairs, a home made surfacing machine, and Souix valve grind machine. I was handed a copy of The Machinery Handbook From 1948, and was told "this is your bible". I learned a lot reading that book. Anyway, back to the forge. My charcoal forge wasn't very efficient and lump charcoal being cheap per bag, but expensive in the number of bags required. I decided to build a coal forge, and did. While it wasn't the very best to be had, it worked well, with a hairdryer for a blower. My first coal fire was, well, I'm glad the neighbors aren't close. Green coal smokes, a lot! But the forge worked quite well. But was not well designed, and rather thin material. I used it for quite some time, but decided to build another, of better design. I don't recall why I built the third design, but it's the best of them all. While we "trust in rust", The rust flakes from an overhead hood cause clinker, and lots of it. I built a side draft which works surprisingly well as long as the wind doesn't blow too much. I've learned lots of things blacksmithing. from IFI, Jennifers videos, and Black Bear Forge, and that guy from Europe that doesn't talk much. I built a decent anvil from a five foot long 250 pound piece of steel, and am still using it today. The majority of smithing has been making tools to work with. Tongs, chisels, punches, hardy tools, post vise, etc. I learned how to make fire pokers, thumb latches, hinges, hooks, tried a few leaves, bottle openers, church keys (which require a special punch), Gas keys (another special punch), dragon heads, Very few blades, which is why I started smithing. But that's OK. I did make a dagger, and a drawknife, a couple of letter openers, and some junk blades. Lot's of junk blades.
The beautiful, and varied work shown here is what keeps me going to try new (to me) things. I've yet to find a blacksmith within a days drive from here, but I can buy smithing coal local. go figure. Lots of farriers around, and I guess enough of them use coal to warrant the local farrier supply to keep it in stock. The ones that I know use propane. I would like to meet up with a local smith, but it seems that there aren't any. So, the school of hard knocks is where i'll learn. I would like very much to get out to visit some of the members on here before I get too old to do so.
-
Didn't follow me home, but followed our adopted daughter home. Bell from an old wall phone.
.jpg.7dcee5854cbf177f17536593be149aff.jpg)
Now what to do with it.
-
Got a little forge time in today. Decided to make a blade from a piece of 94 year old leaf spring. (I have a bunch of that stuff from Model A Ford) Got started thinking of micro fractures and what-all. So, rather than give up on it, I thought about giving it a low carbon internal "spine" to hold it all together. So, I hot cut a length of about 10", then folded it like a hotdog bun, and set it aside. Got a piece of 5/8" square stock and made about 9.5" of it to fit the "bun", and left the rest for a handle. Got it all cleaned up, and fluxed, then decided to put out the fire, clean the forge, and be ready to weld it all together tomorrow.
I don't know how it will work but I'll know more tomorrow.
.jpg.9d19a61bba051336177269d319386c59.jpg)
-
DNAdave, Nice towel rack.
I was a voracious reader from about second grade on. I would read almost anything written on paper. Mom had a set of encyclopedias that also had a set of books filled with short stories, and longer stories. I read almost every one of them by the 5th grade. Some of the books that were required reading for school, I didn't read simply because they didn't hold my interest. Just not my type of reading. If it wasn't a story that I could relate to, it didn't hold my interest.
-
Daswulf, Most of the younger guys that I've worked with would rather replace parts, than to repair. So they soak up all the gravy, while I'm stuck with the big money jobs.
But that's where the "tricks of the trade" really shine.
-
Rojo, rivet setter or not, those are some very nice looking ladles.
-
On 12/18/2023 at 5:07 AM, Dabbsterinn said:
nice weld! it sure looks like it'll hold. torch welding was the first welding method I learned and I'll say the hardest part was learning to adjust the flame just right. I feel like the puddle is a good bit bigger in torch welding than in any other type unless you've really got the amps cranked up so I found it much easier to watch and learn how it moved.
while torch welding is mostly outdated there are several situations where that's the only option like when you're welding around some sensitive electrical equipment or can't get electricity to where you needTorch welding aka gas welding, has been around for many years, and is still in use today. especially handy when all you have is a torch. Tens of thousands of airplanes were welded together with a torch, not because that's all they had at the time, but because it was deemed the best way to do it for structural integrity.
-
Good lookin' banjo hanger. And a nice big shear, you should be able to cut up some pretty heavy sheet with that.
I finished up the tongs, then made a bottle opener. I tried to put a diamond on the end of it, but it came out all wonky. I'll find out if it works shortly.
.jpg.788f90ebc0c217b1e2fe79ef5f074eb9.jpg)
Wet Coke
in Solid Fuels: Coal, Coke, Charcoal, Wood, etc
Posted
Had a session at the forge yesterday, and when finished I pulled the fire apart and left all the coke on the table for use today. Well, It came a hard blowing rain last night for an hour or three. All the coke got soaked through, The table was soaked, the pot and what ash was left in the corners got drenched as well. All the sticks and twigs that I usually use for kindling were also soaked. Took me two tries to get the fire going. Finally started it off with a small handfull of green coal to get the coke dried out enough to burn. Hoo Wee, I ain't had that much smoke since I first fired the coal forge several years ago.") Once the coal got started, I piled the coke on, then the smoke turned to steam. But didn't take long for the coke to dry out after that.
Once the coal got started, I piled the coke on, then the smoke turned to steam. But didn't take long for the coke to dry out after that.