
billp
-
Posts
313 -
Joined
-
Last visited
Content Type
Profiles
Forums
Articles
Gallery
Downloads
Events
Everything posted by billp
-
I wanted 1/4 or thicker cause that is want I was advised to use in another older post. From what I understand the thicker the metal the longer the life of the fire pot. The one I'm using now I made from 1/4 diamond plate, and works OK as for holding up to the heat. I just made it to shallow (about 2") and want to make a deeper one for I hope a better fire. The scrap yard I go to did have some 4" x 4" x 1/4" or 6" x 6" x 1/4 angle I could cut that up and weld together that should work I would think. Thinks guys three or four heads do think better then one. billp
-
I'm having trouble finding a 1/4" thick plate or bigger to make a fire box or at least without buying a whole 4' x 8' sheet which I can't afford. What I do have is several 12" x 18" x 1/8" plates, could I weld two plates together to get my 1/4" thick plates for the fire box? Some how I don't think I can because of how the heat would transfer, but maybe someone who knows more could advise me. billp
-
Thinks Marksnagel Thank you too Rich, I kind of knew the steel I was using was not a good material for knifes but if nothing else it would be good practice for the real thing. Not sure if the place I buy from have and blade quality steel but I did discover a few web sights where I can get what I need. I do appreciate your advice as part of the reason for posting is for advice, being a beginner at knifes. I have been blacksmithing for several years but this is my first attempt at knifes. Thanks again for your input it will help. billp
-
This is my first try at making a knife. This was made from a 1 1/4 x 1/8 piece of hot rolled steel that I used a hand grinder to make. I started with a 60 grid disk and moved to a 120 grid to finish grinding. Then I used my fine grinder I use to sharpen lknifes with to finish off the shape. Have been using a really fine sand paper to polish. The handle is made from oak scales and brass pins shaped with a belt sander and stained. The knife is 8 1/2 inchs long 3/4 at it's widest point and 1/8 thick with a 4 1/4 long blade. I still need to work on the shaping of the blade a bit more and maybe even try heat treating it but not sure if I need to or not. All in all I'm kind of proud of it that is for a first time using what equipment I have. It is a bit heavy with a short handle but my hands are small and fits me fine. Made a sheath for it today so once I feel like I have finished the blade I'll carry it for a work knife. As I prefer a stright knife to a folder when working, never had a stright knife close up on me yet. Any way I'm all fired up and have two more cut out ready to whip into shape. First chance I get will have to buy some better steel and try that.
-
I like your base better then mine it looks really good. I posted a couple pictures of mine which I sell these at my churches book store. The twisted cross is something my wife asked for. I do a single like you but don't have any at home as they are all at the book store. Again real nice job yours real do look good billp
-
 I guess I'm behind I have three tattoos and only two anvils but I am thinking about getting a tattoo of an anvil. My first real anvil is a TFS 100 lb. anvil. I was disappointed with the company I ordered from when I ordered a double horn but got a single insted. My next was a combo deal I got from a friend. I have not seem him in several years and when he discovered I was blacksmithing offered me a deal as he tried blacksmithing but did not like it. The combo includes a rivit forge with a champion blower attached, a well used Fisher anvil and about 40 lbs of coal for $300.00. Needless to say I dug up the $300.00 by the end of the week and had the anvil in my shop building a new stand for it. I never get deals like this only hear about them happening to others so I was real tickled at the find. billp
 -
Good advice Phil I'll try the trade items and your right about being up front about my intent. I'm that way with the little scrap yard not to far from me and they treat me good just don't get many good items any more. So no honesty has always been the best policy for me when doing things like this. But with the barter good to sweeten the deal and be the ice breaker it could help get my foot in the door. Thanks billp
-
Yea I think I know the areas your talking about. I grew and worked there till after loosing two jobs to the economy so now I'm semi-retired. With gas prices are like they are I just don't go into town like I use to. I just know some of the places closer to home respond better to the "good old boy" approach then the ones in Memphis. To many people in the big city bumming for scrap meal to turn around and sell to make a quich buck. But it never does hurt to try. Friday I do have to go into Mphs for more stock metal and other supplies so maybe I'll check the ones I can while I'm there. I'll just have to pack heavy as if I'm right most of these places are not in the best of neighoods but I'm use to that too no problem. billp
-
l have a small arc welder that will handle anything I can do. I am fair hand at it having had a few classes at a tech school when I was a kid but no real training to speak of. It's like my blacksmithing the more I do the better I get. There are no forklift shops near me but, there are a couple of shops for big over the road trucks I know of who may do forklifts too. I'll have to give them a try and see what I can barter from them for. Nothing else a few springs and maybe some other metal parts would be a nice consolation prize.
-
That's about what I'm looking for but don't think I'll have your luck on the free part. billp
-
That would work, heck just about anything off a forklift should.
-
Ok now I understand, so now I'll have to re-think what I use for the anvil part of the hammer. Right now I'm in the process of collecting the materials to build the hammer and it is going slow so I should have the anvil part figured out by then. Who knows maybe I'll come across a 3 foot section of rail. The scrap yard I deal with tends to come up with some intresting stuff from time to time. Oh and Macbruce I ment to tell you, I like that profile picture good choice
-
Here is a picture of my orginal set up the base the rail is on are 3 rail plates that are nailed to the tie's and the rail nailed to it and the ties. These were discards when the railroad company re did the track. I only pick up their scrap never the new. any way I welded them together and it worked pretty good till I found or was told I should be using the end and not the head. But I like your idea macbruce I just need a couple of bigger vices or get lucky and find a leg vice. Think you too Thomas but not sure what you mean by the 3 feet unless it's the distance I should use on the treadle hammer between hammer and anvil. Information I will keep in mind thanks again billp
-
When I first started I was using a 8 inch section of RR rail a friend had cut for me to use as a boat anchor. In fact he cut several for me so I welded one to some other heavy metal pieces and used that for an anvil. My questuon is I was using the top of the rail as the anvil face now I have read that I should have turned it up on one end and used the other cut end as the face. Which would be correct as the surface seems softer then the rail top? I now have two real anvils but would like to know as I did think about using the rail for a treadle hammer anvil.
-
Hardwood charcoal sparking like mad
billp replied to JimsShip's topic in Blacksmithing, General Discussion
I would like to see a good charcoal forge as back up to use charcoal correctly would not be bad to have. billp -
I agree with Dodge if that was your first I'll keep mine to myself even though I don't have a power hammer or a fly press but want one now. You did a really good job congrads billp
-
Hardwood charcoal sparking like mad
billp replied to JimsShip's topic in Blacksmithing, General Discussion
I find the fleas most annoying hitting my hands and lower arms. After finding a set of very thin leather gloves at Sam's, using them help me deal with the fleas in charcoal or coal. Which I know using gloves make me a wimp but they are so thin it really does not disturd my feel of the hammer or the metal much if any at all, and have saved me several burns in the process. Oh and I always use my safety glasses as you just never know where the fire fleas will land. One question though, in comparing like a 5 gal pail of charcoal to coal, to me I seem to use twice as much charcoal, does that sound about right or am I doing something wrong? I use charcoal when I'm having trouble finding coal but in truth prefer coal. Part of it is the fire fleas and the other part is the amount of charcoal I seem to go through. billp -
Now I am really glad I posted this as you have tought me something else I did not know. But I have only been doing this a little over 3 or 4 years and still have a lot to learn. In the old school days I would have just started getting past the beginner stages under the apprenticeship of a master smith. But no, you are right Glenn my fire it to small in that my pot is only about 4 inches deep. Which is why I am now looking for the metal to build a new much deeper fire pot as I can't afford a "store bought" one. Plus to me making it yourself adds more pride to your equipment that much I have learned. Will again thank you all for the great tips I will for sure try the dust next time I punch a hole. And when I fill that 5 gal bucket again will for sure try soaking it to help my fire. Thanks billp
-
Sometime the blast is a bit on the high side if I want it to heat up fast. But most of the time I just try to crack it open a bit extra to get things going a bit faster and still get a shower. So I have to remember to and keep to the side when I open up the gate. Will now I have learned something I never thought of, Thanks guys. I will try your tips next time and will keep my bucket for the dust I do collect from now on. May have to change my mind now billp
-
Not like you did but I did work on filtering out the dust once using several different methods. This was with another load of coal I got from a man who used it to heat his shop for a dump truck company. I drove 3 hours to fill up about 12 - 5 gal buckets of big chuncks of power plant type coal. In had to bust them up with a sledge hammer and ended up with about 8 gals of dust and still had more as I worked through the coal. So no, I appreciate your advice but also been there, done that, and "blip" the t-shirt. Which is why I am so tickled to have made the deal I did to get this really good coal. Going back in a couple of weeks for more in 5 gal buckets and I hope to drop off a 55 gal drum to fill on their next trip to their supplier. So as long as I can keep rotating that drum I want have to deal with the dust or at least like I have before. Thanks again for your advice billp
-
Finely came to the end of a rough batch of coal that was loaded with coal dust. Every time I kicked up the air flow I get showered with a rain of tiny white hot sparks. And after a few dozen times they start to hurt. Especially when it's the same spots over and over. But have found some new styff that is really great high BTU, small nugets, low sulfer, and most important it's claeaner made for blacksmithing. Just got to find a used 55 gal open top drum to carry it in, as that is how this group works, and I'm in business. Best of all NO COAL DUST. billp
-
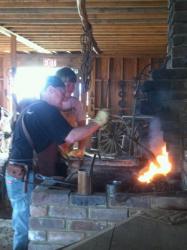
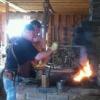
Ok I posted new pictures of the rivit forge plus the forge I built that is now in my shop. I originally made the shop forge to roll and use in demo's but now with the new side draft hood (also pictured) it goes nowhere. The rivit forge bottom is 23" x 17" x 2" with no fire pot only the new grate. I want to know is it worth the trouble to cut and mount a fire pot in this forge or would it be better to just leave well enough alone. I don't want to cut for two reasons, one it's about 3/4 to 1 inch thick and two I really don't like changing the orgional look. As I wuold have to change the routing of the blower too it will be a job. But if it would make it a better forge I can and will do it I'm not afraide of the work, but if it's not needed why bother. So what do you all think. Thank you to all who have responded it does help thanks again billp
-
I have question about what I'm told is a rivet forge. It was on four tube legs but I changed it over to a set of wheels on one end and stronger legs on the other. It has a small hand crank blower attached but a flat grate where you have your fire. I made the changes so I could use this forge when and or if I did shows or demo's and did not have access to electricity. I have attached a picture of how it looked looked a few days after I bought it. The question I have is, would it be more be more beneficial to cut out the grate and put in a fire pot or just leave well enough alone. I would like to keep the orgional look intact as I did the legs to where I can put the orgional back on if I want. I never did like changing something old to be more modern as to me it distroyes a part of history. Which is the reason I did the legs like I did and kept the old ones. Nuts I know but, that is the reason for not putting in the fire pot unless it would make it a much better forge. Oh I was told once to build up around the grate with fire clay to make a type of fire pot. I did that hit a bump the forge fliped on to one side and the whole clay fire pot fell out into a thousand pieces. So I prefer not to do that again as it was money down the drain. So if anyone has any thoughts I would appreciate hearing them. Thinks billp
-
I know I'm late again my life's story but I too want to express my condolence for your loss It's good she was happy and led a full life I know you are sad but proud may God be with you. Also thank you for all your help and information, it has give me some new ideas for my up coming demos and will really help thanks again billp
-
Hearts for Valentine's Day
billp replied to brianbrazealblacksmith's topic in Blacksmithing, General Discussion
Thinks Brian I owe you one that will help me alot in the demo's that i hope to be doing i the future Billp