
jw223
Members
-
Joined
-
Last visited
Everything posted by jw223
-
Thanks Rob- I built the fire box today out of 1/4" Stainless sheet. I still need to cut the hole for the burner to mount into. I have a nice assorment of nozzles to experiment with, since oil service is one of my day job duties. Once this thing is finally put together, I'll put up some pics. I already guessed it would never make welding temps, but I'm hoping it will get me by until I can get a coal forge. What kind of tank are you hooked to? (Small container, or large tank?) JW
-
Just Diesel/ #2 oil. I'm currently using oxy/acety, and it is costing about $50.00 every time I make something. 10 gallons of diesel is much cheaper! In the morning I'm going to build the box to fire into. I'm thinking of using Firebrick to cover the top, leaving only a small hole for the flame to come out of. this will also support the work somewhat. I have been waiting to remove a heating system with an oil burner, so now that i've got one, I'd like to start experimenting! Once I get everything put together, I'll put up some pics of the set up.
-
Hello to all- I have a question about building an oil-fired forge. I have looked at the posts about this, and it looks like everyone is scratch building the burners. Will a comercially built oil burner from an oil furnace work? What I have is a Becket AF2 Burner. Modern design with a pressure switch, flame retention style head. I also have fire brick I saved from another job. the burner has it's own pump, so I don't need to worry about gravity feed- just need to wire up a 120v switch to turn it on and off. Any thoughts? I was going to use some scrap 304 SS to build the forge body out of, because it is an outside project right now. (No current shop)Let me know if this will work for small work (5/8" and smaller) or if I'm just wasting my time.
-
Look Good to me too! I think I'm going to try bolt tongs myself.
-
thanks guys- yes these were pounded out by hand. I have used the twist method before for lightweight tongs, but I came upon a few new spikes, and wanted to see how far I could draw them out. I had some difficulty holding on to the things until they got flattened out a bit more. Maybe I'll have to make a pair of tongs to hold more irregular shaped stock, like bolt tongs, or wolf jaw style.
-
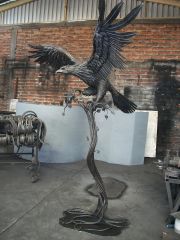 I made an Eagle a few years ago out of copper w/a stainless steel head. After seeing yours, I think mine needs to go to the scrap yard, and start over!! WOW!! VERY NICE! How long did it take? where did you start?
 -
Got the chance to play around this weekend, and this is what I came up with. I made them from two railroad spikes. I think they will work fairly well as pickup tongs. Sorry about the bolt and nut- the rain was comming in, no roof on the work area, and i got in a hurry. I had alot of fun making them, and definately learned alot. not the prettiest you'll see... Any suggestions would be great!
-
Back when I started in the trades, my first boss told me to buy the best tools that I could afford. he didn't say to buy the best tools made. I personally have never had a cheap tool break while it was stored in a tool box. I have however, had many tools break while using them! when I built my house, I was installing the temp. electrical supply, and I stripped out a ratchet while tightening up a lag bolt. my Dad's response was " it's Craftsman, just bring it back and get a new one". The point that was missed was, I was at a new site, no power, limited tools, and what I had broke. At that point, I didn't care who made it or what kind of guarentee it had. That tool didn't go back, it went to the scrap pile, and was replaced by a Snap-on. That being said, I have a cheap Chicago Electric orbital buffer I bought a few years back at HF. I used it to polish some sheet brass w/Brasso. It still works fine, but most of the time it sits in a box.I prefer to make things myself now, but I can't scratch build a 1/2" ratchet wrench either. For tools I'm going to use professionaly, I buy brands that I have tried and have proven themselves to be dependable. If someone else is going to use them also, I may spend a few extra bucks and sleep a little easier. If i got hurt because I purchased a cheap tool and it broke, then my pain was "self inflicted". If someone I know got hurt because I bought something cheap and that's the tool I provided them with, then that's a little different. Speaking of cutting corners, it's pretty sad when McDonnalds has a recall on their Shrek glasses...Wonder who signed that purchase order?
-
I guess I could say "why wear hot gloves when crimping live conductors from the street?" The transformer is fused right? I'ts only 120v anyway...There is a a difference between fear and respect for the medium you are working. some people wear PPE, some people don't. Some people go home at night and enjoy dinner with their family, some get a ride to the morgue. guess it just depends on how you want to spend the evening.
-
I agree that PPE can sometimes get in the way of our normal movement. It seems like I only bump my head on things when I wear a hard hat. Fogged up splash goggles aren't exactly safe either. I always wear a leather apron when doing hot work though. the same with a welding jacket, glasses or a shield. The biggest thing is, spend the money, and buy good safety gear. If you need to go to the emergency room because your $2.00 glasses didn't fit right, were the $20.00 ones really that expensive? If something isn't comfortable, chances are, it won't be used. when you find stuff you like, buy two if you can. these are just some things I've learned, and I'm sure we all already know. I am pretty new to forging, but I have done quite a bit of welding,cutting, grinding, etc. getting burned is no fun, and injuries will really slow the project down. Be safe everybody, and thanks for all the info!
-
Just picked up an old angle iron shear, and a chunk of round bar. ( 9" diameter, 12" tall) I think that is going to be the base of anvil once I get a few more components...
-
Gary- the hand cranked tools come in handy for copper work- if your using sheet. I've got 14 different ones in my shop now, but only really use about 2-3 of them regularly. the stakes are good for small work. My anvil is only 90 lbs, not big enough for everything, but I only paid 50 bucks for it! Remember, almost anything you find could become trade stock down the road, and if you can use it for a project or two, even better. I hate getting rid of any tool, because you just never know. Good luck!
-
I'm going to work on the punch today, and get rid of the edges. I think I'm going to draw it out a little smaller, because the end is about 5/8 or so in diameter. right now, I don't need one that big. I'm sure after I change it though it will be the size I need. Oh well, make another one...
-
Sorry, this is the post I was replying to. Still learning how this site works
-
Wow! Was that the same rusty machine a few pages back? looks like brand new! post a pic of what the inside of the dies look like. I have 15 different machines, and alot of dies. if I knew the dimentions of the shafts, i might be able to get you some die designs. I know this post is older, but let me know if your still looking.
-
I picked this item up for a dollar yesterday, and was wondering if anyone could tell if this was a hammer or a handled punch? The head looks mushroomed, and has a few cracks in it which need to be removed. As far as I can tell, it was hand forged. I was thinking of re-working it into something else, but as a punch, I may just keep it as is, and remove the mushroomed edges. Any thoughts? Also, I'm trying to put an age on my anvil. Can anybody tell by the marks?
-
Wow- that's CHEAP!!! I never seem to find those deals. I was just thinking that movable lifting would really be a plus. Thanks again for the advice. Hopefully I'll get some pics up soon.
-
Junker- ask the guys at your local scrap yard to keep an eye out for old hammers with or without handles. I asked one time while unloading some shear droppings, and on my next trip back, they had a small pile of old tools that had come in from somewhere. i ended up with two ball peins, a crosspein, and a few worn autobody dollies. These were welded to some square bar and i use them as forming stakes. The hammers needed handles, but for less than $20.00 total, I ended up with six new tools. The hammers weren't great, but I'm not a pro either-they don't get used 12 hrs a day! After refinnishing the faces, and the peins, I got some pretty usable tools. Plus, for what I paid, if I find something better or trade them off, I won't feel bad at all! good luck- jw223
-
Thanks for all the advice guys! The radiant floor is definitely a must. I’ve put in quite a few of them at my day job, so I’ll definitely have a good site map of all utilities & a few copies! my last shop was long and skinny (25 x 63) it was nice to have a front half and back half, but wall space on the short walls was almost nil. The gutter for the power is a great idea FE-Wood, that always make pulling extra circuits later that much easier. as soon as I break ground, I'll get some pics up. Is anyone using gantry cranes, or is a fixed beam & trolley more common? Maybe I'll post a print for "review" before I start. Fresh eyes are often helpful to help point out overlooked mistakes. I only want to do this once... for now...
-
How thick? 6-8" or more like 12". I don't have one yet, but i hadn't even considered what the vibraton would probably do to a 4" floor.
-
Hello to all! I'm going to put up a new shop now that the weather has finally broken, and I was wondering if anyone has posted pics of their shops. i am very new to this, so any help with a efficient floor plan would be nice. I know from my other interests that no shop is ever big enough, but i'm thinking 30' x 30'. Other than building costs, are there any advantages to rectangle instead of square? I'd like to use stone for the walls w/a metal roof. let me know your thoughts. thanks- jw223
-
Dan- Thanks for the Info. It sounds like they are of similar size. Mine doesn't say England on it, but from the description of yours, they sound pretty close. I'll try to get a good picture of the writing. Unfortunately, sometime iin the anvils past, someone had the brilliant idea to arc weld the poor thing to a steel stand. the stand is fairly sturdy, but I wish I had gotten to it before... Still, it's my first anvil, and it belonged to a good friend of mine who passed a few years ago, so I think it's a keeper. (He didn't weld it either!) I'll have to put that book on my wish list also. thanks again!
-
I have a small Peter Wright anvil that I am trying to estimate the age of. The only markings on it say Peter Wright Patent 0 3 6. By my best guess, this is a 90# anvil. There are no other markings on the anvil that I can find. The writing doesn't have any kind of stamping around it (circle, oval, or otherwise). Any info would be great.
-
LDW- Thanks for the link. That looks like a lot of the stuff in my shop. It's very old, but still works perfectly. Here is another way you could try putting the bottom on that cylinder: Take your botton disk blank, and using a burring machine, roll about a 3/8 or so flange all around the edge. Place that inside the cylinder with the flange facing down and flush up the two edges. Next, use a turning machine with an 1/8 bead, and roll the two pieces together. I normally do this with the bead profile facing out. This method won't hold a ton of weight, but if it is something that is for light use or decorative, it will work just fine. You could also leave a little extra on the cylinder, and fold it back on itself for a little more strength. I have never tried this myself though. Good luck, let me know how it works!
-
Nice to meet you! Most of my day work is plain galvanized steel, so copper or brass is a nice change for me. Blacksmithing is also nice because I'm on the ground, not 75 feet in the air flying my materials in with a crane! Do you have any experience with a setting-down machine. I just got one, and I'm having a bit of trouble with it. I'm not sure how to prepare the seam before running it through. (is the say, can bottom, flanged, or burred?) Any help would be great!