Purple Bullet
-
Posts
421 -
Joined
-
Last visited
Content Type
Profiles
Forums
Articles
Gallery
Downloads
Events
Everything posted by Purple Bullet
-
I'm not really set up for it, but I'll see what I can do.
-
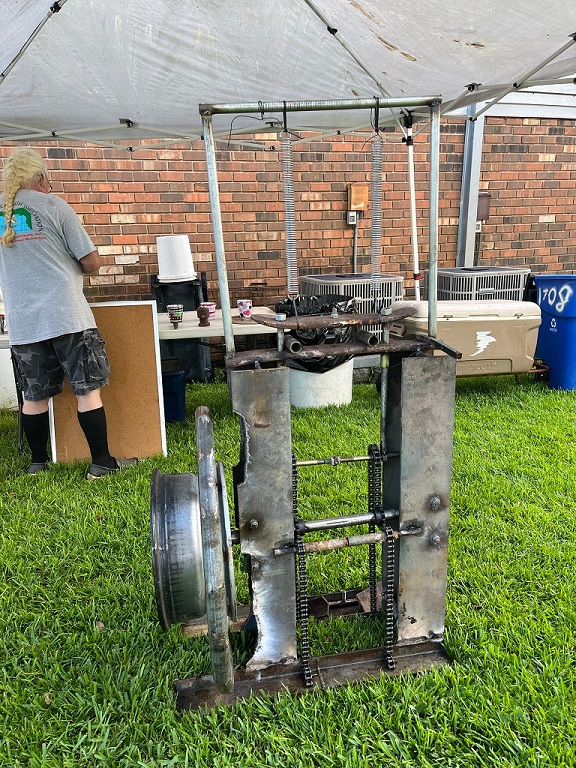
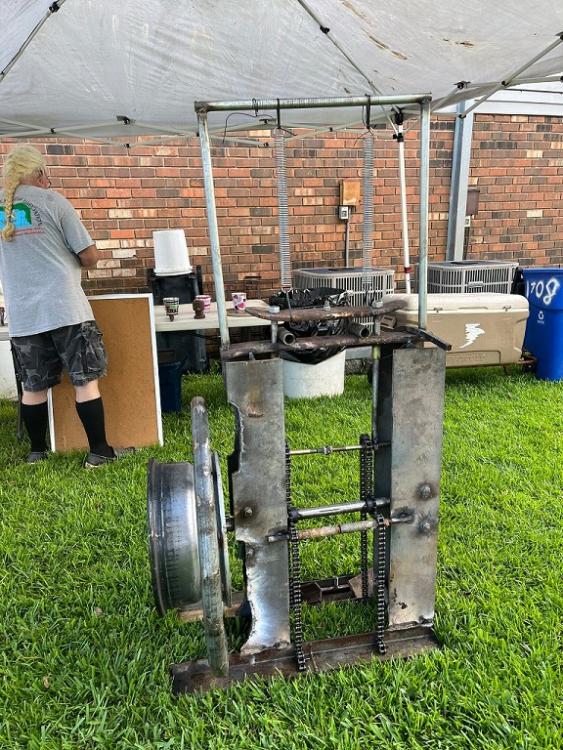
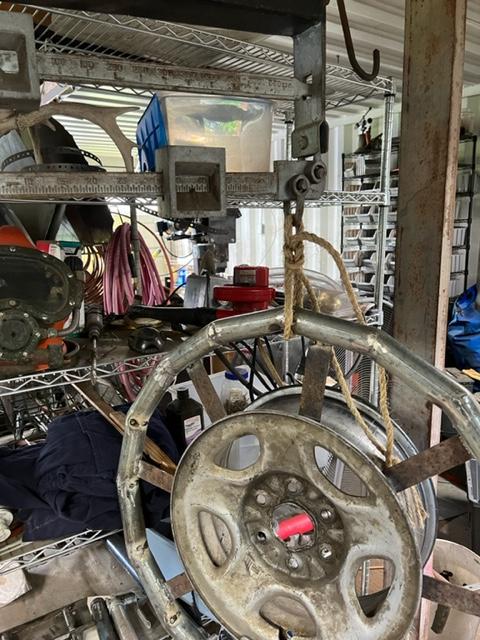
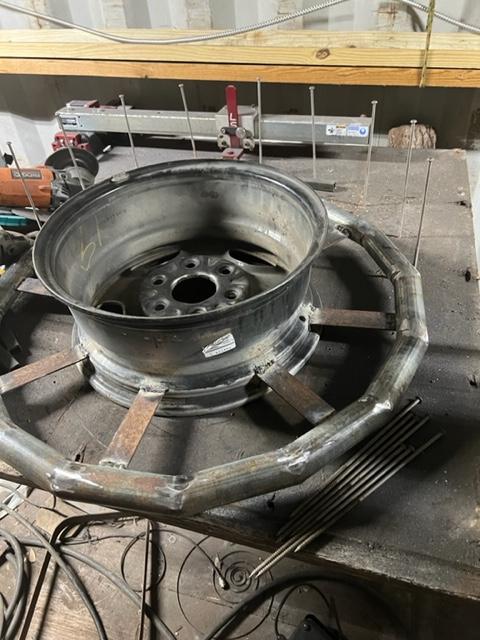
Update time. Probably well past, but I'm recovering from a couple of health issues, not the least is sciatica. I brought the press to our Gulf Coast Blacksmith Association meeting and it was pretty well received. I demoed bending 1/2" square mild steel cold. I got some good suggestions for improvement, specially from Larry House who suggested a brace leg to avoid losing force to lateral movement. I plan to implement that as soon as I can get back to the shop. As you can see from the picture, I ditched the tire (well not entirely, I'm going to make a horse swing for the grand kids) in favor of some junk tubing, sectioned into a circle with ~30 pounds of lead poured into it. This concentrates the weight more to the rim to get the most MA. John's posts on his flypress tools are an inspiration. I just need to get well so I can work on it.
-
What's your latest blade look like? Post em and let us see.
Purple Bullet replied to HondoWalker's topic in Knife Making
Nice razor. I've never made one but I have a couple. I can never get them quite sharp enough. They will shave arm hair. Heck, my knives will do that, but my beard is a mix of stiff and soft hairs. It shaves the stiff ones and leaves the soft ones. I have a stone and a strop, but have never mastered the fine edge. My dad gave me one when I first started to shave. Back then I could bring it to a barber every couple of months to renew the edge. I don't know anyone who fools with them now. -
What did you do in the shop today?
Purple Bullet replied to Mark Ling's topic in Blacksmithing, General Discussion
Let me guess, your bladesmith buddy likes feather Damascus? Nice handle. -
Personally I'm not a boudin aficionado, I like my rice on the side. But LaPlace IS the andouille capitol of the world. .. or so they say.
-
Thanks, Jason - I might try to haul it up to Quad State this year. You need some more boudin?
-
Doesn't look much like the drawing but it does work the way I envisioned. So far I have only used it to cold bend some 1/4" square stock ( I know, you can bend that by hand). The first time I tried to cold bend some 3/8" round it didn't get very far. I found that the tire was loose on the rim and was slipping when it hit the end of the stroke. I inflated the tire to get it firm on the rim and then was successful in bending the 3/8" rod. I bought a couple of rollers to stabilize the draw bars, but so far I haven't needed them. I think it is because I'm "pulling" the force down instead of "pushing" it. My dies are some heavy 2" angle iron with a 1/2" threaded rod welded to it and a 3/4" round ground flat on the mounting side and another 1/2" all thread welded on. I'm thinking of cutting the bottom mount out to 3/4" square so I can use my hardy tools in it. I think my next step, however, will be to remove the tire. bend some 1-1/4" conduit into a 30 inch circle, fill it with lead and weld it onto the rim. I have no idea how much force I'm developing, but it does seem like a useful amount. Concentrating more weight on the rim of the would give me much more initial (and inertial) force to work with.
-
What's your latest blade look like? Post em and let us see.
Purple Bullet replied to HondoWalker's topic in Knife Making
Very nice, Chad. I've made a few with that 1060-ish steel. Haven't had a complaint yet about not holding an edge. Your blade looks like it would be fun to swing. -
What's your latest blade look like? Post em and let us see.
Purple Bullet replied to HondoWalker's topic in Knife Making
Guillaume - Nice, simple, clean. I like it. Maybe that is what I should try for the hawkbill. My only concern is how to keep it closed in a pocket. If it was for myself it wouldn't be an issue, but given to someone who may not understand about tightening the friction every once in a while it might be an issue. -
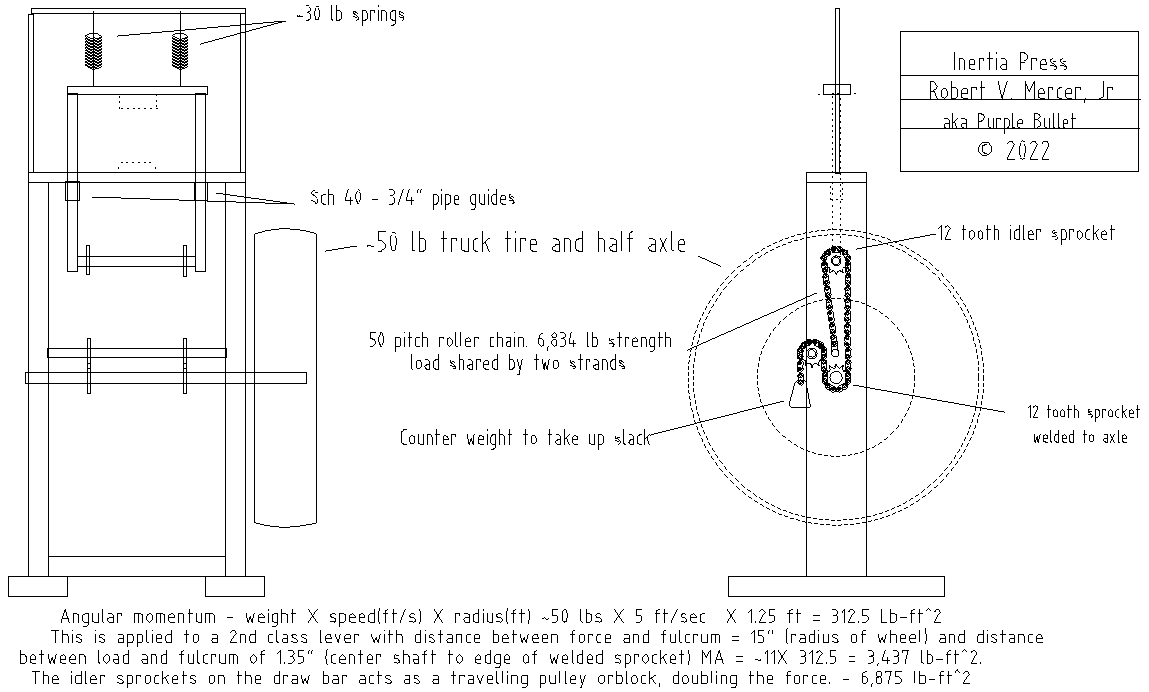
Minor change - I ordered 13 tooth instead of 12 tooth so I wouldn't have to bore out the hub sprocket to 1.25". I also realized that the last sprocket that takes up the slack with a counter weight doesn't need to be a sprocket. Just a rope pulley large enough to fit the chain in to hold it straight. Cost for 2 hub sprockets, 2 idler sprockets and 10 ft of #50 roller chain - USD $76
-
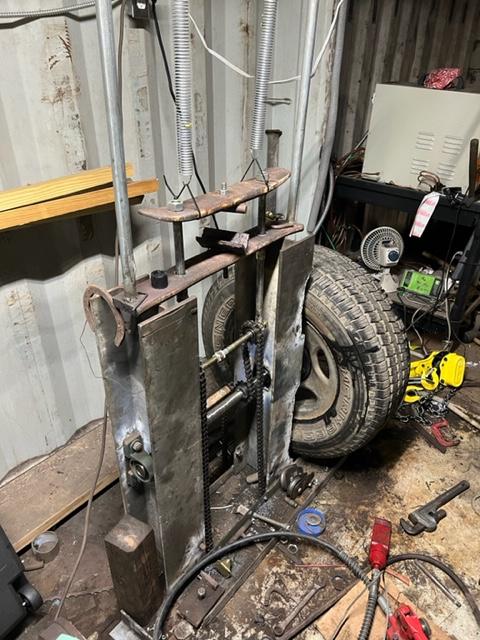
Thanks Latticino. I had that problem on my first try using wire rope without a pulley. I can't say I solved it, but the way I got around it was to have my anvil "float" on the top of the frame. The anvil and ram were made from heavy duty truck springs. I used the center bolt hole to mount my dies. The two draw rods were not connected. The cable would wrap unevenly and it would move as it wrapped. The small movement up until the instant that everything came together was easy to compensate for in a test, but wouldn't be acceptable in a production machine. That is one of the reasons I'm going with roller chain. My hope is that the pull will be consistent enough that I can place the anvil where it will always pull straight through the guides before i weld it down. I'll give your advice some more thought. Perhaps static rod guides ABOVE the anvil that the ram will ride down? And I'll try to be more careful to center the loads than I was in the drawing.
-
I had to look up board hammer. I've never seen one work and the only drop hammer I've ever seen was massive. Thomas, I never meant to imply that fly presses were any more dangerous than anything else you find in a smithy, just that having the flywheel on the side made it a little more safe for the head and MAYBE a little more efficient (remains to be seen). This design is really borne of the desire to have something you can make (and repair) with easily available OTS materials. I haven't heard any challenges to the calculations so I'm going to order the parts and get started. I'll take pictures of the build as I go. Thanks guys.
-
Frosty - Thanks for the input. My aim is to make something comparable to the fly press, but with easily available materials. Too much momentum will make it difficult to get to speed (the other third of the equation - weight X speed X radius) Your idea sounds great for a log splitter because you want one great stroke to do the job. The way I've seen fly presses used, looks more controlled. Again - I have no experience, just trying to think it through. I decided on 50 pitch roller chain because one strand tensile is nearly the same as I calculate the force generated (but I'll have two strands) AND its the largest easily found at Tractor Supply. I don't think that bicycle chain would stand up to the stress very long. I don't know if I could adapt a derailleur to 50 pitch and that might prove something to pursue for greater flexibility. For now I'll be happy if this thing will put out anything close to what I calculate. Almost 3.5 tons/ft^2 concentrated on a die with an area less than 2 in^2 should be useful.
-
Thanks, George. The tire was just my first available thing to use. I thought of filling the tire with concrete, but that would be WAY too heavy. Currently, I'm thinking of rolling or segmenting a three inch pipe into a 30 in circle and weld that onto the tire rim instead of the rubber. Do the force calcs look reasonable? I thought of having different sized sprockets for faster but lighter strokes. Not sure that would be worth the effort. As for a clutch, are you thinking something like a derailleur on a bike? The chain could be on an idler sprocket and swapped to the drive sprocket?
-
At one time a little over a year ago I was all ready to buy a new fly press. I couldn't find one locally and when I called one of the importers he said he wanted to wait and see what the economy did before ordering any more. It got me thinking about trying a build, but although I have a lathe that might be capable, my skills are not up to cutting multiple thread screws. I also kind of question the design. I've never used one, but I've heard of bumped noggins from the handle or counterweight. Also, the force you are putting in is horizontal while the force delivered is vertical. Not the most efficient, but then again, I don't know. Maybe its easier to develop a horizontal pull than a vertical. I started to think of how to do this with commonly available materials. I remember as a kid growing up down Bayou Lafourche, seeing boats lifted up out of the water with two windlasses made of wire rope wrapped on pipe and a large hand wheel. These were ~20 ft skiffs with inboard engines. I don't know how heavy they were, but I'm pretty sure they were multi-ton. I made a trial run with something made from a truck tire with half axle. I turned the axle down to fit pillow block bearings that I mounted on a stout frame. I used two lengths of wire rope to pull two 3/4" rods through guides welded to the cross piece that held the bottom die. This was attached to the movable cross piece (or ram?) that would hold the top die. I made a lightweight frame with springs to lift this pressing part. It worked after a fashion. I could cold bend 1/4 in square mild steel in an angle iron die, but too much energy was wasted in coiling the wire rope so tightly on the shaft. Now I'm trying for a re-design and would like some advice before I go buy the materials. Especially I'd like to know if I'm figuring these forces right, but if you see anything that doesn't look right or safe about this, I'd appreciate the input. One big caveat! THIS IS EXPERIMENTAL! Don't take this as a "how to" to build your own. I'm not saying "Don't build this." I'm saying there are no guarantees here. That's why I'm soliciting input from the experienced and knowledgeable folks on this forum. I BTW - speed of 5 ft/sec is just a guess. I'm thinking that is reasonable for a speed you could accelerate to before the press die hit the object.

-
Like I said, my brother made it. He died years ago and the details died with him as the cannon was stolen out of my front yard years before that. We used to haul it up the Mississippi River levee and fire blanks on holidays. It was a muzzle loader and the carriage was fashioned after a naval carriage, but he used threads from a large C clamp for an elevation screw. The breech was solid welded with a reinforce and trunnions. I think he built it while riding a pipe lay barge down to Brazil back in the 1970's. Lots of time and materials available.
-
My brother made a small cannon out of drill collar. Our ammo was orange juice cans full of concrete. They went a scary distance out in the marsh. I was always concerned that some fisherman or hunter would round the bend after the fuse was lit. A touch hole would have been safer. I don't think we could get away with that in these parts today.
-
What's your latest blade look like? Post em and let us see.
Purple Bullet replied to HondoWalker's topic in Knife Making
Buzzkill - thanks for sharing. I'm puzzled that you wish to keep the cylindrical shape of the cable throughout the welding process. I'm in complete agreement that oil alone will not work for cable welding. I also understand the reluctance to use flux in the gas forge. I think if you had forged your test billet into a flattened rectangle you would have had a good start for a blade. You might still bring that up to welding heat one more time and flatten it into a useable blank. As the curmudgeons tell us "There are no blade failures - just smaller blades." Of course, it may be that you are trying to weld cable for some other purpose. I had success using canister, but because I didn't twist it up first, the strands ended up almost parallel to the edge once it was drawn out. It was my most solid weld, however. -
What's your latest blade look like? Post em and let us see.
Purple Bullet replied to HondoWalker's topic in Knife Making
I've done 1.25 inch but I've always used borax. I'm using a coal forge so I'm continually turning to get even heat. Allowing one side to heat too much creates some interesting warps. I have two power hammers now, but I've never used a power hammer to set cable welds. The thing I've found important is to heat slowly so the outside doesn't burn before the inside comes to temperature. Keeping a good coating of flux helps. I heat to almost welding and super twist in the vise. Otherwise by the time you draw the billet the strands are going straight down the blade. Heat again with a good coat of borax. When ready, I never tried to keep it round, but using moderate blows forge it to rectangular. The problem with using just the grease or oil is that, at least the way I do it, it takes a few heats. After the first heat you need to re-flux. Once the outside is set, then I might take a power hammer to it after reheating. -
What's your latest blade look like? Post em and let us see.
Purple Bullet replied to HondoWalker's topic in Knife Making
Well, I gave it a shot. I was trying to weld the cable without using borax flux. Nope. Without the protection of the borax, the cable starts to look like a fuzzy caterpillar with all the broken wires sticking out. I'm pretty sure, though, that all the grease was gone by the time I made my first twist. Next one will be using borax, but not degreasing. -
What's your latest blade look like? Post em and let us see.
Purple Bullet replied to HondoWalker's topic in Knife Making
Basic grease (which is what I would expect to find in a bulk application like cable) is just an oil that has a thickener material added to it. Some greases have additives that will leave a residue after the oil and thickener wears off, but I doubt that cable manufacturers would be concerned with that. My guess is that it will drive out of the steel as well as borax would when welding. That is, for new, unused cable. Old rusty cable would be a different thing. Its an overcast day, I may have to go light the coal forge and try it. -
What's your latest blade look like? Post em and let us see.
Purple Bullet replied to HondoWalker's topic in Knife Making
Good input. John, you are right. Putting a guard is just habit. I have brazed guards in place before heat treating, but I can't think of a good rationale on it for this knife. Buzzkill - that is a beautiful ladder pattern. I think that on past cable knifes I've been wasting time trying to get the grease out of new cable after hearing what you use for flux. Goods - Interesting! So the notches were intended to strip insulation to bare wire, but a wider groove with a tiny "gut hook" in the middle would enable you to strip romex by the yard. That was one of the things I used to use the hawksbill for. I have a little time to experiment. If that works I might go back to the sheep's foot design. Thanks! -
What's your latest blade look like? Post em and let us see.
Purple Bullet replied to HondoWalker's topic in Knife Making
This is what I have in mind as an electricians knife. I almost hate to label it that. When I worked offshore as a commercial diver, divers and riggers always had the sharpest knife. Electricians always had the dullest. Anyway, the notches at the top would be the most common gauges of house wire (#10, #12, and #14?). The scales will be antler, the loop at the butt is something I first put on a knife for a guy who fooled with horses to clear hooves, but I have found very handy for prying, opening paint cans and such. It remains normalized as I only heat treat cutting edges. Any thoughts?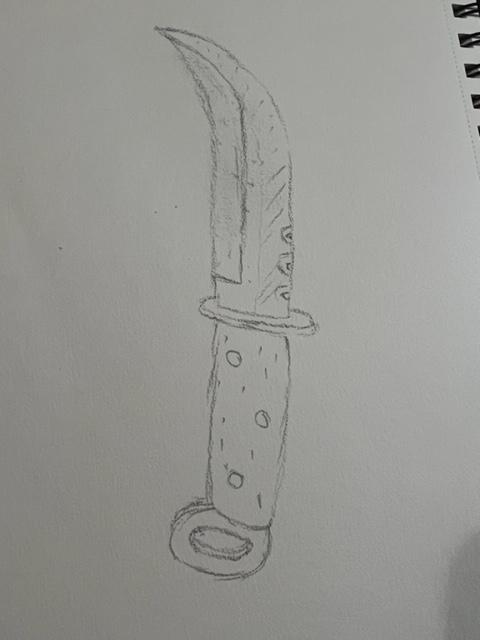
-
What's your latest blade look like? Post em and let us see.
Purple Bullet replied to HondoWalker's topic in Knife Making
I finally succeeded, although I can't say I've mastered the Cable Feather Damascus. This is a knife I made for my friend, Ophei Thibadoux. Some of you met him at last year's Quad State. The cables were consolidated without a canister and forge welded together, although the weld could have been better. In fact, I was originally going to make a straight clip point but had to make it more of a Bowie because the end of the weld wasn't solid enough. My next is going to be Feather Cable as well, but I could use some advice. I'm making it for a nephew who is an electrician. I saw in someone's gallery a sheep's foot blade as an electrician's knife. When I was doing a lot of electrical wire stripping (when I was in the corrosion control industry) I found a hawkbill knife the most useful. I was thinking of a hawkbill with several different gauge stripping notches cut in the spine near the handle. I know there are some electricians out there. What do you think?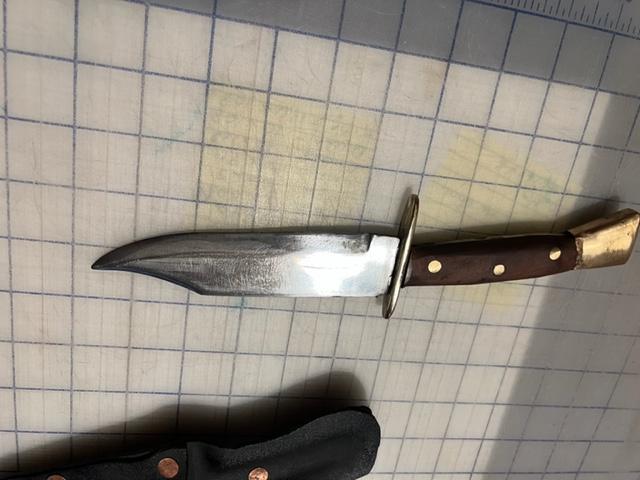
-
What did you do in the shop today?
Purple Bullet replied to Mark Ling's topic in Blacksmithing, General Discussion
Sounds like a good plan and a good start, Dax. I know what you mean about long covid, you just gotta make up your mind to outlast it. Hope you are hammering soon.