

JPH
-
Posts
807 -
Joined
-
Last visited
Content Type
Profiles
Forums
Articles
Gallery
Downloads
Events
Posts posted by JPH
-
-
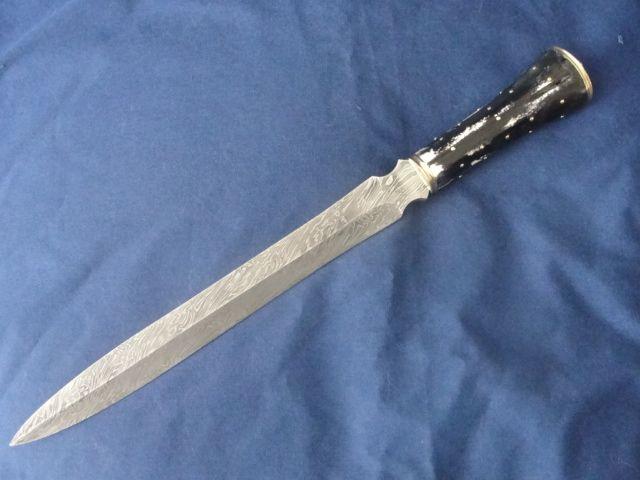
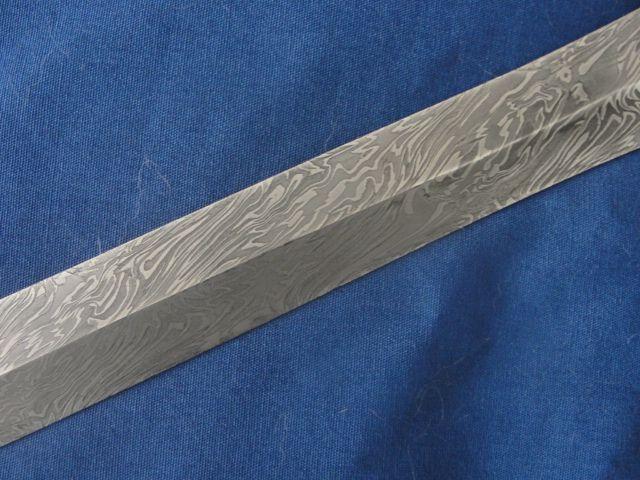
Howdy!!
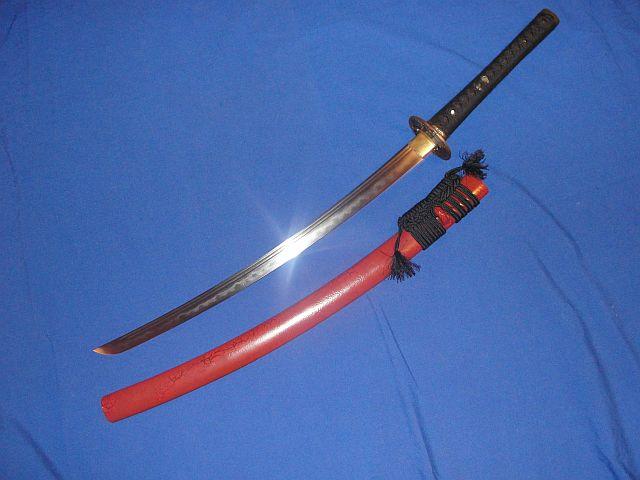
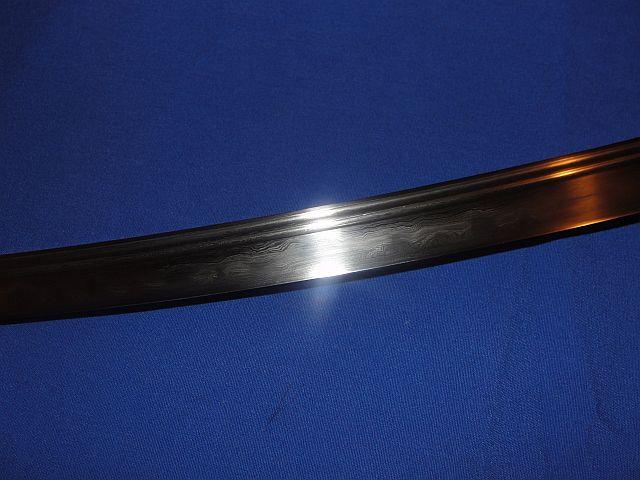
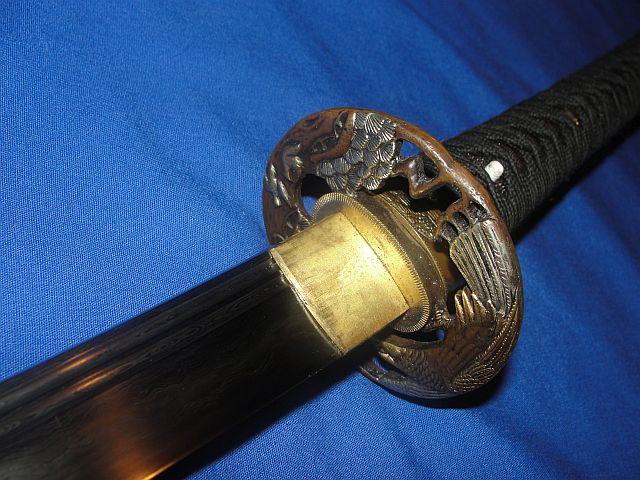
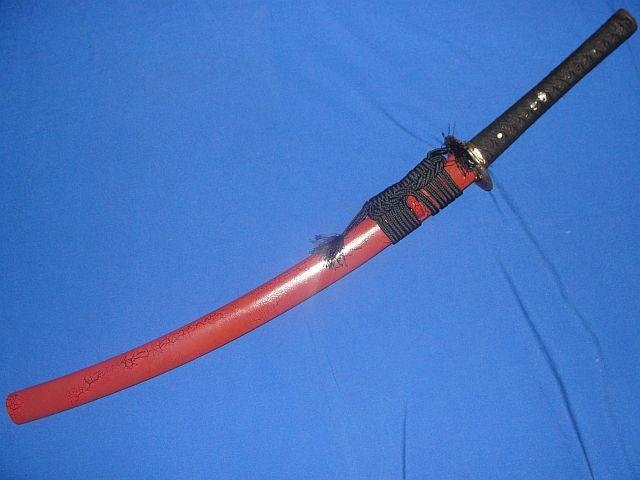
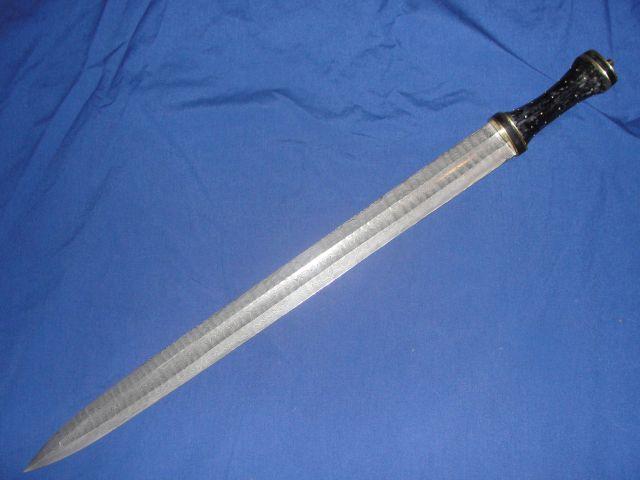
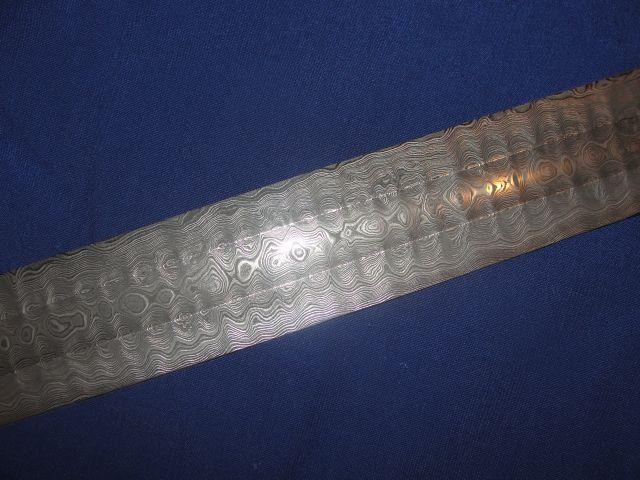
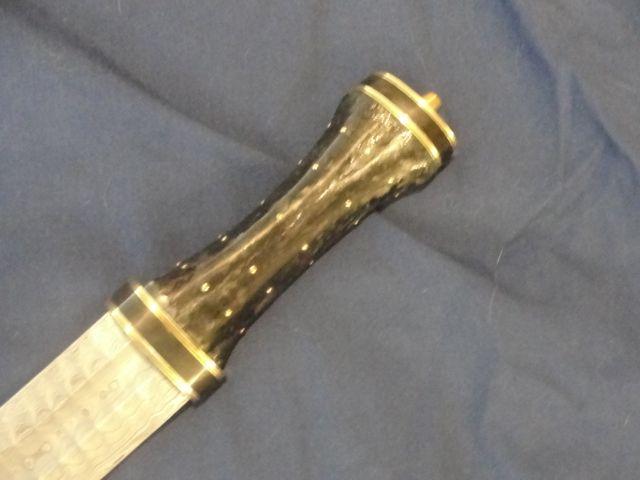
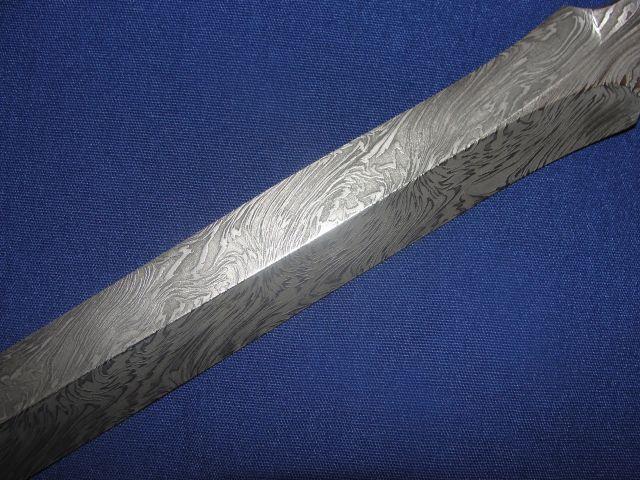
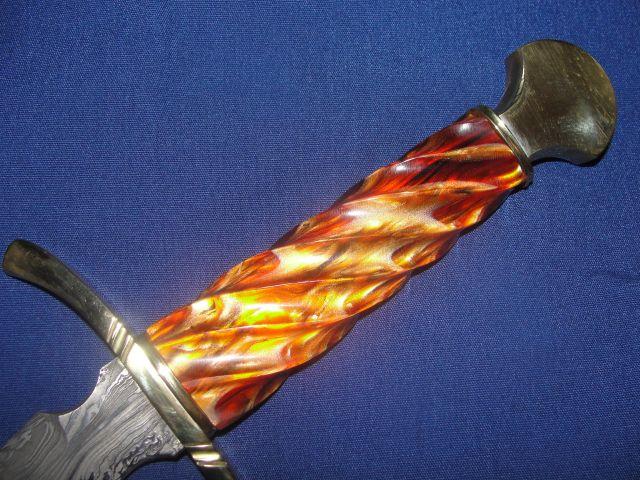
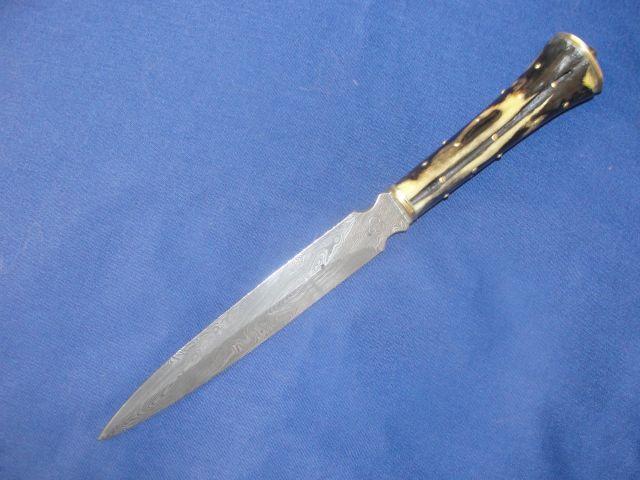
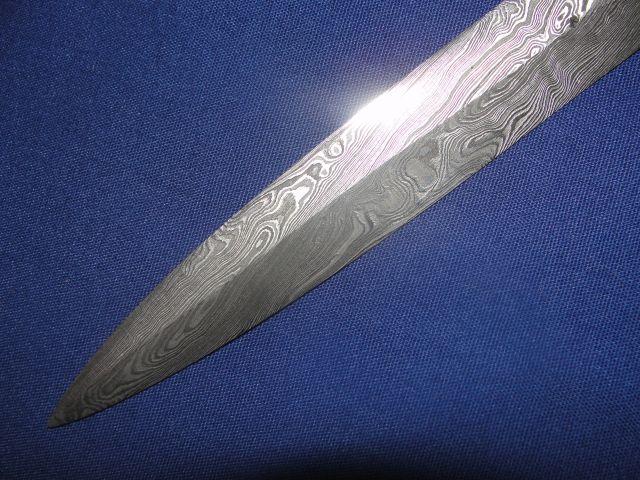
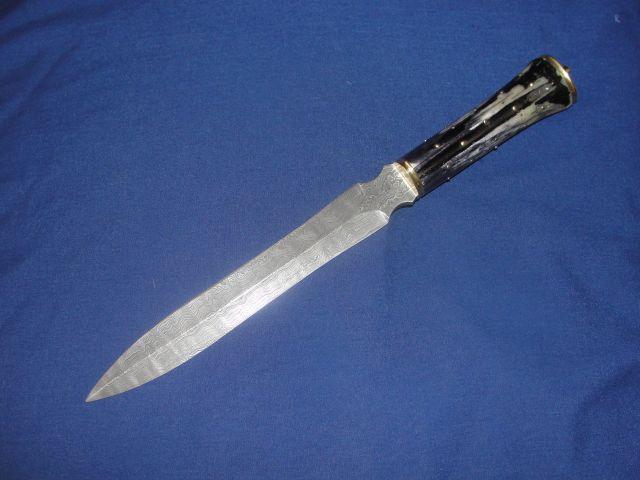
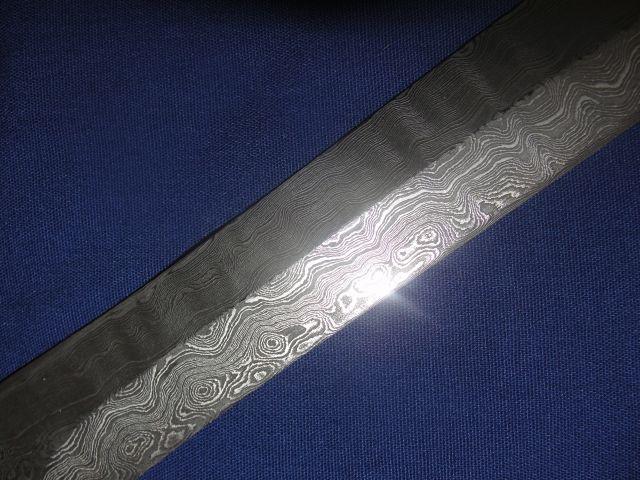
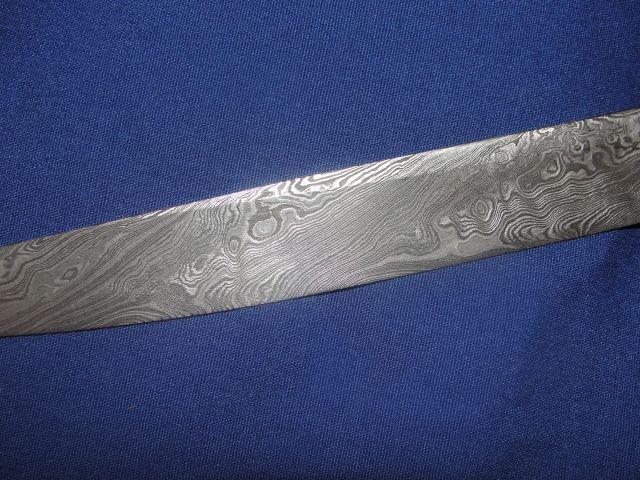
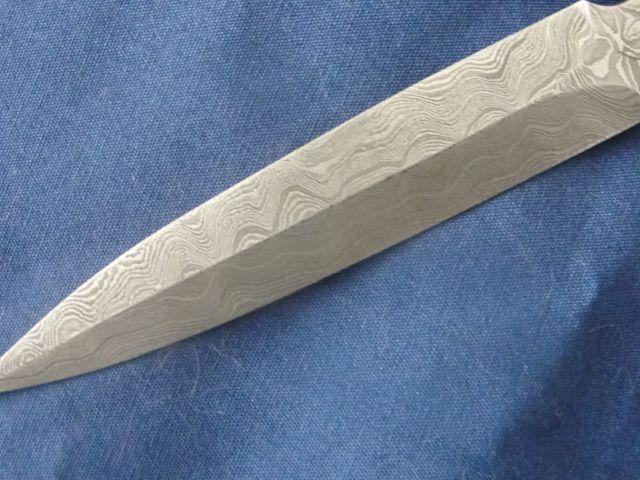
Here is a piece I just finished for book IV..Chisa Katana 23" blade, Shinogi-Zukuri with two narrow Bo-Hi scraped in. 1070/L-6 laminated blade in the Kobuse construction build. Black silk Tsuka-Ito over deep blood red samegawa.. Hawk Motif for the fittings..
Black lacquer under red cracked lac...
I think I finally figured out how to scrape in twin Bo-Hi so they look alike...FINALLY.. This one is being posted tonight for sale on my site..
JPH
-
Howdy!!
I solved it...a broken wire in the power line from the switch/relay to the motor....thankfully I have a bunch of that line so I replaced it and it is back up and running.... and I didn't wind up a grease spot on the floor either,,,
Back to work for me..
JPH
-
Frosty..
You real FUNNY G.I. ... real funny.. tinki-tau .. tinki tau..
Seriously.. this stuff is no fun as far as I m concerned..I am knocking this off for the night and will attack it afresh in the AM.. I need this one up and running as I have a large order to fill...
JPH
-
hello:
Doesn't look like I am getting any juice to the motor..so I either have...I am thinking..a loose wire/connection..a broken wire or a combination of those or a bad relay.. I mean it just clicks when I hit the 240 on switch..so I am in a puzzlement.... the switch/starter in question is a Square D Class 8911 Series B Type DPS042 and they are a wee bit pricey so with my luck..that is probably it..but I would like to rule out everything else...
Thanks Stevie for the suggestion.. Oh man...just when I start to get a head on stuff...these things seem to occur,,,
JPH
-
Howdy:
Ok my press is not working...It was working just fine this afternoon... it was running..doing what is was suppose to......took a break, turned off the electric...both the 120 and 240... a while later I tried to turn it back on to do some more work and now nothing.. The motor will not start..all I get is a click of the switch when I turn on the 240.. Did a current check..things look OK as far as I know....and to be truthful electric stuff scares the bee-gees out of me... Plus I have no idea now what could be wrong as I am now in above my pay grade.. ANY ideas and how do I trouble shoot?? THANK YOU ALL
I do not want to be a grease spot on the floor...
going to check on the motor end to see if I have current while I wait for a reply...
JPH
-
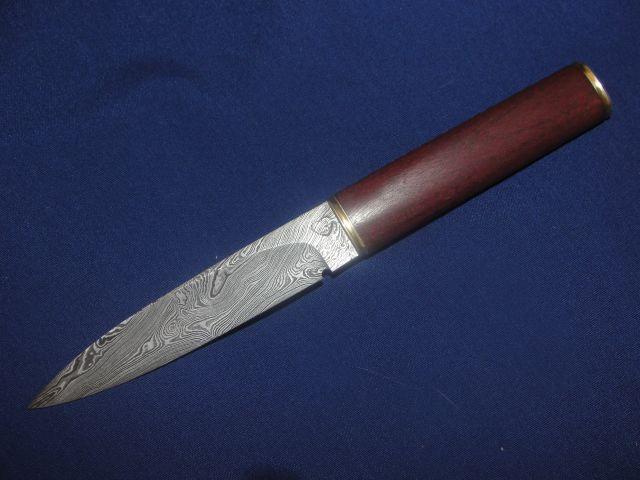
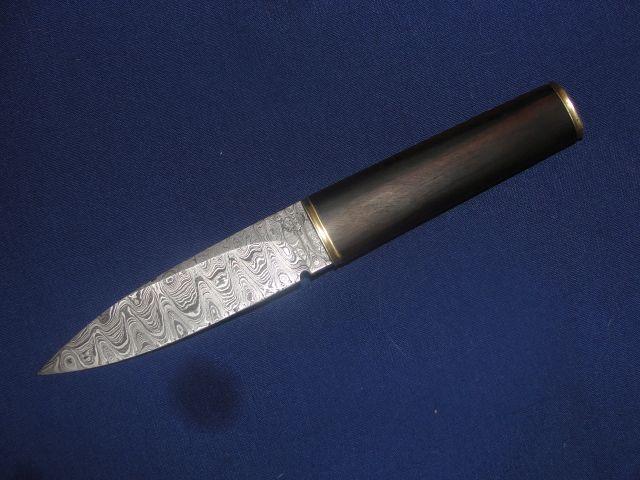
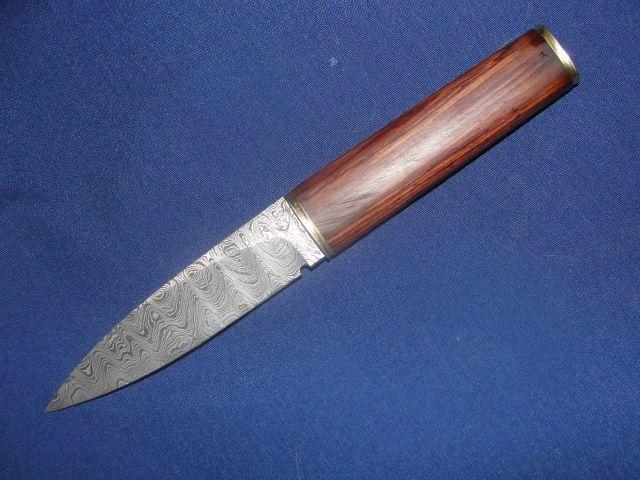
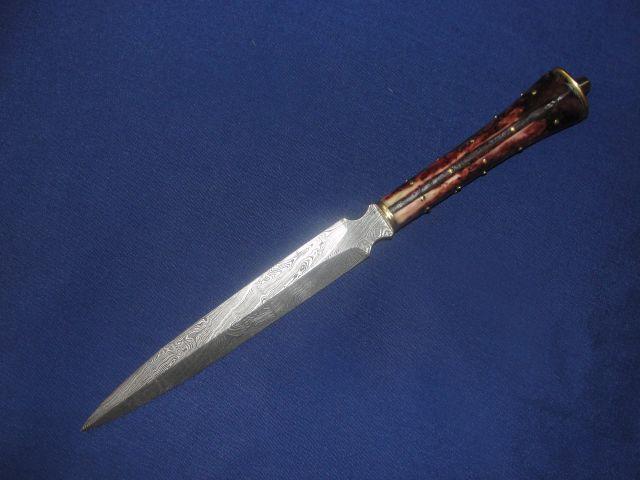
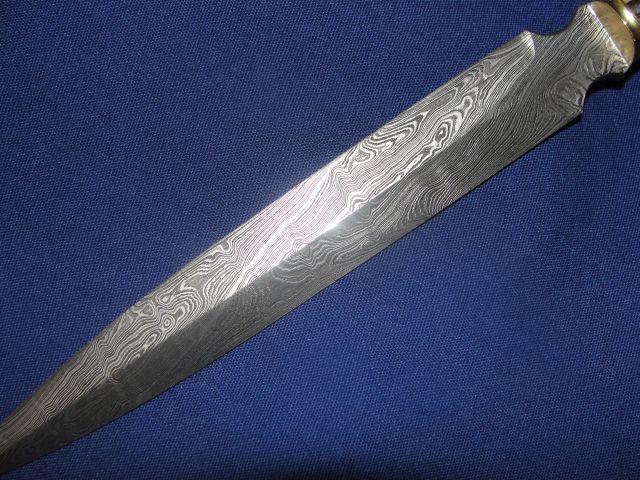
Howdy...
Here is something else from an old man's front yard...a quick and dirty Hugs and Kisses patterned sword... 28" ish blade...1070/L-6 and some meteoric iron for the blade,...one piece blackened bovine ivory grip with three piece phosphor bronze and buff horn guard and pommel plates...didn't turn out all that bad..Made this for a show we are attending this weekend...already listed for sale on my site as well..
Hope these pics turn out...
JPH
-
hello;
Been here now for 18 months...finally got everything more or less set up..Now if I can just remember where I put stuff I would be doing pretty good..
The new studio is close to twice the size of the old one so I have new places for things...I am slowly getting use to the new expanded set up...I actually have ROOM now...
I am still working on replacing the equipment that "walked away" from my storage in Nevada.. the last piece is a bench mill and then I will be totally back up..
All in all I am back to work and finishing off my 4th book...
JPH
Frosty..
I do these free hand using a flex shaft machine and 1/2" dia drum sander arbors..wear a respirator... that is what I say cause this stuff is all sorts of nassy..
I rough cut in with 40 grit, smooth that out with 180 grit and start the polish with 320 and then work on up up to 2000. The last two I do wet..gets messy but oh it comes out like glass.. After the fluting I lightly buff with black crocus..change wheel and then go to the white rouge ..that rouge works on the bronze as well..oh it comes out smooth...
Here's a less fancy one...
JPH
-
Hello:
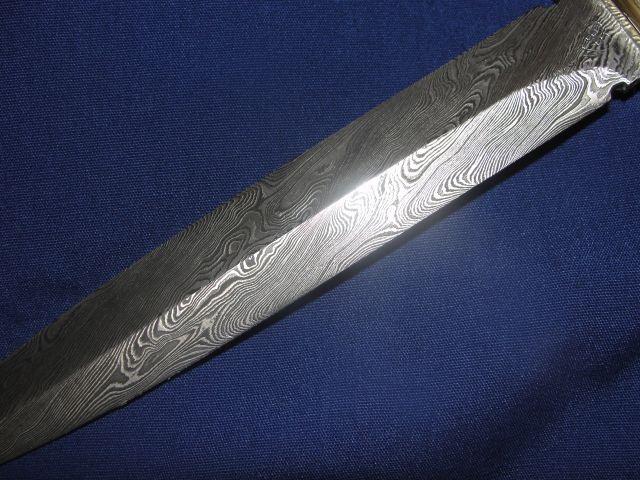
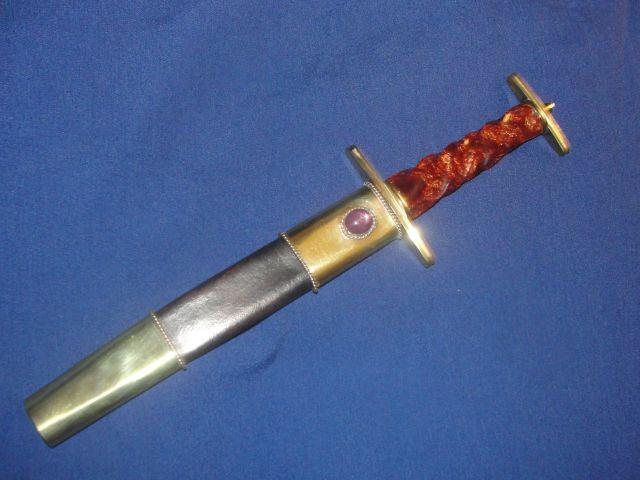
It's been a good deal busy around here with family stuff thanks to a brand new granddaughter arriving .. so this is something I whipped out real quick for site stock..
This one is a mix of 1095, L-6 and some meteoric iron thrown in ..8 1/4" Maiden Hair blade... with phosphor bronze mounts...I used some of that bowling ball material for the fluted grip I have been playing with.. I sorta like it..This piece looks like a deep reddish maple burl... Turned out OK...at least I think so...
The sheath is set with a very nice 17.65 Ct star ruby.. cut this one myself.. All in all I think it didn't turn out too bad..
Hope the photos work... as I said this one is website stock and is currently listed there..
JPH

-
Frosty..
Some of the material I have been using I imported from India two years ago..got 300 pound of the stuff.. It has been cleaned, dried, sanitized and bleached with industrial hydrogen peroxide.. The smaller pieces I process here by cooking it out with a little TSP and letting it simmer away for a few hours depending on the pieces..but not too long as the TSP can have nasty effects on the bone surface..after the cooking I do a hot water soak then I air dry. Then I process it to get what I need....
JPH
-
Frosty!!
I tell ya..bone is a great material to work with but it can sure try your patience.. Yet I do not understand why more makers don't use it... It is a gorgeous material when properly worked...
60ish holes per drill...especially with one so small is not all that bad really...when you come to think about it...this material is pretty much dried out and free of grease and oils due to the way I process it... but it can get under your skin as far as working it goes...but the way it turns out is 100% and then some worth it!!
As promised here are the sgains...there was 6 planned but I had a nasty inclusion in one so only 5 survived...
JPH


-
hello:
That PDF is NOT legit. I have been running these down as fast as I can.. Copyright is still active and well..it's not authorized..
On the drill...the problem is the bone is not consistent,,there are hard spots..there are soft spots..and well..you hit a soft spot after a hard spot..the drill goes in..hits the tang and snap...hit a hard spot from a soft one..the drill jams...snap.. I get about 60 holes per drill..which comes out to about 2 grips worth...
JPH
-
Hello:\
Frosty...yeah,,,these little terrors get a 3/64" dia pilot hole drilled before they are hammered home...I break a lot of drills... I am getting pretty good with my foredom flex shaft though////
For the record I weld by hand, forge to shape by hand...I do alot by hand but Julius does get some time in on these...mostly heavy reduction work...
JPH
-
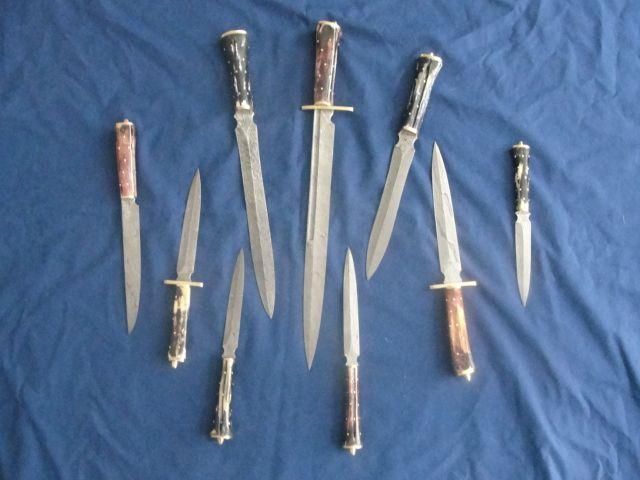
Hello! Here is the results of this last week's work out in my front yard.. Yeah I was busy committing forgery... All are hilted in my bovine ivory and have pattern welded blades in various patterns..All are a mix of 1095, L-6, 1070 and some meteoric iron thrown in for giggles... I hope these photos turn out...
Almost went blind setting in all those nassy little studs...
I have already started the next run of a half dozen PW sgains..should be done tomorrow if all goes as expected..
These ones will be posted to my site this evening..
JPH


-
Frosty:
From what I can tell from reading up on Atlas saws..the gear box is suppose to be full...I know it was when I cracked it open and it had the glop of grease around the gears and oil everywhere else..it was a mess to clean it out..geeze that took a while... still waiting for the parts to show...
-
Frosty!! Mi hermano!
Yeah..thank you for validating my decision... the replacements will be here in the AM..so I have been told..went out and got me some red sticky grease and some gear case oil so I am all set..so I think I am...(I got to remember that this is a 100 year+ old machine so...red grease was from the days way back when)...
I got the little bugger torn down and ready for the new parts..replacing the gear..(no brainer there)..upper bearings, oil seal..lower bearings as well as the snap rings..(I really hate those..they can shoot any and every where..and they are a real PITA to hunt down..) so I be prepared..so I think... Yeah..I know.ME thinking??> NOT a good idea but...In gotta get this one up and back on line ASAP as I have stuff to make!!..
FAB-
JPH
-
Howdy!
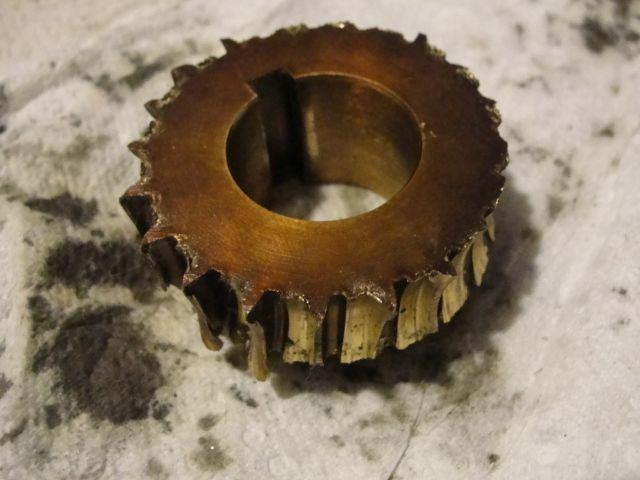
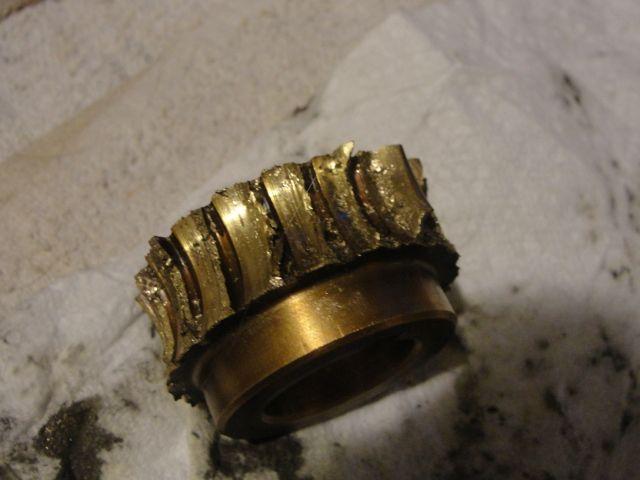
Here is the gear in question: Ya think it's thrashed?
FAB-
JPH
-
These old machines were made by craftsmen for craftsmen..Not like the disposable throw away pieces of trash that they make now.. Use it for a while and when it breaks buy another.. No..I'll take the quality of a properly made machine any time..I have no problem getting covered in grease, oil and grime to maintain a good piece of equipment. It's all part of the experience..
FAB-
JPH
-
Frosty:
This is an old Atlas..made before or early WWI ish..so I have been told...I am thinking lithium grease and a gear box slurry mixed up real goopy and runny like... still looking at some Atlas machine tool boards for info..
FAB-
JPH
-
Howdy!
Well my meal cutting bandsaw has been giving me fits so after trouble shooting it and replacing the top wheel bearings..I decided that I may as well replace the lower bearing as well..... long story short is the worm gear that runs from the V belt wheel into the gear box is 100% a-OK however the bronze gear that drives the lower wheel shaft is toast..I am amazed that the thing still worked!! So..after cleaning out all the bronze shards, shavings and bits and ordering the new bearings, oil seals and the new gear..what kind of grease/lube should I use?? I am a wee bit leery of using gear box oil alone for this..
The new parts will be here Weds I was told...so.. any suggestions??
FAB-
JPH
-
Frosty:
I had the same eye glasses frame material idea that you had hit me last night while I was watching a commercial for custom glass frames.. Some of the material shown looks pretty interesting...This requires a bit more investigation on that.. Let me let slip my e-vile minions on this... I am, not much of a fan of using all these "plastics" and all ..I do prefer natural materials but with the present situation as far as some skeletal materials go and CITES.. I mean I have a BUNCH of ivory that I picked up at an estate sale in the early 1980's (I went in with my dear friend Bob Egnath..who was at the time the finest traditional scrimshander in the world and another maker, Sherman Williams and we bought 4 huge tusks that were harvested around 1890 or so....) So I am stuck with all this ivory that I CAN NOT sell....while the paperwork I have is adequate to make it legal to own..it is not legal to sell.. Sigh... So that is why I am using that 100 year old Bakelite.. So I am always searching for different stuff to fill that "ivory" and "tortoise shell" look without have a vacation at the Greybar Hotel...
FAB-
JPH
-
Eventless:
I just start fluting and work my way from there..I have done so many of these that I can just freehand it and get decent results..at least I think they are decent.. It just takes a wee bit of time to get everything smoothed out..
So ya'all have seen one of the processes I do around here...
FAB-
JPH
-
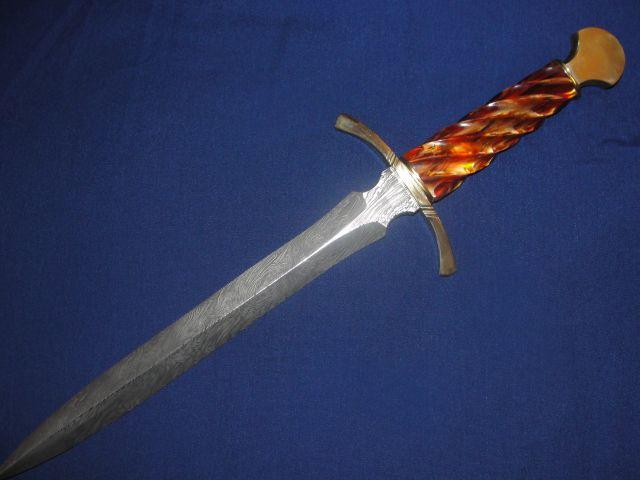
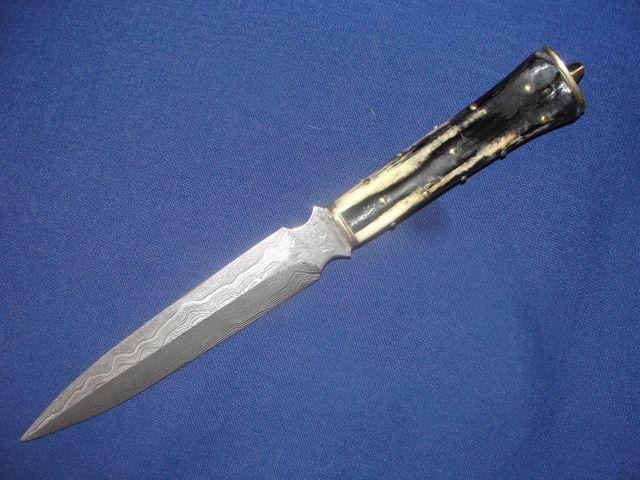
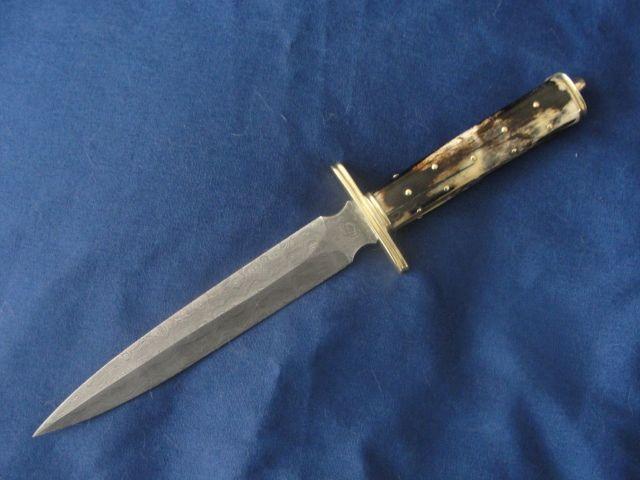
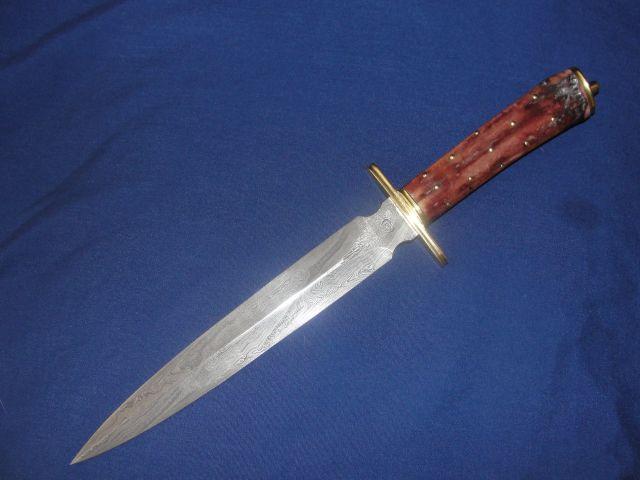
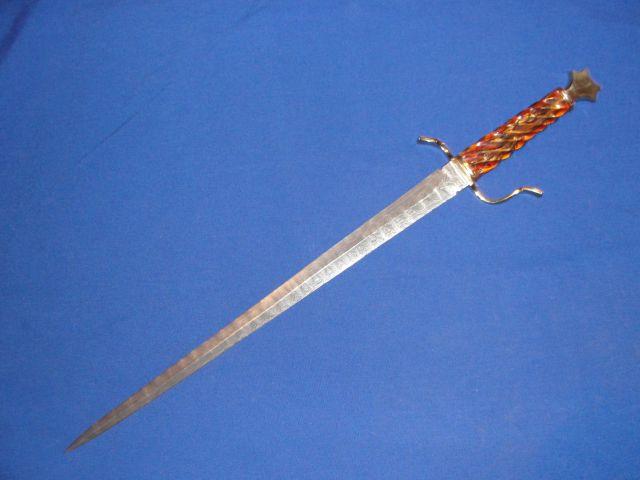
Hello!!
Well..here is the last "installment" in this project..so here we go..
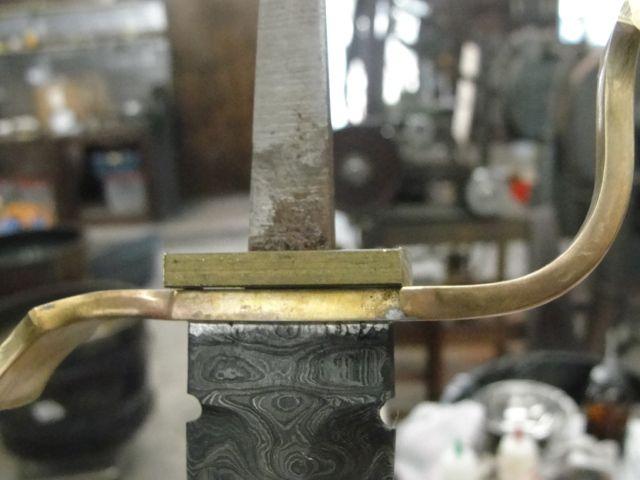
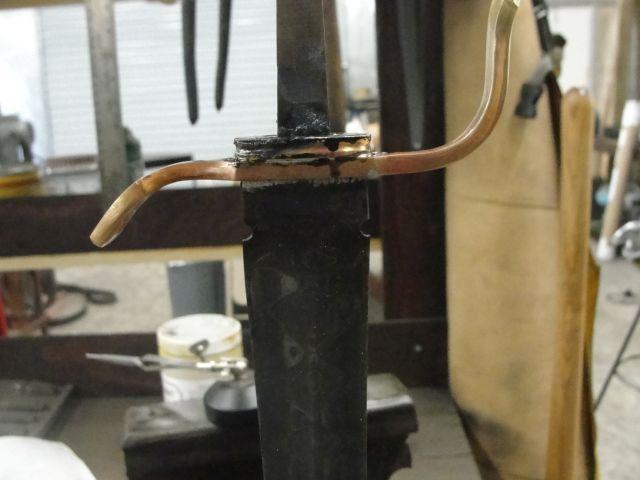
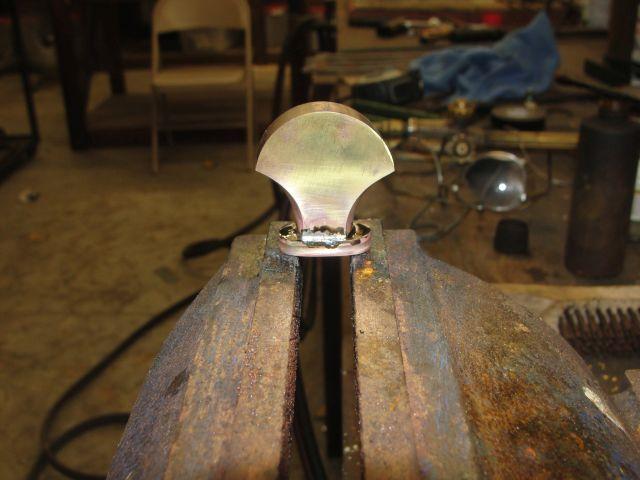
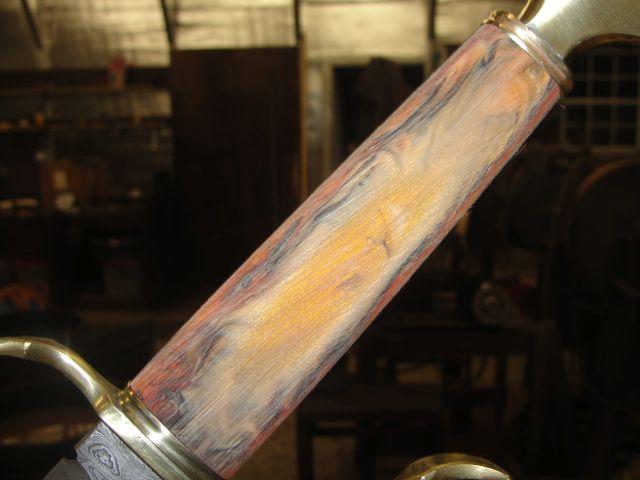
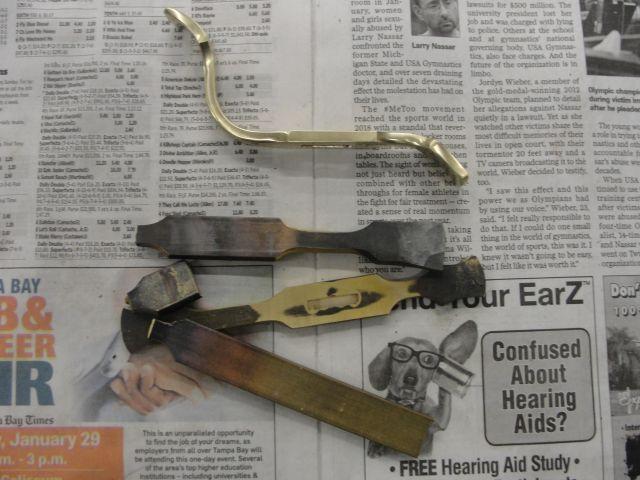
The first photo below shows the guard silver soldered to the blade. I use a 4%Ag 96% Sn solder...
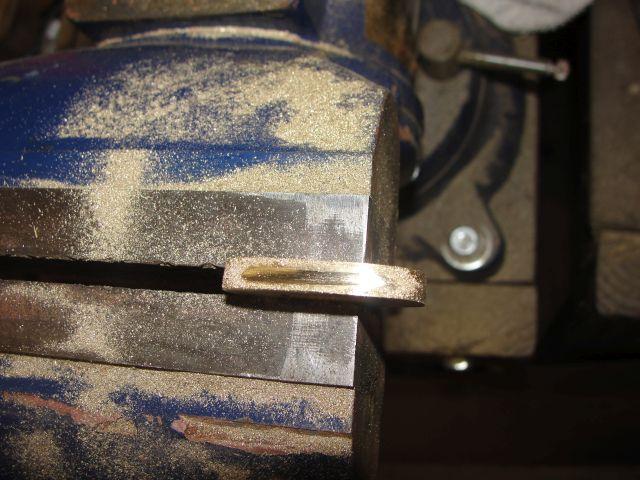
The second shows the bronze bar for the ferrule fitted to the tang/guard area.
Third picture is the shaped guard and start of the file work around the perimeter of the ferrule.
Fourth is the ferrule soldered to the guard/tang
Fifth photo is the rough pommel/ferrule before sculpting
Sixth pic shows the fitted grip before final shaping and fluting
The seventh photo shows the finished dagger.
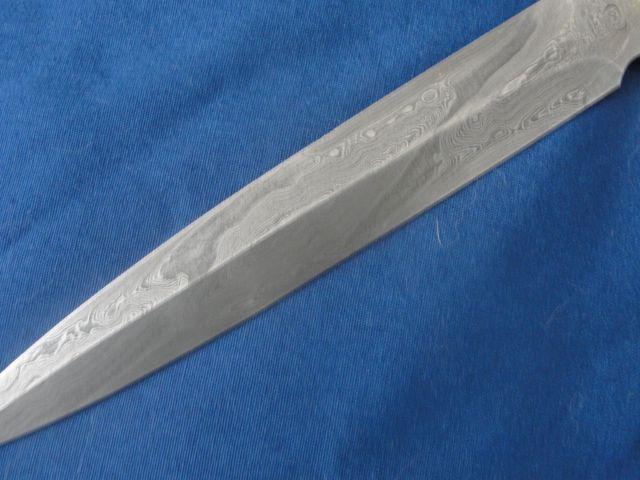
Photos eight and nine are close ups of the blade and the grip respectively.
All in all this did not turn out half bad. The blade length turned out to be 18 1/2" with an overall; length of 25".. Not too bad for an old man..
Hope this helps explain a bit as to how I managed to do things...
FAB-
JPH


-
Maxwell:
I found a gentleman back in Nevada before we moved down the the wilds of the Florida jungle that made custom bowling balls. He laid up some sort of polyester/polyurethane stuff and resin and worked it around the weight block inside the ball..the stuff STINKS when you work it and it is rather picky to polish but it is something to see...takes a glass like polish.. He is now selling the stuff to custom fountain pen makers (in a much smaller size.)
FAB-
JPH
-
Frosty:
Sal Ammoniac does help..and it doesn't take much at all..about 1/4 part fine powder to make a difference...make sure you have more than adequate ventilation when you work hot..no matter what you are doing CO is a killer...and it can sneak up on ya ..
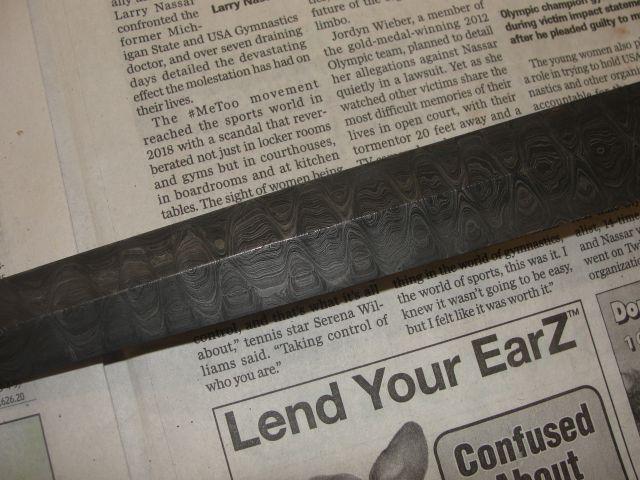
OK next installment.. Didn't get as much done as planned..had some problems with the etch and then the guard decided to be a putz and I messed up 3 of them before No.4 worked....but tomorrow it will be done so here we go..
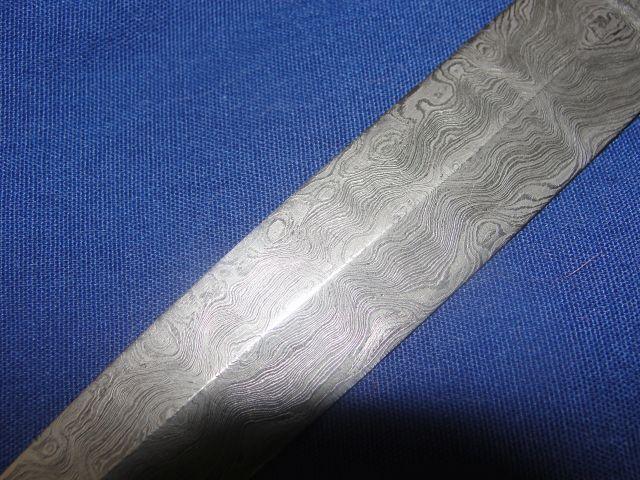
First photo is the etched blade..didn't turn out half bad really...had to change etchant , which solved the evenness problem...got to do that every now and then.
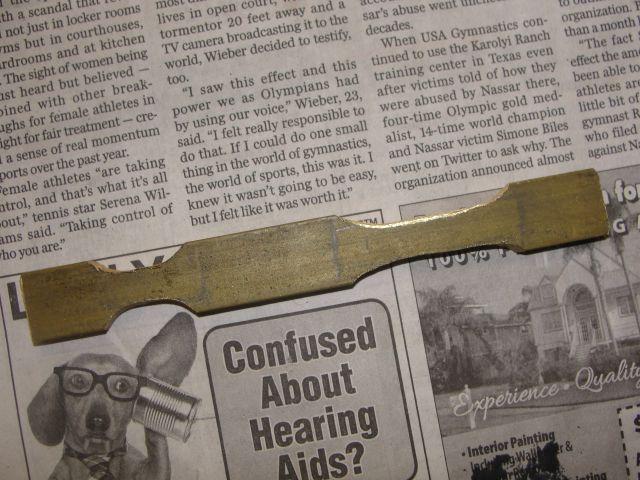
2nd pic is of the rough shaped bronze guard before the forging of the flats and the bends..Here is when I hit trouble...
The third is the buggered up guards and the one that worked..All that needs to be done is solder this onto the blade..make the top and bottom ferrules and pommel.. fit, shape and flute the grip and it's done save for the sheath..I might include that as well just for grins and giggles..
So we will see what happens tomorrow...The missus has a PT appt. in the afternoon for her knee surgery she had two weeks past..so my work time will be curtailed a bit in the PM..
More as things happen
Book IV Chisa Proto
in Swordsmithing
Posted
Brother Thomas:
I am a lot closer than that...a lot closer.. still looking for a graphics person to do my line drawings...
JPH