
Arthur210
-
Posts
239 -
Joined
-
Last visited
Content Type
Profiles
Forums
Articles
Gallery
Downloads
Events
Posts posted by Arthur210
-
-
Salut SLAG, j'apprécie tes commentaires.
Indeed the winters are long and cold around here. But the shed will be fully insulated and I plan on installing a small heating unit to keep it above freezing temperature in the winter. I won't have running water in the shop, but will probably bring a bucket of water from the house whenever I fire up the forge. In any case I don't intend on wearing any synthetics when forging! But that's certainly good advice to anyone who reads this.
A small stick welder is indeed on my wish list and you raise a good point about the fumes. I am hoping that with the chimney and the windows being on opposites sides of the shop, ventilation won't be too much of a problem. It certainly won't be until everything is closed up and insulated, since there will be a roof ventilator. Once the insulated ceiling is installed I am hoping that the chimney can provide enough draw to get any fumes out quickly. I have a little bit of experience with stick welding from growing up on a farm, but I appreciate the warning in any case!
P.S. I'll keep scouting out the various local scrap yards over the summer, hopefully one of them will have ball bearings. In the meantime I have an 8 oz ball pein hammer that I can use if I find an anvil to test.
")
P.P.S. Work on the shed is progressing slowly at the moment. Digging through the roots of the removed tree is a lot of work. Nothing unexpected, but will hard work.
Cheers!
-
Workshop update: The old shed is gone. You can see the materials I recovered from the old shed on each side of the picture. I plan on reusing most of it.
I've started digging to prepare for the concrete slab. The stakes delimitate the area where the workshop will be and the planks (which are level) show the yard's slope. The red pry bar to the left (in front of the piled-up wood) is where the left-most corner will be.
![20170625_164309[1].jpg](https://www.iforgeiron.com/uploads/monthly_2017_06/595157265248d_20170625_1643091.thumb.jpg.2e68f3251a0e4600388e4148b6df8b9a.jpg)
-
Yeah, it looks like it was sold within 3 hours of the add being posted.
-
It's all moot now. The seller got back to me and it's been sold already.
I'll keep my eyes open.
-
Thanks Frosty. Yes, I've read about the rebound test in the "Anvils: A beginner buyers guide". I'm re-reading it now to refresh my memory and see the particulars of how to perform the test with a ball peen hammer instead of a ball bearing... (Can't see anything about that.) Would the added mass of the hammer affect how much rebound I'd get?
-
Thanks for the comments Daswulf. I will only be able to do a partial rebound test with a small ball peen hammer, as I don't have a ball bearing yet. The one scrap yard I have visited so far didn't have any and I didn't expect to have to test an anvil so soon.
I'm waiting to see if the seller has some additional pictures he can send me. Like I mentioned, it is perhaps too heavy for what I need and the small workshop I am currently building. It will be hard to move around, or even unload from my trailer for that matter. And I would have to keep it outdoors (I'd wrap it up to protect it from the rain) until the workshop is built.
I was on the lookout for something in the 120-200# range, but seeing an anvil for sale at such a low price is quite tempting. Did I mention that the price is in Canadian dollars?
") That would make it about $0.85/pound in USD.
That would make it about $0.85/pound in USD.
-
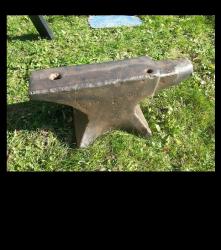
I just saw the following anvil for sale near my location. At first glance, it seemed to be a bit heavy for my needs as a beginner, particularly since I am still building my shop. The seller mentions that it is about 350# but the single picture doesn't show any markings on it. I'm also puzzled about the hole on the side being so close to the surface and wondering about its quality. Could this be a cast iron anvil with no hardened face? The price seems quite low at about $1/pound.
I've asked the seller for more pictures, particularly of the surface and any markings on the anvil. I will post them as soon as I receive any.
Worth the time to go and see this in person? Any advice appreciated. Thanks!

-
27 minutes ago, Frosty said:
Haven't spent much time with folk who speak a different language?
I spend a lot of time with folks who speak a different language: English.
My primary language is French.

(My previous comment was tongue-in-cheek. I just don't find swear words that useful in life, so I concentrate on learning more useful ones instead!)
-
10 hours ago, Daswulf said:
the few other french terms I remember arnt good so I'll leave them in the gutter lol.
Why is it that most people seem to pick up the French bad words faster than the rest of the language?

Of course, that doesn't seem to be unique to French, so it may simply be human nature at work.
-
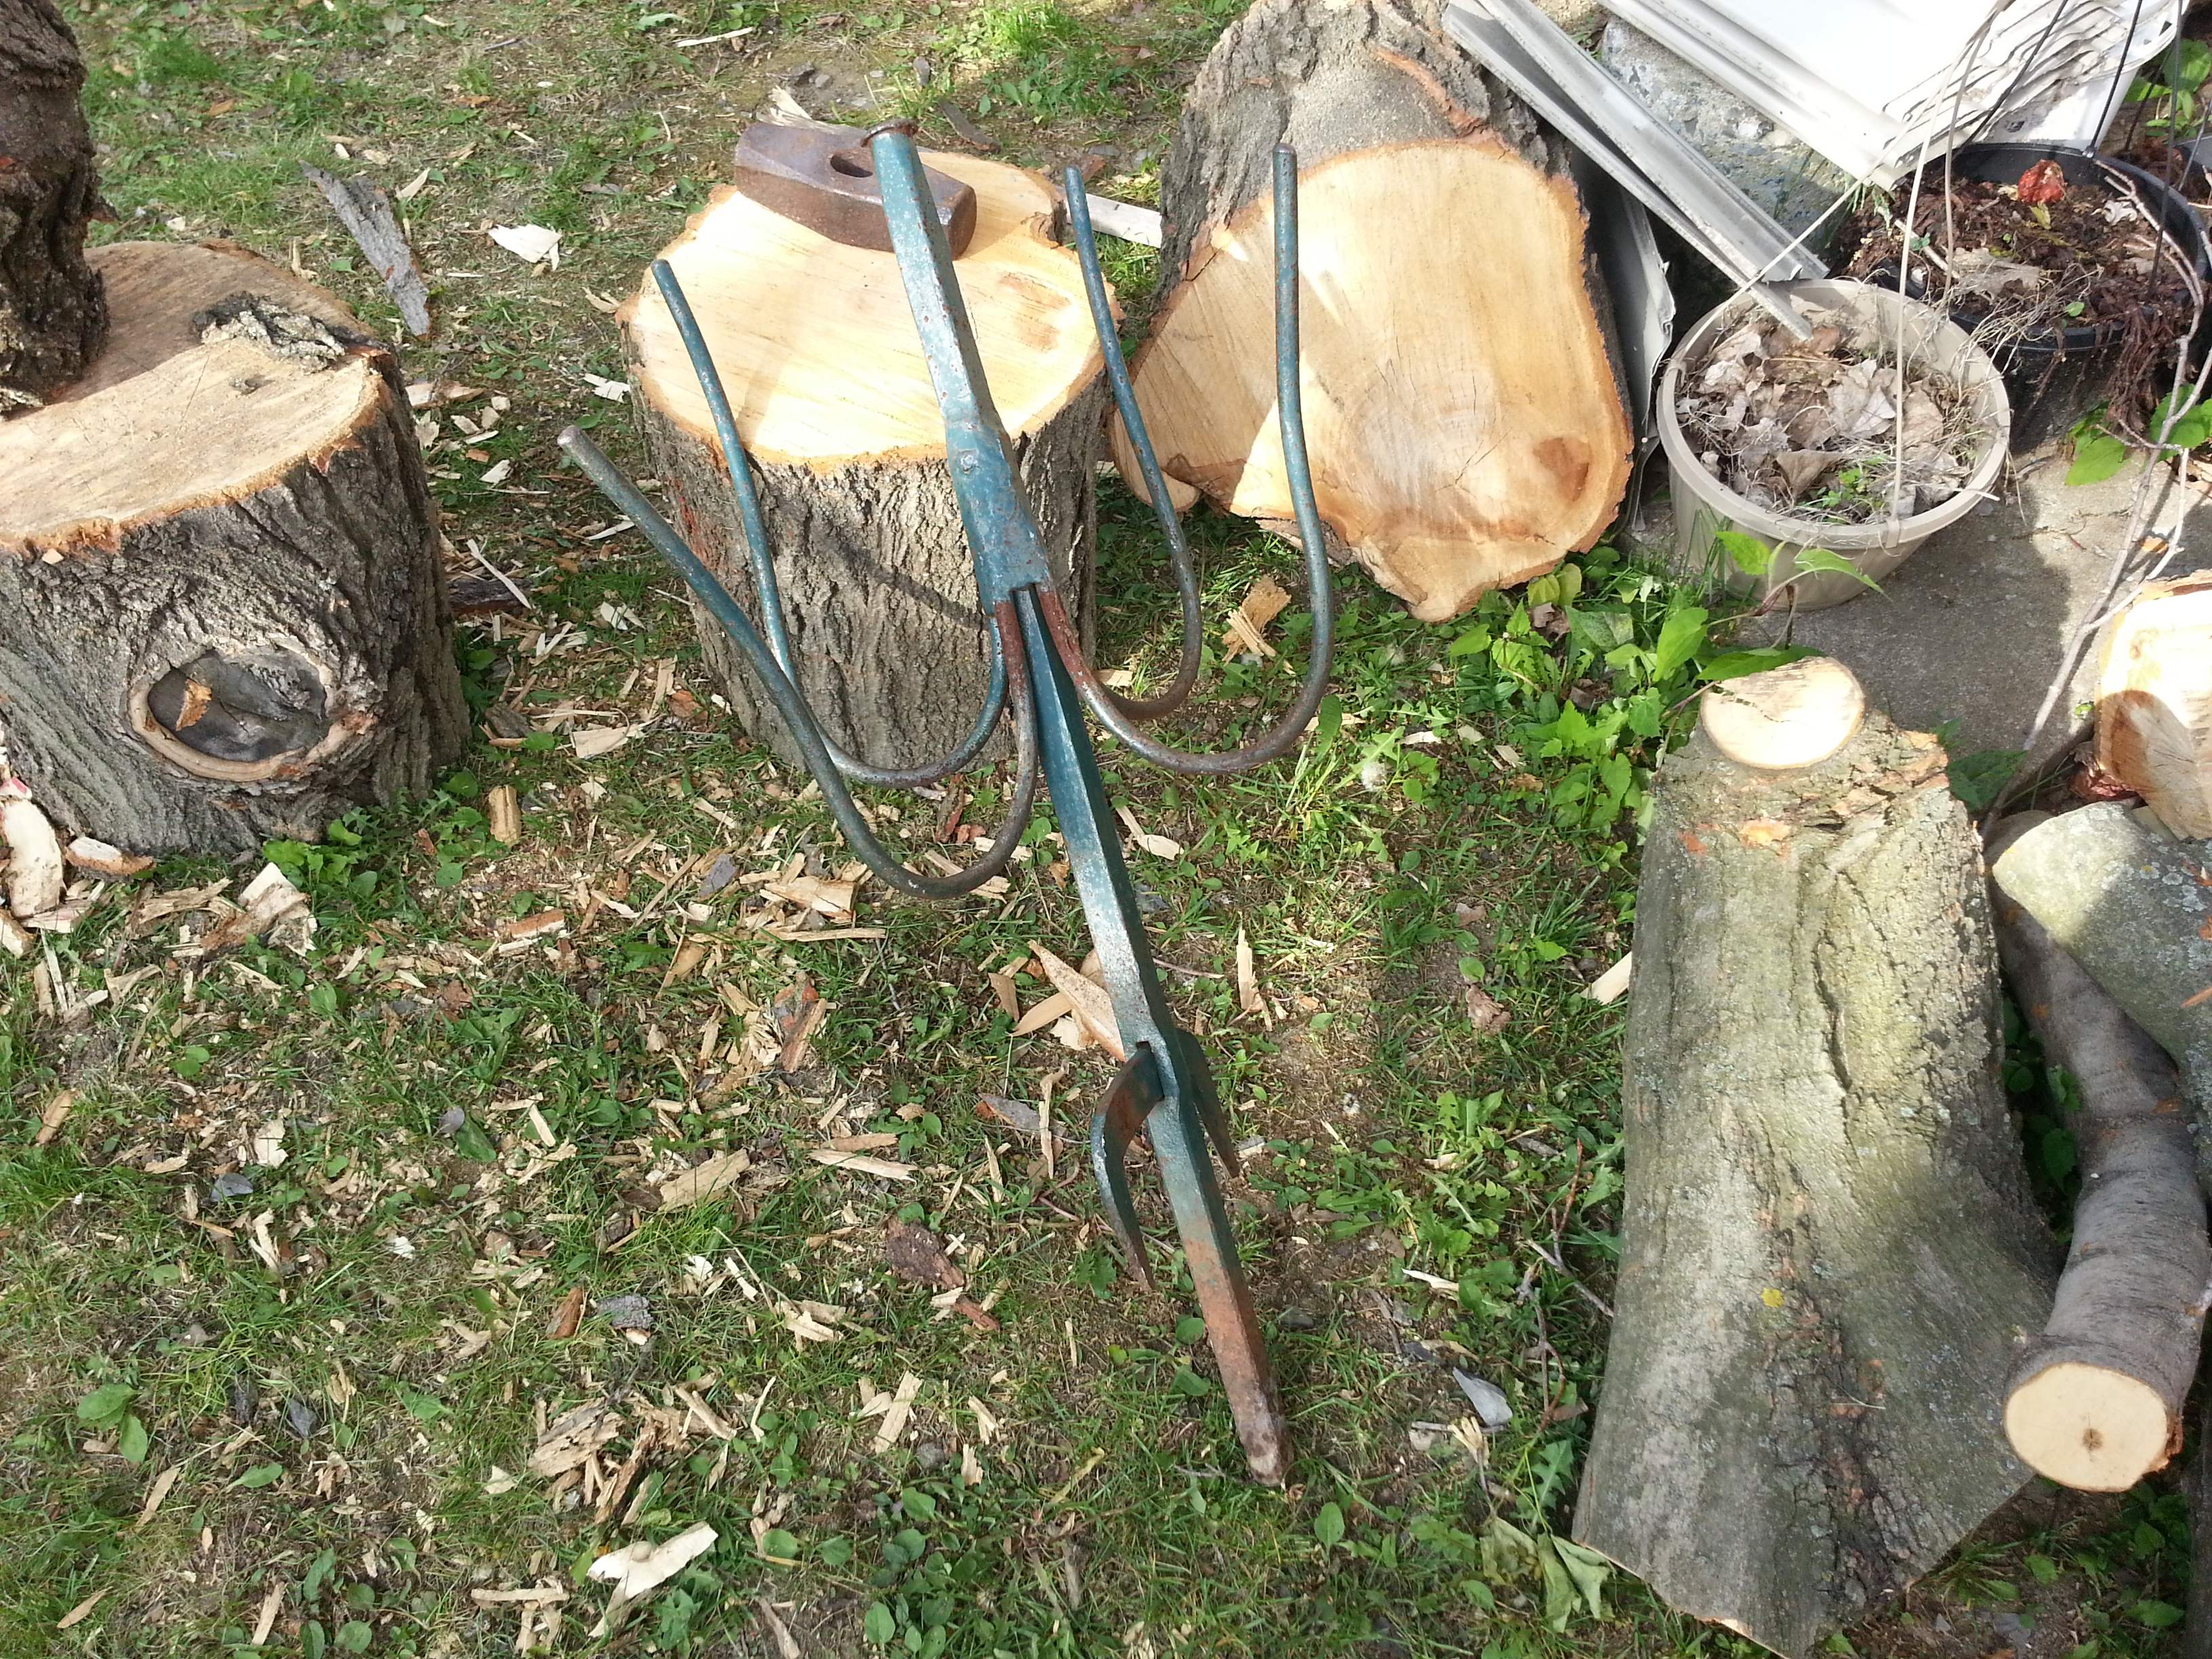
First contribution to this topic. I took the time to read it all (yes, all 247 pages of it) before adding my very modest contribution to the mix. This allowed me to pick up quite a bit of valuable information along the way.
A couple week ago I picked up this thing along the street, leaning against a trash can. As I was going to gas up the car at the time and had the trailer hitched up, I simply threw it in the trailer. Must have been some kind of home-made pot-holder or table holder. The center piece is 1" square solid metal while the curved arms are 1/2" round. Free.
Then, last weekend, I picked up this 6# head at a flea market for C$2. When I looked at it more carefully in sunlight I was finally able to decypher the markings. The top says "BNT1796" and "Made in England". Did a quick search and discovered that BNT stands for Brades and Nash Tyzack, which was formed in 1951 and folded into Spear and Jackson in 1967. I will clean it up a little with a wire wheel and mount it on a short handle.


-
Workshop update: The old shed is now empty and the tree has been cut down. While waiting for the crew for the tree, I started removing the old shed's siding.
![20170602_182049[1].jpg](https://www.iforgeiron.com/uploads/monthly_2017_06/593599ee8b519_20170602_1820491.thumb.jpg.ada75bc72d03b2534a6e992556e027b5.jpg)
-
Indeed. Never crossed my mind not to install one. But a reminder to do it never hurts anyone!
-
15 minutes ago, Will W. said:
I have a side draft hood on my forge as well, now I've only used that single one so I'm no expert, but it seems to me that you would want that forge (and hood, consequently) far from the door. Otherwise the hood and the draft from the door may be conflicting, leading to a smoky shop. Mine is on the other end of my shop from the doors and I've had 0 problems with it. Just my speculation, hope it helps!
Prevailing winds here blow from where the windows are located to where the chimney will be, so just opening the windows should give me a nice draft moving up the chimney. But thanks for the reminder.
20 minutes ago, JHCC said:And keep the fire extinguisher by the door, so that you pause to spray the conflagration before making your escape.
It's on the plan. Two short steps away from the forge for the fire extinguisher. With another two steps in the same direction, I'm outside the door.
-
19 minutes ago, ThomasPowers said:
of Ulm...
What we see a lot of is people making elaborate plans *before* they have the requirements. As a Software Analyst you probably are aware of what that leads to... Some time spent finalizing the requirements will pay off in the long run---if not the short run. Hence the suggestion to spend more time smithing, visit other people's shops, etc.
Very well understood. And, as I've written before, I plan on doing that as well over the summer. The plans of the inside aren't final, but I need at least some idea of where to put the chimney as I build the new shed. Since just building the structure and roofing it will probably take most of my summer's spare time, I need to get started on that so that it can at least be weather-tight before mid-fall.
The rest of the shop's design is only tentative until I've "finalized the requirements" for forging by trying it out. Right now what I'm doing is more along the lines of getting familiar with the constraints of the project before I start it.
-
Unfortunately, I don't have the space on my small plot to keep both sheds, even if the city allowed it. It is only 4800 sqare feet, including the house itself, the driveway and the front yard. You're seeing over half of the backyard in that single picture. Got to keep some space for the grandson (and future other grandchildren) to play.
-
Frosty, I wasn't aware I sounded apologetic. I'm not going to apologize for that. But I'm Canadian and we are generally polite people.
But what I did want to express was that I was appreciative of the advice being given to me, even though not all of it may be applicable. I understand about brainstorming, I just don't want you to believe I'm not listening if I discard some of the ideas you and others bring forward.
I may be new to the smithing craft, but I've worked with my hands before and I've got some experience under my belt in other crafts. I'm 47 and I grew up on a farm, though my education and career is as a software analyst. I tend to think and plan quite a lot before I tackle a new building/renovation project, so that I can understand the pros and cons of various configurations and various ways to obtain the results I am seeking. That's professional deformation, so to speak.
Now, back to the shop, I do indeed plan on putting everything I can on rollers, either permanently or using rolling trays. That will make reconfiguring the shop faster and easier.
The orientation of the shop will be so that the door is to the left of the picture I posted, with the long windowless wall will parallel the neighbour's chainlink fence we can see in the back. That means the door will face the entrance to my driveway, which is not shown in the picture but is to the left of it. So the stack will be about where the far-left corner of the current shed is.
I'll certainly keep a bucket or small tub of water in the shop, just not something as large as the barrel shown in the original drawing. The shelevs will indeed bigin with just plastic tubs for storage, but I find them less effective space-wise because of their slanted sides. They also let dust gather between them. Which is why I plan on testing home-made replacements that fit more closely together. I'll use some tubs to store stuf in the small attic space, as well as the out-of-season home equipment (tires, camping gear, etc.)
Thomas, a cabinet for the gardening tools might be a good idea. I'll see how things go before I invest time/money in that. But I'll certainly keep it in mind!
David, that's a nice shop you have there. Good idea about the configurable shelves/racks/workbench. I may not be able to do something like that, but it is sure interesting to see them.
I'll post more pictures as work progresses on the building. Right now I am emptying the current shed and relocating its content in various places (under the patio or in the basement). I had quite a lot stored in there. The tree should be removed within the next two weeks. I may start deconstructing the current shed before that, if I can find the time to do so. My weekends are already full with other stuff.
-
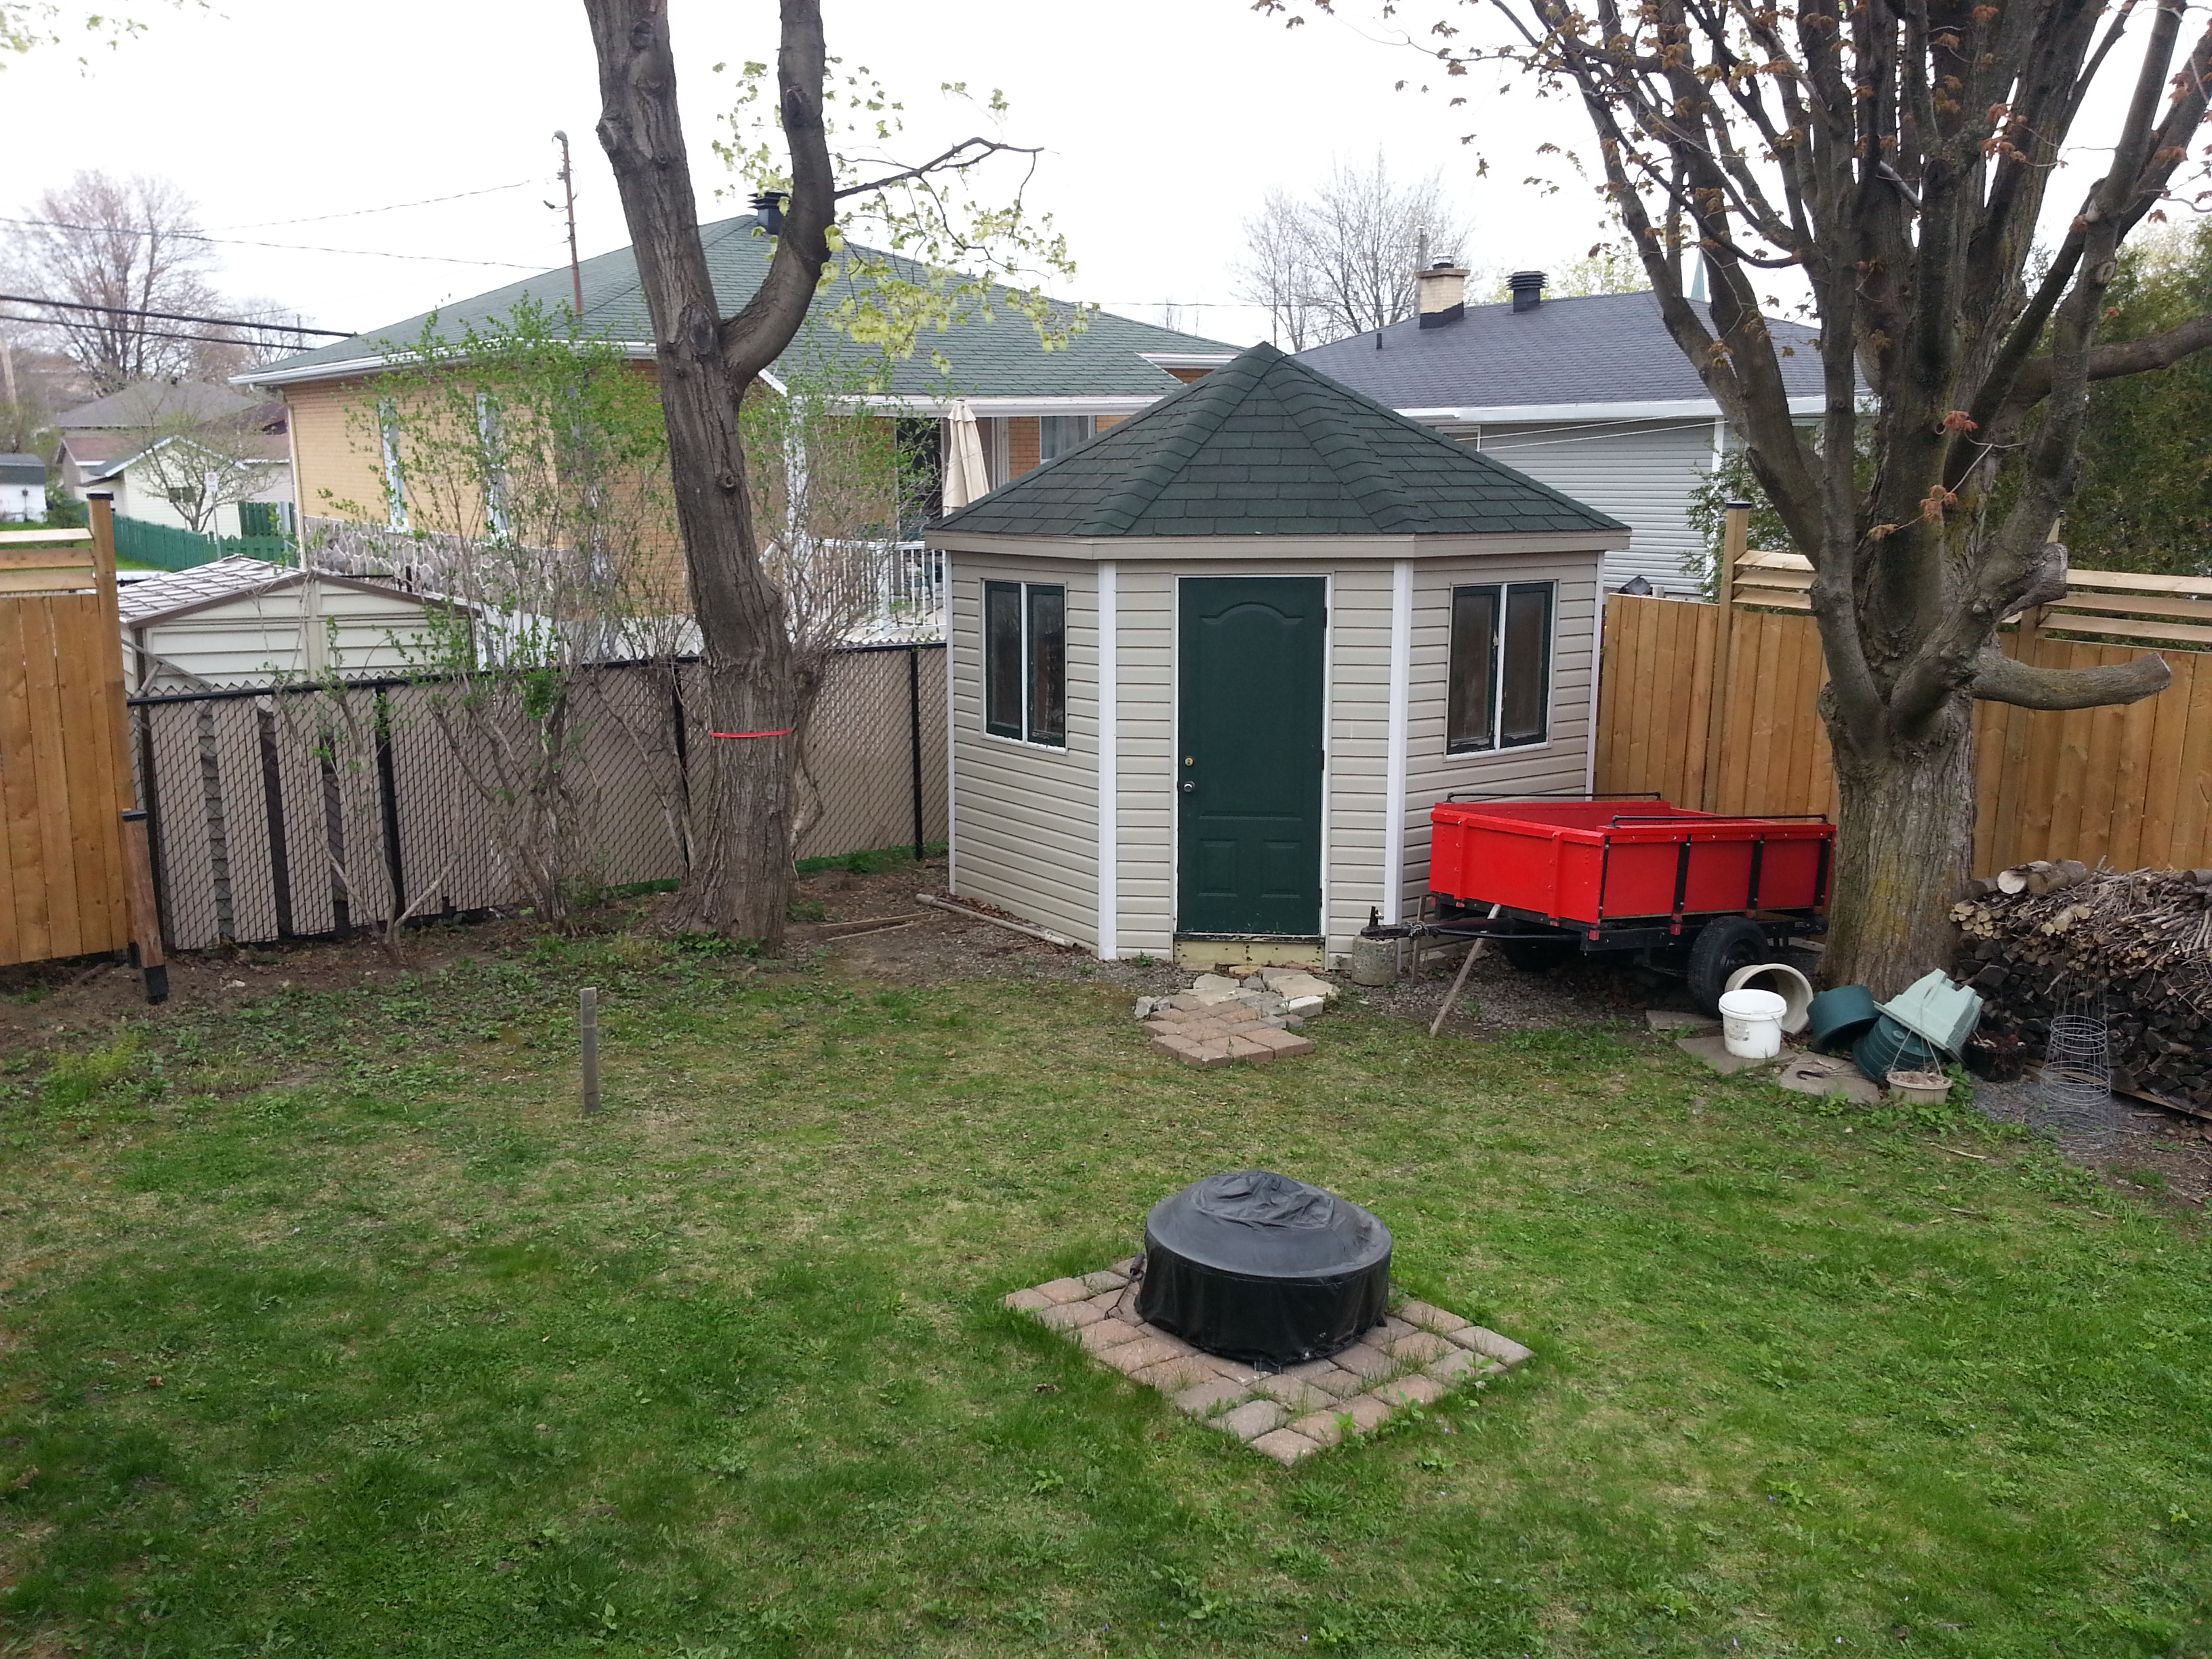
Here's a picture of where the shed will be. The existing one is a bit over 9'x9'. The tree on the left will be removed. As you can see, the neighbours are quite close.

-
First, let me tank you for the advice Frosty. Much of what you say is useful, although there are some elements in there that I've answered already. A few are not applicable because of details I have not mentioned. I'll try to complete the description to answer your comments.
The main thing is that you wouldn't place the forge in a corner, but rather along one of the long walls, in order to accomodate longer stock and pieces being worked on. Unfortunately, between the windows isn't possible because that would put the chimney in the branches of a tree which is located at the bottom right corner of the new shed. I could place it near the middle of the window-less long wall, however. I think that would put the stack far enough from the branches of the tree. I am already removing one of the tree from the backyard to enlarge the shed, but city regulations wouldn't allow me to remove the other one, even if I wanted to.
About the band saw, I mistranslated the name (my primary language is French). I meant a table saw. It is actually a radial arm saw, and its table is actually that large. Yes, I know how dangerous a tool this is. I am very careful when I use it. Eventually, I will inherit my dad's extra-large table saw (36"x60") when he is no longer able to use it.
Moving the lawn mower and shop vac under the shelves frees up floor space, but eliminates some of the shelf space. I will see how this will work in practice. I am planning on shelves built on the wall with close-fitting wooden boxes to avoid dust gathering on store items.
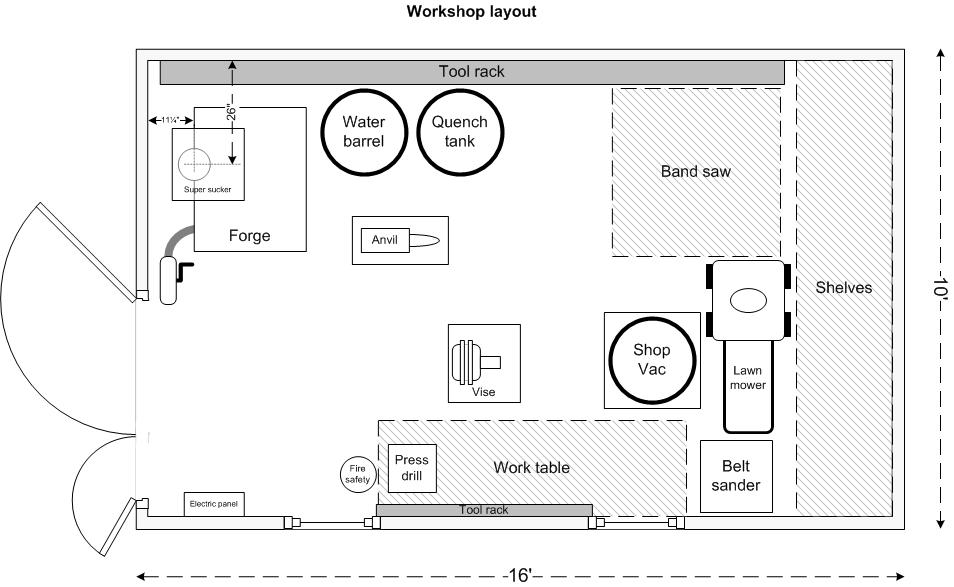
Here's a modified layout. As I mentioned previously (several times), the anvil and vise will be moveable. I show the saw and belt sander in their location when forging.
Everything would be carefully vaccumed to remove any wood dust before I fire up the forge. I understand the need for a seperate shop vac to clean up metal dust after forging.
Is this better? (Note that the anvil and vise orientation are off, I just didn't bother realigning the graphics.)
-
10 minutes ago, ThomasPowers said:
I ran my chimney out the wall and so avoided the whole roof penetration issues
I considered it seriously, but unfortunately it does not appear practical in my case. The shed will close to neighbours' backyard on two fronts (those without windows or door). And the presence of a wall chimney beside the shed's door might prove to be a safety hazard when my grandson visits and plays in my small back yard. So my wife wouldn't agree to a wall chimney.
I'll try to post a picture of the space soon. This might clarify things.
-
Thanks for the advice, Thomas. Enclosing the forge table will certainly be possible when I reach that stage. I do plan on working with one or both windows open, even in the winter. The door as well on warmer days. I have no desire to suffer carbon poisoning! There will be a CO detector in there. And I put a fire extinguisher in the plan, near the work table and labeled "Fire safety".
I do indeed plan on visiting local smiths over the summer as time allows, before I finalize my forge setup. For now my main project over the summer is to get the shed built and roofed. So the main concern at this time is the location of the chimney so that I can put it in place at the same time that I build the roof. I think it is much easier to do it this way instead of retrofitting one into an already-built building.
Everything else will be mobile, so that I can rearrange it as I gain experience on what works and what doesn't.
-
Some more details about the workshop:
- It will be built on a concrete slab.
- As I live in a place that gets quite cold in the winter, with a lot of snowfall, the workshop will be fully insulated.
- I will use the attic space for storage, with 8-foot high ceilings.
- The smithing I plan on doing will be fairly small stuff like tools, camping gear, and knives. I'd like to make swords eventually, but I am aware that it is a much more advanced skill set and that it will be a long time before I am ready for that.
- The chimney will be a super sucker with an 8" insulated pipe. Insulated because of the city code. I got the pipe used at a very good price ($80 for 4 sections totaling 10' in length). But I am aware that it would be better to have 10" or even 12" for the chimney. If I find out that it doesn't draw enough I will install a second pipe to increase the pull.
12 minutes ago, ThomasPowers said:Why do you have both a water barrel and a quench tank? Where will you be standing at that forge---it looks like the work triangle is off. The bandsaw and belt sander need to be as far from the forge as is Possible! Is that a gasoline mower? If so it shouldn't be in the same location as the forge.
Can you set up that setup on your driveway and do several projects to see how it works for you?
Regarding the water barrel vs quench tank: that is just to get a sense of the space I may need. From what I understand, when making blades it is better to use oil to prevent cracks. Having plenty of water nearby seems like a good idea when playing with fire.
I would be standing just by the door. As I mentioned, I am left-handed. But neither the anvil nor the vise will be fixed in place. Each will be on a heavy stump or a sturdy table. So I'll be able to re-arrange stuff as I try them out. Furthermore, when I am not working with the forge everything will be compacted into the corner to leave space to do something else.
The lawnmower is electric. The belt sander and all the other stuff is only displayed to get a feeling of the space available.
For now I have nothing to set up. I'm a newcomer to the craft and still have to buy or build anything for the shop. Everything is still in the planning stage.
-
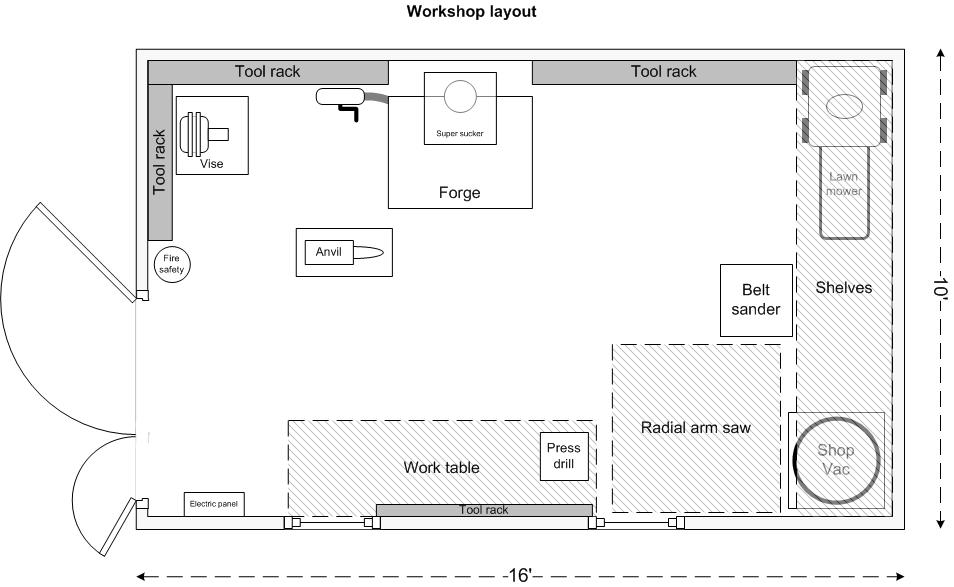
Over the summer, I am building a larger shed in the back yard to host most of my tools, including a small forge that I plan to build. I've read a lot about blacksmithing over the last year, including much on this wonderful site over the last few weeks. So I thought I would share my plans and how they change as I realize the project.
Since I am mostly interested in historical recreation blacksmithing, I plan on using a charcoal forge. As I live in the suburbs I feel that the smell will be less offensive to the neighbours than a bituminous coal woud be. I may eventually also build myself a propane forge, but that will be much later.
The shed will be 10' x 16' but the area I will be able to use for forging will be much smaller. In order to gauge how much space I will have and how things will be organized when forging, I made a drawing of the space. The actual placement of the anvil, vise and other tools will change as I try things out. Note that I am left-handed.
-
17 hours ago, JHCC said:
10' x 16'? O luxury! I've got less than half of that!
Or is that 10' x 16' Canadian?
The whole building will be 10' x 16' but the space I can devote to smithing will be much smaller than that. As I mentioned, I have other tools that will share the space, such as my band saw, winter tires, the lawn mower and other yard maintenance items. I already have a 9x9 shed, which the new building will replace, that is too small already.
So in the end I expect I will only be able to devote about 50 square feet to smithing. It should be enough for most things, but nowhere near as large as I'd like.
17 hours ago, Frosty said:Be REALLY careful about wood dust around hot work. A dust comp for the wood is a good investment.
Punches and chisels are excellent beginning projects but tong are better left for later. It's not that the steps are advanced it's the precision needed to make tongs work properly that takes practice.
If you're going to Pennsic look for Thomas Powers, he should be up for going. I believe his typical "uniform" is Lederhosen, Hawaiian shirts and a distinctive hat. Check out the Mastermyr find. It's a Viking era blacksmith shop in a wooden chest a strong man could carry by hand. It contained all the necessary tools, stock, finished items and unfinished projects. If you're doing SCA events the Mastermyr chest is THE example to mimic.
Thanks for the advice Frosty!
-
Certainly, I plan on walking before I run.
So learning to move the metal and do blacksmithing before I move on to bladesmithing is all part of my learning plans. I've read quite a few books in the last year, so I think I have a fairly good understanding of what this is about. But that doesn't replace actual hands-on experience. I figure I'll start with small projects and exercices from those books first. Make some tools that I will then be able to use for further smithing work, like tongs and punches. I'm thinking that medieval-looking arrow heads shouldn't be too hard to make. Also things like torch-holders, camping stakes, etc.
I'm still a year away from having my forge set up, I think. So I'm hoping I can find someone to help me acquire hands-on experience as well in the mean time. Anyone here who is active in the SCA and going to Pennsic War?
The biggest challenge is that the work area I will have for my forge will be quite limited. The largest shed I can build in my backyard is 10' x 16' and my forge will have to share the space with my other tools (mostly woodworking). So I am trying to build smart. I'll use the attic space for storage, to that I don't waste floor space to simply store the winter/summer stuff (car tires, winter garage, etc.)
Thanks for the welcoming words!
![20170625_164309[1].jpg](https://www.iforgeiron.com/uploads/monthly_2017_06/59515725c30b0_20170625_1643091.jpg.466e5347bde6b7f3cb7bbd7f6f8f0172.jpg)

![20170602_182049[1].jpg](https://www.iforgeiron.com/uploads/monthly_2017_06/593599ee0d738_20170602_1820491.jpg.35f6bcfc2f4ae08b42d1b2fa7581e967.jpg)
Workshop Plans
in Building, Designing a Shop
Posted
Just saw those additional comments. I'll look up the subject of condensation and rust prevention.
Good idea about ordering some ball bearings online. Just ordered some. Ebay is my friend.
Thank, Scrambler!
A-210 made me smile. The numbers were added because the forum wouldn't let me register Arthur just by itself. That's been my name in the SCA (medieval re-enactment) for over 20 years.