

G-son
-
Posts
119 -
Joined
-
Last visited
Content Type
Profiles
Forums
Articles
Gallery
Downloads
Events
Posts posted by G-son
-
-
It's going on a date with a wire brush to take care of the rust. Don't think I'll paint it now, would have to buy paint just for that, but I might get to that when I need to paint something else.
-
Picked up a Fabrex 413 drill press vise a while back. 3" wide jaws, opens 2½" with the swivel jaw in place, twist and lift it out and there's 5" between the jaw and the screw. Well worth the ~$4.

-
I'm thinking that the two supports going from the "funnel" to the gas assembly could be shaped to help the air start moving around, rather than being more or less square. I don't think it should be a huge difference to cast a different shape there?
-
I applied some math to the list of suggested jet size list a while back, and they generally said that the jet size should be about 4% of the mixing tube (actual) diameter. So if the mixing tube is 15mm internal diameter I would have started trying with 0.6mm and worked my way from there.
-
Well, few ideas are so unique so no one has had them before. Turns out other people had thought of it long before me too.
You don't have a flame retention nozzle on your burner in the picture, do you run it that way or did you just not include it in the picture? -
I mentioned these in burners 101 when I had the same idea in may, the general opinion seems to be that the short orifices is a problem. But I like that you are trying them and the results will be interesting once you get it tuned, I will too sooner or later assuming I don't get my hands on other better options by then (even if others may not be quite happy with them they may be good enough to do what I need them to do - if I don't try i won't know.)
-
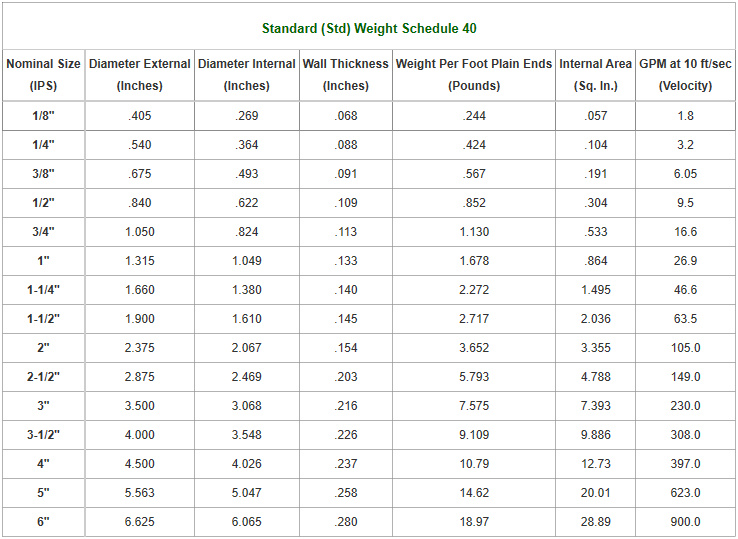
Another thing I think is worth mentioning when talking about length vs. diameter (or jet size vs diameter): The inside diameter of the schedule 40 pipe is not the same as the diameter it is called. Supposedly they started out at the advertised size, but were later changed to thinner wall, and as the outside had to remain the same size for threads to fit the inside became larger.
Generally not an issue if you just paint by numbers and use the same kind of supplies, if you on the other hand use other kinds of pipe/tubing rated in actual size it might throw you off quite a bit.
An interesting side effect, more relevant to the diameter vs. length discussion, is that as the advertised vs actual diameter is different for different pipe sizes, the actual diameter vs. length ratio will differ too. For example, if you make two "8x length" burners, one ½" and one 1" you'll ofcourse have them 4" and 8" long. But as the ½" is really 0.622" diameter the actual length ratio is 4" / 0.622 = 6.43, while the 1" pipe is 1.049, making the ratio 8" / 1.049 = 7.63.
-
3 hours ago, Mikey98118 said:
...BUT, for anyone who wishes to experiment; we hope they will disregards that advice, if it gets in the way, and try something new.
The craziest ideas often leads to the most interesting results. Occasionally the results are good too, not just interesting.
")
-
Vice seized
in Vises
A bit of heat often helps. And I'm guessing a lot of people in this group has access to heat. Just don't over do it, hardened steel parts still needs to be hardened.
-
Cast iron? I'd braze the broken off vanes back on if they're there, or new ones made of mild steel if they're gone - try to get it fairly balanced to avoid vibration. Second option would be to make one from scratch.
-
Have you considered ditching the straight mixing tube, and follow the 1920s design more? The expanding cone seems to BE the mixing tube in that design. A shallower angle may be in order to keep the flame from going back in there at low pressures, but that means a standard pipe mixing tube may be useable, a slight angle could be cut in it with a lathe.
-
A gas jet of basically any origin can work, as long as it has suitable dimensions. But the jet is just one piece of a burner, getting the rest right is harder than sourcing a jet - the most common choice is contact tips for MIG welders, costs something like a dollar each.
-
I believe the process was complicated, or seemed complicated when I read it anyway - something about holding it at a high temperature for many hours or so. But as you can turn regular grey cast into white cast just by heating it cherry red and letting it cool down "fast" (that basically means not packing it in insulation), I'd guess you can go from white to grey by heating it cherry red and making sure it cools down as slow as possible.
If I keep guessing, I'd say that the problem on DIY casts at least in part originates from them being small. Not enough metal to hold the heat when poured into a cool casting mold, temperature drops too fast.
-
Ductile cast iron? I think that was the name, and if I recall that is made by a special heat treatment, not special ingredients. But there is something special about the graphite if I remember this right, it gets a spherical shape rather than the usual flakes, and since the rough flakes are where cracks usually start in regular grey cast iron you get rid of the problem with it cracking easily.
-
Cast iron that cools down too quick becomes white cast iron, where the carbon remains dissolved in the iron in the form of iron carbide. Softer than the tungsten carbide some drills and other cutting tools use for cutting edges, but still a very hard substance.
When it cools down slowly the carbon separates into small graphite flakes throughout the metal, making it darker grey, which gives it the name grey cast iron.
Not only an issue when casting, but very much so when you weld cast iron too. There are several quick and easy methods to weld cast iron, nickel electrodes in a stick welder for example, where you weld a short distance and then hammer the weld as it cools to compensate for shrinking so the tension doesn't crack it, but the area just around the weld turns to white cast. Heating the area/entire piece red hot and welding it with oxygen/acetylene and filler made of cast iron, followed by packing in insulation for a very slow cooldown is still one of the best methods to weld cast iron - unfortunately it's very slow, requires disassembly and many precision machined parts would need re-machining after the heat cycle, so it's not a popular method any more.
Just imagine ripping an engine apart, building a firebrick oven around the cracked block, filling it with coal to heat it, cover with sheet metal until hot enough, open the cover enough to get in there and weld, then cover up again, stop the air supply and wait for a day until cool... and then spend lots of time machining whatever was distorted before you can use it again. Today you'd just get another block, as long as you can. -
24 minutes ago, Irondragon Forge & Clay said:
...My propane forge runs at full blast when at the anvil using more fuel than needed...
Wouldn't it make sense to work multiple pieces at the same time? Grab one, hammer until too cold, put it back in the forge, grab the next one from the forge, and keep going through them in order?
-
Very interesting progress in this thread, and nice to see that research almost a century old still can give good inspiration. These waisted burners look alot like a basic vacuum ejector - just with a smaller angle on the exit, but that makes perfect sense as long as we don't want to turn that area into the flame retention nozzle.
Lots of interesting information, and I really want a metal lathe to be able to make things like these. -
Will it look best in fresh paint or covered in rust and flaking old paint where you intend to put it? Sometimes the surroundings have theanswer, not the piece you are working on.
-
"Omnis traductor traditor", every translator is a traitor, every translation is a corruption of the original - even if the translator has the best intentions.
-
1 hour ago, Frosty said:
Unfortunately that's no longer true. There are people writing OS that make decisions for you and if you try to work around their idea of what and how things should be done the next update will reset THEIR preferences.
…
I have too much direct evidence to the contrary G-son. Computers no longer just do what they're told by the end user, marketers make too much money to let that happen anymore.Frosty The Lucky.
Well... That's a matter of perspective. The computer still does exactly what it's told to do. It just listens to the programmer over the user, as the programmer has the ability to dictate what the user can control.
The computer does as told, but unless you made the program you are at the mercy of the programmer and what he want's you to be able to control. -
On 6/14/2019 at 4:58 AM, picker77 said:
Well, dang. Just once I'd like to be smarter than this computer.
You ARE smarter than the computer. A computer only does what it's told to do, so they generally only do things wrong when incorrectly instructed. People on the other hand, they're smart enough to think up countless new ways to do things - some are right, many are wrong.
")
-
How will you make a DIY reamer?
-
Allrighty! A 3/4" sch 40 pipe has an actual internal diameter of 0.824". that converts to 20,9296mm, I'll round it off to 20,9.
A 20,9mm diameter hole has the area pi * 10,45 ^2 = 343mm2
300cu/i is 4,916l
350cu/i is 5,755l
343/4,916 = 69,8
343/5,755 = 59,6
So, we want a mixing tube diameter that gives us roughly 60-70 mm2 of hole for every liter of forge volume.
For 1l:
2√(60/pi)= 8,74
2√(70/pi)= 9,44
For 2l:
2√(120/pi)= 12,36
2√(140/pi)= 13,35Forge volume per burner vs. mixing tube internal diameter (actual diameter, not advertised sizes!)
1l: 8,7 - 9,4mm
2l: 12,4 - 13,4mm
3l: 15,1 - 16,4mm
4l: 17,5 - 18,9mm
5l: 19,5 - 21,1mm
6l: 21,4 - 23,1mm
7l: 23,1 - 25,0mm
And so on. -
Yeah, right...

I looked here because this seemed like the most logical place to have that info, but no luck. I know the info is out there, hiding in plain sight somewhere in the burners 101/forges 101 threads, but those have a combined length of 113 pages and 25 posts per page. Someone who knows what they're talking about would probably be done long before I've had time to plow through these threads from start to finish yet another time. (I really need to copy & save all the juicy parts when I find them to make the info easier to find again, I can't remember it all. )
)
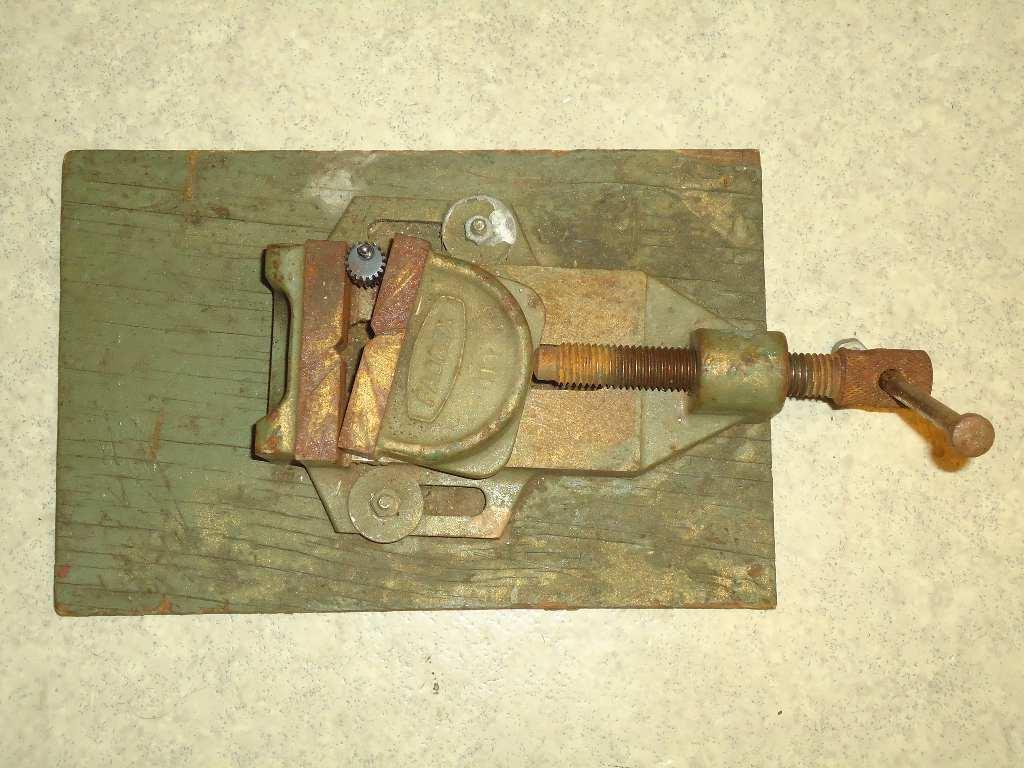
Fabrex drill vise
in Vises
Posted
Chrome plating? I think you just took "hard jaws" to a new level!