
kevin (the professor)
-
Posts
222 -
Joined
-
Last visited
Content Type
Profiles
Forums
Articles
Gallery
Downloads
Events
Posts posted by kevin (the professor)
-
-
that is really good looking handle. how much does a block of that stuff stabilized cost?
nice knife, even without the handle.
kevin -
thanks guys.
the handle is rosewood finished with linseed oil. It is a really heavy, oily, fragrant, and dense wood. I have used it on a few of my knives, and I like it a lot. It is not only beautiful, but I think it will be very sturdy and resistant.
Kevin -
Matt,
Yeah, I know what you are talking about. I have read some well-respected knife makers who consider a choil on a hunter to be a defect. I was torn whether to put one there or not, and left it without for some time. I have personally never had one hang up, on white tail deer. But, I know that they can, especially on larger game.
I went with a really small one, on a pretty long knife. You may be right though, I may have been better without it.
thanks for your input, and the compliments.
Kevin -
very nice. I like the diff. hardening line, did you clay it?
stainless for fittings - i like it. I wish I had thought of doing it.
Kevin -
Hello Again,
Thanks to some feedback that I have gotten from kind people who took the time to look and comment, I have made some improvements to the knife.
Specifically, the guard is better shaped, the leather is better finished and sealed, and there is a finger groove formed by guard and leather. Also, there is now a choil.
Thanks for the comments, input, and encouragement. This stuff really helps me learn and improve (I hope).
take care,
Kevin -
Hello Everyone,
I have made a simple hunter for a good friend. It will be used a lot. It is a relatively straightforward design, no frills.
There is a slight (deliberate) swelling or "belly" toward the point. It is small, but is meant to facilitate delicate slicing of game (deer).
W2 (same rasp as Kukri from before, I got two from this huge thing).
5" blade
4.5" handle
3/16" wide spine @ ricasso
through-tang peened
edge quenched canola
tempered 3 1 hour cycles, 400F
Rosewood handle with linseed oil
brass guard (learned what "red short" means while working with brass)
copper-nickel buttcap (because I crumbled the brass I wanted to use)
This thing is REALLY sharp. Long, flat edge bevel with convexity just at cutting edge (mouse pad and abrasive thing).
Hope you like it. It was fun to make. Comments, ideas, opinions, etc. are encouraged. Thanks for looking.
Kevin -
I like the knife a lot. I have used some rosewood recently, too. I think linseed oil made a slight difference, but not like it does with maple or mesquite.
How thick is the knife at spine at thickest point? I am trying to get a reference for dimension. I am making a hunting knife for a friend, and I am looking for guidance re: how thick to make spine at ricasso.
I like your knife, so this info would be helpful.
thanks for posting,
Kevin -
Panzertank27 -
the OLD files are almost all (I know that Nicholson are) w1. The newer ones are case hardened (cheaper). Some of the really expensive new ones are rumored to be 1095, but I don't know for certain. W1 is actually really easy to hammer and machine, it is the baseline for measurement of machineability for engineers of steel. Its the huge darn teeth on the rasp that are the problem, way worse than a file.
I have only been making knives since December, and this Kukri is the 8th one I have made. Don't sell yourself short. Study and also listen to what people on the forum say. Finally, get in there and try. Past a point, reading won't help.
I hope to try pattern welding today or tomorrow. I have to first find a cheap and efficient way to get a 1/16" sheet of 15n20 cut into bars. Once I do that, I have some 1/8" 1095, and I am going to build a 5 layer, 9/16" billet, and see what happens.
Chrisfrick-
If I can't get the stuff cut to try pattern welding today, then I am taking my kukri into the woods for some mayhem!
thanks for looking,
Kevin -
r-ice,
Welcome. This is a great place to learn and see some beautiful work.
I recommend checking to make certain that you can attach a platen and get to a substantial area of slack belt (maybe by removing guard).
These two things are really important for me. They allow flat and convex grinding. Also, the platen allowes for fast but flat removal of handle material. The slack belt will then even things out and smooth without losing contours.
there is my two cents.
good luck,
Kevin -
Greetings,
I have spent my Spring Break trying to learn some things. The first thing is that I am never forging anything out of an old rasp again, until I get a better grinder.
I got tired of burning through belts on m (y poor 1/3 hp grinder. So, once the blade was smooth to the touch, I stopped grinding. So, the kukri looks like it has feathers!
It was a lot of fun to make. Next time, I will thin the brass out some. Probably heat and squash.
W1
quenched in canola
tempered at 400F for 3 one-hour cycles
blade 11 inches
3/16" thick @ plunge, 1/8" at tip
ranges from 3/4" to 2" wide
The blade will shave. Flat ground with convexity at cutting edge. THIS ONE PASSED THE BRASS ROD TEST! (So did the machete and bowie that I made; #'s 7 and 4).
Handle:
Mesquite w/ linseed oil
5.5 inches (including leather spacers and 1/4" brass bolster and 1/8" copper-nickel buttcap)
Thanks for looking. As always, comments, ideas, teaching, or encouragement are sought.
take care,
Kevin -
Good job,
It is not about not making any mistakes. The more we learn, the more we see that we could do differently.
It is about enjoying the process of discovery and skill development, which you are doing. Besides, it is a lot of fun to whack red hot steal and have it move (even a little) like you want it to.
keep up the good work,
Kevin -
I looked into the belduque, and it was typically more straight and pointy.
I am interested in building on my last experience. If anyone is willing to share any guidance or tips on a traditional blade form that uses a recurved or sweeping blade, I would surely appreciate it. Historical examples with 10" or less blades, how to's, tutorials, whatever. I ultimately want the majority of my work to be based on or inspired by historical forms. Of course, that is some time from now.
thanks for reading, and any info you can give.
kevin -
Thanks for the kind words guys. I do know that this is becoming more fun every time. I am hooked.
I will check out the belduque design.
Most of what little I know I have learned directly or indirectly from people on this forum.
thanks for the information and kind words. I really appreciate any encouragement and guidance I can get.
Kevin -
Hello All,
This is my 7th, and is another chopper. Sort of a mini-machete. I wanted to see if I could reproduce the last design, only 25% larger.
I am so new, that the idea of trying to produce very similar results in consecutive knives seemed challenging. Besides, I am giving the first on to a buddy, and I wanted one for myself. This one is about 25% larger, with a less acute edge bevel, and more of a convex shape to the edge. I forged rather than ground the sweep into the blade this time. It is thicker, has a very large tang peened through the handle, and feels really solid.
1095 blade and guard
11 inch blade, 4.5 inch handle
Edge quenched in canola
Tempered at 400F for 3 two-hour trials
Polished to 1000 grit
Mokume gane butt cap
Rosewood and leather handle
This was a lot of fun, and it was the first time I got to use my new Drill Press!
This is also the limit of blade length that I can heat treat with my single-burner Venturi forge. I had to try and harden twice – the first time I did not heat consistently. It was really pushing it. I am going to spend some time learning the basics, and how to forge weld. Then, I will want to get a heat-treat setup for longer pieces, after I have learned enough basics to make working on them worthwhile.
Please give me your comments. The knowledge, support and feedback I receive from this group means a lot to me.
Thanks for looking,
Kevin -
One more idea,
I am VERY new, so I know a little of where you are coming from.
I spent a year reading, watching videos, lurking on forums, filing and grinding wood, and shaping clay with mallets before I even started a forge. Part of that was due to the need to buy/make equipment, but most was prep work (and I am a little obsessive).
There is a lot of really good material available in book and video form. I don't want to offend anyone by recommending some to the exclusion of others. If you want some good reading or video cites, send me a personal email and I will tell you the ones that worked for me. Or, you can just google them down yourself.
Have fun with it. Its a great activity, even when you are not polished at it. I am not, and I love it.
Kevin -
Hey,
I am very new at this. I tend to forge close to shape and then file/grind. I use a combo of both. Files can set a bevel accurately with not too much effort, and then you can feel the bevel on the platen when you grind with a sharp belt. This way, the developing blade is its own grinding guide.
Also, when forging, after mostly shaped, switch to a light and very smooth/flat hammer. This won't move a lot of metal, but a few runs up and down the blade (in small heats) will smooth things out, remove pits, etc. This really reduces the amount of time you have to spend grinding and filing.
This is what works for me, its true that you will have to find your own way through experiment (it seems at this early stage to me, anyway).
good luck,
kevin -
I can't wait to see how you finish it. It looks nice.
Forgive my ignorance, but why have you referred to the point as the "classic mastersmith's test" type? I don't know that much about the ABS testing system, I will never be trying for those credentials (not because they are not significant, but because I don't have enough time to develop my skill to that level).
I am working just to get credentials for my day job so I can afford to make knives.
Seriously, good knife, and info on the reason for chosen shape would be nice for me to read.
Kevin -
Yes, it is a beach tree. It is in my front yard here in CT.
I haven't made a sheath yet. I am no good with leather work, yet.
I have been making wooden scabbard by sandwiching a layer of boxwood or balsa with a knife-shaped cut-out between two thin and flat layers of the same wood. Then, I put a small piece of leather in the mouth to press the knife into the wood and act as a "keeper." Then, I grind and stain these. Also drill a hole in end for drain and air movement.
The technique is really simple, and you get a sturdy protective box. Unfortunately, the one's I have made to date have been really ugly. I need to either use a more attractive wood, or get some good leather to cover the final product.
I like working with metal better than wood, so I haven't emphasized this, but I am getting a stack of knives with no covering again, so I will make another run at improving sheath skills soon.
kevin -
the handle is made from a maple burl. It is sanded to 400 grit, and rubbed with linseed oil. I am going to sand it better and coat with tung oil.
thanks for looking.
kevin -
Greetings All,
I am posting the "almost done" version of this knife.
It is 1095
just over 10" long
2.5 wide
3/16 to 1/8" thick
edge quenched in canola
tempered at 425 for two 3-hour cycles
1095 guard
mokume butt cap
I want to thank those who gave me input when I asked on the "Design and Critique" board.
I am continually pleased by the willingness of those in this community to help someone with essentially no experience. I can't over state how much this means to me.
Any comments, advice, or encouragement are welcomed. You guys have been serving as proxy teachers, although I have a lead from a nice gentleman for some real teaching soon.
Thanks,
Kevin -
Hey,
good work. What are these tire tools made of (please don't say steel, or iron and carbon). Serioursly, what type of steel is it? I may decide to reshape a few myself.
Kevin -
Hey Guys,
Here is a link for setting gems, and shows how to make a bezel, etc.
[Ganoksin] Jewelry Making - Stone Settings - Theory and Practice of Goldsmithing -
It doesn't look like it would be that difficult for most of the people on this forum.
I personally am not ready for this yet, but I am years behind most of you.
Hope this helps,
kevin -
thanks for looking and commenting. I had decided to go with some simple guard shape, to keep this somewhat funtional. I may use it like a junior machete when camping, among other things.
I am going to try and get rid of the dip in the edge of the blade, just forward of the heel. I have somehow put that same mistake into two knives. When I grind it flat, it will probably make the knife appear to swell more forward and shift center of balance some.
I have to go to a professional conference, and I won't be able to finish the knife until after March 8. Oh boy... I can't wait.
take care,
Kevin -
Jimmy,
You are bound to be a lot farther along than me.
Thanks for info. I am also looking for suggestions about guard shape, butt cap and spacer styling ideas, handle shaping...
I am hoping that people with more experience eyes can not only help see and fix any mistakes, but also give insight into what would function/look good with this type of fairly large and fairly stout blade. Its not too thick, so it can slice as well as chop, but it is substantial.
thanks for the info. I really appreciate the guidance that I have gotten from people on this forum to date.
kevin
(I added "the professor" because I thought there should be more than one Kevin on a forum this size.)


first leaf blade dagger
in Knife Making
Posted
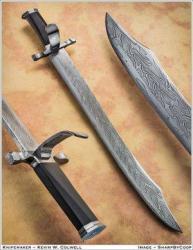
Hello Everyone,
This was a serious learning project. I managed to create my first leaf blade and first dagger. I am happy with the handle and the blade, although I had a bad time with the ricasso. Also, there are a couple of belt marks, and it needs more polish.
But, I have always wanted to make a leaf blade dagger. I think they are beautiful. This one won't win any contests, but it means I am on my way!
10" blade
1.4" wide
1/8" thick
flattened diamond cross-section
handle is maple of some sort,
brass guard
leather spacer
copper-nickel butt cap
quenched in heated canola, tempered at 375F for 3 one-hour trials.
Comments, encouragement, ideas, ADVICE, all welcomed. This was a challenge, and despite its obvious flaws, came out better than I expected.
Thanks for looking,
Kevin