
kevin (the professor)
-
Posts
222 -
Joined
-
Last visited
Content Type
Profiles
Forums
Articles
Gallery
Downloads
Events
Posts posted by kevin (the professor)
-
-
Greetings Everyone,
This is essentially the same bowie from yesterday. However, this one has seen a plastic surgeon and hit the gym since our last visit.
Seriously, I want to thank the several people who took the time to make thoughtful comments on how I could improve this bowie. I am trying to learn without the benefit of a local teacher, and I am grateful to those of you who share you knowledge and impressions with me.
The clip is a little deeper, with more of a curve for transition. Also, now the blade is flat ground with a slight convex at the edge bevel.
This knife is now SHARP. Also, I got the polish better by moving knife across paper rather than other way around. This put less stress on my tendons.
Thanks for looking. Comments, ideas, advice, teaching... all encourage.
Kevin -
Hello Again,
This is a bowie knife that I just finished. It is not the one I asked for help on previously. This knife is "beefy." I left it much thicker than I normally would, so it should stand up to abuse, but it won't ever be a slicer (in present grind).
The blade is 8" long
1.4" wide
7/32 thick @ ricasso
1/8" near tip
Brass guard and butt cap
through-tang.
Scandi or Saber grind with slightly convex edge profile.
quenched in heated canola and tempered 3x for 1 hour at 350.
It has an edge quench, and there is a visible diff hardening line. I etcehd the blade to check for hardening and spot any cracks. This has been polished away.
The handle is walnut, and it is very comfortable and firm in the hand.
I appreciate any ideas or comments.
Thanks for looking,
Kevin
ps - don't tell me that the blade needs more polish. I have a tendon problem in my rt hand, for which I am having surgery in two weeks.
This brings a question - are any of those little hand-held tools that look like a cross between an iron and an orbital sander good for sanding/polishing knives. The little triangular corner projections in the front look as if they could be very useful. More precise than a belt and no more wear and tear on the body. Anyway, I would love advice on any mechanical way to sand and polish that can reduce the hand load, and is not a traditional belt sander or buffer. -
Hello Everyone,
This is the first time I ever began forging a knife without really having a design outcome in mind.
In the past, I posted a knife that was in progress here, for comments and ideas. The outcome was a lot better because of the input I received. Also, the ideas are really valuable to me since i am trying to teach myself through reading and internet. I have valued every scrap of information I have received from you guys - real human teachers!
So, I am showing pics of where I am, and asking what would be a good design to go with from here.
Specs: blade 8" long,
1.25" wide,
taper from 3/16" thick at ricasso to 1/8" near point.
1095.
Handle materials (all blocks - I make through-tang knives due to personal preference, ability level, and equipment):
Ebony
desert ironwood (very low grade)
walnut
mesquite
goncalo alves
maple
kingwood
Leather spacers (several, not enough for entire handle)
guard and butt cap:
1/4" brass bar
stainless steel bar
stainless steel sheet
mokume gane from copper and nickel
So, any advice about potential configurations are welcomed and encouraged. Your ideas and knowledge can help me challenge and grow.
Thanks for looking,
Kevin -
Hello Everyone,
This is a big deal for me, and this place feels like a community, so...
I am posting a link below. I was featured in the NY Times recently for my research. This is what I do to pay the bills so I can buy knifemaking equipment, etc.
http://www.nytimes.com/2009/05/12/science/12lying.html
Hope you like,
Kevin -
Excellent stuff. I grew up on farm in Texas, and carried a machete on the tractor, too.
They are great tools, and that is a really solid one.
good gesture, great machete.
Kevin -
this looks neat. it will be a lot of file work, but you should get good bevels and ridges from drawfiling.
Keep at it,
Kevin -
If you have a well insulated forge,and you don't have pearlite or vermiculite, you can leave in the forge and just shut the thing off and block the openings with hot bricks when it is at or just below the correct temp. Adding a large mass of hot steel helps, too.
I have a forge with firebrick floor and then "wool" under the brick and under the roof, with "wool" side insulation. It is venturi type. I put whole firebricks across openings, careful not to close too much and limit airflow. This helps with reducing hot spots and getting more even heating, too.
I also place bricks just in front of opening to forge, so they get HOT. When time to anneal, I shut off forge with item inside. I then rapidly turn hot bricks so that they totally block the forge. If I had a kayowool blanket, I would put it over forge and bricks as last layer. In my forge, a knife sized cross sections cools to around 500F in about 4-5 hours. Not as good as vermiculite plus hot mass, but...
This is a really simple trick, it works for 10xx and w1 or w2 and o1. It is not good enough for many other types of steel, where vermiculite with a hot brick or large piece of hot steel would work much better. It is just a way that works easily if all you have is your gas forge and fire bricks.
You can get neat patterns on outside if you grind everything smooth but still leave the little "half moons" from the teeth. Looks like fish scale or feathers. This pattern happens if you forge to shape and then grind teeth off. If you ground teeth first, there would not be the little oxidized half moons at the base of each one. So, the surface of this knife is smooth as glass, but it has the "feather" look. If you leave the teeth during forging, don't forge the "middle" section too thin. The teeth will be nothing but a lot of cold shuts and weak spots after forging. You will need to have enough spine left between them, so that when they are 99.5% ground away the knife has sufficient stucture.
OK, I went on a long time. Sorry. I have a lot of rasps.
Kevin
ps - this was the first knife I ever sold! -
OK, I think I get it. If you use pure Ni, the idea is to add a relatively small perecentage by mass. Just to give "highlights."
I am going to stay with 1095 and 15n20 because I am a firm believer in functional art and because I am economically limited.
Thanks for the valuable information. This will help me to pattern weld and still get good results with my minimal equipment.
Kevin -
I am very new to this, so I want some advice, please.
I can imagine what the visual effect is when one combines pure nickel with 1095. However, what does it do to the properties of the blade. For example, if I weld together 2 parts 1095 and 1 part nickel, what will I have in terms of physical properties. Espcially wear resistence, hardness, edge retention...?
Is there an ideal way or amount to mix nickel in (not as alloy like l6 or 15n20, but when adding pure nickel to a billet)?
Thanks for your help. It is great that people with your overall level of expertise will stop to help someone with mine.
Kevin -
steve,
go to knifeandgun.com
click on forge welding
there is 15n20 in bars .049x1 inch, 3rd item down list.
I already have a thin sheet of 15n20, 1/16". But, I just ordered 10lb of the 1095 ribbon, 1/20". So, now I have a good source. The best I had before for 1095 was 1/8" from Admiral.
Good link,
Kevin
ps - the funny thing is I buy from knifeandgun all the time, they just have this steel in a different place from their "bar stock" link. So, I never found it before. -
Hello Everyone,
I have a simple but important question for me: Where can I get some really thing, flat, 1095 (or 1080 or 1070) and really thin, flat 15n20 (or L6)?
I have learned to forge weld pretty reliably (that took a month of serious practice). Now, I want to get more seriously into pattern-welding. This has been my goal all along.
However, I am working by hand, with no power tools, and I need THIN stock to begin so I can get a decent number of layers without getting too thick to work by hand.
So, any sources that will deliver or any that I can drive to near New Haven or Hartford CT.
Thank you for your information.
Kevin
ps - I will name my next blade after you! -
Heck man,
that is WAY better than my first knife.
What did you use to quench the knife in prior to tempering?
No matter, just curious. (I am trying to decide if I really need to heat the canola oil that I am using when the temp is about 70-90F).
The knife is really good, period. It is great for a first.
The good news is that it gets easier from here. The one catch to that is, as you get better, you become more able to see little mistakes. So, it gets easier in general, but there are still plenty of challenges to keep it interesting. Judging from what I read of those who have decades of experience, that continued growth and challenge aspect never goes away.
welcome,
Kevin -
Apache1,
1. clean all surfaces with grinder
2. heat
3. remove and flux everything that will be welded during this session. here was my first major mistake. the heat will oxidize any exposed surface. you want to flux the entire thing well before you let it get really hot.
4. put back in forge and bring up to temp. steel will be color of forge, flux will bubble like mad and look like hot honey.
5. get hammer and striking hand ready.
6. remove from forge, straight to anvil.
7. strike with 2 to 4 firm blows. imagine that you are hitting and then pushing with hammer to stick steel together. try not to let hammer bounce off of the work when you strike.
8. brush off, check welds, re-flux and repeat. same spot, this time emphasize any are(s) that did not weld well the first time.
9. overlap, flux new area repeat from step 4 with new spot.
10 when whole thing is welded, go over it all again at welding heat.
11. now, go over again, but strike on sides. if anything comes loose, stick it back down.
12. if you have any drawing or tapering, do it at a welding heat, and this will help keep things together. be sure not to hit it too cold.
Hope this helps, it works for me in my limited experience. Keep at it, pay close attention to what you do so you can repeat or change. Take a systematic approach to work out variables that don't help or learn those that do.
take care,
Kevin -
OK, this is the 11th knife I have made, and it is the first pattern weld. There is a big cold shut near the tip, you don't have to tell me. That is there because I was greedy. I had an earlier attempt but I did not use flux properly. So, parts of the bar did not weld. I thought that I cut all of those parts out, but I missed one. I am doing all of this by hand hammering (with a hand that needs surgery). So, I tried to use all of the earlier welded material that I could to up the layer count.
I learned, I won't do that anymore.
On the bright side, through a long process of failing and trying.... I have learned a LOT more about how metal works when hot, etc. And, I can forge weld pretty consistently now. For example, this knife was constructed by forming a billet of the dead bodies from the attempts that came before, plus several layers. When the billet was stacked the last time, I ground a notch in the end and welded a monosteel tang into the billet. I never could have done something like that a month ago!
Pattern welding has been my goal all along, it just took me a year of study and 4 months of basic practice before I was ready to try it!
So, this is around 50 or 70 layers of 1095 and 15n20.
etched in Vinegar for about 1.5 hour
Rosewood handle
Brass bolster and cap
Not everything I make will be pattern-welded (especially until I get this hand fixed). But, I will surely make a lot more of it in my life. I have already begun the cutting and folding process on another billet that should lead to 2 knives some day. No wonder you guys have power hammers and presses!
Comments, advice, etc are welcomed.
Thanks for looking,
Kevin -
Steve,
thanks for the inspiration. I look forward to more info and pics. It is great to see what people who have been dedicated to developing this skill set for years are able to produce.
by the way, I was impressed by your work on the website. Thanks for taking the time and effort to show us new folk along and share your knowledge.
Kevin -
Hello,
I make knives as a hobby, and people have started trying to buy from me. I am also a prof of Psy and Law, so I know the legal system.
I searched, and consulted local and state law enforcement, and the results are below:
Kevin, I hope this helps. As far as having it the car as long as you keep it in the trunk and dont have it hanging out the window i dont think you would have a problem transporting it for sale. If you need anything else just let me know. Thanks Joe
Sec. 29-38
Weapons In Vehicles
(Not more than $1,000 fine or 5 years or both)
1. The actor knowingly has in any vehicle owned, operated or occupied by
him
2. any weapon, or pistol or revolver for which a proper permit has not
been issued pursuant to 29-38 as amended by P.A. 99-212, or any machine
gun which has not been registered as required by section 53-202.
Weapon - means for the purposes of this section any BB gun, blackjack,
metal or brass knuckles, police baton or nightstick, dirk knife or switch
knife, any knife having an automatic spring release with a blade that is
released from the handle and having a blade over one and a half inches in
length, any stiletto, any knife the edged portion of the blade which is
four inches or over in length, any martial arts weapon or electronic
defense weapon as defined in section 53a-3, or any other dangerous or
deadly instrument.
NOTE: The provisions of this section do not apply to law enforcement
officers engaged in their duties, any security guard having a baton or
nightstick in a vehicle while engaged in his official duties, any
person enrolled in and currently attending a martial arts school, any
certified martial arts instructor traveling to or from such school or
an authorized event or competition, any person having a BB gun in a
vehicle provided it is unloaded and stored in the trunk or other locked
container (but not the glove compartment or console), any person having
a knife the edged portion of which is over four inches long if the
person is a. a member of the United States Armed Forces and is on duty
or going to or from duty; b. members of military organizations on
parade; c. any person transporting such knife as merchandise to or from
an authorized gun or knife show; d. a person moving between residences;
e. any person transporting such knife to be repaired; f. any person
holding a valid hunting, fishing or trapping license issued pursuant to
chapter 490 or any salt water fisherman having such knife for lawful
hunting, fishing or trapping, or g. any person having such knife and
participating in an authorized historic reenactment.
53-206(
Carrying And Sale Of Dangerous Weapons
(Not more than $100 fine)
1. The actor sells to another a slung shot, air rifle, BB gun,
black-jack, sandbag, metal or brass knuckles, or any dirk knife, or a
switch knife, or any knife having an automatic spring release device by
which the blade is released from the handle, with a blade of over one and
12 inches in length, stiletto, or any martial arts weapon and electronic
defense weapon as defined in Sec. 53a-3 AND
2. he fails to give written notice of the sale or delivery of such weapon
within 24 hours after delivery to the person to whom sold, to the chief of
police of the city, the warden of the borough, or the first selectman of
the town, within which such weapon or implement is sold or delivered, as
the case may be. -
Great work. If your experience is anything like mine and most of what I read, it just gets more and more enjoyable to forge. Keep the knife, it looks nice. You will be amazed at how fast your skills improve and you make little changes to your style.
thanks for posting,
Kevin -
good job,
welcome to the club. this stuff is a whole lot of fun, and you can get as far into it as you want. I like what you made, and you will just get better.
Kevin -
New guy
I checked with the expert, and she confirmed smurf height.
Maybe it is sort of a smurf claymore?
thanks for the compliment. I have now been trying to pattern weld, but have managed to goof it up every time I try to get more than 8 layers. I may make the lowest layer count ever (besides san mai).
Kevin -
Thanks guys, the guard looks a bit bulky, so Im going to try to grind a finger relief into it to add some curve and take some of the bulkyness away. It should make the knife flow better from front to back
I had a hunting knife with a simillar guard that I posted a few weeks ago. Someone pointed out how bulky it was, and I ground it to a smaller and more profiled shape. I profiled lengthwise as well as front to back. It made the guard a lot smaller, but it made the knife better for use. I would not have done it without some encouragement.
If this is to be a skinner, then you need to be able to manipulate it in fairly tight areas. A smaller guard may be a good idea.
Form and function... anyway it helped me. It is a good knife as it is, and I would like to own one whether you change the guard or not.
Kevin -
very nice - you'd better make sure no one you know wins - it will looked rigged. That should draw some attention.
kevin -
that is a nice and formidable looking blade. The handle would fit my hand well. I don't always like it when people look at a photo and say the handle is too big - the handle is only too big if it doesn't feel like you want it to feel when you use the knife in its designated activity.
I ramble... good job,
Kevin -
thanks for the kind words. A person with more experience than me told me that this may be better described as a spear point rather than leaf blade.
It was forged as a leaf blade, but every time I goofed with grinding, I ended up taking a little more off of the swells or shortening the point to make up for it. So, I have almost parallel sides (it actually swells most of the way from ricasso to just behind point, then tapers to point - there is a very small swelling at base).
My wife wants me to call it THE SMURF SWORD! It looks like a good cut and thrust compromise for a mighty blue warrior! (her comments).
Kevin -
It is 1095. At this point, that is all I ever really use. That or W2.
I wanted to keep the steel simple and as close to the historical types as possible without learning how to smelt for myself.
thanks for looking,
kevin


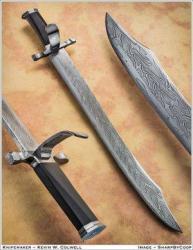
Stag & 1095 Bowie
in Knife Making
Posted
Hey Matt, that is one "sharp" bowie. I really like it. High benchmark for sure.
thanks for posting,
Kevin