

Eric Farrar
-
Posts
88 -
Joined
-
Last visited
Content Type
Profiles
Forums
Articles
Gallery
Downloads
Events
Everything posted by Eric Farrar
-
I don't know if it would be easier for you to get or not, but I have been using an acetylene regulator on my forge for nearly 2 years now without problems. Both propane and acetylene are corrosive liquids with the vapors being the product used. Both are used at low pressures to avoid risk of explosions. I simply had an extra acetylene regulator when I built my forge so have used it since then. I am curious if anyone has any reason not to use an acetylene regulator with propane or any other comments on this substitution.
-
Yes I have - not any time recently though. And I wasn't thinking about that when I sold my projector yesterday... Oh well... But they are great for drawing your layout work on the layout wall but be careful that your original drawing is to scale! The margin of error increases dramatically under magnification! That's why I am now depressed about my computer-connected projector that I sold yesterday...
-
Power Guillotine?
Eric Farrar replied to Eric Farrar's topic in Power Hammers, Treadle Hammers, Olivers
Did I fail to mention the bench goes 18 inches into the ground and is secured with concrete? Not much sound when I pound on vice-mounted tools... I will let ya know how noisy it is soon! -
Power Guillotine?
Eric Farrar replied to Eric Farrar's topic in Power Hammers, Treadle Hammers, Olivers
So I had a moment today where it seemed that the light bulb above my head actually turned on for a few seconds... My idea here is a tiny power hammer that will reside on my workbench. Why not build it into my workbench???? The workbench is made of pressure treated 2x6's from my old deck... The thing is pretty darn stout. So, I will weld my "anvil" chunk of steel to a steel plate and bolt it to the table top; mount the pulley/crank and the motor to the frame, then use a wooden post as the main support for the leaf spring! I have a feeling that this little baby will be working before the weekend is over! なるほど! -
Can anyone bothering to look at my profile tell me what doesn't look right in my profile picture? Other than my eyepro being on top of my head instead of covering my eyes...
-
Power Guillotine?
Eric Farrar replied to Eric Farrar's topic in Power Hammers, Treadle Hammers, Olivers
LMAO - okay, let me rephrase that... My 1/4hp motor came from a large standing fan and has 3 speetings: 300 OR 900 OR 1200 rpm. I have a 3.5" pulley on the motor and plan on using an 11" pulley for the crank. This gives me a circumference ratio of 3.14:1 and should give me 96 OR 286 OR 382 bpm. I expect a bit of slip with the V-Belt so if I lose 20% of my bpm I won't be too disappointed -
Power Guillotine?
Eric Farrar replied to Eric Farrar's topic in Power Hammers, Treadle Hammers, Olivers
My 1/4hp motor came from a large standing fan and has 3 speetings: 300,900,1200 rpm. I have a 3.5" pulley on the motor and plan on using an 11" pulley for the crank. This gives me a circumference ratio of 3.14:1 and should give me 96,286,382 bpm. I expect a bit of slip with the V-Belt so if I lose 20% of my bpm I won't be too disappointed. This is going to be my prototype that I get some experience on before I build my big one - already have a 70# ram, the guides and most of the frame for it - just need an anvil and to decide on its drive method. It will also be good for traveling (this mini one) -
Power Guillotine?
Eric Farrar replied to Eric Farrar's topic in Power Hammers, Treadle Hammers, Olivers
Thomas, Thanks for the info - I managed to find some posts on a bladesmith forumn with a pretty good description of the mini hammer in question... Just can't seem to find any pictures. Got all my materials together except the pillow blocks... Got a guy who said he has a couple hundred solid brass light duty pillow blocks he needs to get rid of; hope to get my hands on them by the end of the week. Eric -
I'll put in my 2 cents here - Google Sketchup is great in its free version - I have know a smith here in Colorado who has painstakingly made a library of smithing templates from twists and bends to 8+ bar basket twists! If you pay the trivial amount for the registered version, many of those templates are downloadable. I have seen quite a few Sketchup files in various smithing blogs, so even if you don't use it, it is handy to have installed. I've heard a lot of people using AllyCAD - again free but the registered version is much more versatile. I've tried Sketchup and AllyCAD but I am more comfortable with my graph paper and pencil. Got a cool graph paper "book" bound with about 500 sheets of graph paper - keeps all my sketches in one place!
-
Ok... I have been checking out every web resource on power hammers I can find for a couple years now... The boss (wife) has finally given up on keeping smithing out of the back yard and I have about 12x6 feet of space which I have been getting a cozy smithy operational. Now with surgery coming up on the other shoulder (the hammering one now) and a bad case of tennis elbow in my hammering arm, I would REALLY like to build a power hammer! My area is pretty cramped already so space is definitely a concern. I keep thinking about this mini power hammer I saw on YouTube at: rtsp://v8.cache1.c.youtube.com/CkYLENy73wIaPQkFE4XCyyAl1hMYESARFEIJbXYtZ29vZ2xlSARSBXdhdGNoWg5DbGlja1RodW1ibmFpbGDE-7iC86e-iUwM/0/0/0/video.3gp And wanted to get some input on the idea of a tiny power hammer - I'd even go so far to call it The POWER GUILLOTINE - a 5-10 pound ram with a 50 pound anvil. I would use some guides like in the one on YouTube to keep it simple and it could be bolted to my workbench with a foot pedal connected to the idler pulley via an adjustable length light chain... I made up a basic sketch that I will scan in this evening but I just finished going through searching for any other posts and can't find something along these lines. I work on stock below 3/4" - most of the time under 1/2" so I think this might suite my needs (for now - until I have more space). Any thoughts or suggestions? Eric
-
My First Project Ever - Complete and given to my Wife
Eric Farrar posted a gallery image in Members Gallery
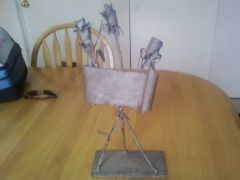
From the album: I Made It!
In exchange for rebuilding a web site for a friend during my 3rd tour in Iraq in 2008 (Tour was 2007-2009), I was given my first lessons in blacksmithing. This was an idea I conceived and completed before the end of that tour and brought home to my wife. 3 Roses on a stand supporting a scroll on the stems - the scroll reads, "The Army Wife Fights the World While her Soldier is Away..." The stand lists all of the reasons she has been alone due to the Army with hatch-marks counting each... Deployments... FTX... TDY... Schools... -
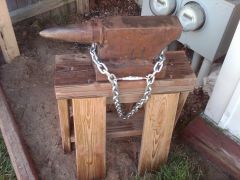
From the album: I Made It!
This is my DIY Anvil after it went on a diet. There is a pic of it before I put the flame wrench to it in my gallery. -
From the album: I Made It!
Got the forge fired up and making a russian rose from some 5/16" 1045... Seems that 1045 is all I have - from 1/4" up to 1"; round and square.... anyone want to trade some 1018 or wrought iron for 1045? -
From the album: I Made It!
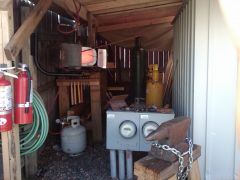
Just finished building a roof over my smithy - put everything in tentative spots and tried it out last night. I don't think the TV wall mount is going to work for my current propane forge - that thick steel housing weighs too much. Almost done with my new double-burner forge using some 3/32" diamond-plate so perhaps it will work. -
That is a nice little forge there! I tried making one with a Benzomatic torch but didn't have much luck - Never seemed to heat up to foring heat for me. Looks very tidy and seems to work exceptionally well - good work!
-
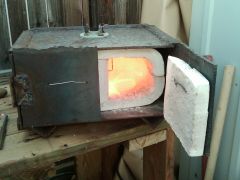
Kaolin is like Kaowool - it is a refractory lining (pre shaped and hardened in this case). A refractory lining reflects back the heat generated by the flame of a gas forge, helping in heating metal placed in the forge. I hope this picture attaches - if not I will put it in my gallery. Note the size of this solid piece of pre-formed refractory - the chamber made by two whole pieces would be about 12" x 18" x 5" - a rather large chamber for most forgings. This material is easy to cut with a knife or razor blade or hack saw to make whatever shape you need. And the dust/scrap fibers is great for packing around the forge's burner and doors. Kaolin is non-recoverable and is class IX as a part so would get ordered through the motor pool. Feel free to email me directly at ericjfarrar@yahoo.com or eric.farrar@us.army.mil - if I understand your location a little better, I could point you in an appropriate direction for wherever you are. COB? FOB? Fire base? Patrol base? Outpost?
-
For another smith to call something a beast is a huge complement to me! She is great at reshaping facory hammers into diagonal peens and such - 15 minutes and she'll have 4 2.5 lb heads bright cherry! For any military folks out there, the NSN for kaolin is 3040-00-057-0225. If you can't find someone who has some and need to order it, just remember that a "commemorative" knife, trophy, or set of spurs (if you ain't Cav, you ain't sh*t!) For your Sergeant Major, commander, or maintenance sergeant and costs of supplies and materials have a way of getting justified.
-
From the album: I Made It!
This is my first gas forge - still using it most of the time; The refractory is KaoLin formed refractory lining. I used 3/16" HR Plate to build this HEFTY girl. Don't like moving her around much either. I made a really simple Ron Reil Style burner with a floor flange bolted on instead of the flared end. There is a slight flare on the inside of the flange and I cut a flared opening in the refractory lining - it works beautifully and can reach forge welding temps between 10 and 15 psi really quickly or around 8psi if I feel like waiting around or working on other stuff first. -
I picked up blacksmithing on my 3rd tour to Iraq so I understand your situation with some differences of circumstances. I got pretty lucky with the scrap yard on my FOB - hopefully you can find something good too. If you'd like some ideas on scrap metal Anvils and other deployment smithing things, please feel free to email me! In my case, a propane forge was the way to go. I don't know if your unit uses any of this type of stuff in the maintenance/nbc sections, but here are some potential sources of supplies. Your maintenance folks - specifically the welding (Service & Recovery/S&R) shop may be able to give you some excess stuff that they don't use very often - perhaps they have already ordered replacements for the older stuff they brought into theater with them. They are also great place to find old tools that they don't need anymore, like files, punches, hammers, drill bits, etc... So - a propane forge is really easy to build and use (just don't try lighting it with a lighter - use a burning piece of paper in the forge BEFORE you turn on the gas!) If you get fire bricks, 8-10 will make a nice medium-sized forge in just a few minutes. A sheet metal frame can be added later - just use a sheet of metal to bolt the burner onto on the top. My favorite material is what I started out with - Kaolin; it is used in NBC decon systems as the refractory in the water heater. It is rated at over 2700 degrees F and is pre-fabricated into a shape where 2 pieces stacked on each other makes a pretty little box - I think about 10"x10"x4". Stupid easy to make a forge out of; even without anything else but a plate for the burner to mount onto - it lasts much longer if you build an enclosure for it - check out my gallery for a picture of my first forge with that stuff. If you are interrested in trying it, I would need to dig up the NSN but I know I have it somewhere in my notebooks. The burner - I recommend a Ron Reil style burner - stupid easy to make but you will be better off ordering the stuff you need than finding it... Basic list of ingredients: 3/4" x 6" black iron/steel pipe, threaded on both ends, 3/4" floor flange, 1 1/2"-->3/4" bell reducer, 1/4" x 4" brass tube threaded on both ends, 1/4" brass cap, 1/4" --> whatever size your hose fitting is adapter. You wil need a #58 #59 or #60 drill bit for the burner orifice - try to find a drill press around your maintenance folks before you trust yourself with free-hand drilling. Your maintenance folks may have all sorts of brass fittings and tubes in their bolt bins - anything bigger than a humvee pretty much has air brakes and that's what the Army uses brass pipe/fittings for. http://www.anvilfire.com/FAQs/gas_forges.htm (This is the Ron Reil Burner - instead of the flare opening, I just used a floor flange and haven't had any problems but got a really simple and easy-to-attach burner!) http://www.forgemonkeys.com/ http://www.zoellerforge.com/flare.html (Zoeller Forge sells everything to make gas forges if you want to just buy it instead of trying to scrounge the stuff to get a forge). NSNs if you have a source of supply: Duplex Hose: 4720-01-043-4099 Adapter for Duplex (red) accetalyne hose to 1/8" NPT : 4730-01-224-7308 Fire Bricks: 9350-00-299-4217, 9350-00-240-6794, 9350-00-599-9464 KaoLin: I'm looking for that one.... let me know if you want it.... Accetalyne Regulator: 4820-00-344-0807, 4820-00-551-1094 Propane 8120-01-399-5107 (FEDLOG search should give you about 2 dozen results - here is one. Check the descriptions of these in FEDLOG to make sure you aren't ordering a bunch of little camp-stove size bottles)
-
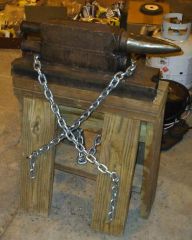 This is my DIY anvil that I made during the winter of 2008-2009 towards the end of my 3rd tour in Iraq. The base was a chunk of a large Iraqi forklift fork, about 6" wide by nearly 2" thick. It was originally 29" long as seen here. The middle and top sections were Iraqi tank half shafts - the rear end on both was threaded before I got my hands on them. The square portion is about 3" and they had a long 3" diameter round portion with another threaded section at their ends. Using a hack saw, I cut one of the round portions completely off and cut a rought octagonal bick which got touched up a little with the flame wrench (oxy/accet) and a grinder. The top two sections rang like a beautiful bell but toned down quite a bit once all 3 pieces were welded together. I pre-heated all three pieces and welded them together with 3/16" 70018 welding rods at about 350 amps. Heat treating was started wit a 50-gallon oil drum filled with (and constantly replenished) scrap wood burning with a shop vac blowing air through a pipe into it for about 6 hours. Then, using a chain I had tack welded to the base, I lifted the anvil out when it had been a bright red bordering on orange for a couple hours using an extended reach forklift, I then put it into a 55-gallon drum of 80-weight oil (not previously used - so little in the way of contaminants) to quench. The oil fire that bubbled out of that barrel was something pretty impressive to watch - I had quite the mess to clean up afterwards! With the residual heat after it cooled to a straw color was quenched away with a bunch of 5-gallon coolers of water. Not sure what the hardness is and I still have no idea what kind of high-carbon steel the top pieces are, but it works beautifully and only really bad misplaced hammer blows will mark it. After tearing my rotator cuff on my right shoulder, I can't lift things like I used to, so during November 2009 I cut off the rear round portions and cut a bit of a waist into her, then got rid of the excess base. The scrap chunks are somewhere around 50 pounds. She weighs in around 130 pounds now. The only other thing I am working on changing is adding a 1"x4" chunk of O1 tool steel to the face - after I finish cutting a hardy and pritchel hole in it. That is slow going but I am trying to be as patient as possible so it turns out clean with good edges and usable holes.
 -
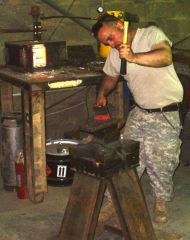 Here I am on my first project at Camp Taji, Iraq. Note the DIY anvil made from some scrap Iraqi heavy equipment and topped off with 1"x4" O1 Tool steel. Watching that little beauty take shape sparked my interrest in blacksmithing. The forge and anvil were creations of Matthew Kasten of Kasten Steel - visit him at www.kastensteel.com to witness some of his creations!
 -
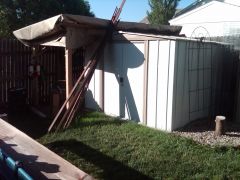
 Finally got some space that the boss is going to let me use (she wants to keep my clutter and "all that rusty metal" out of sight)... It's not much but it's mine!
 -
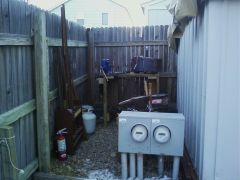 Finally got some space that the boss is going to let me use (she wants to keep my clutter and "all that rusty metal" out of sight)... It's not much but it's mine!
 -
Junker, Looks pretty nice - I used one with a very similar design recently (forgot to get pictures because I was so excited to try it out). It still had the hand-pumped hydraulic jack and I was able to reshape a comercial 3 pound hand sledge into a double diagonal-peen 2.2 pound hammer. Having a helper made it work without too much trouble - and after using it we decided to weld on a T-Handle to the release to make the return stroke much easier, and we also decided to weld on the handle to the pump. We then realized that we could make a simple treadle to operate the pump handle so the only thing we needed to use a hand for was releasing the jack - After all modifications we made, we were able to get in about 4 well-positioned pressings per heat for the 2.5 inch stock we were forging. I am about to make my own with these modifications until I get an air-over-hydraulic jack and when I get it finished, I'll post some pics of it.
-
Hello everybody - I'm tired of seeing the message about not posting a bulletin yet, so I'm introducing myself now. I am a missile maintenance NCOIC in the Army starting my 13th month of my 3rd tour in Iraq, and this time I work close to a service & recovery section that does TONS of metal fabricating by welding. Their NCOIC is the president of Kasten Steel - check it out at Kasten Steel (I wrote the first version of the web page for him and in return for writing the basic site and helping him get started in web publishing, he has been teaching me some blacksmithing). He is simply put, an Artist. He has come up with some of the most amazing iron work I have ever seen and when he gets out of the Army this next summer will be going to work full time welding and blacksmithing in Colorado where we are based out of. I have fallen in love with hot metal - welding, forging and anything related to it since this tour started. I think my wife is going to want to kill someone when I bring all of this new hobby home - time to dull the sound of my anvil a little, I think!