
teenylittlemetalguy
-
Posts
1,081 -
Joined
-
Last visited
Content Type
Profiles
Forums
Articles
Gallery
Downloads
Events
Posts posted by teenylittlemetalguy
-
-
the only trick to making them is to make sure all the holes are exactly the same length apart. Any difference and they will bind.
-
Really nice! :)
-
isn't it a blast? I had the exact same feelings when I started. I love how it gives you a real network of guys. I recently had a reason to travel abroad and made good friends over blacksmithing while on the road.
-
I love the detail, and the bowl is really awesome. you must have welded it solid and then forged the depression?
Now did you end up keeping it or was it a gift for someone lucky? -
interesting paint job. How did you get the effect of depth ? Paint it, then power wire brush it back to steel for high lights ???? Is it clear coated ?
Well, I do a couple things that come together to cause an illusion. First off is decide where the center line is, then scotchbrite in differenet directions so you cause a line, that acts like shading. Then the second is the translucent paint, which really helps fool the eye. third is the naturally occuring place where the sharks color stops at about that same midway line, but not exactly. blending over the midway line a tiny bit with some overspray helps to make it look natural.(if you masked it off it would be obvious that it was flat). Fourth the clear coat(several layers) helps with depth.
I do wish I could have done this in blue as the translucent spray paint would have really looked natural. -
Nice job, but where are the teeth? Makos have those cool skinny round teeth.
How much did it end up weighing? Did you pound it into a shot bag, or some other form, or did you form it over a stake?
thanks guys. I really like the weathervane idea!
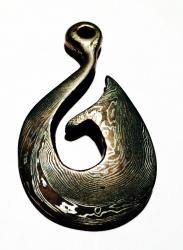
it must weigh in somewhere around 60 lbs, the brackets in the back are made for 3/8 in lags to hit studs, so it should be firm on the wall. Despite how it looks in the picture it is flat, any curve you see is an illusion from the grinding and paint. I thought about throwing some depth in and then using my english wheel, but 1/8 is just too thick for that so I settled on flat. As for teeth, I didn't want to make it menacing as I have a suspicion it will end up on her dining room wall. -
The only forging done was a couple mounting brackets on the back side, but I had to show this gift for my sister in law. Who is a big fan of sharks and anything purple. Thus, the purple Mako shark.
Made from a scrap electrical panelboard. it it 1/8" thick by 7'5"


-
I like the flowers off to the side like that, nice touch. :)
-
I like the satin finish on the guard. classy touch.
-
It appears to be a Fischer. Looks just like mine. They Were USA made, cast with a tool steel top. Don't ring loud (which I like) but they are good anvils. Mine came from a navy shipyard in California. I am told the military was one of thier biggest customers.
B) -
I have a smaller one with about 2" jaws that is great for those odd jobs that get lost in a big vise.
Mick
actually I have found it useful IN my big vice so I have some horizontal jaws when needed. Was worried at first if it would slip or not, but they seem to hold really good. -
Bob, thanks, I see no spikes on mine, but that would have been a nice feature.
Phil, sorry to hear about the scrap man, that sounded like a good old vice with some great memories. My grandfather was a machinist and I would give my I tooth for just 1 of his old tools.
Maddog, thanks for the info. When I saw it I thought first off how simple it was and that I might be able to copy it. but of course I just bought it. if you want closer pix in order to copy it I can send them. a hand size would be nice. -
On vacation I found this neat little vice. No brand name or markings at all. It is built like a post vice, but it has no leg. Small jaws about 3 inch wide.
the hinge plate apears to be brazed on the rear jawpost and the front is riveted in the plate. Screw threads into a seperate nut that is inset but not attached, just like a post vice. Spring looks like an obvious replacement,I can see wear marks from a missing flat spring.
Not sure what it was built for. I had not seen one like it so I thought I would share a picture.
-
Hey guy, nice little forge.
If you are frosting your tanks up there are a couple solutions. raise the temp by putting the tank in a bucket of water, or increase the available gas. I use 2 small tanks at the same time and don't have a problem with frost.
Also I just coated a couple forges with ITC and recommend it, but it is expensive. and you will want extra for maintenance.
Best price I could find was at seattle pottery supply. http://www.seattlepotterysupply.com/
I noticed faster heating in mine once I added it.
Good luck! -
:) Rawtiron showed a real natural talent for forge welding. I have precious little experience welding, but together we made really good progress.the shop time was really inspiring. It was a great visit and the hospitaliy was top notch! -Tristan
-
I have found no better price then seattle pottery
http://seattlepotterysupply.com/ -
Not sure about the dollars, but sems way more expensive than quarters comparing the weights.
I have been very succesful recently doing this and thought I would share a few tip that worked for me.
I tried the nickels mentioned here. and they are a great addition. Planished to the same size as quarters and alternated in a stack. I have done stacks over 3 inches with good results.
What I found is the nickels must be flat. no gaps more than a about a few sheets of paper can be between the coins.
that is where a nice holder comes in handy. I use 2 steel plates and some bolts.
once they are hot and almost thinking about melting I stick the whole shooting match in either the vise or the shop press and give them a good squeeze to about 3/4 their original height. then back in the forge and up to temp. one more squeeze so you are about 5/8 of your starting height.
this will make a nice solid chunk that will stay together if you drop it on the floor (on purpose of course). After that I found, despite reason that you must stay nice and orange while moving the material. if the edges start to delaminate, then stop before they get very big and stick them back together.start tapping edgewise to square it up a bit, little blows at first , checking for delam often. I you try to flatten the stack diagonally you get better adhesion and actually more of that wood grain look.

-
thanks bentiron. Sounds pretty neat to have a 2 ft dime! Bet that is hard to spend. not exactly pocket change at that point.

I saw a program on tv where they showed the process of fusing the nickel and the copper and they do it in large plates using explosives at a quarry. Really amazing. the fused up plate then gets rolled all the way down to coin thickness. must just stick better than I can stick them in my shop.
I know if I try and hammer it cold it moves a bit, then even after repeated anneallings it will crack and seperate on me. others might have luck doing it cold, but I can't. -
I admit it guys,
 I am addicted. I jumped up this morning and made piece #2. I think it looks even better.
The trick for me was making sure they were warm enough after I made the billet. That nickel really doesn't want to move while it's cold and will just shear if not glowing. -
I did it!
After burning up $7.00, I got it to work. and xxxx it feels good!
thanks for the help guys.
-Teeny
-
←
thanks guys, I did find that tutorial late last night. I believe I am being to easy on the heat. I gotta stop cringing at the fact that I am literally "burning up money".. heh heh. -
← JBIN, wow, very impressive. I am just now starting to try this after years of just admiring. and I can't even get quarters to stick. and suggestions on where to start so I do this right?
I am using a gas forge , wrapping them w/ stainless wire . and all I seem to get is squished dirty quarters -
I have had funny colors show up when my slack tub was contaminated. They disappeared when I changed the water.
I had weird purples and burnt orange colors (I am sure it wasn't rust) -
You know nakedanvil, that idea might really catch on, the drawings on some of the blueprints are "sketchy"
I use sketchup alot (because I don't know any better) and if it is where you are starting at it is a blast to use when you have no CAD training.


Tsunami Damascus
in Knife Making
Posted
Outstanding, both are very distinctive. The low layer count almost looks like skulls. B)