doggonemess
Members
-
Joined
-
Last visited
Everything posted by doggonemess
-
-
While I never post to ancient threads like this, I take exception in this case because most of the links and images provided seem to be dead. This forum post this comes up at the top of Google searches, so I wanted to post some links that I found to be very useful. Very nice blog post about building a set: https://www.woodland-ways.co.uk/blog/primitive-crafts/home-made-bellows/ Here's a set of plans used to make the bellows above: http://www.manaraefan.co.uk/index_files/Page408.htm Here's a guy who provided a novel way of controlling the airflow with his design: http://persimmonforge.blogspot.com/2013/01/making-great-double-lung-blacksmith.html
-
-
Greetings, all. After a few months of general nuttiness, I finally got around to doing the untreated test. I got two pieces of 5160 from the original stock that I made the previous four knives with and made two knife shaped objects. They're ugly, but it's not a beauty contest. I was lazy about taking pictures and video this time, so there isn't as much detail in those. You can see the results of the chopping, bending, and heavy thing drop tests in this imgur album. https://imgur.com/a/GTsKGhJ In the close ups of the blade, you can see the section in front of my finger where the edge has flattened or rolled after the chopping test. It was fairly sharp before that. For the bend, I did take video of both in case something interesting happened. Nothing did - they just bent a whole lot. I then bent them back, which you can see in the album. After that, I dropped the wrought iron bar on the edges and it caused less damage. This is visible in the second to last image. It just slightly deformed the edges instead of breaking a chip off. The end result shows that these normalized pieces behaved very differently from the hardened steel tests. While none of this is conclusive, it suggests that there is something more to this method than it appears. I don't know what the mechanism is, but I have made a few blades this way and they perform as well as my other (properly) heat treated blades. If anyone has access to an electron microscope, I'd love to send some samples. Barring that, I'm going with my gut on this one and using this technique to treat longer edges, as it's much easier than quenching and tempering.
-
I can say for sure that a mild steel knife wouldn't survive the chopping test and remain sharp. I've made a few knives from inferior steel and they couldn't keep an edge at all. I would expect them to also fold the edge rather than crack when abused. But I should have more data shortly - I made the knives out of 5160 and left them untreated. So that will give us the baseline performance for that piece of metal.
-
Okay, true enough. There is very little quality control in the torch method, but I've never done differential hardening, so the first several times would yield unpredictable results. With the torch, the process is easy to monitor - when a section turns bright orange, you move a little further down the blade. It would be much better if there was a way to guide the heat down the blade mechanically.
-
-
-
-
I apologize for the delay in posting the results; holidays happened and I got really distracted. The link below goes to an imgur page of the test results. I haven't posted any captions yet, but I'll describe what I did and it's presented chronologically. The blades are identifiable by the letter stamped on the handle as indicated below. https://imgur.com/gallery/4617zrE As you can see, I made four KSO (Knife Shaped Object) blades of almost exactly the same dimensions. They're pretty ugly, but I'm not trying to win a beauty contest, just test their properties. Two came out larger than the others, so I used one large and one small for both methods, to even it out. The steel is cut from the exact same bar of 5160, which I bought from Alabama Damascus http://www.alabamadamascussteel.com/. I chose their company because they were the best price for a small quantity. Most of the other companies I checked gouged on shipping or required a large purchase. During forging, I marked each blade with "T" or "S". The "S" indicates the standard treatment, and the "T" is the water trough. The standard treatment involved hardening in oil and tempering in a 400 F oven on top of a stone for two hours, then allowed to cool in the oven overnight. The trough method I've described above and uploaded videos of a bladesmith doing it. I decided on three tests, each inspired by the ABS. Now, some of the results would be difficult to compare to other knives but the point of this exercise was to compare these identical knives to each other. 1. Edge hardness To perform this test, I clamped a piece of 2 x 4 to my deck. Because the blades were so short, I didn't want to try cutting all the way through, so I decided on an arbitrary number of strikes and then compare the edges. I started with 40 wacks, since it worked so well for Lizzie. At the end, none of the blades showed any sign of wear and were still shaving-sharp. So I upped the difficulty and got a piece of ipe. Anyone who knows wood knows that this is one of the hardest commonly available woods. I gave that one 40 wacks with all the blades and none showed any deformation or chipping, and all were still just as sharp. 2. Bending For this test, I stuck each blade handle-up in a post vise and bent to almost 90 degrees. I say almost since I didn't set up a gauge behind the vise and, I'll admit it, I got really nervous when they were bending past 45. I took the video and corrected the vise angle in Photoshop to get some rough angles. I'm wearing a welding mask because I couldn't find my faceshield. I'm sure I looked silly to my neighbors. I recorded these tests and posted them to youtube as I knew that it would be very easy to make false claims about this sort of thing, and wanted to be certain that the results were believable. The first test was the longer of the two trough hardened blades. It bent almost to 75 degrees without cracking and then back to about 45 degrees of set. I was just as surprised as everyone else will be. https://www.youtube.com/watch?v=yVA8nUQIZKI The second test was the longer of the oil-hardened blades. I was feeling confident at this point so I had no worries. It broke violently at about 60 degrees. https://www.youtube.com/watch?v=nB7IK0-G7Rw The third test was the shorter of the trough blades, resulting in almost the same outcome, bent to a max of 65 degrees. https://www.youtube.com/watch?v=HZKNSt_g2M4 The fourth test was the shorter oil-hardened blade; it broke even sooner at around 40 degrees. https://www.youtube.com/watch?v=YO_3njU-bWE 3. Edge toughness Since all the blades were ruined at this point, I figured I might as well see what other kinds of punishment they could take. For this test, I dropped a 1 Kg wrought iron rod from a distance of 30 cm. This is obviously not a standardized test; my goal was to compare the damage to each of the knives as see how they compared to each other. You can see the tests here, but to sum up, I placed a blade in the vise edge-up, held the chunk of metal against a mark on the backdrop and dropped it. They all performed about the same, resulting in a chip about the size of a fingernail clipping. I was very surprised, I thought the trough knives would roll the edge, even though they performed the same during the chopping test. T1: https://www.youtube.com/watch?v=EZD3LRdhWjk S1: https://www.youtube.com/watch?v=BcjWfrzAvjc T2: https://www.youtube.com/watch?v=hGYGvP3H6XU S2: https://www.youtube.com/watch?v=3VkbRQMNaKA Fun fact - the wrought iron bar is a piece of the USS Constellation, given to me by the guy in charge of restoration. It was some bonus material left over from making hooks for the ship. The results of this fairly informal test are pretty clear to me. With 5160, this method seems to produce a hard edge with a very flexible spine that performed just as well as traditionally hardened blades. The trough treated knives were very flexible and durable. I'm going to make some more blades using the trough method and see how something a little more substantial does in the tests. If there is anything I would take away from this personally, it's that I obviously don't temper my blades long enough the standard way. I've got to work on that, clearly. Watch the videos, look at the pictures, let me know what you guys think. I'm open to any feedback, and happy to receive it. Thanks! Jamie
-
I'll fill you all in on the details a little bit later today - it's definitely 5160 as I bought it from a reputable metal supplier and it was cut from the same piece of stock, so each piece is identical to the next. Unfortunately, I can't blind test as I made them and I'll definitely know which is which. I suppose if I had gone in with that plan in the first place, that would have been doable. Even so, I'm on the fence about this technique, so I'll be as impartial as possible. I'll also post pictures on imgur so people can see the results themselves. You are right about the shape making it difficult. My knife-shaped-objects are slightly curved, and it made the treatment difficult. I had someone help me, though, so it worked out. As for the test, I'm going for chopping, checking the edge for sharpness and deformation, and then I'm sticking them in a vise and bending until 90 degrees. I don't think I'll be able to get there, so I'll probably use a tool for leverage. Hopefully, I'll have some results later today or over the break!
-
Greetings again, everyone. I'm happy to report that I finished forging and tempering my test blades. I'm sharpening now and will start to conduct my tests this week! Initial results seem promising. Both sets of knives are properly hard and durable, but the testing will yield real data. I'll have more pictures and also some video of the vise bending test. Should be interesting.
-
One thing I can assure you is that it's not simply normalized. I've done that plenty of times and this is a definite hardened edge. You are correct - it isn't consistent in this case, but the examples I was shown were thicker blades and it seemed to be very even. I'm curious what would happen if the edge was tested for hardness in many places, like every 1/2 inch or so. I wonder if it would come up softer in some spots (not on my sword, it's obviously not even; on his knives). Just to make my experience with this clear - though my post count is low, I've been treating and tempering steel for seven years using the proper methods. This is something new to me and I'm as skeptical as everyone else. All I can say is that it sure seems to have worked. I'm going to try it out on something I don't care about and do some tests to destruction and see how it compares. I'll knock up a few crummy knives and heat treat half of them traditionally and half with this method and see what happens. I'll definitely post the results of my tests. You are correct - that is what he's doing. I agree with everything you just said. It seems like it shouldn't harden it, and then afterwards, there is no tempering process except what the water imparts. But that's what I'm seeing - the edge is file-hard and isn't chipping when I strike hardwood, which I have seen happen with one of my blades that I didn't temper properly. I've put an edge on aluminum! Back when I was a kid I had a mail-order "ninja" sword (those are sarcastic air quotes). I couldn't understand why it dulled the instant I tried to cut with it. And why it bent sideways when I hit a post with it. Ah, memories. What I'm seeing here looks and feels like a hardened and treated edge. It doesn't add up, I agree. Like I said in my other reply, I'm going to do some testing and see what happens. Thanks for your feedback on this, everyone. I really appreciate the knowledge you guys have on these matters, and you could have just as easily ignored my original post as a "newb" question.
-
Here are a few pictures of the process and the results. The sword is made from 5160, which he recommended for this technique. I may have been wrong before when I said he did this with 1095; if so, I apologize. The thinness of the steel made it challenging - I'm glad that someone with a lot of experience did this part. It definitely reached transformation temperature all along the edge of the blade, but a less steady hand (mine) probably would have ended up burning it. Below is the smith doing the work. His name is Bill, but I missed his last name. He's been making knives professionally for decades. Here's the finished product. The edge was good and hard. I can see from the color that the tempering went a little too far in a few spots, moving out of blue and into grey, but I don't fault him for it. This was the first time he'd worked a blade this thin and long, and it required a great deal of focus and effort to keep it as consistent as he did. Below is one spot that got cooked, but the rest of the blade was excellent. NOTE - His blades that he showed me did not have this issue. He's far more skilled at blade crafting and my blade had very inconsistent thickness, making it almost impossible to treat evenly. When I watched him do this to a proper knife, the end result was perfect, no variation in the color. Interestingly, the finished blades he showed me had edges that looked like hamon from proper katanas. Maybe this method produces a similar effect to the clay/water technique used by Japanese smiths.
-
Greetings again, all! I have an update to this topic. The man who taught me this technique is a master bladesmith. He brought in examples of his work, including ones that survived testing. He has had his blades professional tested for Rockwell hardness, coming in around 60 HRC. He's definitely no BSer, and I've met quite a few. He can back up what he told me with actual evidence. On top of that, he brought one of his blades and did the hardening at the forge one day. I asked if it would work on a 5160 sword blade. He wasn't sure, but he was excited to try, having never worked with a long blade. Below is the video, check it out if you're interested. I can attest that the blade is hard and flexible. I gave a hard stump a few good whacks and didn't see any deformation of the edge. Granted, this isn't a real test, but my own failures in tempering have taught me enough to know when the process failed. How good it is, I don't know, but it definitely can be sharpened and can cut without bending or breaking from the stress. I've got some pictures, too, which I'll upload shortly. On a side note - the water was ice cold when we started and like warm bath water when we were done. That's A LOT of heat if it warmed up that much water that quickly. Heat treating process: https://www.youtube.com/watch?v=vcJ5VI7zazo Testing edge with file: https://www.youtube.com/watch?v=vsM5sGgBWOw
-
-
The steel he used was 1095. I used an old file since I didn't want to spend any money on an something I had little confidence in. Sorry, the first responder asked the same question and I forgot to answer. Despite my post count, I'm actually somewhat experienced with this, having done it as a hobby for almost eight years. I did make the mistake years ago of trying to make a blade with mild steel, so I'm definitely not innocent of that. I've also made a bi-steel blade with a spring steel edge and folded wrought iron core; I love the way it turned out and would like to do it again. Hence, I'm very interested in differential tempering, especially if there are easier ways to do it than what I've read about.
-
If this works as a quench, that's great, but what about tempering? Wouldn't this method result in a really hard edge? Or does the heat moving down the blade serve to temper the region near the part being heated? If so, wouldn't the extreme heat nearest to the 'active' area destroy any tempering? It seems like it could work, but also that it shouldn't. I did try it myself with a MAPP-Pro torch. FYI - MAPP-Pro isn't hot enough to get the metal glowing red when the rest of the blade is submerged. Good to know. The blade didn't really harden much - I managed to roll the edge by hitting a tree stump with it.
-
Greetings, I recently had a conversation with a blade maker who told me that his method for hardening and tempering is as follows. Using a tub of water, he places all but the half inch of edge in the water. He then takes an oxyacetylene torch and heats the metal using slow circular motions until it is bright red. He continues evenly down the blade in this manner until reaching the end. When the color fades, he takes the knife out of the water and lets it finish cooling in the air. This is very different from any other method I've heard of. Has anyone tried this themselves? Is this a standard practice I don't know about? The process seems logical, but at the same time, it seems to me that the blade wouldn't harden properly. The knife he showed me that used this method had a good, strong edge and seemed to be well made. Any thoughts? Thanks!
-
Not to resurrect a dead thread, but I had to comment on this. I have the exact same anvil, except mine has "100" in raised numbers on the side (and weighs 220lbs). It's a cast iron ASO for sure, and I've used it as a beater just to pound stuff on that I don't care about. If the OP is still on the site, I'd like to know if you found out anything about this anvil. Does anyone have any idea where they came from?
-
Thanks for all the great ideas, I'm thinking that it might have been a sliding access hatch as suggested by Alan Evens. The pointy bit could stick into a bracket and the curved part would facilitate it moving out of the way against a curved wall. The farms around me were primarily corn and cattle, from what I've seen. I don't think there was ever a silo in the area I live, although there are some about two miles from me that are extant. Who knows, someone like me might have found it in the middle of nowhere and dumped it in the woods after deciding it was junk. Either way, I've already used some of it to make the top of my portable forge. It worked great for that. I just have to stick it in the fire to get rid of the rust. Jamie
-
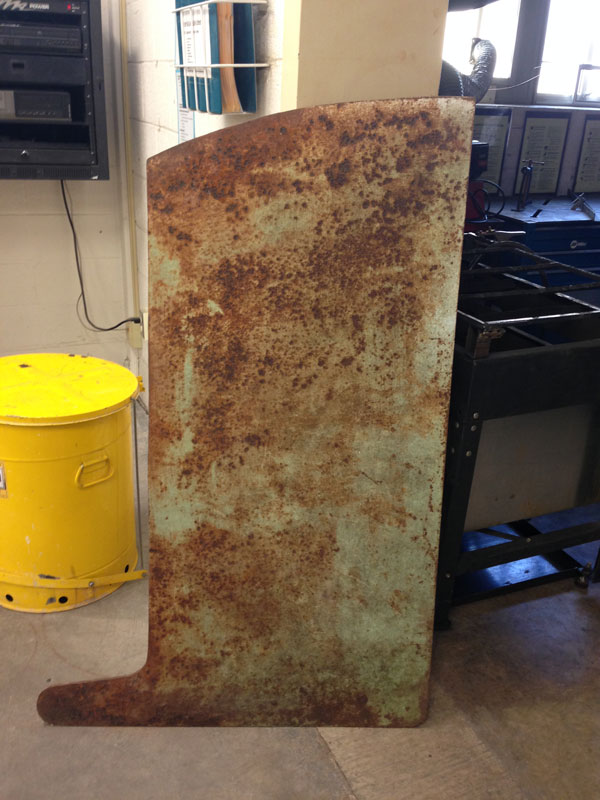
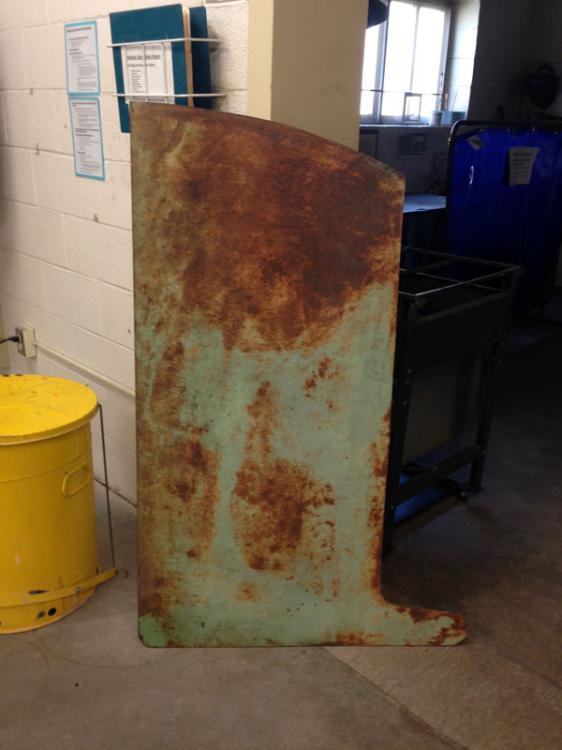
Greetings, I found some more interesting metal. I'm not sure what it came from, or what kind of metal it is. I'm assuming it's mild steel based on a quick spark test. The odd thing about it is the shape. Any ideas what this could have come from or been used for? The plate is 5/16" thick, longest dimension is 56", width is 26" not counting the pointy bit, and it weighs about 100 lbs. Looks like it was a green color originally, doesn't appear to be any other color on it. It came from the right-of-way behind my house. The area in question was a farm / dumping ground at one point. I'm using part of it to build a portable forge, which I'll post pics of when it's ready. The other part (with the pointy bit) will be part of my larger home forge. Thanks! Jamie

-
-
-
Greetings all, I was picking around a farmer's dump site (probably from the '50s) and found this metal... thing. It looks almost like a large set of tongs, but the ends don't have pincers, just rusted chunks that look like bolts. For a moment I thought it was the suspension for a wagon seat, but then saw that it slides in the middle. I'm completely stumped. Can anyone give me a guess? Thanks! Jamie