ThorsHammer82
-
Posts
586 -
Joined
-
Last visited
Content Type
Profiles
Forums
Articles
Gallery
Downloads
Events
Everything posted by ThorsHammer82
-
Here is my post Anvil


-
So far I've only really used it "cold". Used it to straighten some bars. Bent a really quick and dirty dinner triangle. used the vise to hold some metal for grinding. Can't fire up the forge right now for fear of setting the rest of the state on fire. current burn ban in "NO FIRES WHAT SO EVER!"
-
Railroad spikes on one side and of Track?
ThorsHammer82 replied to The Armourer's topic in Blacksmithing, General Discussion
If that's their stand than, I think you're safe. But as others have said, it's better safe, than sorry. -
AMT standing drill press
ThorsHammer82 replied to ThorsHammer82's topic in Drills, Post drills, Mag drills, etc
We get that, we're just pointing out that you can use the depth stop, to act the same as a quill stop. to position the work directly under the drill bit for precision drilling. Just need to make sure you leave enough room after you've stopped it to be able to drill the depth you need. Otherwise, you might as well just set the position with the drill stem up and the table raised to an appropriate height. but back to the task at hand. Still haven't found anything in regards to a manual or anything like that. I have however found them for sale for anywhere from $100-$250. I think at this point I'll just use it and go from there. -
AMT standing drill press
ThorsHammer82 replied to ThorsHammer82's topic in Drills, Post drills, Mag drills, etc
I just went out and locked it in the down position with the stop. Preventing upward movement. Now I'm going to go back out and let it off because I don't see a point in leaving it down to let dust and crud get onto those parts more than needed. I'm pretty sure my bench top press will do the same thing. -
AMT standing drill press
ThorsHammer82 replied to ThorsHammer82's topic in Drills, Post drills, Mag drills, etc
which feed? the spindle or the table? I'm pretty sure there is a threaded pin on both, but I think the one on the spindle is a stop, not a lock, though in theory it could be set as a lock. Also, I've tried finding their website and all I can come up with is a site that sells Jet tools, or an industrial pump site. My googlefu is failing me. -
I was approached on Saturday evening by a friend of mine, He asked me if I needed a standing drill press. (who would say no to that? I'm still confused on why he didn't want it) And of course I said yes. As it turns out his father had passed away and he and his brother had finally started cleaning out his shop. Well his brother already had a standing drill press, and he says his bench top press is all he needs. So now I'm the proud owner of an AMT 3/4 HP 12 speed free standing drill press. I know nothing about AMT, and my internet searching has only managed to find me 1 of the same model that used to be for sale, and the rest are all older model presses. If anyone can give me an idea of the quality of this press (it's gotta be 20+ yrs old) and where I might be able to find some information or a manual for one that would be great. if not, thanks for reading.
-
the angle on the washers isn't a big deal. 99% of the time you'll never work with the vise open that far. For the 3/16" gap, add a 1/4" washer to the handled side of the handle side thrust washer. done. The resistance on the screw at the outer reaches of the vise is the screw itself hitting the vise. Note the angle of the moving jaw as compared to the screw. Solution - don't open that far. For the 1 1/2" gap. Get washers to take up some or all of the gap (a wheel bearing will take up the full gap and make loosening and tightening much easier - not picture below)

-
after a little TLC and a couple coats of paint. she's looking beautiful and ready to get to work.

-
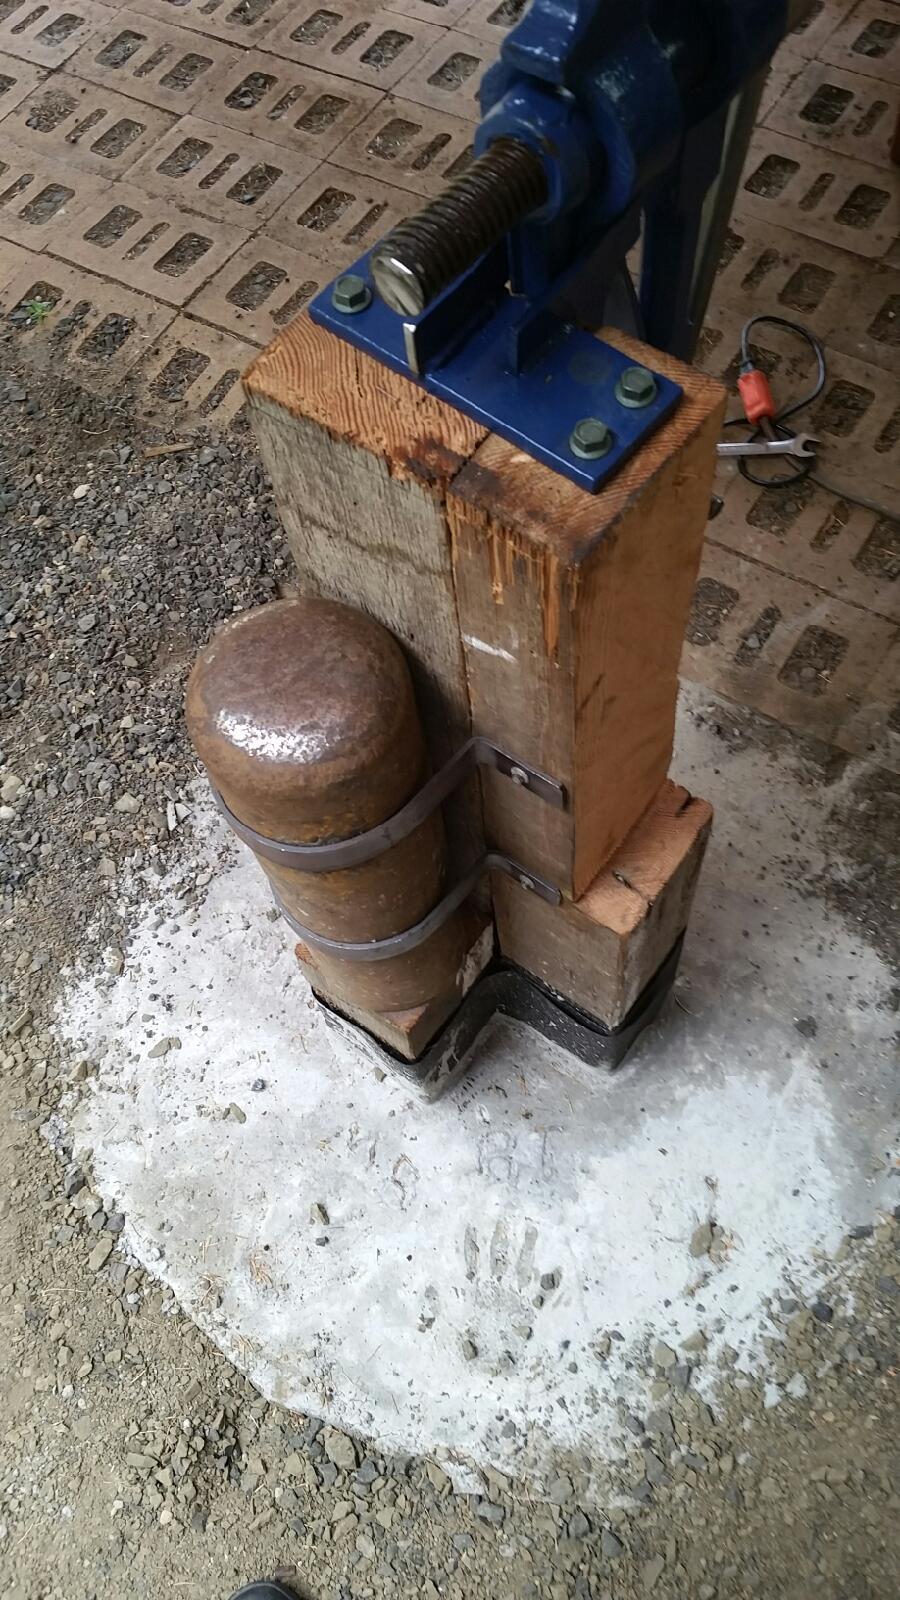
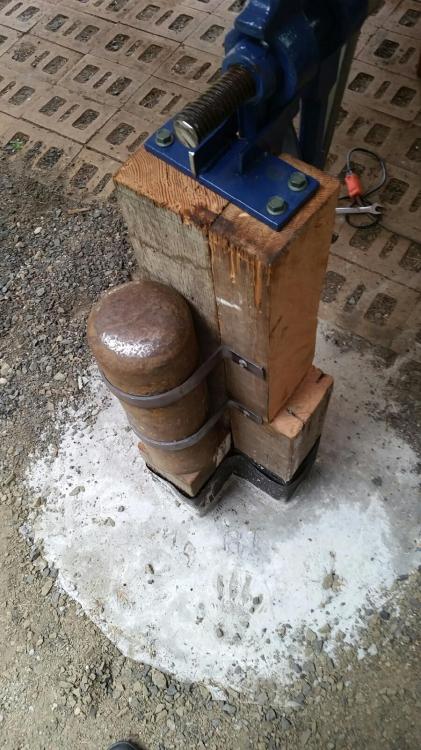
Well She's just about done. Still need to cut and dress the RR track and mount it on the notch. But for all intents and purposes, the mount, the vise, and the Post Anvil are ready for me to find some time to get some coal burning. Just strapping the Post Anvil to the wood securely quieted it down by probably 50% so I decided Not to mess around with the caulk. Let me know what you guys think. Managed to get my kids, and my niece and nephew's hand prints in the base when we poured. Thank you again to Larry (monstermetals) for helping me find my first Post Vise. I plan on putting it to many years of good use.

-
Well they've got me in a walking boot and so I decided to mount the vise on the post. Next I'll make a pedestal for the leg, and mount the post anvil. I set it on the post to check height tonight and tapped it a couple of times to check rebound. That thing rings like a bell. will definitely be putting some caulking under the base and on the straps. I should have the Anvil mounted on Saturday. I'll take pictures then.
-
I've got a 30 gal and don't have the CFM at a high enough PSI to run mine effectively. a 6 gal certainly won't be enough. Stick with the pressure washer.
-
what kind of sand blaster were you hoping to build? the biggest issue with Sandblasters is the air supply. to small of CFM or to small of PSI and you're fighting it all the way through, and not removing much materials if any. I bought the HF 100 lbs. pressure tank sand blaster, and the blast itself works fine, but my air supply is to small to feed it at optimum output. so I have to fight clogs and don't remove much material. If you're insisting on building one. Copy an existing design and go off of it's air requirements. If you don't have the air, you're not going to have a useful tool.
-
lets see some pictures. we like pictures.
-
There are many people (myself included) that have used hair dryers successfully for forging. both with Charcoal, and coal.
-
Project Lay out/Marking the Metal
ThorsHammer82 replied to ThorsHammer82's topic in Blacksmithing, General Discussion
Yes. The hitch in question will be part of a 3 axis hitch that will also be used on my ATV trailer. the U will pin into the center section of the 3 axis hitch. Behind the horizontal pivot. The vertical pivot and rotational Pivot will be removed for use as a recovery hitch. -
Project Lay out/Marking the Metal
ThorsHammer82 replied to ThorsHammer82's topic in Blacksmithing, General Discussion
Well someone is grumpy this morning... I can only assume it's because you're other post was much longer and for some reason the sight still isn't running at full steam. I know how to do it, and just was wondering what everyone uses to mark the metal prior to heating it. -
Project Lay out/Marking the Metal
ThorsHammer82 replied to ThorsHammer82's topic in Blacksmithing, General Discussion
not so much a blacksmith project. Just using the forge to get the metal up to bending temp. I want the sling to stay flat. So I don't plan on pringling the pipe at all. The weld will radius the top and bottom of the pipe slightly, but in reality not enough to really make the pipe pringle shape. I trust my welding skills much more than my smithing skills at this point. Not enough time on the anvil yet, and a lot fewer Blacksmithing tools than welding tools at this point. I'm slowly but surely getting there. but for this, I'd rather just get it done, than try to improve my minimal forging skills. I have several Smithing projects in the line up for practicing that in the next dozen or so projects on the ever growing list. -
Project Lay out/Marking the Metal
ThorsHammer82 replied to ThorsHammer82's topic in Blacksmithing, General Discussion
If I keep the bottom of the U flat and square it won't tend to cause the strap to bunch up in the bottom of the U. Adding the section of pipe into that will keep the eye of the strap open (like an insert/thimble on a rope eye, or wire rope eye). Both of these reduce the stress on the strap adding to longer strap life. The amount of load that this might see means that the haze will not have any affect on the finished product. Yes I know I could just buy a large shackle and get the same thing essentially. but I'm cheap, and I like projects. -
My take on the Split Cross/Fredricks Cross
ThorsHammer82 replied to norrin_radd's topic in Blacksmithing, General Discussion
I've never tried these. And have what very well could be a dumb question. Anyway, the tutorial above uses Material that is nominally the same size either round or square (example 1/2"x1/2", 3/8"x3/8", Etc.) My question is can these be made with material that isn't nominally the same size? stock that has a more rectangular cross section. Or would that just not look right? -
DSW, an engine hoist makes a great post puller too if they have a large concrete base on them. The splayed legs and long reach of the hoist works great. Though, depending on the soil in the location, you may need to make some wooden nests to put under the wheels to keep them from sinking in to much.
-
Project Lay out/Marking the Metal
ThorsHammer82 replied to ThorsHammer82's topic in Blacksmithing, General Discussion
to give an idea of the particular project that brought this to mind. I plan on making a pivoting recovery shackle for my ATV. The plan is to bend 2"x3/8" (you'll see that size as a common theme for me for a while as I was given 8 full sticks and then some so it's on hand and free) into a U shape and that will be pinned through a hitch bar (1.25") that will go into my ATV's receiver. The Pin will be the 1/2" Receiver pins that match the 1.25" hitch systems. I want to bend the flat bar with my post vise to keep the bend square and hopefully sharp. I will be welding in a half circle of pipe on the inside of the U to reduce stress on the strap. a Center Punch mark seems to be the simplest, yet most effective way to get the mark I'm looking for. I'll lay out and scribe my marks and then Center punch the bend lines so that I can line them up in the vise easily before bending. -
She's a beauty.
-
Project Lay out/Marking the Metal
ThorsHammer82 replied to ThorsHammer82's topic in Blacksmithing, General Discussion
Would a scribed line be visible? I'm not worried about the mark being left on this project. I just want it accurate. -
I looked for a Project layout sub forum and didn't see anything (probably just blind and not looking hard enough). Anyway, I'm wondering what you guys use to mark you metal that will last through the heating process. For example. If I wanted to make a bend at 4" up the piece, and again 2" up from that. How do I mark the work piece so that I don't have to measure after the heat so that I'm not wasting heat, but I'm still getting an accurate location on my bend?