
urnesBeast
-
Posts
252 -
Joined
-
Last visited
Content Type
Profiles
Forums
Articles
Gallery
Downloads
Events
Everything posted by urnesBeast
-
setting an anvil in dirt floor
urnesBeast replied to urnesBeast's topic in Anvils, Swage Blocks, and Mandrels
From the storm, there is already a debarked strip like that. Why is just a strip good enough? -
setting an anvil in dirt floor
urnesBeast replied to urnesBeast's topic in Anvils, Swage Blocks, and Mandrels
So, I played with this more today. I had dug down five feet. I then took various and asundry rocks and delicately threw them in the hole. It is now a 4 foot deep hole, with a foot of rocks in the bottom. I cut the split part of the trunk to an appropriate height. I tried to shave the bark off with a chainsaw. This was not particularly efficient. I tried a rasp. That was labor intensive, but was working. Looking for a good angle grinder blade for it. I got out the torch, that got the bark smouldering. That might be enough. How much smouldering is enough? Doug -
setting an anvil in dirt floor
urnesBeast replied to urnesBeast's topic in Anvils, Swage Blocks, and Mandrels
I like the idea of not linseeding if people think is is not needed. I have seen ZERO evidence of water or life in this soil/sand. I would rather not debark this thing if it is unneeded. I have already painted the buried ends, but I could charm them instead, especially if I cut them off because this is too long. Gravel/coal at the bottom is easy. I will be gravel back filling a lot of this. -
Wanted to share what I have done, and get some advice since I am half way through the project. I have a #335 Euro anvil and am setting up my new smithy. It has a dirt floor. After a while using the smithy, I figured out a good orientation and location for the anvil. I acquired a tree trunk of the right diameter, fresh fallen ash, 8 ft long. The trunk forks about midway. I have dug a hole 57 inches deep, about 1.5 feet wider than needed. The whole is elongated so I can slide the trunk (fork down) into the hole and as it slides down it should be easy to get into a vertical orientation. Frost line is 4 feet here. So I am already 10 inches deeper, and could go deeper if needed. I painted the forked end of the trunk to stop checking. The smithy is has a slope down and away on one side, but is down slope from the road. So far in digging it seems like dry sandy clay after one foot of rocky nastyness (it was a horse barn before) --- The rest of the plan is to cut to the right length, chainsaw off the bark (if this is not needed, I would like to know) I would then use boiled linseed oil to preserve it. Likely mixing it with coal dust too. I plan to put some kind of taper on the above ground bit so I can have a band that gets tightened by hammering down. I think it would be easier to just put a band it and nail it to the stump. If this would be sufficient, I will do that. I was going to back fill the hole with gravel, any rocks I found in excvation. I am hoping this will keep any possible water away from the trunk. The clay san is nice to walk on, so I am glad to just use it to cover my floor with instead of hiding it in the hole again. I would set the anvil on top with silicone or caulk or something. If needed strap it down, but the silicone on my current stand is plenty. Ideas?
-
Drywall vs metal for interior walls
urnesBeast replied to urnesBeast's topic in Building, Designing a Shop
To clarify: My chimney is a side draft 13 square. There is 8 inches of gap on all four sides where it penetrates the wall. This larger hole is lined with cement board on the edges and covered with metal inside and out. I took the spacing that was provided by the existing vertical studs, i just cut one stud out and framed the chimney out like it was a window. The the stuff on the floor is whatever comes out of my ash trap, some amount of which is the coal dust that is in the bottom of the firepot when cleaning out. I might start just bucketing this instead of trying to make a floor out of it. -
Drywall vs metal for interior walls
urnesBeast replied to urnesBeast's topic in Building, Designing a Shop
I am using ear muffs because I want to be able to hear in 50 years. I would wear ear protection if I was out on an open field smithing. -
Drywall vs metal for interior walls
urnesBeast replied to urnesBeast's topic in Building, Designing a Shop
One of the goals, as someone who has burned a smithy to the ground, was to sleep well after forging. That has been achieved. The final construction ended up like this: Bare studs and clapboard add insulation add 5/8 fire code drywall 8 inches of air clearance and then cement board around side draft forge chimney (chimney supported in this area by metal studs) Heat shield on outer wall nearest the chimney (inspector's idea, not mine) Metal on all walls, 8 ft up. Cement floor in half Dirt floor in other half. Though I am building up coal dust and clinkers. From the floor discussions, this seems to be fine. Not sure how I feel about covering the floor with flammable material (though it will not really burn without much effort) ---- For the sound, not an issue. I wear earmuffs all the time I am in there anyways. -
Drywall vs metal for interior walls
urnesBeast replied to urnesBeast's topic in Building, Designing a Shop
As a follow up to this, the ribbed material is great, EXCEPT when needing to cut around electrical outlets. They always seemed to fall in the middle of a rib. There is not a great way to cut around these. I ended up having to fill in the rib area with joint compound and silicone. It tieded it up quite a bit. Doug -
I just went to the heating supply place and got 12 diameter galvi pipe for something similar. Not sure what gauge it is, but I suspect it is the same as yours. It works fine, set it on the horizontal bit, fix it tight and done. The galvi is no where near the heat, and even if it was, it would be on the way up and out. On my chimney, I had set a candle on the horizontal bit to see if it ever got warm. After months of forging, the candle had shown no sign of having melted.
-
Wait, that is not you, Brian? Are you two twins?
-
Review: Classes with Brian Brazeal
urnesBeast replied to urnesBeast's topic in Blacksmithing, General Discussion
Yes Brian is very precise in his language. These are dies, not a hammer and anvil. The sooner you learn the language the easier the communication comes. Other things that I really internalized. Give credit where credit it due. If you are using someone's design, or a novel technique learned from someone, mention it. It does not take much to add a little bit to the tag or description to say "a design inspired by Brian Brazeal" If you are posting something here, let people know where you got it. For many of us, this is just a hobby. for some it is a career. For people like Brian, it is a calling/addiction/lifelong pursuit. When I was in his shop, I realized that a lot of the things I have learned on this site were from Brian, but I forgot it (his punch shaping, the piece support on the side of the forge, the "tv tray" forging table) I am thinking of just changing my signature to: "I probably learned this from Brian." just to make sure I am covered! :) -
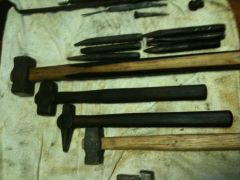
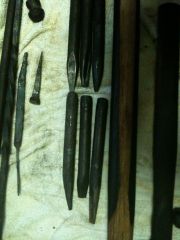
As with many of you, I became of Brian Brazeal through iForgeIron.com. Later, I met him in person at the National Convention 2010. Brian offers private classes at his forge in Brandon Mississippi. This is a review and endorsement, not an advertisement, so I will leave you to ask him directly for prices. The deal was this: he would forge with me for as long as I would like each day, teaching the techniques I chose each day. I assure you, he will outlast you at the forge. I would say we averaged about 10-12 hour days. Room and board were included. Karen is an excellent cook under even the most difficult of situations. This really removed the down time, and left it pretty much forging all day, every day. The class produced this Tools: --------- Rounding Hammer 3" fullering hammer 3" Bottom fuller 1.5" Bottom fuller Hexagonal edge tool (for anvils with wide faces of dulled edges) Cupping tool 3" Bottom swedge Two tapered hot cuts Feather tool Six chisels Touch mark 3" top tool 1.5" top tool Punch top tool Top set Shoulder tools (for making hammer, keeps cheeks off anvil while drifting) Drift finished Drift unfinished Fire poker Fire mop ----- Example pieces: Bird, cattail, leaf forge welded bundle (made by Brian) Grappling hook forge weld bundle (made by me) Corkscrew (brian) Mushroom (brian) Rings (Lyle) Feathers (Brian and Lyle) Calalily (Brian) Leafs (All) Collared trivet (Doug) ----------- For this class, I mostly focused on tool making. I struck for most of tools above, directed or worked solo on a fair amount of them. With the tools made, and the knowledge gained, I feel confident that I could make a serviceable version of any of the above tools with a novice striker. In fact, I believe I could make a serviceable version of most of the tools in his racks. I would recommend the class to most aspiring blacksmiths. I would caution on a few things: 1.) It is hot there for a northern boy. Wait until later in the year. 2.) Two weeks straight (with a four day break in middle) is likely too physical for office dwellers like me. Consider two one week trips. 3.) Brian's rig is very mobile, he is willing to travel. Consider paying the extra to bring him to you. My next session will likely be with a power hammer at my place. 4.) Working with anyone that intensely for an extended period of time on projects that can be frustrating will wear on your nerves, and the instructor's. Be willing to walk away and to take a nap. 5.) Karen described the accommodations as "Glorified camping". It amazed me how used to that you get quickly. Did I mention she is a great cook? 6.) It was nice to have Lyle stop by in the evenings for a change of pace. More pictures by Lyle here: CLICK HERE
-
All products of 10 day course with Brian Brazeal
urnesBeast posted a gallery image in Member Galleries
 Everything made with Brian in a ten day course with Brian Brazeal. I estimate the cost of the product I took home to be greater than the cost of the class. Plus, the knowledge gained this is the highest value class I can imagine.
 -
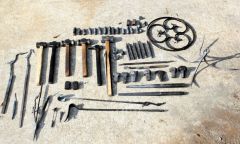
 Bottom tools made by Doug and Brian Brazeal in a class taught by Brian Summer 2010
 -
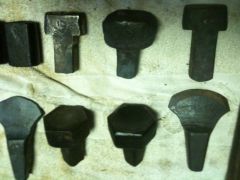
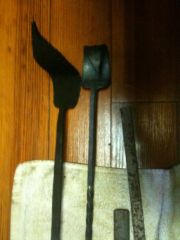
 Top tools made by Doug and Brian Brazeal in a class taught by Brian Summer 2010
 -
 Chisels made by Doug and Brian Brazeal in a class taught by Brian Summer 2010
 -
 Birds made by Doug and Brian Brazeal in a class summer 2010
 -
 By Doug and Brian, as taught by Brian Brazeal Summer 2010
 -
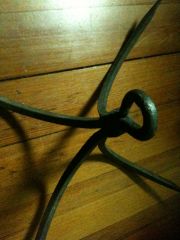 Grappling hook made via Forge welded bundle as taught by Brian Brazeal in a class Summer 2010
 -
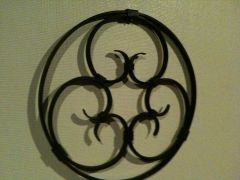 Collared trivet made to Brian Brazeal's jigs in a class, Summer 2010
 -
I just made one of these with brian Brazeal. We made ours hexagonal. When we brought it down to height, we did it such that the top was wider than the bottom. This happens because the striking anvil cools the bottom first. When flattening the sides out to parallel, this caused fishlips or a hollow to start on the face. This is desirable because the ball top tool will already have a seat and is halfway there.
-
So, I see a lot of cool touchmarks, and recognize some of them. The idea is to mark your work. I get that. But outside of this small community, they do not do much to help the buyers find you to buy more. Are people incorporating contact info into the piece, or do you find that it really does not matter, so just pick a cool looking touchmark? www.MyName.com is pretty long for a touchmark.
-
Attaching an iron bar to a wooden door
urnesBeast replied to urnesBeast's topic in Blacksmithing, General Discussion
This is purely to stop opportunistic thieves and curious neighbor boys from being in without supervision. These doors are old enough that a good swift kick or three would likely take them down. I would want to find some carriage bolts in non-galvi so I can improve them in the fire. Ideally both the inside and outside would look good, so bent nails, or carriage bolts would be OK, but not ideal. -
My new shop is about two weeks from first fire. I have already had an opportunistic theft of two empty propane tanks from outside my shop. They were in sight of the road, and unsecured. I thought I was far enough out in the country not to worry about that. Oddly enough, they left half a ton of coal in five gallon buckets. That was way more valuable! These double doors are wooden and open inwards. I have a viking era padlock to use until I make my own. I was going to make some nice metal reinforcement bar for the outside that can hinge across the two of them to be padlocked. What I do not know how to do is attach these two bars (each the the width of the door) to the outside of the door. I want to do this with style. Something I make. This can be permanent, or removable from the inside.
-
If you pay full price for one of Mark's books, you did not pay enough. After actually working through it, if you would not pay double for it, read and use it again. There is a reason you are not finding them used.