
Mark Aspery
-
Posts
319 -
Joined
-
Last visited
Content Type
Profiles
Forums
Articles
Gallery
Downloads
Events
Posts posted by Mark Aspery
-
-
I have used truck half-axles with good results. I am presuming that they have an amount of Nickel in them to help resist torsional rotation.
I have made both hammers and top tools out of them.
I use oil to harden them with.
Thus far I have been very happy with the results. -
Here is a photograph detailing the 'Anvil effect'.
A piece of 3/8 round was doubled back on itself and welded with the blows coming from one side only.
You are viewing the piece from the side that was resting upon the anvil.
Notice how the top side has spread more than the bottom.
This shows that the bottom was acting as an anvil for the top to move.
When we talk about the 'penetration of your blow' and 'working form all appropriate sides' this gives a clear example of why. -
If I can add just a bit-for me worked adding piece of soft steel(or even iron,if available) between them two pieces(to somehow mimick soldering).It works sometimes better and one doesn't need to upset ends.Handy especially when making plenty of rings.
I would like to know how you do this. Is the soft iron a third piece or do you weld it to one of the other pieces first and then make the weld? -
I think it is possible to schedule back-to-back courses at most of the school.
I know that the Penland School in Nth Carolina offers 8 week - intensive classes -with the same instructor.
There is a school in Canada that I believe is offering a 17 week class.
Check out the ABANA web site (ABANA.org) and look under their educational opportunities. -
Excellent thread Mark.
Would you go into a bit more detail on the "wings"
Before we talk about the wings, Let's look at the four things that can effect the penetration of your hammer-blow into a piece of metal.
1.) How hard are you hitting?
2.) How hot is the metal?
3.) What is the nature of the metal -stainless vs bronze
4.) The location of your hammer blow - in the middle of the stock or at one end.
We know that we need to use light blows to unite a forge weld. We can use heavier blows once we are sure of the weld.
If I have a 4 x 4 block of steel 12 inches long and it is ALL hot - as hot as you like (sav liqued).
I want you to stand it on end and upset it into a cube using your hand hammer.
How much effect do you think you will have at the bottom of the bar.... Zip-nil-zilch-nada you get the idea.
So even though the bar is ALL hot, it can be argued that at some point it can act as its own anvil (the anvil effect)
As you use light blows to unite a weld I doubt that you are fully penetrating both pieces of steel. The bottom piece will be acting as an anvil.
The top piece will spread.
If the toe of your scarf is as wide as the bar to which it will be weled, then the toe will spread past the sides of the bottom bar due to the anvil effect - thus creating the wings.
A very pesky situation involving sharp intakes of breath and much gnashing of the teeth! -
Life's too short to get all stressed out.
Isn't that a fact! -
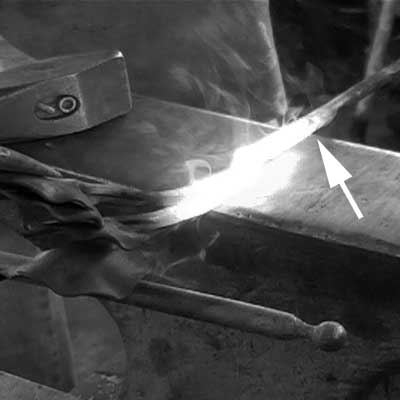
On photo 1 b, What if both pieces are 10 inch long? would you set them flat on the anvil and strike from the end of one of the pieces ? Is that called a butt weld?
No I wouldn't.
I have a frame that sits in my (round) pritchel hole. It goes over the edge of the anvil and then turns 90 degree to parallel the anvil.
As the bar is round, I can swing the frame out to act as a stand during a weld of long or difficult stock.
I have an attachment (angle iron) that I can bolt to the frame to hold round stock securely.
You can see the end of the frame in the photograph. The arrow just shows me resting the other stock on the side of the anvil as I guide it into place.
A butt weld is an end to end weld. -
I started this thread as a result of posting on a similar thread. I thought the subject warranted its own start.
There are many different types of scarf for forge welding. Some are regional (Germanic, UK or USA) and others favor a fuel source (coal, coke or propane) Still more are personal preferences. They all work, given the required practice!
Please feel free to offer your own renditions and why they work.
I favor the technique outlined below. It is the one that I have practiced and become familiar with and it is very user friendly for students. With more experience, you may change this scarf slightly by forming the step over a round edge and increasing its depth somewhat.
Let -
Mark,
What type of flux do you use?
Thanks
Chris
I use Anhydrous Borax. I get this from a local knife maker.
I don't think that there are any 'Super-fluxes' out there. Pick one and then get to know it ...well! -
Mark, do you not in this case put a little edge on each tip so as to dig in or bury itself in the mating bar so as not to burn in the fire...like when we made the flux spoons in class.
Not in this case Jim,
With the flux spoon, the little bend on the end was to allow a gap between the two surfaces in the (faggot) weld-but allow the toe (tip) of the scarf to touch the larger parent stock.
In touching, the parent stock acts as a heat sink to the toe of the scarf, preventing it from burning in the fire.
With the lap weld (drop tong) there is no heat sink available (2 separate pieces) - the smith has to be a little more careful in the fire to prevent burning the toe of the scarf. Thus no need for the little bend at the end.
I do place the scarf with the toe up in the fire for most of my welding heat as I feel that the piece heats from the back first - this I feel protects the toe somewhat. As I hope you see - this is a hypothesis with no scientific evidence to support it. -
Mark:
How do you correct for that?
Thanks,
Frosty
For me, it's a question of thinning down the toe of the scarf. If the end of the toe is thin, then it will soon be turned and forged into the bar. It is when the end is thick that it acts as a shear, cutting the metal (forming the crack ) rather than blending in.
I hope these two photos show the problem and the fix.
The graphic shows the result of a thick end to the toe (visable crack). The photo shows the fix - thin the toe before going into the weld.
I hope that I am explaining this OK. -
Those look like nice welds - well done.
I see a little crack at the toe of the scarf. For me that indicates that the toe was too thick going into the scarf.
As the end (very tip) of the scarf is in line with the blows applied (top and bottom) it is not in a welding plane.
When the surface is going in the same direction a
as the blows, it is in a shear plane - not a welding plane.
I hope that this makes sense to you.
Nice job with your welds! -
If I have a brand that needs making it goes to Dick Fedder of Fickle Hill Forge And Farriery in Humbolt County Nth California. It'll come back right and exceedingly good value for money.
-
Have you thought about plain old W2 steel?
Plenty around - not too expensive - water hardened -Rockwell C 60 at 500 Degrees F temper - easy to forge (within forging range)
'Hand Chisel' is listed on the 'Uses' section
Try this link Diehl Steel - W-2 Water Hardening Tool Steel -
I'm really not sure what the difference is between an amateur and a professional other than payment. I have seen some outstanding work done by self professed amateurs. I digress...
I like to forge out the leaves rather than chisel detail into them.
The below photographs represent by entry level leaf. -
.
I would still be inclined to follow the lead of Mr. Lillico and call them bolster and swage bolster
Of course, I could be wrong, flipping through some books and quoting them doesn't make one right :-)
Thanks Gerald,
I've followed Lillico for a long time now - I see no reason to abandon his council at this stage!
Good research - thank you.
Can you give me chapter and verse (page and paragraph) please.
Thanks to all who have contributed. -
I agree with the opinions stated. I think Nett's is closest to my own opinion.
But it's just that, an opinion.
I was really looking for chapter and verse.
Even in older text I cannot find a definition.
A heading plate to me was/is a flat surface with a hole in it. A bolster is anything other than a flat surface with a hole in it.
In the photos attached I am drifting over two different plates.
In fact one was used to make the other (as shown in photo).
I know what I WANT to call each piece, but I cannot find anything that offers a definition. -
What is the difference between a heading plate & a bolster
I have used the terms interchangeably throughout my career as a smith.
I think that -'Wind direction during use'- is probably the single most important factor determining the use of one name over another that I have seen.
Does anyone have a definitive definition? -
That waistline says Swedish to me... Frosty??
-
I'm going to go for a Swedish Sodafors.
Look for a crown somewhere on the waist of the anvil.
Just a guess!
If you look at it end on, is the waist narrower than the heel? -
I do know that AZ (AABA) has a similar system to the CBA. Grizz LaBrash is heading it up at the moment.
It works on the same system as the CBA.
There are blacksmith classes at the Mesa Art center. -
Doesn't Micheal Sobrado teach a night class about blacksmithing at one of the junior colleges in AZ.
Hyme (Hi-me) used to teach classes around the Phoenix area.
I would suggest contacting the Arizona Artist Blacksmith Assn.
Doug Kluender would be a good person to contact as he is the outgoing education chair.
AABA ~ THE ARIZONA ARTIST BLACKSMITH ASSOCIATION -
OK thanks guys. How about slitters? 10xx series??
I would use the 4140 here as well. But this time I would heat-treat it and protect the heat-treatment with frequent quenching as I work with the chisel in the hot metal. -
Due to the nature of use of drifts...in that they are sometimes in the material for a protracted period of time - I don't bother with any heat treatment as I will soon loose it.
I get - as Gerald states- very good access to used chrome/moly alloys of various types.
I am relying on its greater toughness (not hardness) over mild steel when I choose that material for my drifts.
I use chrome/moly drift in place when I spread the eye of my hammers under the power hammer (see YouTube video if you have high speed internet access - YouTube - Forging the general purpose leafing hammer)


Forge weld flux
in Fluxes used in blacksmithing
Posted