
Mark Aspery
-
Posts
319 -
Joined
-
Last visited
Content Type
Profiles
Forums
Articles
Gallery
Downloads
Events
Posts posted by Mark Aspery
-
-
I like to have the bick or horn of the anvil pointed away from the forge. This allows for a blacksmith to work completely around the bick (such as chamfering an eye) without the tongs or the steel interfering with the forge.
Otherwise I'm with the triangle theory - actually more of a pentagon with power hammer and swage block added to the mix. -
I swing a hammer with my right hand and have the bick or horn of the anvil oriented to my left.
This allows me to chamfer eyes and do bevelled scroll work -where I have to move completely around the bick - without interfering with my hammer hand.
I would prefer the hardy to be to my left over the mass of the anvil. This is not a safety concern as I rarely use a hardy cut off - favoring a hot-cut chisel, but a pragmatic want to get more return to my hammer blows.
Alas I have a London Pattern anvil and the hardy hole is in the heel and so to my right. -
Think of hot metal as fresh cow poop!
If you jump into it with both feet, it will spread everywhere - This is the same as hitting the hot steel with the flat face of the hammer on the anvil face.
If, however, you throw a branch into the cow poop, it spreads 180 degrees - either side of the stick.
The stick is like the horn on your anvil or the cross peen of your hammer. In blacksmithing terminology, we call this division of material fullering. A chisel is a fuller - all-be-it a sharp one.
The cross peen in your picture is too sharp - by a lot!
I consider my cross peen reasonably sharp and it measures 3/8 inch across the peen. My peen is slightly crowned with the corners relieved.
All this can be achieved with an angle grinder and a flap disc - just be careful not to pull any color (effect the temper of the hammer). -
I like your approach to installing a vice for filing.
I have found filing (for the blacksmith application) can be a bit awkward given the angle of the vice jaws.
You might try knocking yourself up a filing vice insert to change the angle a little. -
There is such a thing as an umbrella policy that covers you for liability as you volunteer for non-profit organizations as well as other situations.
I think I pay a little over $100 a year for mine.
Talk to your insurance agent.
I am a member of the California Blacksmiths Assn.
A few years ago we had a good look at our liability insurance. It seems to cover everyone EXCEPT the members. That is, if I hit a chisel and it ricocheted over the fence and killed the neighbors dog, the dog is covered. But if the same chisel hit a CBA member - the member was not covered as we are all named under the policy.
We, the CBA, had to go out and get accident insurance to cover our instructional workshops. At the time it was a little over $2.50 per person per year.
I hope this helps. -
Hello Mark. when I heat the steel to welding heat, after it has been fluxed and all, as soon as I take it out of the fire it looks crusty on the outside. Does that mean it is crusty on the inside?
Yep!
It has to look wet on the outside when you go to weld. The scale has to be in liquid form to exit the weld area.
look at your flux and make sure that it is dry (earlier entry - this thread).
Make sure your forge is not oxygen rich -
Make sure your forge is hot enough - otherwise your will spend too long getting to a welding heat and destroy the flux. -
Don't worry about the scarf at the moment. All you need to do is get the weld.
When you are happy with the weld, then start scarfing the ends as in the flux spoon. Spreading the material will prove the weld.
Use solid blows when you spread the weld or you may shear the weld. -
I don't do the bee-hive thing.
A deep open fire works best for me. A nice bright yellow fire.
The older smiths used to say that you heat the bar until it disappears in the fire.
I'm going to say the same thing in a slightly different way.
The bright yellow fire is at the upper end of the welding heats for steel.
When you place your steel into the fire, it will chill the coals around it. When those coals come back to yellow and envelops your piece [it disappears in the fire] you are at an appropriate heat to weld. -
In the extreme, the bar will feel and sound like you are hitting solid putty when it is welding.
The bar will feel and sound a lot more like the normal forging sound when it isn't going to weld.
Get a 20 ft length of 3/8 bar and cut it into 2 foot sections. Bend all the ends over so that you have a 3/4 inch long staple at the ends. Don't try to weld until you have all the ends prep'ed - all 20 of them.
Now start to weld the ends together - one right after the other.
Start at a low temp and increase the temp with every end. Use flux.
At some point the bar ends will start to weld.
I hope that because you are doing so many in such a short period of time that you will feel and hear the difference when you start to weld.
Get a couple of welds under your belt and then slowly start to drop the temp until you start to fail at the weld. Then go back up in temp.
You'll know when the bars will weld after the first blow. You could almost close your eyes. -
Hello Metal muncher,
I think we have communicated before.
Flux does three things;
1.) Borax, being slightly basic, will dissolve the scale into a liquid form at a temperature lower than the scale usually becomes liquid at.
2.) It covers the metal like a glass preventing the 'super heated' free oxygen in the fire from formiong more scale
3.) it is a physiological crutch
It is quite possible to weld without flux. The problem is to heat the steel to a temperature at which the scale will become liquid. The scale needs to be in a liquid form so that it will exit the weld area, leaving two clean surfaces in close enough proximity that they will weld under your hammer blows.
The trick is to heat the bar to the point where the scale becomes liquid without burning the bar.
Flux is an easier way to go.
Do you live in a humid environment? I'm thinking that you probably do.
When you apply the Borax, does it flow into a nice glassy paste (dry borax) or does if look like its fizz-ing and make a grey colored ball when you apply it (wet borax). If it makes a ball, you might consider drying out your flux before using it.
If you want to go all out, spread it on a baking sheet and melt it in your kitchen oven. Then grind it into a salt like consistency.
If you are using re-bar, I am presuming that it has a higher carbon content that your local mild steel. As such, it should weld at a lower heat. If when you hit the bar it crumbles or falls apart, then you got it too hot.
Try this... With no expectation of welding, put the biggest re-bar that you have into the fire and slowly heat it free of flux. Turn the bar often as you do this to prevent any one spot from burning in the fire. Pull it out often and look at it...I mean really look at it!
At some point the surface of the bar will look wet. After a few seconds out of the fire, the wet surface will start to look crusty. It will not weld when it looks crusty.
If you never get to the wet looking stage, then I might suggest that you have too much air (O2) coming into the fire or your fire is not hot enough.
The same is true when you weld with flux. The bar must look wet or it will not weld. If you had a successful test with the 'heating the bar until the surface ran without flux, then you have a guide as to the upper welding limit of the steel.
Heat the bar to near that heat and apply your dry flux. The reason you flux at a near welding heat is that the flux will degrade in the forge environment.
Keep the bar moving in the fire. The more practice you get welding the less you will have to turn the bar.
It takes 1,000 trys to become a proficient forge welder and even then you can get stumped.
After each failure (and yes they will happen with amazing regularity) just knock off one unit of your 1,000 trys.
Light blows at first until you FEEL and HEAR the weld take and then start putting the spurs to it.
Don't bring the hammer from West Hell until you are sure of the weld.
Good luck and after the next try you will be down to 999 - we've all been there and all done our 1,000! -
The size of your monkey tool can depend upon the size of your tenon and how you go about making it.
If you are using Top and bottom tooling to make your tenon (or a similar thing under the power hammer) then the tenon may come out a certain size. Your monkey tool should be about the same size as the HOT (expanded) tenon or slightly larger. If you wait for the tenon to cool then you will have to add a little to your drill hole measurements to compensate.
For me, I keep monkey tools around by the 1/16 for small sizes of tenons and by the 1/8 for larger ones.
1/4, 5/16, 3/8, 7/16, 1/2, 5/8, 3/4, and so on.
I like to slot punch and drift to form the eye as this aids in my skill development that can be used later to make hammers.
I like to make my monkey tools out of square stock as it will stay put on the face of the anvil and not require an appropriately sized half round bottom swage to capture it.
I like the face of the monkey tool (generally) to be convex. This will produce a slightly concave tenon shoulder. This allows for the edge of the shoulder to grip before the root of the tenon is seated.
As previously stated, make sure that the drill hole has a slight chamfer to it in order to produce a slight shoulder at the root of the tenon. This will prevent the tenon from cracking during cooling after riveting. -
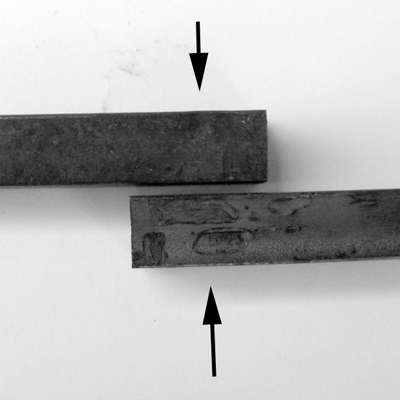
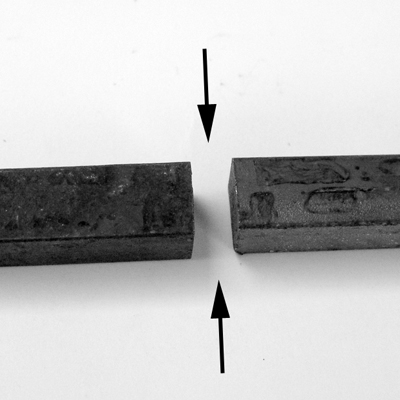
If you look at the photographs attached you will see some bars assembled ready for a proposed weld.
The arrows indicate the direction of the hammer blow. It (I hope) can be seen that some hammer blows are not coming from the right direction.
I am going to draw a conclusion to this, that the force applied (your hammer blow) should come at about 90 degrees to the welding surfaces. If the welding surface and the hammer blow are in the same plane they will not weld.
That being the case, if the ends of a scarf are not tapered, then they are still in line with the hammer blow and not in a welding plane.
This will cause what appears to be a crack at the end of the weld as seen in the drawing. -
One thing I do for myself is thin the scarf to a point - not a feather edge across the whole joint but an actual point on the scarf tip. I find this blends better than other methods.
I agree with Holister. The toe of the scarf should be narrower than the bar to which it will be welded.
This is to counter the 'Anvil effect' of the two pieces.
If you had a 4 x 4 solid bar 12 inches long, all hot, as hot as you like. Hold the bar on end and upset it to form a cube with your hand hammer. How much effect do you think you would have on the bottom of the bar?
Nil!
At some point a bar, even though it is all hot, can act as its own anvil.
The light blows used when uniting two pieces during a forge weld will not fully penetrate to the lower bar. The top bar (toe of the scarf) will spread on top of the lower bar. If the toe of the scarf is the same size or bigger than the bar to which it will be welded - well you get those little wings creeping out at the side of the weld, and they are a bit pesky to get to weld. -
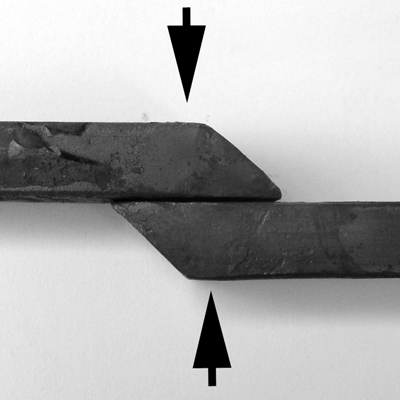
If there is a secret to forge welding, I think that it is how the two scarfs (SP?) fit together.
I know that the hammer blows need to be light initially so that I don't blow the weld. If there is a gap between the scarfs then the light blows won't close the gap or unite the pieces.
The scarf on the video is a beginners scarf in that the step is not very deep and that the end has a lot of mass to carry the heat from the forge to the anvil.
With practice, the step can be a little deeper - making the weld finish quicker.
The two pictures attached show the scarfs going into the weld and the initial weld. The weld has taken without the two ends being deformed overly - I hope that this shows the importance of the scarf fit. -
Here is a picture of a forged collar with square corners and butt end joints.
-
The formulas are a place to start and none will ever take the place of a test piece or two.
The general formula is the perimeter of the stock to be collared plus 2.5 - 3 times the thickness of the collaring material.
This varies depending upon the collar thickness and shape, and the dimensions of the collared material.
I cut mine a little short and forge them on a mandril or collaring tongs to produce the correct length and get square corners to the collar.
I like the ends of my collars to butt up next to each other. The other style is to draw a taper to both ends which overlap when applied. The latter is a little more forgiving.
The joint should be away from the viewer and on the long surface of the collared stock if it is a rectangle. -
There are some free downloadable books from the Countryside Agency. The Council for Small Industries in Rural Areas (CoSIRA) which became the Rural Development Agency and now the Countryside Agency put out and gave apprentice training. Type in 'The Blacksmiths Craft' into your search engine and it should get you there.
The training still exist and is run out of the UK National School of Blacksmithing (Hereford Center for Technology - HCT)
You can get 1, 2 or 4 year degree courses out of Hereford.
There is a very (7 acres piled high) good second hand and army surplus center out of Hampshire. Piles of anvils, tongs, vices and fly presses. I can't remember the name of it now but you can contact Richard Bent via his web site and ask him for the address he may give it to you. You may have to promise beer and your first born to get the name but it's worth it.
I hope this helps.
BABA is a great resource, and I recommend joining -
Making and using tongs is somewhat like forge welding. If you are capable in the required skills and thought process, it lends itself to other things. People who are good at forge welding are not afraid to incorporate it into their work - the same goes for tongs. Poorly fitting tongs invite streams of blue invective and are dangerous to boot but light and well fitting ones are a joy to use.
Nicely stated!
I have heard the shouts of the 'blue streak' at various hammer-ins and conferences across the land. In fact, nothing but the ill fitting or poorly designed tongs extracted such vituperation from the smith.
If I make it to Texas, I'll call ahead! -
My argument is one of pragmatism.
Sometimes the only tongs that will do the job are not available commercially. Certainly I can try and adapt an existing pair of commercial or flea-market tongs, but then I am starting to invest time and money.
I have spent the time to develop my tong making so that when I do need a pair of specialist tongs, I can make them without too much gnashing of teeth or sharp intakes of breath.
I am developing some Acanthus leaves at the moment. In order to form the box for forge-welding, I have a couple of options. The more traditional is to close the box over a mandrel or...
I can make a pair of collaring style tongs. The tongs have two different jaws. The top one in the picture allows the sides of the box to come up without interference.
The lower jaw is the same as the material to which the leaf will be welded. This allows me to close the box without too much time involved.
Without these tongs, I would be spending too much time closing the box to make it worth the customers while. The tongs make the job!
These style of tongs have to be made or adapted. -
This is an interesting debate. Of course it comes down to personal preference or circumstance.
I like to make my own tongs. I probably pay more for them if I work at a shop rate (which I do) than if I bought them directly from a supplier.
My skill development and maintenance is strong when making tongs. My first few pairs were pretty rough and hopefully still buried in a secret location.
These days my tongs are what I want them to be: left handed for at the anvil, heavier and right handed for at the power hammer, spring reins, tools steel or mild depending upon the application and perhaps the most important thing - the jaws are oriented correctly for the job in hand.
Too often do I see someone using diamond bit tongs where box jaw would offer a much better working circumstance. In these cases the user saved time and money initially by buying the tongs but then looses much more of both while using the tongs in an ineficient manner.
The skills of isolating material and manipulating it to your desired specifications is a strong one. Making the jaws what you want them to be.
The old addage of;
"If you can't hold it, then you sure as xxxx can't hit it" is a good one.
Making tongs is the language of a journeyman smith. Blacksmithing is such a broad term, it's like calling someone a scientist. What sort of scientist are they?
Our common language is one of hammer and tongs. Regardless as to our style of smithing, we all appreciate good tongs. I get a little more out of it because there is a good chance that I made the tongs myself.
A frustrating experience at first, making tongs is a very good way to develop your blacksmithng skills.
Looking at the word count, this may be 3 cents worth! -
I have an old #5 fly press. I can punch a slot (flat ended punch) 1 inch by 1/8 through a 1 inch square bar with 7 bumps. 6 from one side and 1 to clear the slug.
The big issue for me when I started to do this was not the size of the press but the thickness of the table on the base and the amount it flexed under load.
I started with a 1/2 inch plate and quickly went to 1-1/4 thick.
The next problem was one of slop in the flypress.
When fully extended so that the business end of my punch rested upon the plate I had some 'wobble' to the tool.
I did tighten up the ways a little -but I also move the table up another 2-1/2 inches. That removed the wobble and gave me the accuracy that I wanted.
Make sure that you have some method of stripping the hot bar from the tool welded to your table. -
I really want to make leaves like that, but haven't been able to see the steps in my head yet. Anyone know any good resource that outlines the process?
For those with high speed internet access (and the inclination of course) I have an acanthus 'how to' video on YouTube url...
YouTube - The Forged Acanthus Leaf
It's a bit rough around the edges but it conveys the general idea. -
I remember you quite well. That was a few years ago now.
I saw your hammers that you had made on another thread... Very nice.
It's good to know that you are still smithing. -
There are many ways to find the 'right' height for your anvil and all are about as good as the next. Just when you have it adjusted to draw out points on the bick, you reach for a top tool or a chisel and there goes the perfect anvil height.
I think it's about the 'average'.
For me that equates to a piece of 1/2 inch stock on the face of the anvil. On top of that I place my normal (in my hand most of the time) hammer and look at my arm. I don't want it too straight as I might hyper-extend the elbow. I don't want it too bent as I will not be maximizing the attainable force of my hammer blow.
And of course this measurement has to be within your inside seam measurement if you want to hold the tongs between your legs when you want to use both hands free of the tongs.
I like Kevin's idea about the twist in the square stock until you make your box-jaw tongs.
As far as hammers go - I like a 1/16 rise in the center of the face with rounded edges. It's a personal preference thing.


set up?
in Blacksmithing, General Discussion
Posted
One more thought with anvil orientation.
If you plan to punch holes in bars (and you probably do) orient the anvil so that the ambient light falls evenly on either side of the punch as you hold the steel.
If you end up with a strong light source on one side of the bar, you will tend to punch your holes off-center and that can lead to much gnashing of teeth and sharp intakes of breath!