
civilwarblacksmith
-
Posts
571 -
Joined
-
Last visited
Content Type
Profiles
Forums
Articles
Gallery
Downloads
Events
Everything posted by civilwarblacksmith
-
The table size is fine but a little thick. Your table really only needs to be about the thickness of 12 guage which is 3/32" - 1/8" . Most of your heat will be contained in the fire pot. We have 8 forges at the Blacksmith Guild of Central Maryland and have been using them for a few years now with no problems. These are all side draft hoods also. I found one of the old forges that we used to work on that was 20 x20 and to look at I can't believe we worked on something that small. Reb The Civil War Blacksmith
-
First thing you ever forged ?
civilwarblacksmith replied to LITTLEJOHN's topic in Blacksmithing, General Discussion
First thing I forged was in blacksmithing 101 at the Blacksmith Guild of Central Maryland. We made j-hooks and some tools for blacksmithing like the coal rake and drip can. Reb The Civil War Blacksmith -
I am already a member of the BGCM as well as on the board of directors there. I buy coal from there for the Union Mills Homestead which is my main shop, but can not use it at my home shop. We don't sell coke or charcoal at BGCM, these are what I need at home. Reb The Civil War Blacksmith
-
In my smithy at the Union Mills Homestead, the forge itself was built 25 yrs ago. It is a colonial style forge and had a brick fire pot that was the length of a brick deep (7"-8"). Under that it had a duck nest tyuere with clinker breaker. I tried using it that way but when I put air to the firepot, the fire seemed to drop deeper into the the bottom of the fire pot. We had to use a piece of clay pipe over the air blast and then surround the pipe with clay until it was at least 4" from the top of the fire pot to be able to heat the metal. The depth had alot to do with the problem. Reb The Civil War Blacksmith
-
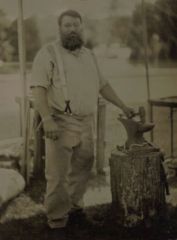 Civil War Period Tin Type taken with a camera lens from 1859.
 -
-
Touch mark stamp.
civilwarblacksmith replied to civilwarblacksmith's topic in Tools, general discussion
I've done all that with the home made punches but don't get the desire depth into the metal that I like. -
Blacksmithing at Fairs
civilwarblacksmith replied to Archie Zietman's topic in Blacksmithing, General Discussion
I demonstrate at re-enactment and also a 1797 homestead/ grist mill called Union Mills Homestead. I demonstrate more at Union Mills because there I can choose what to demo instead making custom orders at the re-enactmants. Like what has been said before, the attention span of most people is 15 mins. Keep things short and sweet. Something good to demo and will sell well are dinner bells. Make up a jig to bend these. They like to watch them being made and will buy them right there because they saw it being made. It means something more to them than buying it off the rack. S-hooks, leaf key chains, horseshoe nail rings for kids, find a really made swage block paper weight and use the ladle indentions to make ladles from horse shoe nails. These all do well and will keep their attention. If you mix up what you make, alot of time you will find the same audience hanging around for a hour watching the different items being made. To keep crowd control make some stanchions and run rope through them and sit them back from your area about 10 ft from your anvil site. If you can see in the photo, I use stanchion to border my smithing area. In situation where you are not demoing for other smiths but regular spectators, don't forge weld. Reb The Civil War Blacksmith -
Bellows vrs Fans
civilwarblacksmith replied to Sesshoumaru's topic in Blacksmithing, General Discussion
My main smithy is at the Union Mills Homestead dated 1797. 4 years ago they built a bellows for the forge. I have used all three types of systems, crank; electric, and bellows. I like the bellows for the more even air flow they provide and when you are hammering your fuel is not burning at an excellerated rate. Crank blowers are alright in providing air but not at the steady flow of the bellows unless your cranking is steady. Air pressure tends to vary. Electric blowers need to watched. Work fine if you have a rheostat, so you can adjust the air flow and cut off switch to turn off the blower while hammering. If you don't turn off the blower while hammering, you'll build up clinker and waste your coal because it is still burning at a fast rate. If no rheostat, an air gate and cut off switch will work . Needed if working with coke. But I prefer the bellows though. Reb The Civil War Blacksmith -
A friend of mine has one of the air powered gas forges from Darrin Ellis and I plan on buying one also. He makes alot of damascus in it as well as knives. Using a 100 pound propane tank, he can forge 12 hours straight each day for three days before refilling.
-
Anyone ever try using wood pellets that go into pellet stoves as a fuel? I know some people are using unburnt 6" and under 2x4's to forge with in there fire pot. Using the wood as is and having turn to charcoak in the forging process.
-
Touch mark stamp.
civilwarblacksmith replied to civilwarblacksmith's topic in Tools, general discussion
My stamp would be smaller to use on stock anywhere from 1/4" - 1", but will probably need more than 1. One for name and one for Civil War Blacksmith, If using small enough font shuld be able to do the latter on 1 stamp. -
What about using wood pellets from a pellet stove. Has anyone ever tried that yet and how did it turn out.
-
Touch mark stamp.
civilwarblacksmith replied to civilwarblacksmith's topic in Tools, general discussion
I started out in the cavalry with the 35th batallion Virginia Cav. I upto last year portrayed General Fitzhugh Lee, (R.E.Lee's nephew and second-in- command of Cavalry unto Hampton showed up). As a Civil War Blacksmith I portray mostly a civilian. A friend of mine is working on a Civil War Traveling Forge and we will take that out as a military portrayal. Will not be going to Gettysburg and unbeknownst to me, there is no age limit on camping there as long as you are with a group. During that re-eanactment I will be doing Boyds Bear's Yankee Doodle days. They are located straight down the Emmittsburg Road (Steinwehr Ave). Reb -
The 2 most common mistakes that beginners make are: Not getting the steel hot enough. Not using the right tongs for the stock they are trying to forge. Most beginners are so anxious to work that they don't let the steel get hot enough, before they pull it out of the forge. You want your steel a good bright orange. A corollary to this mistake is that they hammer too long, before putting the steel back into the fire. Hammering the steel at the right temperature just works so much easier, in the long run it takes less time. You end up with a better quality end product. Using the correct tongs is a safety issue. If you are not using the tongs properly sized and shaped for the material you are hammering, there is a good chance the red-hot piece of steel will come flying out and possibly burn you or someone in your vicinity. Whenever possible use a piece of steel that is long enough that you can hand hold it. However, eventually you will need to use a pair of tongs. You will notice a real difference in the ease of forging when you have the right tongs. with the wrong tongs, you find yourself fighting to maintain a hold of the steel. With the right tongs, you can focus on your hammer control and again end up with a better quality end product. Here are some other techniques to keep in mind as you work. It might be helpful to make a list and review that list each time before you start to forge. "The Death Grip": Many beginners grip the hammer much to tight, as if their lives depend on it. This just tires out your forearm. You want a loose grip, just tight enough so that the hammer does not fly out of your hand; and then tighten at the moment of impact so that the hammer does not twist and change its angle as it strikes the steel. Be careful as you cut off items on the cut-off hardy. You don't want to go all the way through and either dull the hardy, or mar the hammer. Also, when you go all the way through, the piece cut off often flies across the room, which can be a safety or fire hazard. When working with tongs, especially when drawing a taper or rounding up, do not twirl the tongs in your fingers, turn the stock by cocking your wrist back and forth. This will be much less tiring than twirling the tongs with your fingers. Try to get into the habit of cleaning fire scale off of the anvil between heats. If you hammer on top of the scale, you drive the scale into the surface of your work, which can mar the finish. Ideally, you should wire brush the steel when it comes out of the fire. Pay attention to the steel in the fire. I often see beginners get distracted and the next thing you know, the have burnt the end off of their project. I quickly trained myself, that when I start to talk to someone, I would pull my steel out of the center of the fire and set it to the side. If you are using an electric blower on your coal forge, shut off the air between heats. If you are using a gas forge, once the forge is up to temperature, turn the gas off between heats. (This will save you money, a tank of propane will last longer) Don't let the coal in your forge burn down into a hollow. You should be using your forge poker every 2-3 heats to rake fresh coal towards the center and keep a nice mound built up in the center of the forge. Also, you should be adding fresh coal to the outside edges of your fire as you work. When you stick your iron in the fire, don't angle it down towards the bottom of the forge, the oxidizing region. Your steel should be horizontal, with a couple inches of hot coals on top . The corollary to this mistake is just laying your steel on top of the fire. It will not heat up. You need to stick it in the fire. Always straighten your steel before you put it back into the fire. Try to pay close attention to how steel moves as a result of each hammer blow. Notice that if the hammer strikes at a certain angle, the steel moves in a certain way or leaves a particular mark on the steel. Hammer marks in the steel will tell you what you are doing right and doing wrong. With time, all of these actions will become subconscious. You will do them without being aware of it. But as a beginner, you have many new skills to assimilate. Being aware of these practices will make you a better smith.
-
Metal Cutting Safety ALWAYS WEAR SAFETY GLASSES Dressing Metal - With all the different ways we have to cut metal whether using chop saws, band saws, cut off hardies, hack saws or torchs, always make sure that the newly cut ends are cleaned up and dressed of any burrs that are left. It is even more important that the metal that is being put back into the rack be free from burrs, so that anyone reaching into the rack doesn't get cut. This can be done by using files, bench grinders and bench sanders. After cutting steel (if hot cutting make sure the metal is cold first or use a hot file), grind, sand or file the burrs and lightly run your finger over the end to make sure that all the burrs are remove, if not repeat the process. ALWAYS WEAR SAFETY GLASSES when you are dressing metal. I find that wearing a face shield as well as safety glasses gives added protection when operating a grinder or belt sander to protect from any bit of metal or sparks. Face Protection - Always wear face protection when cutting or dressing metal in the shop. There are different types of face protection that can be used for cutting and dressing metal. Goggles - Goggle fit fully around the eyes and is tensioned by an elastic band that goes around the head. These offer very good eye protection, but can suffer from fogging. Anti fogging wipes and sprays work fairly well to eliminate this. They do tend to leave an unfashionable ring around eyes though. Safety Glasses - Safety glasses come in alot of different styles to suit the taste of the wearer. They also come in a lot of different shades also. You can get safety glasses to fit you eye prescription. Prescription safety glasses are fitted with side shields that may or may not be removable. Side shields need to be replaced every now and then as they tend to cloud up with age, reducing your perifferal vision. Safety glasses don't fit a tight as goggle and have to potential to allow debri from above, below and from the sides where gaps form around the face. Used in combination with a face shield, they have the potention of keeping 99% of debri out. Safty glasses should be Z87 rated. Face Shield - Face shields give full face coverage with optimal viewing and are better for use on grinders and sanders.
-
Touch mark stamp.
civilwarblacksmith replied to civilwarblacksmith's topic in Tools, general discussion
How are they on cost? -
I demonstrate at many different places. One place is the Union Mills homestead which is dated at 1797. The blacksmith shop there is my main shop where I smith at. The build ing That I'm in is over 200 years old. We use wooden stanchions with rope through it to hold the crowd back. The anvil at the smithy is roughly 10 to 12 ft back but not too far that the spectators can't see what is going on. I eventually want to build a railing in ther in order to be more sturdy. The other demonstration area varies. I am also a Civil War re-enactor and it takes me to different places and different types of spectators. The set up stays the same generally. A 12 X 12 dining fly that has metal stanchions driven into the ground about 2-3 feet out from the edges of the fly. With spectators that aren't blacksmiths, I won't forge weld when they are around. Reb The Civil War Blacksmith
-
I am trying to find some companies that make touch mark stamps. I have made my own in the past but have not been satisfied by the way they have turned out. Reb The Civil War Blacksmith
-
Blacksmithing Movies And Music
civilwarblacksmith replied to stonetrooper's topic in Blacksmithing, General Discussion
I liked the Kingdom of Heaven. It just goes to show, don't mess with a blacksmith. -
I live in a town house developement in Maryland close to the South Central border of PA. and will need to use either coke or hardwood charcoal. As to not go to the expense of going to Lowes or Home depot for the charcoal I need to find suppliers for each. I use coal at my shop at the Union Mills Homestead circa 1797. Does anyone know of any close to my area? I live in Taneytown, Md. Reb The Civil War Blacksmith civilwarblacksmith@msn.com
-
Forged Hacksaw Help
civilwarblacksmith replied to primtechsmith's topic in Blacksmithing, General Discussion
We just had our blacksmithdays hammer-in in Westminster, MD. As a raffle item we made a tool box and member forged tools to go with it. One item was a hacksaw. click here to see Reb