

Buzzkill
-
Posts
2,062 -
Joined
-
Last visited
Content Type
Profiles
Forums
Articles
Gallery
Downloads
Events
Posts posted by Buzzkill
-
-
My personal experience is different than yours. I agree in the sense that it takes a certain amount of fuel combined with the right amount of air to produce a certain level of heat per unit of time. However, I get plenty of swirl in my forge using a naturally aspirated ribbon burner. I also get a far more even heat than I did with a single port burner. There is no noticeable hot spot anywhere in the forge once up to temperature. My forge is quite small - around 240 cubic inches. It also seems to me that since the smaller flames lose momentum more quickly than a single larger flame, more of the heat stays in the forge a little bit longer which results in slightly better efficiency than I got with the same orifice/mixing tube setup as a single port burner. Your mileage may vary.
BTW I've never heard of anyone running a forced air ribbon burner using 5 psi through a 1/4" gas supply orifice. Usually people with that size gas supply opening report running around 1/2 psi.
-
I'm fairly certain it's illegal to have a flat horizontal surface that large with no appreciable amount of clutter on it.
I've never used unistrut on anything, so I have no frame of reference here, but I'm curious if you have trouble with debris falling in and making it difficult to slide items along the channels.
-
Yeah, but what's more fun and satisfying? Pushing a mower around someone else's yard or playing with fire, steel, and hammers? Plus after succeeding on a project like that there is a profound sense of accomplishment that has significant benefits to mental well-being.
At least that's the type of reasoning I use to justify my actions to myself and my wife when engaging in a project that doesn't appear to make economic sense.

-
6 hours ago, Titian said:
I used a 1 mm migtip as the entry point for the fad. Is this enough or should I go bigger?
Since you are using a blown burner this is mostly irrelevant. Too small an orifice can limit the gas flow and therefore your max temp, but you do not seem to have that issue. The only real value of a small gas inlet orifice like a mig tip on a blown burner is creating pressure in the supply line that you can reference with a gauge which will allow you to "dial in" specific temperatures that you can repeat easily. You still have to adjust the air supply properly, so even that is of limited value.
If you're getting the temps you want then there is no need to change it. If you can't get the temps you desire then you may want to use a larger gas supply orifice.
-
Keep in mind that the size of the drive wheel makes a big difference in speed and power. The bigger the drive wheel the greater the speed (surface feet per minute), but the lower the effective power. Normally you see drive wheels in the 3 to 5 inch diameter range even with 2 or 3hp motors powering them.
-
Interesting design. A couple thoughts though. If it has a belt tracking adjustment I didn't spot it in the photos. The variation in belts makes that a necessity. Secondly you will need a flat platen, but I assume there is a plan for that. Most importantly, that is not nearly enough HP for a 2x72 belt grinder. You really want to be in the 1.5 to 3 hp range if you plan to do any real grinding. I stalled a 1 hp motor frequently with moderate pressure before I upgraded.
Looks like TP beat me to it and with pretty much the same issues.
-
First the disclaimer: I haven't used fibre board or the specific castable refractory you've used. However, the last 2 or 3 gas forges I've built tend to get uncomfortably warm on the outer surface of the shell after running for an hour or so. I can place my hand on the surface briefly (about a second or so) with no burns or damage, but I can't rest my hand on the shell for any length of time before it's too uncomfortable. I'd guess the temperature is between the upper and lower limits you gave.
I will also say it depends a little on what I'm doing. Running at forge welding temperatures for extended periods of time does tend to produce a higher outer shell temperature than general forging temperatures.
If you aren't seeing any cracks in the refractory then you most likely did a satisfactory job when curing it. Don't worry, it will probably crack at some point anyway. The difference between ambient temperature and forging temperature is a significant thermal shock that eventually takes a toll on almost everything that is subjected to the extremes.
If it were me I'd look for any obvious spaces between the insulation and the shell or any other route for heat to go places I didn't want it to go. If I found anything I'd probably fill gaps with extra fibre blanket and/or refractory. If I didn't find anything obvious I'd just "forge on" and try to avoid touching the shell when it's at high temps.
-
Generally speaking, a choke on a T burner is a step backwards. When properly tuned a T burner pulls in the right amount of air for the volume of fuel being injected across the operating pressure range of the burner. So, if you have to choke the burner then it wasn't tuned properly to begin with, and most likely is not burning as hot and as efficiently as it should be.
My personal experience with a NARB powered by a T burner is that it tended to run richer than it had as a single port burner. I had to make some modifications to allow more air to be induced, which is the opposite of what you're suggesting. However, with all these DIY projects no two are identical, so you can't assume you will get the specific results as me or anyone else.
-
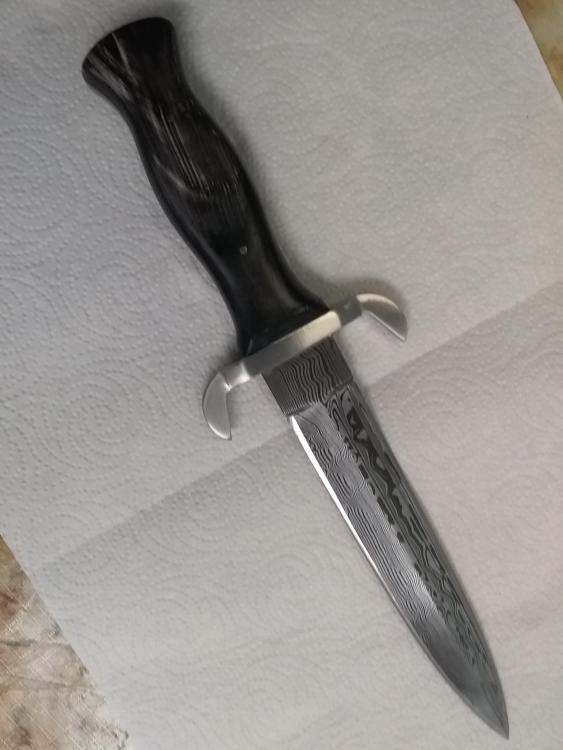
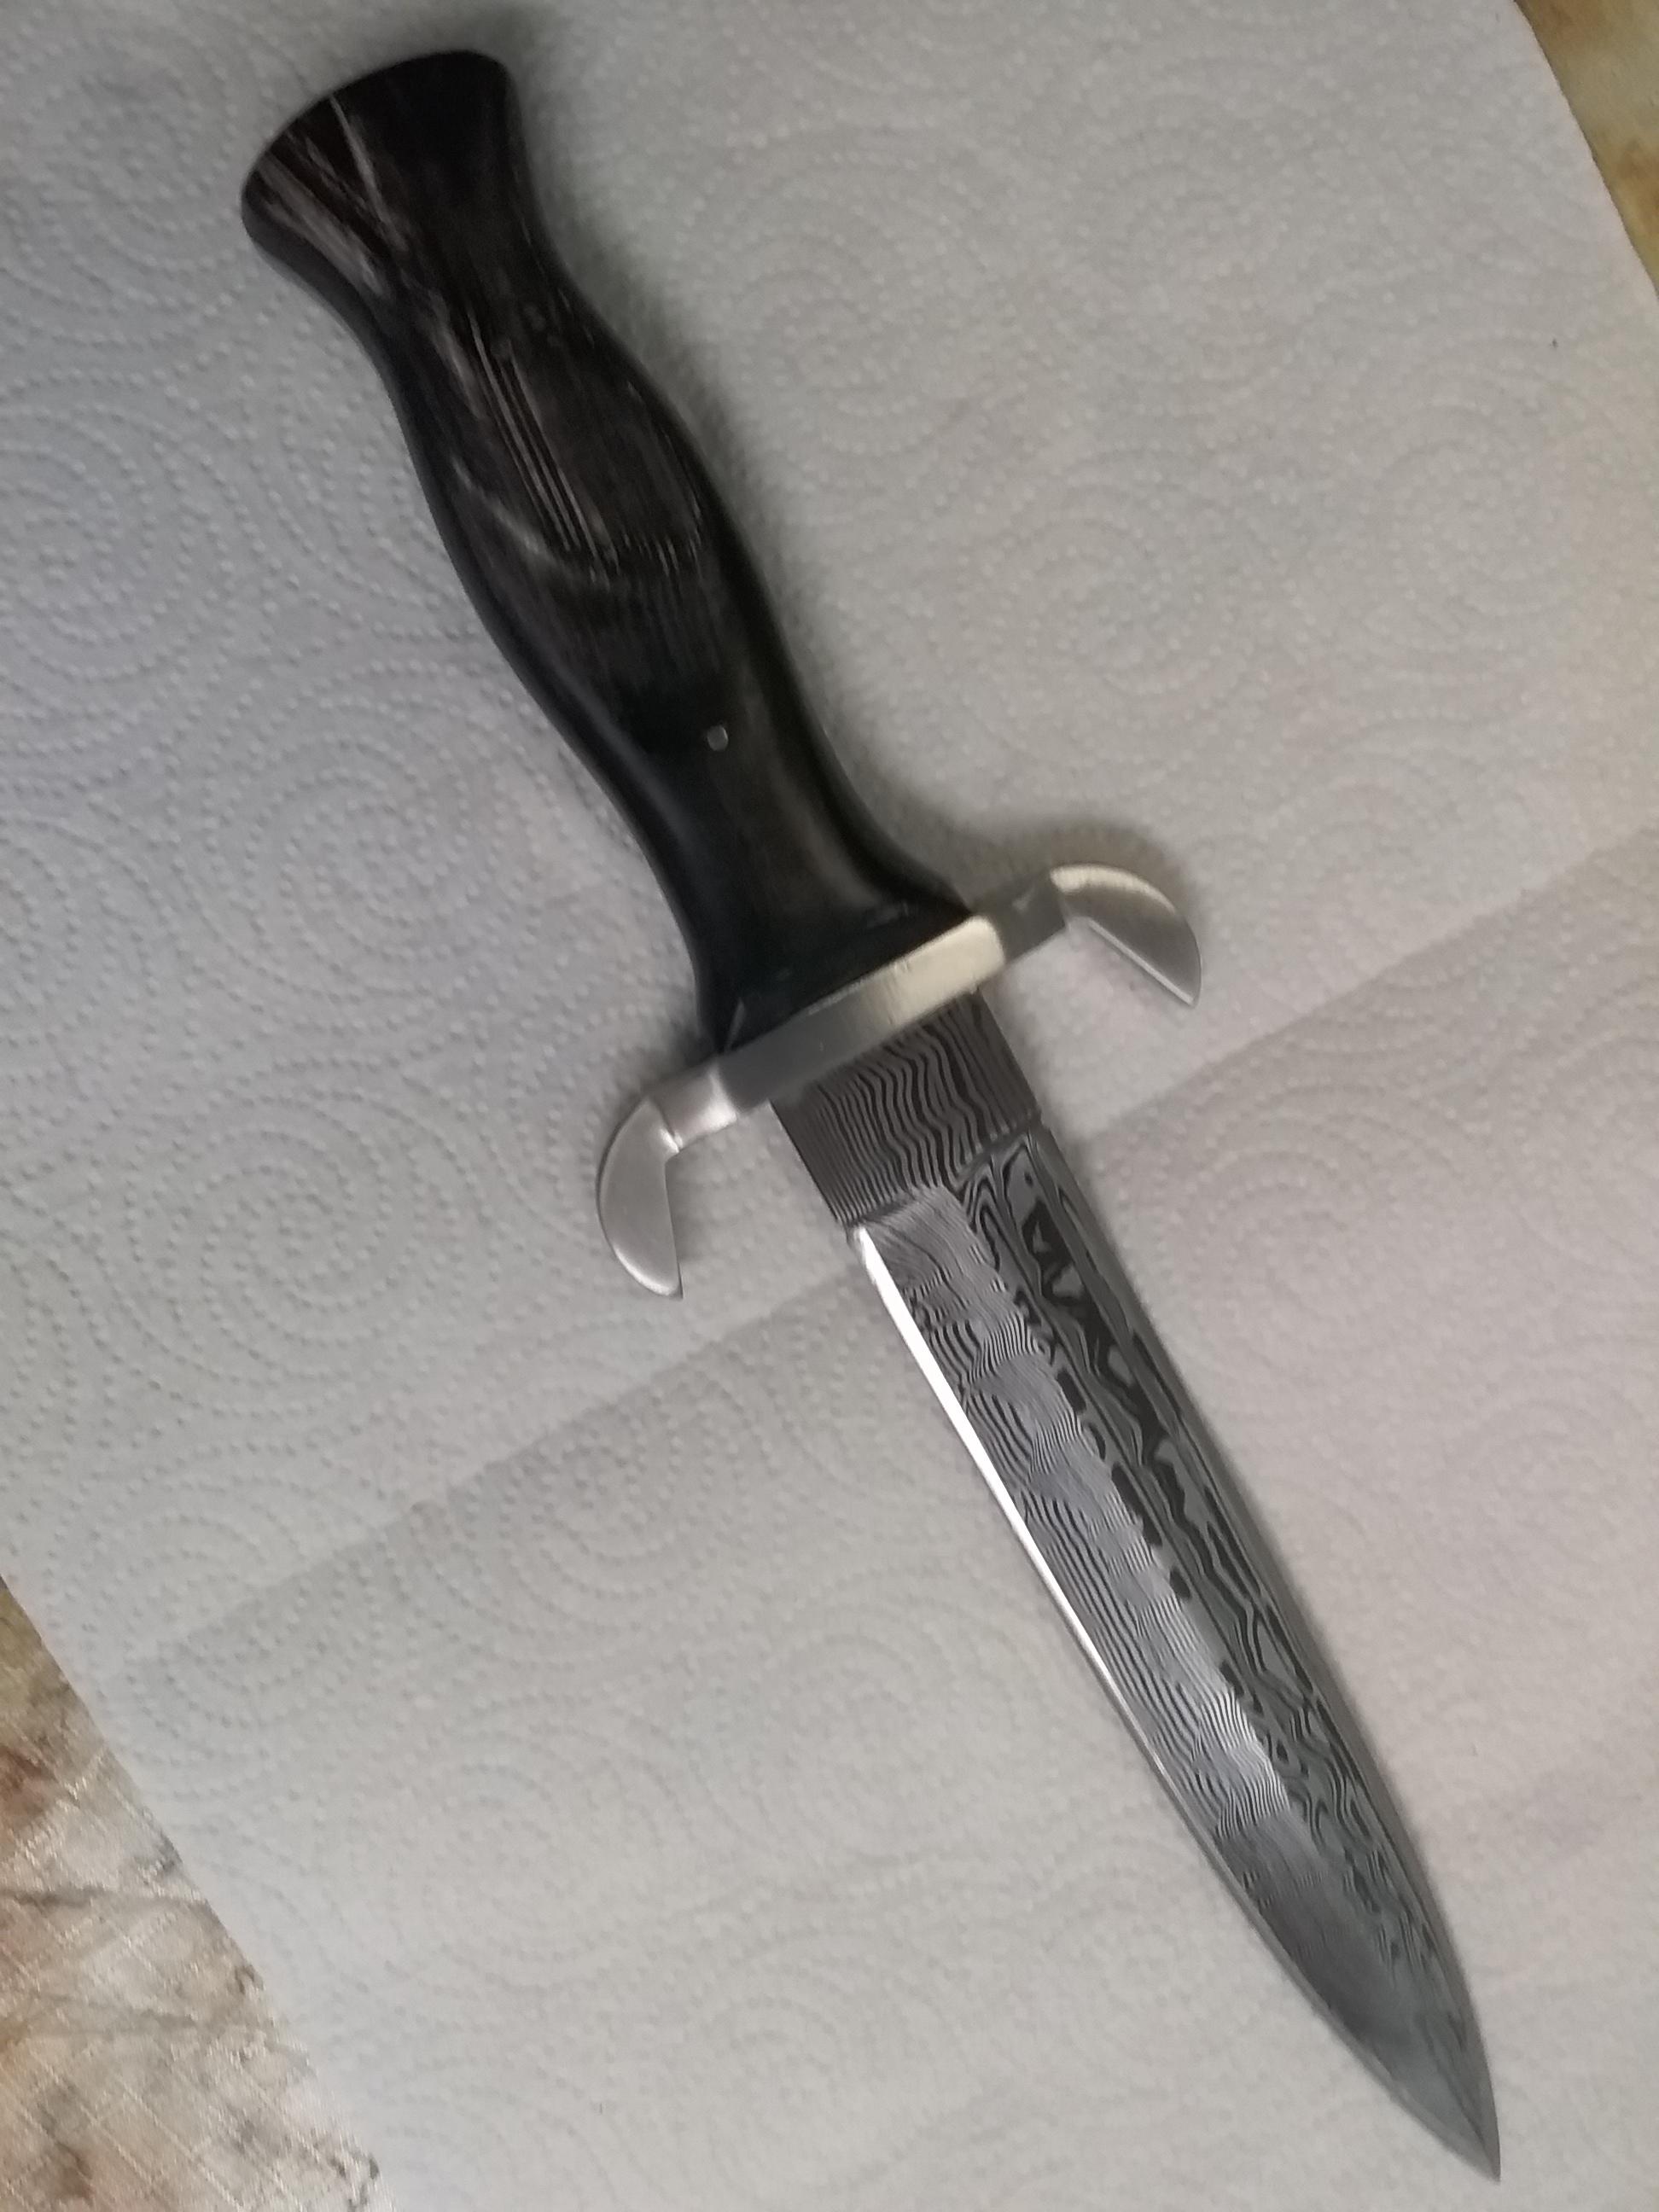
Finally got this one done for my brother in law. Blade is 1095 and 15N20, hollow ground on an 8 inch wheel. Hand sanded to 1000 grit after grinding and then etched in coffee. Guard is stainless, and handle slabs are water buffalo horn. Overall length is about 12.5 inches.
-
2 hours ago, Mario prefontaine said:
My goal is to be able to sand cast 45 lbs dumbbell plates. There is a unit that I found from a company in USA called pcm supplies. I phoned the company and they say that the forge I was looking at would get to the melting temps I would need, but it says that the forge runs on 110 volt 3 prong standard plug in. I just have a hard time believing that with 110 volt I would be able to reach those temps.
I have limited experience casting and have never tried cast iron. However, I do know that you need to be able to melt more material than your finished product will weigh. Typically there are risers, sprues, and/or runners which will contain some of the melted metal, so you need to compensate for those things. In addition most castings require some cleanup or machining which will also reduce the final weight.
I have built a heat treating oven which uses 110v. I built it to pull slightly under 15 amps. Just to heat the interior of the oven up to 1950 degrees F takes about 3 hours. That's for a space much smaller than you would need, there's no big heat sink (crucible) to add to the time, and it's still a few hundred degrees below the temps you would need. The bottom line is you were right to be skeptical about that furnace being suitable for your desires.
I know you're probably already tired of reading it, but what you want to do is extremely dangerous and is far from a beginner's project. If you're serious about casting you should start with easier metals and smaller projects to get some experience before diving into the deep end of the pool. Aluminum and brass casting are also dangerous, but less dangerous than cast iron. If your budget is $6,000 USD you should be able to get the proper PPE, but I would also highly recommend using a portion of that budget to take a casting class or get some other personal instruction from someone who has experience doing what you want to do. You're much more likely to get the results you want and avoid serious injury or death that way.
-
38 minutes ago, NathanMiller said:
So it's pretty likely that it is chrome-plated then and not stainless?
It looked stainless rather than plated to me due to the fine machining marks that would probably be covered, or at least not as defined, if it were plated. However, at least one of the wear surfaces appeared to have rust, so I'm reserving judgment. If it is non-magnetic it is almost certainly stainless. If it is magnetic it could still be either plated or stainless, depending on the alloy.
-
First off. The party size helium tank is fine. There is more than one size, but if it's comparable to a disposable refrigerant (freon) tank then it's a good size for a first propane forge. I used one for a while with a single 1/2" Frosty T burner and was able to forge weld in it. However, if you think you are frustrated with getting odd-shaped pieces placed properly to heat a specific section now, that will only be magnified with a gas forge. Small gas forges do quite well with straight or nearly straight pieces that need less than 12 inches heated at one time, but when you are dealing with a chamber opening which is typically between about 4 and 8 inches in the largest dimension, that does create some additional challenges for irregular stock shapes.
Breezes also tend to be an issue for a lot of naturally aspirated burners. However, the NARBs I have built don't seem to be quite as sensitive to wind as the single port burners were.
If by "shelf" you mean the floor then soft insulating firebrick is not a particularly good choice. Between the thermal shock of repeated heating and cooling and the mechanical abuse of dragging hot steel across the forge floor an IFB will not last long. If you use flux you could destroy it in a single forge welding session. You're better off with a castable refractory floor or even a split hard fire brick. High alumina kiln shelf is better yet.
Regulators designed for gas grills only operate at a couple psi usually and are not adjustable. That's barely enough pressure to make some naturally aspirated burners function, and not enough for others. If you want to build it right then you want an adjustable regulator. If possible you want to get one that can go from 0 psi to at least 20 psi. It's not so much about the "dial" (I assume you mean gauge here) as it is about being able to change the pressure of the fuel going to your burner. That pressure will be a major factor in the temperature achieved inside the forge, and while we caution people not to fixate on specific numbers, you probably won't be able to achieve the temperatures you want using a regulator from a gas grill.
You do not need welding skills to build a brick pile forge. Many people have built them with a few pieces of angle iron and some all-thread rods for the main components. Frosty has shown pictures several times of forges built that way at his local club and they clearly work well as they are built.
The best advice I can probably give you is this: pick one plan known to function well and strictly follow that plan. Don't substitute or change anything unless/until you ask the designer or a knowledgeable person who has used that design if it will matter. Once you build and understand your gas forge you will be in a position to incorporate changes/improvements into your next one - and there will be a next one.
-
I hate to tell you this, but those burners appear to be substandard. I found some pics of those on ebay, and the flames shown in the pictures leave a lot to be desired. If those are indeed 1" burners and you used Wayne's plans, then a single one of those burners should be overkill for that size of forge if they were of good quality. Two of them in a forge that size is ridiculously overpowered. What I saw was extremely rich flames, which translates to lower temperatures and a LOT of wasted fuel. Then there's the risk from excessive carbon monoxide production.
The good news is that if you followed Wayne's plans you should have a well constructed forge. Assuming the regulator and hose are propane rated you are good there as well. All you need is one (or two, depending on the size) well constructed burner and you are in good shape. If you have a few tools and some basic shop skills you can make your own burners inexpensively.
Instructions for making some reliable efficient burners are here:
https://www.iforgeiron.com/topic/43976-t-burner-illustrated-directions/
As a bonus, you get to troubleshoot any problems you may have with the designer of the burner. I don't know if we can realistically help you modify the burners you have now cheaper than just buying the needed parts and building your own burners. We can help you get a hot forge, but not with those burners in their current condition.
-
Yes, it's basically an oversized 1/2" T burner. I started off attaching the same single port 1/2" T burner I had used previously to the plenum. However, once I attached it to the plenum I always had a significantly rich burn no matter how short I trimmed the mig tip. The standard 3/4" T setup with a .023 mig tip gave me a lean burn, so I bought a 3/4" schedule 80 pipe nipple and that seemed to give me what I was looking for.
-
I did modify the design a little. I used a .023 mig tip, but initially I couldn't induce enough air to get close to neutral flames. I ended up using a 1" by 3/4" T with the .023 mig tip and a schedule 80 3/4" pipe nipple between the T and the plenum. The inside diameter of 3/4" schedule 80 is between the ID of standard (schedule 40) 1/2" pipe and standard 3/4" pipe.
For the burner face I used a piece of insulating firebrick (2300 degrees F rating) and drilled a lot of 1/8" holes in it using a piece of welding rod. Unfortunately I don't remember how many holes I drilled, and of course I failed to write that down. I used a piece of a computer case venting for a template to help me with hole placement. Those bricks are rather fragile, and I failed on my first attempt before I got it set in the plenum. I managed to partially melt the first IFB burner head I successfully installed. I am still using the second one I installed, but it is starting to show some signs of degradation. I now have to use higher pressure than I did originally to keep it from burning back in the plenum after a half hour or so of use. That's not a problem when I'm forge welding, but I do end up running hotter than needed for general forging.
I can't turn it down enough for tempering. There's no problem using it to prepare for quenching though. Hope that helps.
-
Yes they will. I'm using an upward facing NARB fed by a 1/2" Frosty T design. It's installed in a flat floor with a curved shell overhead (D-shaped forge). There's plenty of swirl. It's only visible when the forge is fairly cold of course, but I get even heating in the forge and am able to forge weld high carbon steel no problem. I haven't tried mild steel in the forge, but I'm pretty sure I could do that as well.
-
I'd bet that the "second table" is actually where a piece of the hardened face broke loose. I would not pay top dollar for that anvil, but if the remaining steel face has good rebound and there are no buzzing sounds to indicate delamination when tapping on the face it could still have a lot of use left in it.
-
I probably would attempt to make a surface grinder attachment for my 2x72" belt grinder if I had that part hanging around. It wouldn't have the precision of commercial surface grinders, but it would be close enough for blade work IMO.
-
On 3/18/2021 at 3:23 PM, LeeJustice said:
What I understood from the OP's posts is that they are not expecting to get a functional knife...yet. They want to practice the technique on some inexpensive steel , so as not to drop a lot of coin in refining that technique. I can totally see doing so, I am not wealthy either.
I suspect most of us on here have had the same thoughts. It's a bit of a trap though. After a while I think most of us have concluded that it's actually cheaper in the long run to purchase known new steel for things like blades. A lot of times steel we get for free ends up costing us more in the long run, especially in the time and fuel areas. For knives I've found that the cost of the steel is insignificant compared to the fuel, abrasives, pins, glues, etc.
There is something to be said for practicing techniques to improve them of course, but practice is usually best done with the materials that the finished product will be made from. For instance if you wanted to enter an archery competition and you decided to practice with a 45 pound draw bow although your intention was to use a 60 pound draw weight in competition, you would get some benefit - but you'd get more benefit by practicing with the one you'd use in the end. In this case a successful pattern welded billet is a source of joy when starting out, no doubt about it. However, that joy is even greater if you can turn that billet into something you can sell or use and be proud of.
All that to say I recommend practicing with materials you intend to use in finished products. It seems a little daunting at first, but forge welding short, straight, flat pieces of high carbon steel really isn't that difficult to accomplish. If all mating surfaces are clean and shiny, the right temperature is attained, oxidizing flames are avoided, and firm "dead blow" strikes are used, the success rate should be very high.
-
EDA, I'm curious about the changes you made. It also may be of some use to others in the future, so take a minute to share the info if you don't mind.
-
You can purchase a brand new cast steel anvil of the same weight, and possibly have it shipped to you, for less than $1000.
-
One thing to keep in mind with single port burners like the one you pictured is they are LOUD! When they are running the roar is similar to standing near a jet engine. Multi-port (ribbon) burners are much quieter. If noise is an issue you may want to factor that into your decision.
-
Neither option is particularly good for stress corrosion cracking caused by aqueous chloride solutions. Many things come into play, such as temperature, concentration of the chlorides in the solution, etc. We've had 316 SS trailers which have had corrosion holes bored all the way through them in less than a year of service transporting brine solutions. Those have had to be lined to continue the service. Duplex 2205 supposedly has more resistance to damage from chloride solutions, but we haven't had those in use long enough for me to know if there is a significant difference yet.
304 is used extensively for USP grade products, pharmaceuticals, kosher grade food products, milk hauling, etc. It is the standard for food grade products that are not significantly basic or acidic.
In the context of this discussion, a spatula made from 304 would not be an issue if the surface was brought up to a fine finish and passivated.
-
He doesn't need forging temperatures. I believe this could be accomplished by simply drilling small holes in pipes and feeding those with a T burner head. I'm thinking the normal length mixing tube ending in a T with capped and drilled nipples perpendicular to the mixing tube. Of course getting the right number of holes in the pipes might take a bit of trial and error.
Old welding rods for practice?
in Welding/Fab General Discussion
Posted
Standard 7018 rod is a challenge to use with an AC only buzz box. The 7018AC rod works much better, but I always end up using significantly higher amps than the same diameter of 6011 or 6013. For 7018 rod especially, keep an old file nearby that you can use to rough up the end of the electrode if it has cooled down. That makes striking your next arc much easier.