

Buzzkill
-
Posts
2,065 -
Joined
-
Last visited
Content Type
Profiles
Forums
Articles
Gallery
Downloads
Events
Posts posted by Buzzkill
-
-
A normally closed solenoid for the gas supply should be more than far enough away from high heat to avoid damage.
If the blower and solenoid are tied together then the PID system should work ok after getting it tuned initially from a fuel to air ratio point of view. However, generally speaking you want to leave the blower on for a while after the gas is turned off to avoid the potential for explosion in the mixing portion of the system. If the blower is left running without any fuel to burn, that will cool the forge fairly rapidly. For my electric furnace the "on" cycles tend to be really short as the system approaches the desired temperature. I'm not sure how that will play out with a gas and blower system. You may be able to run an idle circuit though where there is always a minimal amount of fuel and air in the right ratio and then the PID controller runs a second fuel line and blower (or blower setting) for "full blast" forging. You'd need a second normally closed solenoid for safety before both of the circuits though.
I considered doing something similar early in my forging experience, but ultimately concluded there wasn't enough advantage for me to make it worthwhile. For most of the things I forge, "eyeballing" the temperature is close enough. I did build the aforementioned electric heat treating furnace for alloys that require more precision though.
-
This may seem a little counterintuitive, but I'd start by making sure the mig tip orifice was free of burrs and debris. We shorten the tips to help induce more air, but if there is any restriction or deflection of the fuel stream it can have the effect of inducing less air. If you did run a torch tip cleaner or something similar through the mig tip I guess it's possible you increased the orifice size a bit which could produce the effect you are seeing.
Another thing to check is the axial alignment of the tip with the mixing tube. Sometimes things don't get lined up when we replace the tips as they were before we removed them.
P.S. I know it's just a photographic perspective thing, but your first pic looks like the back wall of your forge is the propane tank and it's glowing. It made me shudder a bit when I first saw it.
-
The only one I found was 1075 and 15N20 at artisan supplies (dot) com (dot) au, but it's currently out of stock.
Personally I use New Jersey Steel Baron mostly. I can usually get the width and thickness I want and cut to length myself. To me the steel is reasonably priced, but if you're used to cheap or free shipping it can definitely seem a bit pricey.
-
Is this a blown ribbon burner or naturally aspirated ribbon burner (NARB)? Is the mixing tube that feeds the burner horizontal or vertical? If the mixing tube is horizontal there shouldn't be much of an issue as TP said. The hot air has to have somewhere to go for it to be a problem. With a blown burner there are normally a few bends and turns in the air supply line so I wouldn't expect there to be any appreciable chimney effect. Most NARBs I've seen or built have the mixing tube perpendicular to the the flame face of the burner, so again not too much likelihood of a significant chimney effect.
250 degrees F is not much though in terms of forges, so if a component can be damaged at that relatively low heat you could have issues even without any chimney effect. What component(s) concerns you?
-
They are pretty light. Very similar in size and weight to the disposable CO2 cartridges used in air guns. This whole thing has far more PR value than anything else. As already stated, the amount of energy required to "recycle" or repurpose these canisters into blades far exceeds the energy that would be used to recycle them at the nearest scrapyard. Kudos to the guy for finding a niche and filling it though.
-
We've probably just about beat this to death, but here's another relevant tidbit:
Excerpt from Metallurgy of Steel for Bladesmiths & Others who Heat Treat and Forge Steel by John D. Verhoeven (Page 69 if anyone is interested)
"When heat treating to form martensite, toughness is also enhanced by fine grained austenite because it results in a finer lath or plate size in the martensite. Again the same ideas apply. Rapid heating and repeated cycling produce smaller martensite microstructures. Grange [8.3] has presented a study showing the beneficial effect of small austenite grain size on the mechanical properties of 8640 steel. He achieved grain sizes in the ultrafine range of ASTM No. 13 to 15 by a 4 cycle process where the steel was austenitized in molten lead for around 10 s, cooled to room temperature, cold worked and then cycled again. A series of similar experiments was performed here on 3 steels to examine the effectiveness of thermal cycling alone, no cold working was employed. The steels were heated by immersion in a salt pot. Initially the steels were austenitized for 15 min. at 1650 oF and oil quenched in rapidly stirred oil. Then the steels were given 3 thermal cycles consisting of a 4 minute austenitization in 1450 oF salt and a quench in rapidly stirred oil. The grain sizes were measured with the same technique described by Grange [8.3] and the ASTM numbers before and after the 3 cycle treatment are given in Table 8.2. It is seen that ultrafine grain sizes were obtained." -
12 hours ago, George N. M. said:
Still no explanation of why or how triple quenching benefits 5160 steel
In addition to the article I remembered, I did a little digging over at Blade Forums. The conclusion/consensus seemed to be that multiple quenches do indeed reduce grain size, but you can accomplish nearly the same reduction by normalization cycles before quenching. It didn't seem like anyone was a big proponent of the multiple quench idea when taking all factors into account.
-
I'll have to see if I can find this article I read a few years ago. In it they were discussing/exploring the concept of multiple quenches. They used the same stock and did single, double, and triple quenches on different pieces. After that they broke the pieces and took pictures of the resulting grain structure. There was a noticeable reduction of grain size for the multiple quenched pieces. However, I do not recall if they did multiple normalizations before the first quench or in between quenches.
Personally I think that a single quench after 3 normalization cycles and then followed by at least one temper cycle of 2 hours is going to get most of the possible benefit out of a simple alloy steel. For me the added stress on the steel and increased potential risk for catastrophic failure of the piece with subsequent quenches is not worth whatever minor benefit that they might provide.
-
There's no way to give you a meaningful answer on the scissors. It's basically mystery steel unless you have a lot more information to supply. Most "normal" size scissors would not interest me due to the "work to useful steel" ratio to do anything with them.
The big paper cutter is a different story entirely. If those are not plated it's a fairly safe bet that there's good knife steel there if it's all one solid piece. If it looks like there is an insert or different color steel on the cutting edge then that might be the only high carbon steel present. The older the cutter the more likely it is to be good forging material. If I had one of those I'd probably try to do something like an "expedient zombie killer" blade where you could still tell that it was from a paper cutter.
-
On 12/26/2021 at 6:28 PM, Doc Peepaw said:
I just checked my welding stuff looking to see if I already had a 0.023 tip and found I actually was using a 0.03 not 0.035. I didn't have a 0.023 though
Just for reference's sake, the last NARB I made uses a .030 mig tip in a 3/4" Frosty T configuration. If you are using the same size tip in a 1/2" setup it's pretty much guaranteed to be running way rich.
Based on the apparent size of your forge chamber the 1/2" T is probably the right size, but as Frosty said you need to drop back to a .023 mig tip to get it dialed in. If you're anything like me, once you get that NARB tuned properly you'll never go back to a single port NA burner. There are just far too many benefits and very few drawbacks imho.
-
The somewhat unfortunate reality is that often the handle sells the knife. Interesting shapes on the blade sometimes have that effect too, regardless of the practicality. Your average person doesn't know the difference in alloys or the proper heat treating steps. They know what looks good to them and/or feels good in their hand. Frequently those are the only criteria used when they make a purchase. It is assumed by most of these people that if a knife is hand made it is of superior quality compared to the mass produced knives, so they take that for granted.
Serious collectors and enthusiasts do know the difference though.
-
I agree with JHCC. If you have any intention of building a power hammer in the future keep 6 to 7 feet of it intact. It's got a good amount of intrinsic weight, and if you fill a few feet of it with sand that would greatly add to the stability of the hammer in use.
-
So again we're all saying the same thing. The answer was designed to cover behinds, not impart accurate information. I get it. Many times on here if I answer a question it will be what or how I would do something rather than recommend a specific action for someone else to do.
In that vein, if I had a Chili forge I would be comfortable using fire bricks or other objects to block off most of the front and rear openings while in use. I would have them completely open when lighting the forge, and I would always leave room for exhaust gases to escape while the forge was in use. With that criteria I would not be concerned about an explosion.
")
Other people should do their own research and do what they think is best.
-
45 minutes ago, Frosty said:
I have to disagree Buzz, if you block the openings back pressure will prevent the burners from inducing combustion air so the ONLY thing the jet can do is squirt raw unburned propane into the chamber and make a very real explosion hazard.
And I disagree right back
Let's say your burner is already lit and you completely close off the openings which would significantly reduce or eliminate the ability of the NA burner to pull in air. In that case all available oxygen will be consumed and combined with the propane until there is no more oxygen available. At that point the forge chamber is saturated with unburned propane, which *can't* explode. All that could happen is burning of the propane any place it leaks out into the open air. Along with unburned propane, oxygen is a *requirement* for an explosion. Maybe it's possible to create that scenario in a forge with the burner still functioning, but I'm having a hard time seeing how that could happen.
Regardless, I've never seen anyone on here recommend completely closing off a forge chamber while it is in use. If a door or other object that is used to block an opening has even a couple square inches of area to let out exhaust I can't see an explosion hazard forming. It may or may not be enough for optimal burner performance, but I personally would have absolutely no concern about an explosion.
I'd recommend opening the ends of the forge and tossing in a burning piece of paper or something like that before turning the gas on any time a forge is to be lit, but especially once the temperature inside exceeds the combustion temperature for the fuel air mix the risk is so minimal as to not be worth discussing, in my opinion.
-
12 hours ago, Grouser said:
No. Adding doors to these forges is dangerous. Closing the openings
can introduce unburned propane into the forge chamber, which under
certain conditions may explode.This doesn't really make any sense. Unburned propane simply cannot be introduced into the forge chamber just by adding doors. Propane, whether burned or unburned, is introduced by the burner, not the openings or the doors. Before a forge is lit there is certainly the possibility of trapping air and unburned propane together in the forge chamber which could result in a small explosion when ignited. However, if a burner is functioning properly it should be pretty much impossible to accumulate unburned propane and air inside the forge chamber in quantities great enough to cause an explosion after initial ignition. Even if a burner is running extremely rich the result would be flames extending from the openings and combusting in the open air, not an explosion inside the forge chamber. This strikes me as a statement designed to cover their own behinds rather than to impart correct information.
Having said all that, what I said is my opinion based on my experience and understanding of propane forges. Take that for what it's worth.
-
I think it's clear to all of us that you have done a fair amount of homework before diving into the deep end. Kudos to you for that. I wish I had when I was starting. Your modified plan seems pretty sound to me. I'm looking forward to seeing your work. If the initiative you've shown on getting your forge built right is an indication of how you operate in general then I have high expectations about your quality of work.
-
33 minutes ago, Kliff said:
I was planning to aim the burners at about 1/3 of the way in from the edge, not the center of the floor. In looking at my own drawing, I can see why it looks that way.
The point of my comment regarding the burners is where they are aimed, not their placement. Your drawing indicates you have them aimed at the center line of the kiln shelf. What I was suggesting is to either aim the burners near the edge of the kiln shelf closest to them or at the opposite wall slightly higher than the floor. Either of those options will create more swirl than aiming the burners at the center line of the floor.
Kastolite is not something you use *instead* of ITC, Plistex, or Matrikote. Typically we put a layer of Kastolite over rigidized fiber blanket and then apply one or more coats of the aforementioned products to the Kastolite layer. Adding a kiln wash layer after the ITC layer would mostly defeat the purpose of the ITC I believe.
For the last couple D-shaped (or mailbox shaped if you prefer that term) forges I have built I just use insulating firebricks to block off the forge openings, which means that the length of the forge (unlike the other 2 dimensions) remains the same as the shell length - or very close to it anyway.
I find it easier both in building the forge and in use if it has uniform openings at both ends. I can just block off all or part of an opening as needed and am not limited by a permanent design feature which restricts stock shape and size to a greater degree. Your forge and your choice though.
-
Here's my 2 cents.
The internal dimensions are the most important. You didn't indicate what you plan to forge so it's hard for us to evaluate whether your plan is suitable. Generally speaking, sixteen inches is longer than needed for most things if you can pass the stock through both ends. You are paying for fuel to heat the entirety of your forge chamber, so the bigger you make that chamber the more it costs you to heat it. For me 10 to 12 inches in length is about right. The height is also a couple inches more than I would use, but it's not crazy big.
You don't appear to have any plan to line the fiber blanket with a hard coating that can take some physical abuse of stock rubbing or stabbing into it. There are some people who build their forges that way, but you will most likely have to reline your forge more often if you go that route. ITC 100 is expensive and is not better than a couple other coatings for this application, such as Plistex or Matrikote.
It appears as though you plan to aim your burners at the center of the floor. Getting the flames to swirl is preferred in a gas forge and that is better accomplished by aiming the flames at the near side of the floor or at the opposite wall at an angle rather than at the middle of the floor. For a gas forge ideally you won't have direct flame impingement on the stock. The flames heat up the internal surfaces and those radiate the heat back into the forge interior to heat the stock. You *can* heat your steel by aiming the burners directly at it, but if combustion is not complete before the flames reach the stock you can get some scaling and/or super-heated spots that can have detrimental effects. That's a bigger concern with high carbon steel though.
To answer your question, we recommend that the end of the burners be just inside the shell - about 1/4 to 3/8". So compared to the surface of the forge chamber the ends of the burners are recessed 1.5 to 2 inches, depending on the thickness of the lining and coatings.
-
On 12/5/2021 at 1:27 PM, HUTT SMITH said:
so i normalized and reheated and quenched in a extreamly salty brine and i have to say..was a significant improvment over the oil quench...so now i have another qustion....since the steel is not hard enough for optimal performance is it nessasary to temper the axes....wouldnt that soften the steel a little bit.....and reduce the edge holding caapabilitys?
There is another option for making them have better edge retention. You can weld high carbon steel to the bit area. This could be done by forge welding or electric arc - as long as you get full penetration welds. Beveling the edges to be welded and welding from both sides has worked for me with other projects. Of course then you have to clean up the welded area and then go through the heat treating steps for the alloy that you weld on.
-
I have the uncanny ability to be unable to find something that was in my hands 30 seconds earlier and I have moved less than 10 feet from the last location that I know I had it in my hands. Along with that ability I can intentionally put something in a place where I know I'll be able to find it - and then promptly forget where that location happens to be. Normally I'll find the lost object at a later time when looking for something else I've misplaced - or stashing another object in a place I can't forget.
I can't be sure, but I suspect there are shop gremlins whose goal in life is to cause (or intensify) insanity in anyone focused on a project.
-
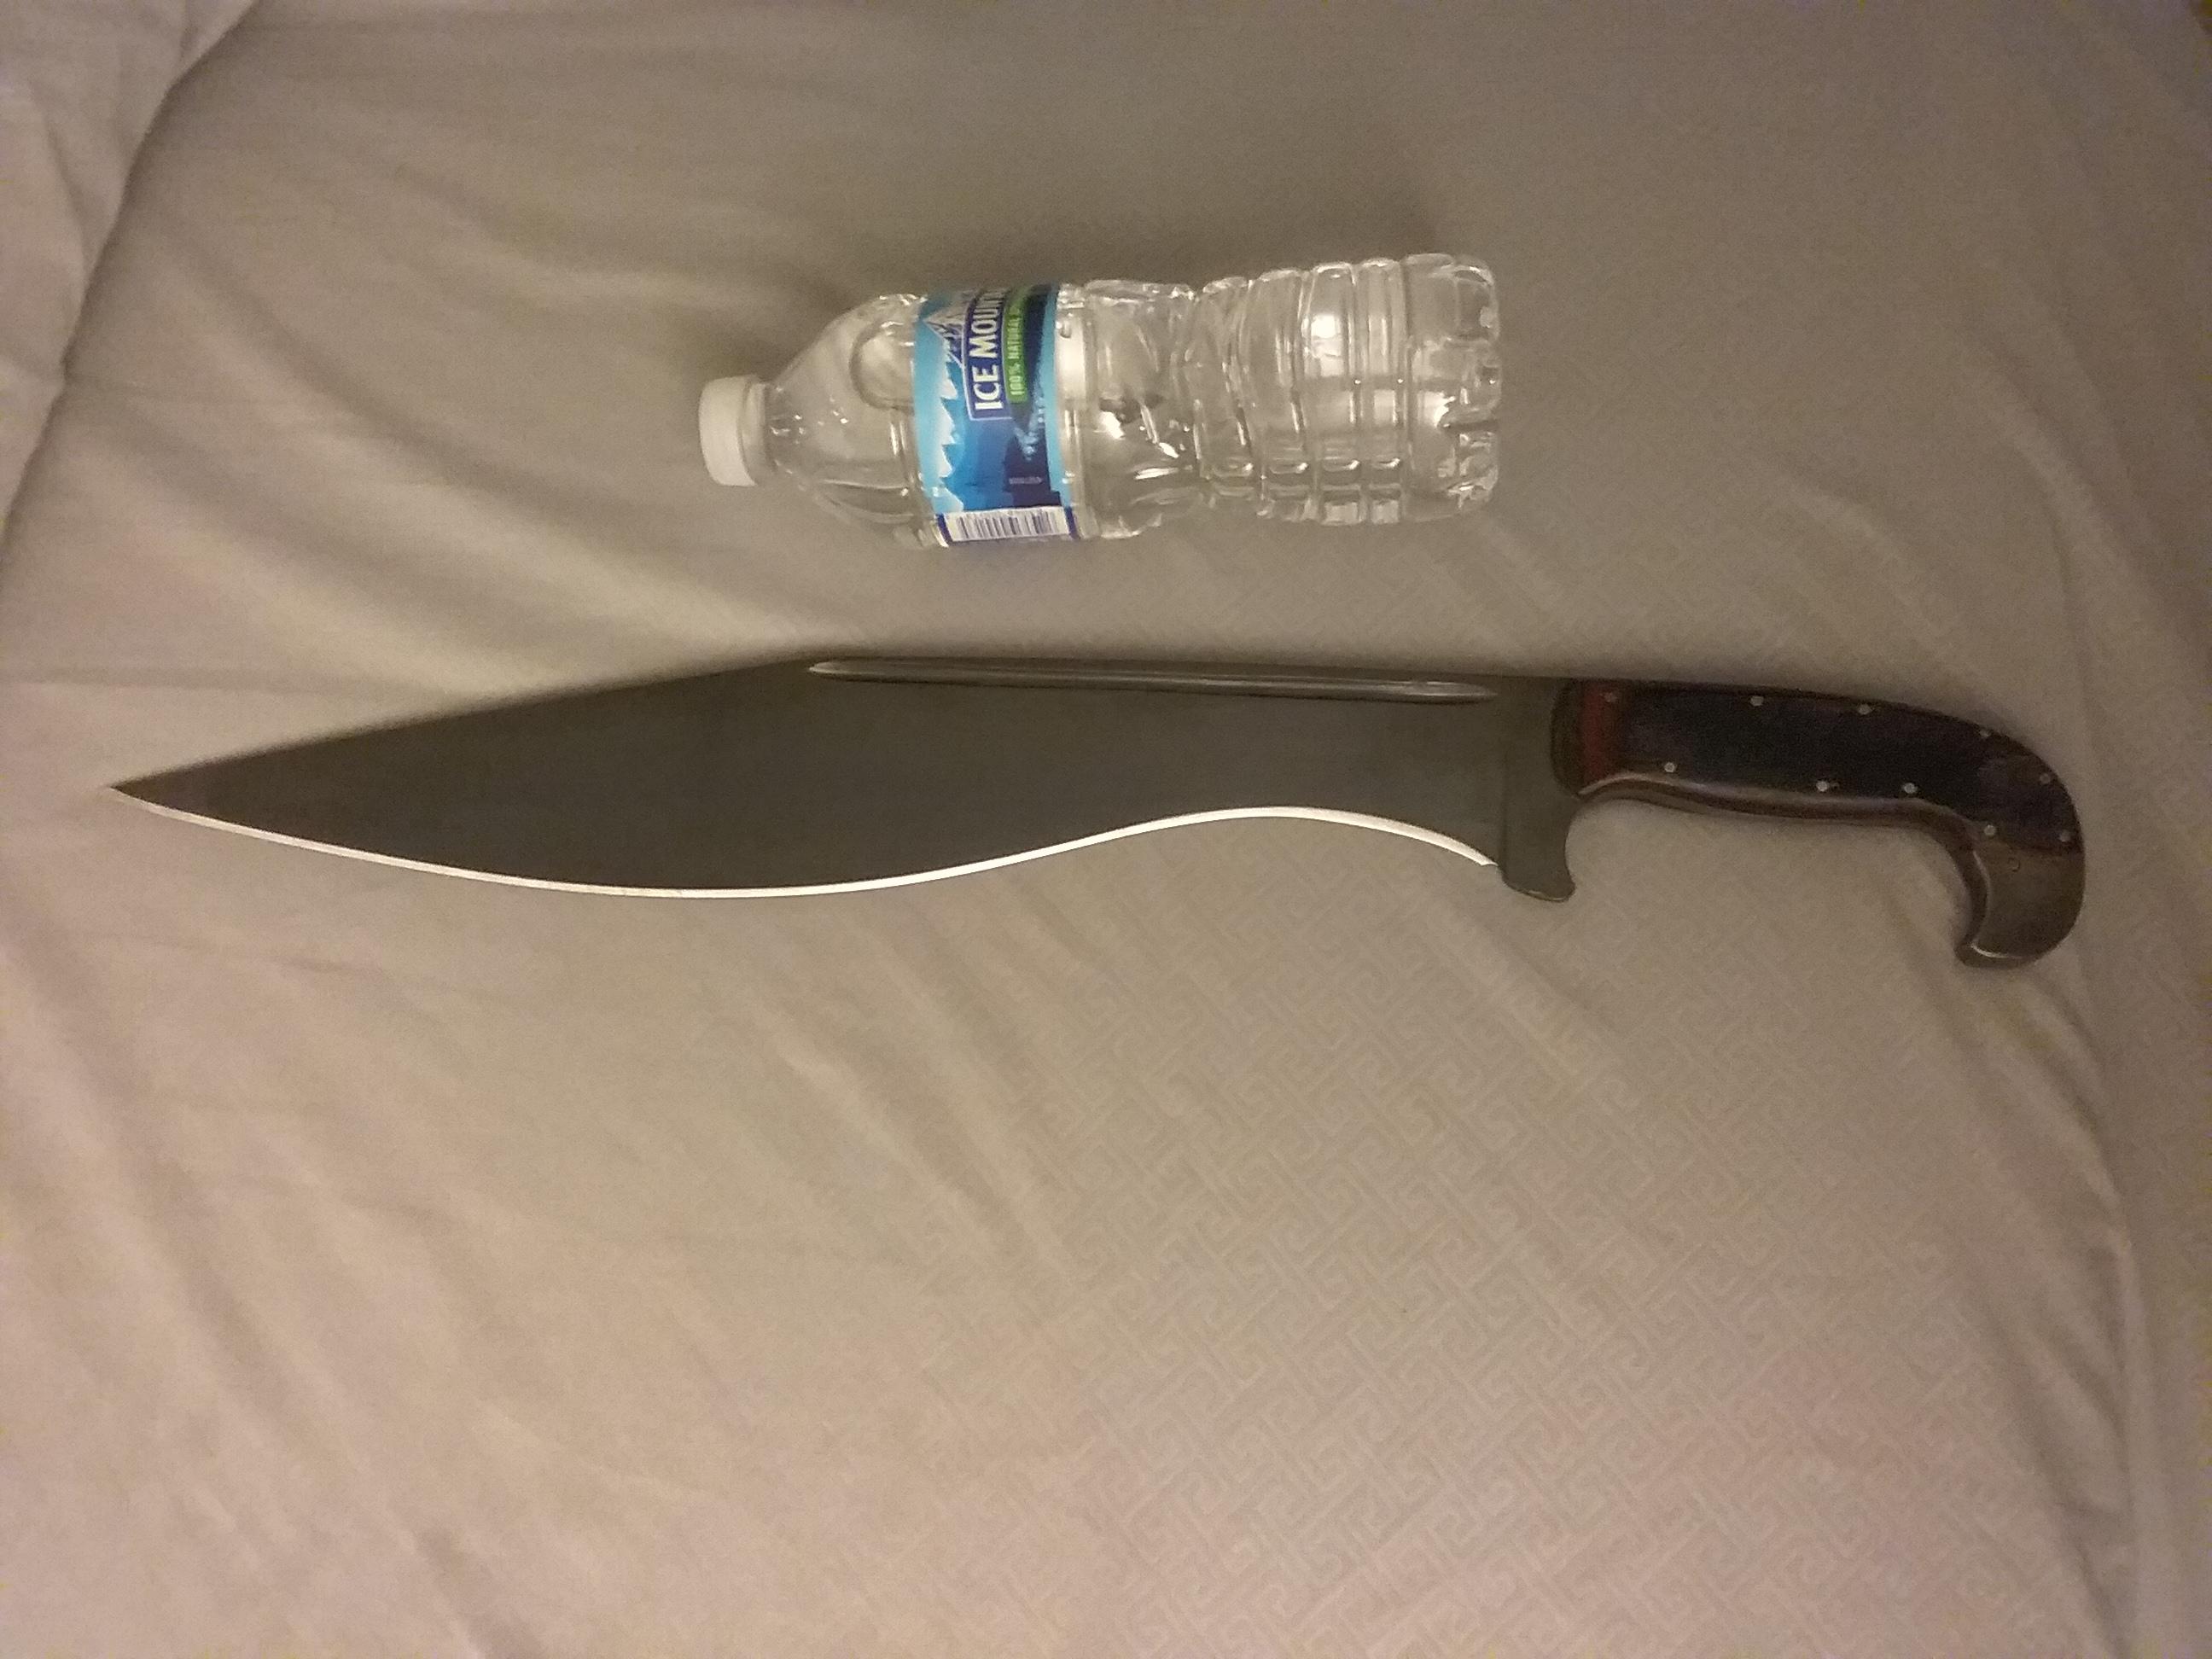
Here's one I finished a few days ago. A friend of mine wanted a "really big, scary looking knife" that would be suitable for something like a zombie apocalypse. This is what I came up with. Obviously it is heavily influenced by the kopis sword.
It's 80CrV2, sanded to 400 grit and then cold blued. I put the water bottle in the picture for scale. It's 20 inches long overall, 2.5 inches at the widest spot on the belly, and 3/8" at the thickest point on the spine. It weighs in at 2 lbs, 2.5 oz.
He seems happy with it, so I am too.

-
Here's a way to narrow down the potential problems: switch the fuel input lines for the burners. If the problem stays with the same burner then the issue can only be in the burner itself (or where the burner enters the forge). However, if the problem switches to the other burner, then you have a supply issue. Once you can narrow the possibilities down a little we can work through them one at a time until we discover what caused the change.
-
17 hours ago, bkelle00 said:
I then went to the hardware store and bought enough fire brick, angle iron and brass fittings to make my forge body.
17 hours ago, bkelle00 said:I also noticed that it takes quite a while for the file I was beating on to get to a bright orange, bordering yellow heat but it never gets hot enough to weld.
Typically the type of fire brick that is sold at hardware stores is the heavy hard fire brick. These bricks are not very insulating, which means they soak up a lot of heat, and that can cause a forge to take a long time to heat up. It may also limit the max heat you can reach.
If you are going to use bricks for the forge body you want insulating fire bricks (IFB). These are much lighter, much more fragile, and much more expensive. However, they can withstand the heat produced in the forge and they hold the heat in much better. The recent consensus on here is that Morgan K-26 bricks are among the best insulating fire bricks available at this time. You still may want to put a piece of kiln shelf, or possibly even a hard fire brick, on the floor to protect the more fragile bricks from mechanical damage as you move stock in and out of the forge.
-
You also may find the size and shape of that kiln somewhat limiting for blade work. If you only intend to make relatively small knives it will probably be fine. Larger blades may not fit well in it. However, if it's in working order I'd probably snap that up for $100.
Naturally Aspirated Ribbon Burner. Photo heavy.
in Ribbon Burners
Posted
I had forgotten how many NARBs I've fiddled with in the past few years. One of them I made which was fed by a 1/2" Frosty T setup used 1/8" holes drilled into an insulating fire brick. I believe the number of holes in that one was in the high 60's and I concluded it could have used more holes.
The one I'm using now has 44 holes that are 13/64" in diameter, but it's fed by a 3/4" Frosty T burner system.
I'm interested to see how your next one turns out though.
I really liked the idea of the floor mounted burner in a D shaped forge, and it did perform well, but the loss of so much floor space changed my mind so I went back to a side mounted NARB for my latest build.