
dognose
Members
-
Joined
-
Last visited
Everything posted by dognose
-
It appears as though Yellin, amongst other craftsmen of his era suffered from many of the same issues discussed in this thread. Here is a quote from Jack Andrews YELLIN from George Howe, an architect and one of Yellin's contemporaries. "It is an unfortunate fact that the real nature of craftsmanship, the use of materials in a way appropriate to their nature, for ends to which they were well adapted, is little understood today, not because there is any dearth of information on the subject, but because the perfection of the mechanical means of production at our disposal has blinded us to the simplicity of the means which produced the great works of art of the past, and had led us to admire tricks of legerdemain, and illusions, by which one thing is made to look like another, and materials are loosed from there proper sphere to be discovered again in another, and foreign one. To add to his difficulty, the craftsman is constantly asked to slur over that which is deemed unimportant, or will not show, and is urged to make his work as cheap, yet as showy, as possible. Against this tendency, Samuel Yellin has steadfastly set his face". This quote is from 1918.
-
My wife is on an outrigger canoeing team, when they had there annual fund raiser this past summer, I made this paddle/bottle opener as a raffle prize.
-
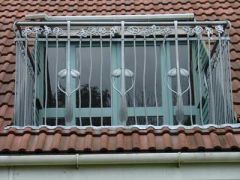 Adrian, just came across this post today. The balcony railing is phenomenal. Were the squashed "scrolls" a happy accident?
 -
Thanks for all the pointers, I'll look into all of them. To answer Judson's question, The angles will be incorporated into an architectural element over a wood gate I made (see pic). I find it sort of humorous that this detail could be done with my band saw and welder quite easily, yet I would be unhappy with the results and consider myself a failure for having done so. I find while working, somewhere in the back of my mind, the quality/complexity of work smiths of yesteryear were able to accomplish without modern conveniences. I guess everybody has drawn there own line in the sand for what's exceptable and what's not. For example, I have no problem using my electric drill press for riveting, My MIG welder for making tools, an angle grinder to save time before filing or my horizontal bandsaw when a hacksaw would do the job. I guess while I'm still just learning, I don't like to see any non-forged elements in my work and while sometimes it's quite frustrating, I enjoy the challenge. Hopefully in the near future I'll be posting a pic of the finished project. Thanks for the advice, I look forward to trying your ideas.
-
Although I agree with all you said, I'm still not sure what I'm hammering against? Are you suggesting it's the same process as forging a 90 as it is for any other angle? Just eye ball it while working, the check it against the drawing at the end of every heat? As for upsetting, it seems as though with each heat, that's the process that's already going on (driving the ends into the angle). If i were to pre-upset, I would think I'd end up with a larger mass at the angle's bend than the rest of the parent stock when done.....
-
I imagine this information is somewhere on this site, but as usual, I'm unable to locate it. I'm attempting to forge a series of non 90 degree angles in square and or rectangular stock. I know the process for making 90 degree angles, but in my mind, it doesn't apply once you go above or below the right angle. My brain immediately thinks that a top and bottom swage is the way to go, but with a dozen or more different angles, that would be a lot of tooling and as far as I know, an adjustable angle swage doesn't exist. So, I'm posing the question, how does one go about forging clean, sharp angles without changing the dimension of the parent stock? I'm hoping my pea sized brain is overlooking something quite simple. I've included an image of a quick sketch of what I have in mind. Thanks
-
I actually did try and find this very thread for quite a while before posting with no luck. Computing is not one of my strong points, sorry for the convenience.
-
I'm just now finishing up a piece that's taken quite a while to complete. Although I still consider myself a beginner, I feel proud enough about the results to sign my name to it. I was wondering if some of you wouldn't mind showing pics of your touchmarks (preferably home made) and perhaps a little bit of how they came about. What type of alloy? Size? Tools used in the carving of etc.... I will post mine once finished. Thanks Slow down take some time and read through the forum, we have a lot of information here besides the general smithing section. Your thread is now merged with the existing one. It may answer your question
-
-
I realize there are better steels for my purpose, it's just that I was able to pick up dozens of used 5/8" x 18" Hilti jackhammer bits from Home Depot for $20. The best advice I've gotten so far is (I phoned a lifeline), after the first quench (before running the colors) clamp the working end in a vice (to keep it cool as possible) and heat from the struck end up and quench again. Afterwards, just try and keep the working end quenched when working hot.
-
Having a problem with the working end of my tools not seeming hard enough. When I push a file accross the end, it wants to bite more than skip, and when put into hot work use, they don't seem to hold their edge for too long. A few more details; I let the tool soak in my forge at an orange, non magnetic temp before plunging into a water quench and use a map gas torch on the non business end to run the colors before quenching again. I have been told that placing the tool in a 400 degree oven for 1 hour afterwards helps, but I didn't think it was necessary. Is this a question of letting the color band run up too far or not enough, or am I missing something?
-
i saw that today and tried sending you a pm, think it may have went to the wrong person. will try and sort it out. thanks so much. very useful info.
-
Found your thread, too bad the pics are gone because my feeble brain can't seem to get a grasp on picturing the method you describe. What does slitting and drifting the two holes accomplish? Do they prevent future cold shuts and do they show up in the finished piece? I'll attach a poor quality photo of an old iron cross I'm trying to duplicate, and the slit portion of the piece is the one that's holding me up. If it helps or matters, the finished cross is about 32" in diameter. Thanks for all the advice so far.
-
I'd like the bar to end up with only a small parallel gap running the length of it, square up corners.
-
I did try that although perhaps the stock I was using was too thin as it seemed to just fold in on itself before forging the V out. Will try it again with thicker stock and see how it goes. Any other methods anyone can think of?
-
Need help figuring out the best way to clean up the inside of a slit bar. The chisel leaves a V shape cut that is proving difficult to remove. I tried building a "bridge" tool, also tried opening the slit into a squashed football shape and filing it, neither of which provided the results I was hoping for. Thought I might see if anybody had any tricks I could try tomorrow. Thanks
-
Ok, not quite stealing, but it may require a similar technique perhaps. The house I'm currently renting has a couple hundred gallon propane tank which is about 40% full (I paid to fill it). If possible, I'd like to fill some of my 40 gallon tanks from it before we move next month. I know there are possible dangers in this undertaking, pardon the pun, but has anybody done this that could explain a safe way to go about it? I've watched youtube clips on how to gravity fill small canisters from 5 gallon tanks, but nothing on the subject of larger ones. The inlet and outlet on the larger tank are both centrally located in the top. The male gas line that threads into the pressure regulator leading to the house is the same thread size that fits the female threads of my smaller tanks. Since this would not be a gravity fill, is it possible to transfer the contents from one to the other, and if so, how do I go about it? Thanks in advance
-
Got busy and have been away, sorry I missed all the responses. I live off of Kanan Road and Mulholland in the Santa Monica Mountains. City of Malibu.
-
Does anybody know of any blacksmiths working in the LA area. I recently moved here and would like to meet some local blacksmiths. I've looked into the Ca Blacksmithing Assoc. but from what I can tell, they seem to be primarily located in the central or northern part of the state. Thanks
-
Hoping someone out there can help me out. I'm trying to forge crescent moon shapes out of rectangular stock. The problem arises after I forge the tapers down on both ends. When it comes time to try and bend the shape around a mandrel, I have no way of holding the piece firmly. If I grab it so the tongs don't interfere with the mandrel, the piece just turns as I strike it. If I hold it by one of the tapered ends, I can't get close enough to the mandrel. Don't know if this detail matters but I'm trying to achieve a crescent (about a half circle) where the points are about 5" apart. Thanks in advance